Hugo è un generatore di siti Web statici open source progettato per piccoli progetti e siti informativi. È scritto in lingua Go, il che lo rende molto sicuro ed estremamente veloce. Hugo offre un'ottima esperienza di scrittura ed è ottimizzato per la visualizzazione di siti Web. Non è necessario installare alcuna dipendenza come PHP, Python o database per eseguire i siti Hugo.
In questo tutorial, ti mostreremo come installare e utilizzare il generatore di siti Hugo su Ubuntu 20.04.
Prerequisiti
- Un nuovo VPS Ubuntu 20.04 sulla piattaforma Atlantic.Net Cloud
- Una password di root configurata sul tuo server
Fase 1:crea un server cloud Atlantic.Net
Per prima cosa, accedi al tuo server Atlantic.Net Cloud. Crea un nuovo server, scegliendo Ubuntu 20.04 come sistema operativo con almeno 1GB di RAM. Collegati al tuo Cloud Server tramite SSH e accedi utilizzando le credenziali evidenziate in alto nella pagina.
Dopo aver effettuato l'accesso al tuo server Ubuntu 20.04, esegui il comando seguente per aggiornare il tuo sistema di base con gli ultimi pacchetti disponibili.
apt-get update -y
Passaggio 2:installa Hugo
wget https://github.com/gohugoio/hugo/releases/download/v0.79.0/hugo_0.79.0_Linux-64bit.deb
Una volta scaricato il pacchetto, puoi installarlo con il seguente comando:
dpkg -i hugo_0.79.0_Linux-64bit.deb
Se vedi errori di dipendenza, puoi risolverli con il seguente comando:
apt-get install -f
Dopo aver installato Hugo, verifica la versione installata di Hugo con il seguente comando:
hugo version
Dovresti ottenere il seguente output:
Hugo Static Site Generator v0.79.0-1415EFDC linux/amd64 BuildDate: 2020-11-27T09:09:02Z
Fase 3:crea un sito Web utilizzando Hugo
Innanzitutto, crea un nuovo sito Web chiamato web1.doamin.com utilizzando il comando hugo, come mostrato di seguito:
hugo new site web1.domain.com
Dovresti ottenere il seguente output:
Congratulations! Your new Hugo site is created in /root/web1.domain.com.

Just a few more steps and you're ready to go:

1.Download a theme into the same-named folder.
Choose a theme from https://themes.gohugo.io/ or
create your own with the "hugo new theme <THEMENAME>" command.
2. Perhaps you want to add some content. You can add single files
with "hugo new <SECTIONNAME>/<FILENAME>.<FORMAT>".
3. Start the built-in live server via "hugo server".
Visit https://gohugo.io/ for quickstart guide and full documentation.
Puoi vedere l'elenco di tutti i file e le directory generati da Hugo con il seguente comando:
ls web1.domain.com
Uscita:
archetypes config.toml content data layouts static themes
Fase 4:crea la tua prima pagina
Ora cambia la directory del tuo sito web e crea una nuova pagina chiamata main.md con il seguente comando:
cd web1.domain.com
hugo new main.md
Dovresti ottenere il seguente output:
/root/web1.domain.com/content/main.md created
Quindi, modifica la pagina main.md e aggiungi del contenuto:
nano content/main.md
Aggiungi le seguenti righe alla fine del file:
# Test Page
This is my first test page.
Salva e chiudi il file quando hai finito.
Passaggio 5:scarica e installa un tema
Per prima cosa, cambia la directory in temi e scarica il tema Hugo con il seguente comando:
cd web1.domain.com/themes
wget https://github.com/digitalcraftsman/hugo-strata-theme/archive/master.zip
Una volta scaricato, decomprimi il file scaricato con il seguente comando:
unzip master.zip
Quindi, rinomina la directory estratta con il seguente comando:
mv hugo-strata-theme-master hugo-strata-theme
Quindi, copia il contenuto di esempio dal file config.toml che si trova all'interno della directory dei temi nel file config.toml predefinito:
cat hugo-strata-theme/exampleSite/config.toml > ../config.toml
Quindi, modifica il file config.toml con il seguente comando:
nano ../config.toml
Modifica l'URL di base e definisci il nome della tua pagina come mostrato di seguito:
baseurl = "/"
[[menu.main]]
name = "main"
url  = "main"
weight = 5
Salva e chiudi il file, quindi crea un file di layout della pagina di destinazione con il seguente comando:
nano /root/web1.domain.com/layouts/index.html
Aggiungi le seguenti righe:
{{ define "main" }}
{{ if not .Site.Params.about.hide }}
{{ partial "about" . }}
{{ end }}

{{ if not .Site.Params.portfolio.hide }}
{{ partial "portfolio" . }}
{{ end }}

{{ if not .Site.Params.recentposts.hide }}
{{ partial "recent-posts" . }}
{{ end }}

{{ if not .Site.Params.contact.hide }}
{{ partial "contact" . }}
{{ end }}
{{ end }}
Salva e chiudi il file.
Fase 6:crea il tuo sito web
Ora, cambia la directory nel tuo sito Web e crea il tuo sito Web Hugo usando il seguente comando:
cd /root/web1.domain.com
hugo
Dovresti ottenere il seguente output:
Start building sites …
WARN 2020/12/06 09:21:44 Page.Hugo is deprecated and will be removed in a future release.
Use the global hugo function.
WARN 2020/12/06 09:21:44 Page.RSSLink is deprecated and will be removed in a future release.
Use the Output Format's link, e.g. something like:
{{ with .OutputFormats.Get "RSS" }}{{ .RelPermalink }}{{ end }}

| EN
-------------------+-----
Pages            |  7
Paginator pages  |  0
Non-page files   |  0
Static files     | 26
Processed images |  0
Aliases          |  2
Sitemaps         |  1
Cleaned          |  0
Quindi, avvia il server Hugo specificando l'IP del tuo server come mostrato di seguito:
hugo server --bind=0.0.0.0 --baseUrl=http://your-server-ip -D -F
Dovresti ottenere il seguente output:
Start building sites …
WARN 2020/12/06 09:22:02 Page.Hugo is deprecated and will be removed in a future release.
Use the global hugo function.
WARN 2020/12/06 09:22:02 Page.RSSLink is deprecated and will be removed in a future release.
Use the Output Format's link, e.g. something like:
{{ with .OutputFormats.Get "RSS" }}{{ .RelPermalink }}{{ end }}

| EN
-------------------+-----
Pages            | 11
Paginator pages  |  0
Non-page files   |  0
Static files     | 26
Processed images |  0
Aliases          |  3
Sitemaps         |  1
Cleaned          |  0

Built in 35 ms
Watching for changes in /root/web1.domain.com/{archetypes,content,data,layouts,static,themes}
Watching for config changes in /root/web1.domain.com/config.toml
Environment: "development"
Serving pages from memory
Running in Fast Render Mode. For full rebuilds on change: hugo server --disableFastRender
Web Server is available at http://69.87.216.179:1313/ (bind address 0.0.0.0)
Press Ctrl+C to stop
Passaggio 7:accedi all'interfaccia utente Web di Hugo
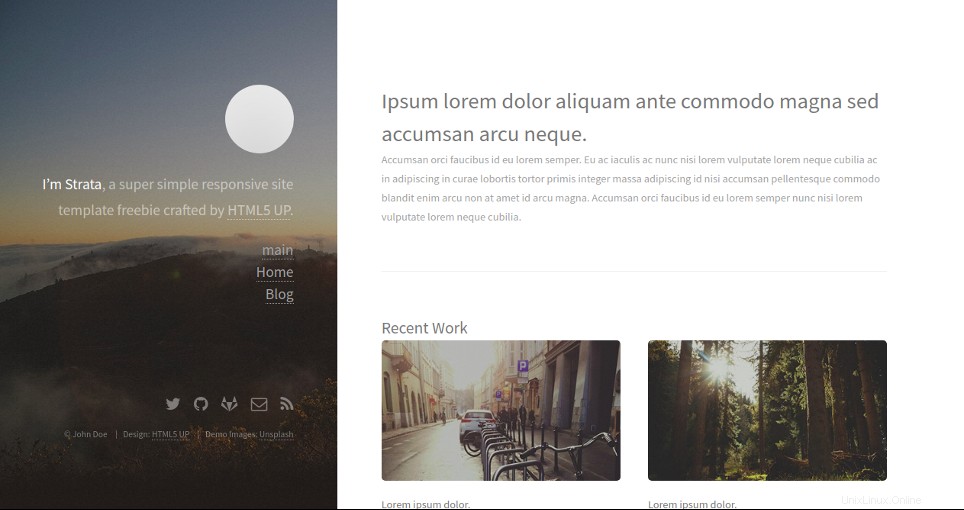
Ora apri il tuo browser web e digita l'URL http://your-server-ip:1313 . Dovresti vedere la dashboard di Hugo nella schermata seguente:
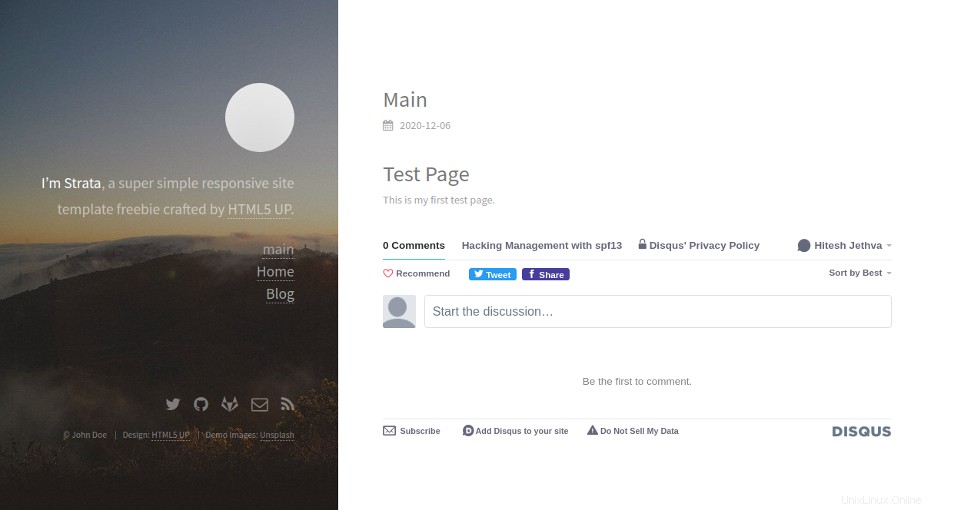
Fai clic su principale nel riquadro di sinistra. Dovresti vedere la tua pagina nella schermata seguente:
Conclusione
Nella guida sopra, hai imparato come installare Hugo e generare un sito Web statico su Ubuntu 20.04. Ora dovresti avere abbastanza conoscenze per creare facilmente il tuo sito Web statico con Hugo; provalo oggi sull'hosting VPS di Atlantic.Net!