Jitsi è un'applicazione di videoconferenza e messaggistica istantanea gratuita, open source, multipiattaforma per Web e dispositivi mobili. Funziona su Linux, macOS, Windows, iOS e Android e puoi usarlo come app standalone o incorporarlo nella tua applicazione web. La chat audio/video di Jitsi Meet è completamente crittografata e supporta diversi protocolli tra cui SIP, XMPP/Jabber, ICQ/AIM, Yahoo!, estensioni GTalk/Hangouts e ZRTP.
Con Jitsi Meet puoi condividere il desktop e le presentazioni, invitare utenti a una conferenza tramite un semplice URL, modificare documenti con Etherpad e scegliere URL divertenti per ogni riunione.
In questo tutorial spiegheremo come installare Jitsi Meet Video Conferencing Server su Ubuntu 20.04.
Prerequisiti
- Un nuovo VPS Ubuntu 20.04 sulla piattaforma Atlantic.net Cloud
- Un nome di dominio valido puntato all'IP del tuo server
- Una password di root configurata sul tuo server
Fase 1:crea un server cloud Atlantic.Net
Per prima cosa, accedi al tuo server Atlantic.Net Cloud. Crea un nuovo server, scegliendo Ubuntu 20.04 come sistema operativo con almeno 1GB di RAM. Collegati al tuo Cloud Server tramite SSH e accedi utilizzando le credenziali evidenziate in alto nella pagina.
Dopo aver effettuato l'accesso al tuo server Ubuntu 20.04, esegui il comando seguente per aggiornare il tuo sistema di base con gli ultimi pacchetti disponibili.
apt-get update -y
Fase 2:installa Jitsi Meet
Prima di iniziare, dovrai installare le dipendenze richieste nel tuo server. Puoi installarli eseguendo il seguente comando:
apt-get install apt-transport-https software-properties-common -y
Una volta installato, scarica e aggiungi la chiave GPG Jitsi con il seguente comando:
wget -qO - https://download.jitsi.org/jitsi-key.gpg.key | apt-key add -
Quindi, aggiungi il repository Jitsi usando il seguente comando:
echo 'deb https://download.jitsi.org stable/' | tee /etc/apt/sources.list.d/jitsi-stable.list
Quindi, aggiorna il repository e installa Jitsi Meet con il seguente comando:
apt-get update -y
apt-get install jitsi-meet
Durante l'installazione, dovrai fornire un nome di dominio valido come mostrato di seguito:
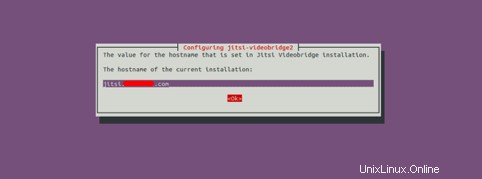
Fornisci il tuo nome di dominio e fai clic su Ok pulsante. Ti verrà chiesto di generare un nuovo certificato TLS autofirmato in modo che in seguito tu possa ottenere e installare un certificato Let's Encrypt affidabile, come mostrato di seguito:
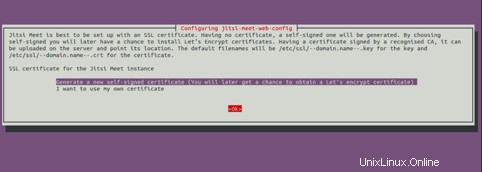
Seleziona la prima opzione e premi Invio per avviare l'installazione. Una volta che l'installazione è stata completata con successo, puoi verificare lo stato del servizio Jitsi con il seguente comando:
systemctl status jitsi-videobridge2
Dovresti ottenere il seguente output:

Fase 3 – Proteggi Jitsi Meet con un certificato Let's Encrypt
Prima di iniziare, dovrai installare il client Certbot nel tuo server per installare e gestire il certificato Let's Encrypt.
Innanzitutto, aggiungi il repository Certbot con il seguente comando:
add-apt-repository ppa:ahasenack/certbot-tlssni01-1875471
sudo add-apt-repository ppa:certbot/certbot
Quindi, aggiorna il repository e installa il client Certbot con il seguente comando:
apt-get update -y
apt-get install certbot python3-certbot-nginx -y
Lo script di installazione di Jitsi Let's Encrypt prevede certbot nella directory /usr/local/sbin mentre Ubuntu lo installa in /usr/bin, quindi crea un collegamento simbolico dello script con il seguente comando:
ln -s /usr/bin/certbot /usr/local/sbin/certbot
Quindi, aggiorna install-letsencrypt-cert.sh per utilizzare certbot invece di certbot-auto.
sed -i 's/\.\/certbot-auto/certbot/g' /usr/share/jitsi-meet/scripts/install-letsencrypt-cert.sh
Quindi, esegui lo script install-letsencrypt-cert.sh per proteggere Jitsi Meet with Let's Encrypt SSL:
/usr/share/jitsi-meet/scripts/install-letsencrypt-cert.sh
Ti verrà chiesto di fornire il tuo indirizzo email e di accettare i termini di servizio come mostrato di seguito:
————————————————————————-
This script will:
- Need a working DNS record pointing to this machine(for domain jitsi.example.com)
- Download certbot-auto from https://dl.eff.org to /usr/local/sbin
- Install additional dependencies in order to request Let’s Encrypt certificate
- If running with jetty serving web content, will stop Jitsi Videobridge
- Configure and reload nginx or apache2, whichever is used
- Configure the coturn server to use Let's Encrypt certificate and add required deploy hooks
- Add command in weekly cron job to renew certificates regularly

You need to agree to the ACME server's Subscriber Agreement (https://letsencrypt.org/documents/LE-SA-v1.1.1-August-1-2016.pdf)
by providing an email address for important account notifications
Enter your email and press [ENTER]: example@unixlinux.online
Fornisci il tuo indirizzo email valido e premi Invio . Al termine dell'installazione, dovresti vedere il seguente output:
Saving debug log to /var/log/letsencrypt/letsencrypt.log
Plugins selected: Authenticator webroot, Installer None
Obtaining a new certificate
Performing the following challenges:
http-01 challenge for jitsi.example.com
Using the webroot path /usr/share/jitsi-meet for all unmatched domains.
Waiting for verification...
Cleaning up challenges
Running deploy-hook command: /etc/letsencrypt/renewal-hooks/deploy/0000-coturn-certbot-deploy.sh
Output from deploy-hook command 0000-coturn-certbot-deploy.sh:
Configuring turnserver
IMPORTANT NOTES:
- Congratulations! Your certificate and chain have been saved at:
/etc/letsencrypt/live/jitsi.example.com/fullchain.pem
Your key file has been saved at:
/etc/letsencrypt/live/jitsi.example.com/privkey.pem
Your cert will expire on 2020-08-31. To obtain a new or tweaked
version of this certificate in the future, simply run certbot
again. To non-interactively renew *all* of your certificates, run
"certbot renew"
- Your account credentials have been saved in your Certbot
configuration directory at /etc/letsencrypt. You should make a
secure backup of this folder now. This configuration directory will
also contain certificates and private keys obtained by Certbot so
making regular backups of this folder is ideal.
- If you like Certbot, please consider supporting our work by:

Donating to ISRG / Let's Encrypt: https://letsencrypt.org/donate
Donating to EFF: https://eff.org/donate-le
Fase 4:accedi a Jitsi Meet
Ora apri il tuo browser web e digita l'URL https://jitsi.example.com. Verrai reindirizzato alla seguente pagina:
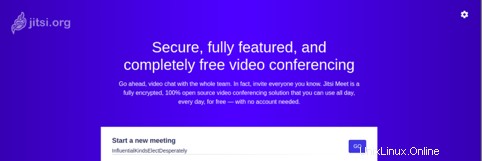
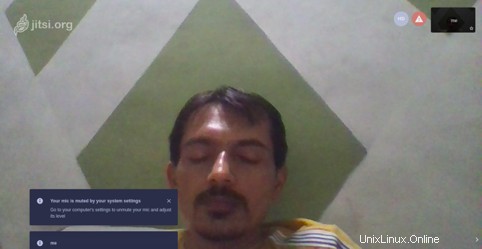
Digita un nome per la tua riunione e fai clic su Vai pulsante. Una volta avviata la riunione, dovresti visualizzare la seguente schermata:
Conclusione
Congratulazioni! hai distribuito con successo un server di videoconferenza Jitsi Meet su Ubuntu 20.04. Ora puoi installare l'app client Jitsi sul tuo dispositivo mobile e iniziare a esplorare Jitsi. Prova Jitsi su VPS Hosting da Atlantic.Net e visita la documentazione di Jitsi per ulteriori informazioni.