Passbolt è un gestore di password open source che ti consente di archiviare e condividere la tua password in modo sicuro. È progettato per le organizzazioni di piccole e medie dimensioni per archiviare e condividere le credenziali di accesso tra i membri del team. È self-hosted ed è disponibile sia nella community che nelle edizioni basate su abbonamento.
In questo tutorial, ti mostreremo come installare Passbolt password manager con Nginx e Let's Encrypt SSL su CentOS 8.
Prerequisiti
- Un server che esegue CentOS 8.
- Un nome di dominio valido puntato all'IP del tuo server.
- Sul tuo server è configurata una password di root.
Installa il server LEMP
Innanzitutto, installa il server di database Nginx e MariaDB utilizzando il seguente comando:
dnf install nginx mariadb-server -y
Successivamente, dovrai installare l'ultima versione di PHP e altre estensioni PHP richieste nel tuo server. Per impostazione predefinita, l'ultima versione di PHP non è disponibile nel repository predefinito di CentOS. Quindi dovrai aggiungere EPEL e REMI repo al tuo sistema.
Puoi aggiungere entrambi i repository con il seguente comando:
dnf install epel-release -y
dnf install https://rpms.remirepo.net/enterprise/remi-release-8.rpm -y
Quindi, disabilita il repository PHP predefinito e abilita il repository REMI con il seguente comando:
dnf module reset php
dnf module enable php:remi-7.4
Quindi, installa PHP con le altre dipendenze richieste eseguendo il comando seguente:
dnf install php php-fpm php-intl php-gd php-mysqli php-json php-pear php-devel php-mbstring php-fpm git make unzip -y
Dopo aver installato tutti i pacchetti, dovrai modificare il file di configurazione PHP-FPM e cambiare l'utente e il gruppo in Nginx.
nano /etc/php-fpm.d/www.conf
Modifica le seguenti righe:
user = nginx
group = nginx
Salva e chiudi il file, quindi cambia la proprietà della directory di sessione:
chgrp nginx /var/lib/php/session
Quindi, avvia il servizio Nginx, MariaDB e PHP-FPM e abilita l'avvio al riavvio del sistema con il seguente comando:
systemctl start mariadb nginx php-fpm
systemctl enable mariadb nginx php-fpm
Successivamente, dovrai installare l'estensione GNUPG sul tuo sistema. Puoi installarlo eseguendo i seguenti comandi:
dnf config-manager --set-enabled powertools
dnf install gpgme-devel
pecl install gnupg
echo "extension=gnupg.so" > /etc/php.d/gnupg.ini
Quindi, riavvia il servizio PHP-FPM per applicare le modifiche:
systemctl restart php-fpm
Installa Composer
Composer è un gestore delle dipendenze per PHP. Dovrai installarlo nel tuo sistema.
Innanzitutto, scarica il file di installazione di Composer con il seguente comando:
php -r "copy('https://getcomposer.org/installer', 'composer-setup.php');" Quindi, installa Composer con il seguente comando:
php composer-setup.php --install-dir=/usr/local/bin --filename=composer
Dovresti ottenere il seguente output:
All settings correct for using Composer
Downloading...

Composer (version 2.0.11) successfully installed to: /usr/local/bin/composer
Use it: php /usr/local/bin/composer
Successivamente, verifica la versione di Composer con il seguente comando:
composer -V
Dovresti ottenere il seguente output:
Composer version 2.0.11 2021-02-24 14:57:23
Crea un database
Successivamente, dovrai creare un database e un utente per Passbolt.
Innanzitutto, connettiti a MariaDB con il seguente comando:
mysql
Una volta connesso, crea un database e un utente con il seguente comando:
MariaDB [(none)]> CREATE DATABASE passbolt DEFAULT CHARACTER SET utf8mb4 COLLATE utf8mb4_unicode_ci;
MariaDB [(none)]> GRANT ALL ON passbolt.* TO 'passbolt'@'localhost' IDENTIFIED BY 'password';
Quindi, svuota i privilegi ed esci da MariaDB con il seguente comando:
MariaDB [(none)]> FLUSH PRIVILEGES;
MariaDB [(none)]> EXIT;
Una volta terminato, puoi procedere al passaggio successivo.
Installa e configura Passbolt
Innanzitutto, cambia la directory nella directory principale web di Nginx e scarica l'ultima versione di Passbolt con il seguente comando:
cd /var/www
git clone https://github.com/passbolt/passbolt_api.git passbolt
Una volta completato il download, cambia la directory in passbolt e installa tutte le dipendenze richieste con il seguente comando:
cd passbolt
composer install --no-dev
Successivamente, dovrai installare Haveged per generare la chiave GPG. Innanzitutto, installa l'haveged con il seguente comando:
dnf install haveged
Quindi, avvia il servizio haveged con il seguente comando:
systemctl start haveged
Quindi, genera la chiave GPG con il seguente comando:
gpg --full-generate-key
Rispondi a tutte le domande con attenzione. Lascia vuoto il campo della password quando chiedi di impostare una password:
gpg (GnuPG) 2.2.9; Copyright (C) 2018 Free Software Foundation, Inc.
This is free software: you are free to change and redistribute it.
There is NO WARRANTY, to the extent permitted by law.

gpg: directory '/root/.gnupg' created
gpg: keybox '/root/.gnupg/pubring.kbx' created
Please select what kind of key you want:
   (1) RSA and RSA (default)
   (2) DSA and Elgamal
   (3) DSA (sign only)
   (4) RSA (sign only)
Your selection?
RSA keys may be between 1024 and 4096 bits long.
What keysize do you want? (2048)
Requested keysize is 2048 bits
Please specify how long the key should be valid.
         0 = key does not expire
        = key expires in n days
      w = key expires in n weeks
      m = key expires in n months
      y = key expires in n years
Key is valid for? (0)
Key does not expire at all
Is this correct? (y/N) y

GnuPG needs to construct a user ID to identify your key.

Real name: Hitesh
Email address: [email protected]
Comment: Welcome
You selected this USER-ID:
    "Hitesh (Welcome) <[email protected]>"

Change (N)ame, (C)omment, (E)mail or (O)kay/(Q)uit? O
We need to generate a lot of random bytes. It is a good idea to perform
some other action (type on the keyboard, move the mouse, utilize the
disks) during the prime generation; this gives the random number
generator a better chance to gain enough entropy.
We need to generate a lot of random bytes. It is a good idea to perform
some other action (type on the keyboard, move the mouse, utilize the
disks) during the prime generation; this gives the random number
generator a better chance to gain enough entropy.
gpg: /root/.gnupg/trustdb.gpg: trustdb created
gpg: key 1A0448FECA43E1F9 marked as ultimately trusted
gpg: directory '/root/.gnupg/openpgp-revocs.d' created
gpg: revocation certificate stored as '/root/.gnupg/openpgp-revocs.d/40733A5076D11E86EF2FE5B51A0448FECA43E1F9.rev'
public and secret key created and signed.

pub   rsa2048 2021-03-12 [SC]
      40733A5076D11E86EF2FE5B51A0448FECA43E1F9
uid                      Hitesh (Welcome) <[email protected]>
sub   rsa2048 2021-03-12 [E]
Nota :ricorda la chiave segreta generata sopra.
Quindi, esporta la chiave segreta nel file serverkey_private.asc e serverkey.asc con il seguente comando:
gpg --armor --export-secret-keys [email protected] > /var/www/passbolt/config/gpg/serverkey_private.asc
gpg --armor --export [email protected] > /var/www/passbolt/config/gpg/serverkey.asc
Quindi, imposta la proprietà corretta sulla directory passbolt:
chown -R nginx:nginx /var/www/passbolt
Quindi, inizializza il portachiavi Nginx con il seguente comando:
sudo su -s /bin/bash -c "gpg --list-keys" nginx
Uscita:
gpg: directory '/var/lib/nginx/.gnupg' created
gpg: keybox '/var/lib/nginx/.gnupg/pubring.kbx' created
gpg: /var/lib/nginx/.gnupg/trustdb.gpg: trustdb created
Quindi, rinomina il file di configurazione predefinito di Passbolt:
cp config/passbolt.default.php config/passbolt.php
Quindi, modifica il file passbolt.php e definisci le impostazioni del database e l'URL di base:
nano config/passbolt.php
Modifica le seguenti righe:
        'fullBaseUrl' => 'https://passbolt.linuxbuz.com',
    // Database configuration.
    'Datasources' => [
        'default' => [
            'host' => 'localhost',
            //'port' => 'non_standard_port_number',
            'username' => 'passbolt',
            'password' => 'password',
            'database' => 'passbolt',
            'serverKey' => [
                // Server private key fingerprint.
                'fingerprint' => '40733A5076D11E86EF2FE5B51A0448FECA43E1F9',
                'public' => CONFIG . 'gpg' . DS . 'serverkey.asc',
                'private' => CONFIG . 'gpg' . DS . 'serverkey_private.asc',
Salva e chiudi il file, quindi installa Passbolt con il seguente comando:
cd /var/www/passbolt
sudo su -s /bin/bash -c "./bin/cake passbolt install --no-admin" nginx
Dovresti ottenere il seguente output:
All Done. Took 0.9595s

Import the server private key in the keyring
---------------------------------------------------------------
Importing /var/www/passbolt/config/gpg/serverkey_private.asc
Keyring init OK

Passbolt installation success! Enjoy! ?
Configura Nginx per Passbolt
Successivamente, dovrai creare un file di configurazione Nginx per Passbolt. Puoi crearlo con il seguente comando:
nano /etc/nginx/conf.d/passbolt.conf
Aggiungi le seguenti righe:
server {
  listen 80;
  server_name passbolt.linuxbuz.com;
  root /var/www/passbolt;

  location / {
    try_files $uri $uri/ /index.php?$args;
    index index.php;
  }

  location ~ \.php$ {
    fastcgi_index           index.php;
    fastcgi_pass            unix:/var/run/php-fpm/www.sock;
    fastcgi_split_path_info ^(.+\.php)(.+)$;
    include                 fastcgi_params;
    fastcgi_param           SCRIPT_FILENAME $document_root$fastcgi_script_name;
    fastcgi_param           SERVER_NAME $http_host;
  }

  location ~* \.(jpe?g|woff|woff2|ttf|gif|png|bmp|ico|css|js|json|pdf|zip|htm|html|docx?|xlsx?|pptx?|txt|wav|swf|svg|avi|mp\d)$ {
    access_log off;
    log_not_found off;
    try_files $uri /webroot/$uri /index.php?$args;
  }
}
Salva e chiudi il file, quindi verifica Nginx per eventuali errori di sintassi:
nginx -t
Uscita:
nginx: the configuration file /etc/nginx/nginx.conf syntax is ok
nginx: configuration file /etc/nginx/nginx.conf test is successful
Quindi, riavvia Nginx per applicare le modifiche:
systemctl restart nginx
Passbolt protetto con Let's Encrypt SSL
Successivamente, dovrai installare il client Certbot per installare Let's Encrypt SSL for Passbolt. Puoi installarlo con il seguente comando:
dnf install letsencrypt python3-certbot-nginx
Quindi, ottieni e installa un certificato SSL per il tuo dominio Lets con il seguente comando:
certbot --nginx -d passbolt.linuxbuz.com
Ti verrà chiesto di fornire il tuo indirizzo email e di accettare i termini del servizio:
Saving debug log to /var/log/letsencrypt/letsencrypt.log
Plugins selected: Authenticator nginx, Installer nginx
Enter email address (used for urgent renewal and security notices)
 (Enter 'c' to cancel): [email protected]

- - - - - - - - - - - - - - - - - - - - - - - - - - - - - - - - - - - - - - - -
Please read the Terms of Service at
https://letsencrypt.org/documents/LE-SA-v1.2-November-15-2017.pdf. You must
agree in order to register with the ACME server. Do you agree?
- - - - - - - - - - - - - - - - - - - - - - - - - - - - - - - - - - - - - - - -
(Y)es/(N)o: Y

- - - - - - - - - - - - - - - - - - - - - - - - - - - - - - - - - - - - - - - -
Would you be willing, once your first certificate is successfully issued, to
share your email address with the Electronic Frontier Foundation, a founding
partner of the Let's Encrypt project and the non-profit organization that
develops Certbot? We'd like to send you email about our work encrypting the web,
EFF news, campaigns, and ways to support digital freedom.
- - - - - - - - - - - - - - - - - - - - - - - - - - - - - - - - - - - - - - - -
(Y)es/(N)o: Y
Account registered.
Requesting a certificate for passbolt.linuxbuz.com
Performing the following challenges:
http-01 challenge for passbolt.linuxbuz.com
Waiting for verification...
Cleaning up challenges
Deploying Certificate to VirtualHost /etc/nginx/conf.d/passbolt.conf
Redirecting all traffic on port 80 to ssl in /etc/nginx/conf.d/passbolt.conf

- - - - - - - - - - - - - - - - - - - - - - - - - - - - - - - - - - - - - - - -
Congratulations! You have successfully enabled https://passbolt.linuxbuz.com
- - - - - - - - - - - - - - - - - - - - - - - - - - - - - - - - - - - - - - - -
Subscribe to the EFF mailing list (email: [email protected]).


IMPORTANT NOTES:
 - Congratulations! Your certificate and chain have been saved at:
   /etc/letsencrypt/live/passbolt.linuxbuz.com/fullchain.pem
   Your key file has been saved at:
   /etc/letsencrypt/live/passbolt.linuxbuz.com/privkey.pem
   Your certificate will expire on 2021-06-09. To obtain a new or
   tweaked version of this certificate in the future, simply run
   certbot again with the "certonly" option. To non-interactively
   renew *all* of your certificates, run "certbot renew"
 - If you like Certbot, please consider supporting our work by:

   Donating to ISRG / Let's Encrypt:   https://letsencrypt.org/donate
   Donating to EFF:                    https://eff.org/donate-le
Registra un utente per Passbolt
Successivamente, dovrai registrare un utente per Passbolt. Puoi farlo con il seguente comando:
cd /var/www/passbolt
sudo su -s /bin/bash -c "./bin/cake passbolt register_user -u [email protected] -f howtoforge -l Demo -r admin" nginx
Dovresti ottenere il seguente output:
     ____                  __          ____
    / __ \____  _____ ____/ /_  ____  / / /_
   / /_/ / __ `/ ___/ ___/ __ \/ __ \/ / __/
  / ____/ /_/ (__  |__  ) /_/ / /_/ / / /
 /_/    \__,_/____/____/_.___/\____/_/\__/

 Open source password manager for teams
---------------------------------------------------------------
User saved successfully.
To start registration follow the link provided in your mailbox or here:
https://passbolt.linuxbuz.com/setup/install/f81227bc-b0b6-44b5-99a7-6b490a4ba262/5a112de0-6ca4-4e1b-97c8-26453ef3828b
Puoi utilizzare il link sopra per accedere al Paabolt.
Configura Firewall
Successivamente, dovrai consentire le porte 80 e 443 attraverso il firewall. Puoi farlo con il seguente comando:
firewall-cmd --permanent --add-port=80/tcp
firewall-cmd --permanent --add-port=443/tcp
Ora, ricarica il firewalld per applicare le modifiche:
firewall-cmd --reload
Accesso all'interfaccia utente Web Passbolt
Ora apri il tuo browser web e digita l'URL https://passbolt.linuxbuz.com/setup/install/f81227bc-b0b6-44b5-99a7-6b490a4ba262/5a112de0-6ca4-4e1b-97c8-26453ef3828b . Verrai reindirizzato alla seguente pagina:
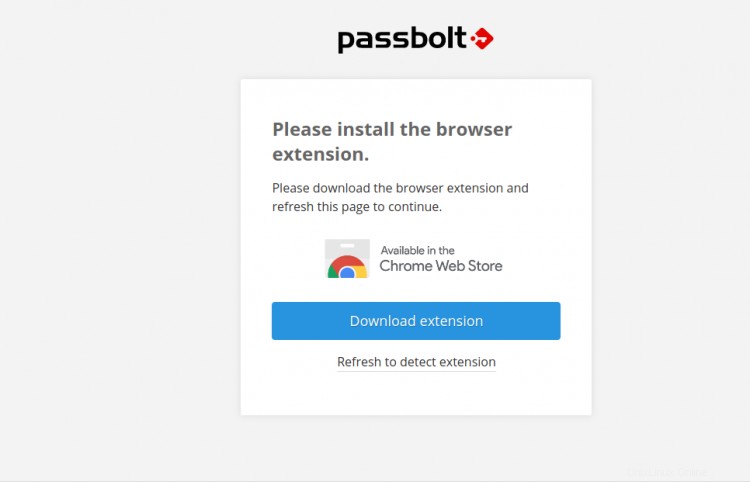
Qui, dovrai scaricare le estensioni del browser Passbolt e aggiornare la pagina una volta installata. Dovresti vedere la seguente pagina:
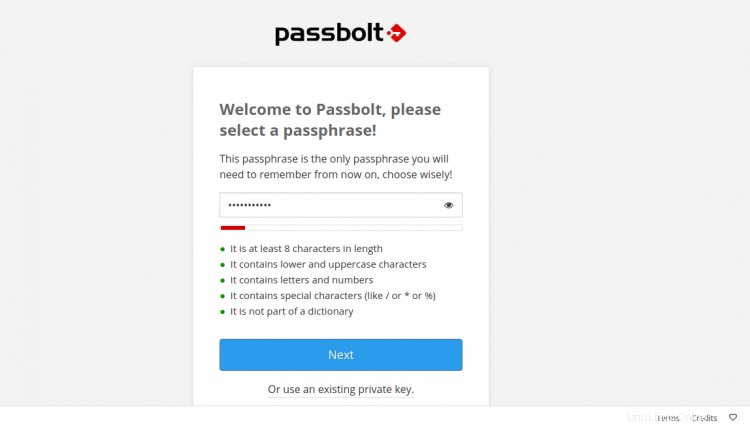
Specificare la password sicura e fare clic su Avanti pulsante. Dovresti vedere la seguente pagina:
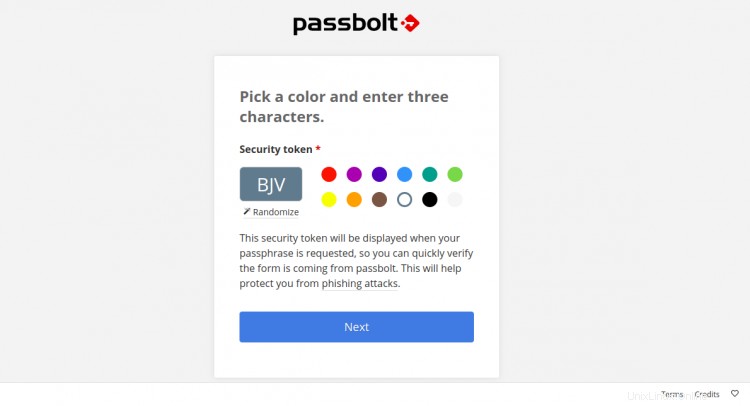
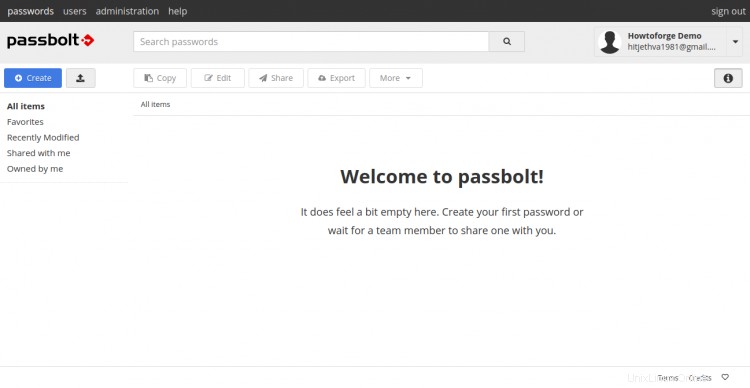
Scegli un colore, inserisci un token di sicurezza e fai clic su Avanti pulsante. Verrai reindirizzato alla dashboard di Passbolt nella pagina seguente:
Conclusione
Congratulazioni! hai installato correttamente Passbolt password manager con Nginx e Let's Encrypt SSL su CentOS 8. Ora puoi implementare Passbolt nella tua organizzazione e iniziare a memorizzare e condividere le credenziali di accesso tra i membri del team in modo sicuro.