Questo tutorial descrive l'installazione di un server Web, e-mail, database e DNS in cluster da utilizzare per la ridondanza, l'elevata disponibilità e il bilanciamento del carico su Debian 8 con il pannello di controllo ISPConfig 3. La replica MySQL Master/Master verrà utilizzata per replicare i database dei client MySQL tra i server, Unison verrà utilizzato per sincronizzare /var/www (siti Web) e le e-mail verranno sincronizzate con Dovecot.
1 Nota generale
In questa configurazione, ci sarà un server master (che esegue l'interfaccia del pannello di controllo ISPConfig) e un server slave che rispecchia i servizi web (apache), email (postfix e dovecot), dns (bind) e database (MySQL o MariaDB) del server principale.
Per installare la configurazione in cluster, abbiamo bisogno di due server con un'installazione minima di Debian 8.4 e la stessa versione di ISPConfig.
Nel mio esempio utilizzo i seguenti nomi host e indirizzi IP per i due server:
Server principale
Nome host:server1.example.tld
Indirizzo IP:192.168.0.105
Indirizzo IPv6:2001:db8::1
Server slave
Nome host:server2.example.tld
Indirizzo IP:192.168.0.106
Indirizzo IPv6:2001:db8::2
Ovunque questi nomi host o indirizzi IP si presentino nei passaggi successivi dell'installazione, dovrai cambiarli in modo che corrispondano agli IP e ai nomi host dei tuoi server.
Tutti i comandi devono essere eseguiti come utente root. Se devi apportare modifiche a MySQL, accedi a MySQL con la password di root per MySQL:
mysql -u root -p
2 Installa il server principale
Per prima cosa dobbiamo installare ISPConfig sul Master-Server. Se hai già installato ISPConfig su questo Server, puoi saltare l'installazione (assicurati che l'installazione esistente sia aggiornata).
Installa ISPConfig sul Master-Server secondo The Perfect Server - Debian 8.4 Jessie (Apache2, BIND, Dovecot, ISPConfig 3.1).
Aggiungi lo Slave Server al file /etc/hosts
vi /etc/hosts
quindi sembra:
127.0.0.1       localhost
192.168.0.105   server1.example.tld server1
2001:db8::1     server1.example.tld server1
192.168.0.106   server2.example.tld
2001:db8::2     server2.example.tld

# The following lines are desirable for IPv6 capable hosts
::1     localhost ip6-localhost ip6-loopback
fe00::0 ip6-localnet
ff00::0 ip6-mcastprefix
ff02::1 ip6-allnodes
ff02::2 ip6-allrouters
ff02::3 ip6-allhosts
3 Preparare il server slave
Esegui i passaggi da 1 a 19 da The Perfect Server - Debian 8.4 Jessie (Apache2, BIND, Dovecot, ISPConfig 3.1).
Non installare ancora ISPConfig sul server2.
Aggiungi il Master Server al file /etc/hosts
vi /etc/hosts
quindi sembra:
127.0.0.1       localhost
192.168.0.105   server1.example.tld
2001:db8::1     server1.example.tld
192.168.0.106   server2.example.tld server2
2001:db8::2     server2.example.tld server2

# The following lines are desirable for IPv6 capable hosts
::1     localhost ip6-localhost ip6-loopback
fe00::0 ip6-localnet
ff00::0 ip6-mcastprefix
ff02::1 ip6-allnodes
ff02::2 ip6-allrouters
ff02::3 ip6-allhosts
4 Accesso senza chiave da Server1 a Server2
Sul server2:
Consentiamo temporaneamente il root login nel server2 con una password. Apri /etc/sshd_config:
vi /etc/ssh/sshd_config
e cambia
PermitRootLogin without-password
a
PermitRootLogin yes
in seguito, riavvia il demone ssh:
service ssh restart
Sul server1:
Crea una coppia di chiavi privata/pubblica:
ssh-keygen
Generating public/private rsa key pair.
Enter file in which to save the key (/root/.ssh/id_rsa): <-- ENTER
Created directory '/root/.ssh'.
Enter passphrase (empty for no passphrase): <-- ENTER
Enter same passphrase again: <-- ENTER
Your identification has been saved in /root/.ssh/id_rsa.
Your public key has been saved in /root/.ssh/id_rsa.pub.
The key fingerprint is:
f3:d0:62:a7:24:6f:f0:1e:d1:64:a9:9f:12:6c:98:5a [email protected]
The key's randomart image is:
+---[RSA 2048]----+
|                 |
|           .     |
|          +      |
|       + *       |
|      E S +      |
|     o O @ .     |
|    .   B +      |
|       o o       |
|        .        |
+-----------------+
È importante non inserire una passphrase, altrimenti il mirroring non funzionerà senza l'interazione umana, quindi premi semplicemente INVIO!
Quindi, copiamo la nostra chiave pubblica su server2.example.tld:
ssh-copy-id -i /root/.ssh/id_rsa.pub [email protected]
The authenticity of host '192.168.0.106 (192.168.0.106)' can't be established.
ECDSA key fingerprint is 25:d8:7a:ee:c2:4b:1d:92:a7:3d:16:26:95:56:62:4e.
Are you sure you want to continue connecting (yes/no)? <-- yes (you will see this only if this is the first time you connect to server2)
/usr/bin/ssh-copy-id: INFO: attempting to log in with the new key(s), to filter out any that are already installed
/usr/bin/ssh-copy-id: INFO: 1 key(s) remain to be installed -- if you are prompted now it is to install the new keys
[email protected]'s password: <- enter root password from server2
Ora prova ad accedere alla macchina:
ssh [email protected]
E controlla /root/.ssh/authorized_keys per assicurarti che non abbiamo aggiunto chiavi extra che non ti aspettavi.
cat /root/.ssh/authorized_keys
ssh-dss AAAAB3NzaC1kc3MAAACBAPhiAexgEBexnw0rFG8lXwAuIsca/V+lhmv5lhF3BqUfAbL7e2sWlQlGhxZ8I2UnzZK8Ypffq6Ks+lp46yOs7MMXLqb7JBP9gkgqxyEWqOoUSt5hTE9ghupcCvE7rRMhefY5shLUnRkVH6hnCWe6yXSnH+Z8lHbcfp864GHkLDK1AAAAFQDddQckbfRG4C6LOQXTzRBpIiXzoQAAAIEAleevPHwi+a3fTDM2+Vm6EVqR5DkSLwDM7KVVNtFSkAY4GVCfhLFREsfuMkcBD9Bv2DrKF2Ay3OOh39269Z1rgYVk+/MFC6sYgB6apirMlHj3l4RR1g09LaM1OpRz7pc/GqIGsDt74D1ES2j0zrq5kslnX8wEWSHapPR0tziin6UAAACBAJHxgr+GKxAdWpxV5MkF+FTaKcxA2tWHJegjGFrYGU8BpzZ4VDFMiObuzBjZ+LrUs57BiwTGB/MQl9FKQEyEV4J+AgZCBxvg6n57YlVn6OEA0ukeJa29aFOcc0inEFfNhw2jAXt5LRyvuHD/C2gG78lwb6CxV02Z3sbTBdc43J6y [email protected]
Non consentire l'accesso come root con una password. Apri /etc/sshd_config:
vi /etc/ssh/sshd_config
e cambia
PermitRootLogin yes
a
PermitRootLogin without-password
in seguito, riavvia il demone ssh:
service ssh restart
Disconnessione dal server2:
exit
logout
Connection to 192.168.0.106 closed.
Ora siamo di nuovo sul server1.
5. Replica Master-Master MySQL
5.1 Prepara il server1
Accedi a MySQL e crea un account specifico per la replica in MySQL. Uso un utente separato per la replica per ridurre al minimo la possibilità di compromissione con altri account (nome utente e password sono memorizzati in testo normale nel file o nella tabella del repository delle informazioni principali):
CREATE USER 'slaveuser2'@'server2.example.tld' IDENTIFIED BY 'slave_user_password';
CREATE USER 'slaveuser2'@'192.168.0.106' IDENTIFIED BY 'slave_user_password';
CREATE USER 'slaveuser2'@'2001:db8::2' IDENTIFIED BY 'slave_user_password';
e concedi il privilegio REPLICATION SLAVE:
GRANT REPLICATION SLAVE ON *.* TO 'slaveuser2'@'server2.example.tld';
GRANT REPLICATION SLAVE ON *.* TO 'slaveuser2'@'192.168.0.106';
GRANT REPLICATION SLAVE ON *.* TO 'slaveuser2'@'2001:db8::2';
QUIT;
Apporta alcune modifiche per la replica su MySQL-Config:
vi /etc/mysql/my.cnf
Cerca la sezione che inizia con [mysqld] e inserisci le seguenti opzioni (commentando tutte le conflitto esistenti opzioni):
[...]
[mysqld]
server-id                = 1
replicate-same-server-id = 0
auto-increment-increment = 2
auto-increment-offset    = 1
log_bin                  = mysql-bin.log
expire_logs_days         = 10
max_binlog_size          = 100M
binlog_format            = mixed
sync_binlog              = 1
relay-log                = slave-relay.log
relay-log-index          = slave-relay-log.index
slave_skip_errors        = 1007,1008,1050, 1396
bind-address             = ::
e riavvia MySQL in seguito:
service mysql restart
Salto semplicemente alcuni errori slave. L'ho spiegato sul mio blog:
- 1007 =Impossibile creare il database '%s'; il database esiste
- 1008 =Impossibile eliminare il database '%s'; il database non esiste
- 1050 =La tabella '%s' esiste già
- 1396 =Operazione %s non riuscita per %s - Impossibile creare l'utente
puoi trovare l'elenco dei codici di errore MySQL qui:Codici e messaggi di errore del server
5.2 Prepara il server2
Apporta alcune modifiche per la replica su MySQL-Config:
vi /etc/mysql/my.cnf
Cerca la sezione che inizia con [mysqld] e inserisci le seguenti opzioni (commentando tutte le conflitto esistenti opzioni):
[...]
[mysqld]
server-id                = 2
log_bin                  = mysql-bin.log
expire_logs_days         = 10
max_binlog_size          = 100M
binlog_format            = mixed
sync_binlog              = 1
slave_skip_errors        = 1007,1008,1050, 1396
5.3 Creare uno snapshot dei database esistenti sul server1
Scarica i database su server1 e inserisci la password di root MySQL:
mysqldump -p --all-databases --allow-keywords --master-data --events --single-transaction > /root/mysqldump.sql
Copia il dump sul server2:
scp /root/mysqldump.sql [email protected]:/root
5.4 Importa il dump sul server2
mysql -u root -p < /root/mysqldump.sql
Spegni mysql su server2 :
service mysql stop
Copia il file di default per MySQL da server1 a server2. Passa a server1 e corri
scp /etc/mysql/debian.cnf [email protected]:/etc/mysql/debian.cnf
Avvia MySQL su server2 :
service mysql start
e accedi a MySQL per impostare il server master con:
CHANGE MASTER TO MASTER_HOST="server1.example.tld", MASTER_USER="slaveuser2", MASTER_PASSWORD="slave_user_password";
Avvia lo schiavo:
START SLAVE;
e controlla lo stato di slave con
MOSTRA STATO SLAVE \G
Il risultato sarà qualcosa di simile a
*************************** 1. row ***************************
               Slave_IO_State: Waiting for master to send event
                  Master_Host: server1.example.tld
                  Master_User: slaveuser2
                  Master_Port: 3306
                Connect_Retry: 60
              Master_Log_File: mysql-bin.000001
          Read_Master_Log_Pos: 109989
               Relay_Log_File: mysqld-relay-bin.000002
                Relay_Log_Pos: 110276
        Relay_Master_Log_File: mysql-bin.000001
             Slave_IO_Running: Yes
            Slave_SQL_Running: Yes
              Replicate_Do_DB:
          Replicate_Ignore_DB:
           Replicate_Do_Table:
       Replicate_Ignore_Table:
      Replicate_Wild_Do_Table:
  Replicate_Wild_Ignore_Table:
                   Last_Errno: 0
                   Last_Error:
                 Skip_Counter: 0
          Exec_Master_Log_Pos: 109989
              Relay_Log_Space: 110574
              Until_Condition: None
               Until_Log_File:
                Until_Log_Pos: 0
           Master_SSL_Allowed: No
           Master_SSL_CA_File:
           Master_SSL_CA_Path:
              Master_SSL_Cert:
            Master_SSL_Cipher:
               Master_SSL_Key:
        Seconds_Behind_Master: 0
Master_SSL_Verify_Server_Cert: No
                Last_IO_Errno: 0
                Last_IO_Error:
               Last_SQL_Errno: 0
               Last_SQL_Error:
  Replicate_Ignore_Server_Ids:
             Master_Server_Id: 1
               Master_SSL_Crl:
           Master_SSL_Crlpath:
                   Using_Gtid: No
                  Gtid_IO_Pos:
Se "Seconds Behind Master" è diverso da 0, attendere che lo Slave abbia letto tutti i dati dal master (basta ripetere il comando per ottenere il valore corrente). Assicurati che il server2 utilizzi il registro principale e la posizione del registro corretti.
Su server1 esegui in MySQL:
SHOW MASTER STATUS \G
*************************** 1. row ***************************
            File: mysql-bin.000991
        Position: 69185362
    Binlog_Do_DB:
Binlog_Ignore_DB:
1 row in set (0.00 sec)
E confronta le coordinate del registro binario principale della replica.
Stiamo eseguendo una replica MySQL Master-Slave in cui il server1 è il master e il server2 lo slave.
5.5 MySQL Master-Master-Replica
Crea l'utente MySQL per la replica e concedi il privilegio in MySQL:
CREATE USER 'slaveuser1'@'server1.example.tld' IDENTIFIED BY 'slave_user_password';
CREATE USER 'slaveuser1'@'192.168.0.105' IDENTIFIED BY 'slave_user_password';
CREATE USER 'slaveuser1'@'2001:db8::1' IDENTIFIED BY 'slave_user_password';
GRANT REPLICATION SLAVE ON *.* TO 'slaveuser1'@'server1.example.tld';
GRANT REPLICATION SLAVE ON *.* TO 'slaveuser1'@'192.168.0.105';
GRANT REPLICATION SLAVE ON *.* TO 'slaveuser1'@'2001:db8::1';
QUIT;
Apporta alcune modifiche per la replica su MySQL-Config su server2 :
vi /etc/mysql/my.cnf
Cerca la sezione che inizia con [mysqld] e inserisci le seguenti opzioni (commentando tutte le conflitto esistenti opzioni):
[...]
[mysqld]
[...]
replicate-same-server-id = 0
auto-increment-increment = 2
auto-increment-offset    = 2
relay-log                = slave-relay.log
relay-log-index          = slave-relay-log.inde
e riavvia MySQL:
service mysql restart
Accedi a MySQL e ottieni le coordinate del registro binario principale:
SHOW MASTER STATUS \G
*************************** 1. row ***************************
            File: mysql-bin.000002
        Position: 326
    Binlog_Do_DB:
Binlog_Ignore_DB:
1 row in set (0.00 sec)
Accedi a MySQL su server1 e impostare il master-server con
CHANGE MASTER TO MASTER_HOST="server2.example.tld", MASTER_USER="slaveuser1", MASTER_PASSWORD="slave_user_password", MASTER_LOG_FILE='mysql-bin.000002', MASTER_LOG_POS=326;
Avvia lo schiavo:
START SLAVE;
e controlla lo stato di slave con
MOSTRA STATO SLAVE \G
Verifica che lo slave sia in esecuzione:
Slave_IO_Running:Sì
Slave_SQL_Running:Sì
Se la tua replica smette di funzionare, potresti trovare ulteriori informazioni qui:
- Come saltare determinati errori nella replica di MySQL
- riavvia la replica master-master di MySQL
- mysql-replication – Impossibile analizzare la voce dell'evento del registro di inoltro
6 Installa ISPConfig sul server slave
Accedi a MySQL e crea un utente root per server2:
CREATE USER 'root'@'192.168.0.106' IDENTIFIED BY 'myrootpassword';
GRANT ALL PRIVILEGES ON * . * TO 'root'@'192.168.0.106' WITH GRANT OPTION MAX_QUERIES_PER_HOUR 0 MAX_CONNECTIONS_PER_HOUR 0 MAX_UPDATES_PER_HOUR 0 MAX_USER_CONNECTIONS 0 ;
CREATE USER 'root'@'server2.example.tld' IDENTIFIED BY 'myrootpassword';
GRANT ALL PRIVILEGES ON * . * TO 'root'@'server2.example.tld' WITH GRANT OPTION MAX_QUERIES_PER_HOUR 0 MAX_CONNECTIONS_PER_HOUR 0 MAX_UPDATES_PER_HOUR 0 MAX_USER_CONNECTIONS 0;
CREATE USER 'root'@'2a01:dddd::2' IDENTIFIED BY 'myrootpassword';
GRANT ALL PRIVILEGES ON * . * TO 'root'@'2001:db8::2' WITH GRANT OPTION MAX_QUERIES_PER_HOUR 0 MAX_CONNECTIONS_PER_HOUR 0 MAX_UPDATES_PER_HOUR 0 MAX_USER_CONNECTIONS 0;
QUIT;
La replica copre tutto il database. Copia i db-configs per PHPMyAdmin e roundcube dal server1 al server2.
Su server1 :
scp /etc/dbconfig-common/phpmyadmin.conf [email protected]:/etc/dbconfig-common/phpmyadmin.conf
scp /etc/phpmyadmin/config-db.php [email protected]:/etc/phpmyadmin/config-db.php
scp /etc/dbconfig-common/roundcube.conf [email protected]:/etc/dbconfig-common/roundcube.conf
scp /etc/roundcube/debian-db.php [email protected]:/etc/roundcube/debian-db.php
Su server2 :
Scarica ISPConfig 3.1:
cd /tmp
wget -O ISPConfig-3.1-beta.tar.gz  https://git.ispconfig.org/ispconfig/ispconfig3/repository/archive.tar.gz?ref=stable-3.1
tar xfvz xfz ISPConfig-3.1-beta.tar.gz
cd ispconfig3-stable-3.1*
cd install
e avvia il programma di installazione con
php -q install.php
--------------------------------------------------------------------------------
 _____ ___________   _____              __ _         ____
|_   _/  ___| ___ \ /  __ \            / _(_)       /__  \
  | | \ `--.| |_/ / | /  \/ ___  _ __ | |_ _  __ _    _/ /
  | |  `--. \  __/  | |    / _ \| '_ \|  _| |/ _` |  |_ |
 _| |_/\__/ / |     | \__/\ (_) | | | | | | | (_| | ___\ \
 \___/\____/\_|      \____/\___/|_| |_|_| |_|\__, | \____/
                                              __/ |
                                             |___/
--------------------------------------------------------------------------------


>> Initial configuration

Operating System: Debian 8.0 (Jessie) or compatible

    Following will be a few questions for primary configuration so be careful.
    Default values are in [brackets] and can be accepted with <ENTER>.
    Tap in "quit" (without the quotes) to stop the installer.


Select language (en,de) [en]: <-- Hit Enter

Installation mode (standard,expert) [standard]: expert <-- expert

Full qualified hostname (FQDN) of the server, eg server1.domain.tld  [server2.example.tld]: <-- Hit Enter

MySQL server hostname [localhost]: <-- Hit Enter

MySQL server port [3306]: <-- Hit Enter

MySQL root username [root]: <-- Hit Enter

MySQL root password []: <-- Enter your MySQL root password

MySQL database to create [dbispconfig]: <-- dbispconfig2 (the local ispconfig database name of the master and slave must be different, as both servers share the same databases)

MySQL charset [utf8]: <-- Hit Enter

The next two questions are about the internal ISPConfig database user and password.
It is recommended to accept the defaults which are 'ispconfig' as username and a random password.
If you use a different password, use only numbers and chars for the password.

ISPConfig mysql database username [ispconfig]: <-- ispconfig2

ISPConfig mysql database password [06d434604a3371a706a100f9786aec9b]: <-- Hit Enter

Shall this server join an existing ISPConfig multiserver setup (y,n) [n]: <-- y

MySQL master server hostname []: <-- server1.example.tld

MySQL master server port []: <-- Hit Enter

MySQL master server root username [root]: <-- Hit Enter

MySQL master server root password []: <-- Enter the root password of the master server here

MySQL master server database name [dbispconfig]: <-- Hit Enter

Adding ISPConfig server record to database.

Configure Mail (y,n) [y]: <-- Hit Enter

Configuring Postgrey
Configuring Postfix
Generating a 4096 bit RSA private key
........................................................................++
....................++
writing new private key to 'smtpd.key'
-----
You are about to be asked to enter information that will be incorporated
into your certificate request.
What you are about to enter is what is called a Distinguished Name or a DN.
There are quite a few fields but you can leave some blank
For some fields there will be a default value,
If you enter '.', the field will be left blank.
-----
Country Name (2 letter code) [AU]: <-- Enter 2 letter country code
State or Province Name (full name) [Some-State]: <-- Enter the name of the  state
Locality Name (eg, city) []: <-- Enter your city
Organization Name (eg, company) [Internet Widgits Pty Ltd]: <-- Enter company name or press enter
Organizational Unit Name (eg, section) []: <-- Hit Enter
Common Name (e.g. server FQDN or YOUR name) []: <-- Enter the server hostname, in my case: server2.example.com
Email Address []: <-- Hit Enter
Configuring Mailman
Configuring Dovecot
Configuring Spamassassin
Configuring Amavisd
Configuring Getmail
Configuring Jailkit
Configuring Pureftpd
Configure DNS Server (y,n) [y]: <-- Hit Enter

Configuring BIND
Configure Web Server (y,n) [y]: <-- Hit Enter

Configuring Apache
Configuring vlogger
[WARN] autodetect for OpenVZ failed
Force configure OpenVZ (y,n) [n]: <-- Hit Enter

Skipping OpenVZ

Configure Firewall Server (y,n) [y]: <-- Hit Enter

Configuring Ubuntu Firewall
Configuring Metronome XMPP Server
writing new private key to 'localhost.key'
-----
Country Name (2 letter code) [AU]: <-- Enter 2 letter country code
Locality Name (eg, city) []: <-- Enter your city
Organization Name (eg, company) [Internet Widgits Pty Ltd]: <-- Enter company name or press enter
Organizational Unit Name (eg, section) []: <-- Hit Enter
Common Name (e.g. server FQDN or YOUR name) [server2.example.tld]: <-- Enter the server hostname, in my case: server2.example.tld
Email Address []: <-- Hit Enter

Install ISPConfig Web Interface (y,n) [n]: <-- Hit Enter


Configuring DBServer
Installing ISPConfig crontab
Detect IP addresses
Installation completed.
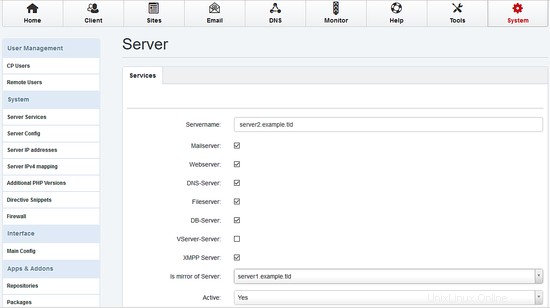
Accedi a ISPConfig sul server1 e vai su Sistema / Servizi server e scegli server2.example.tld e imposta È il mirror del server a server1.example.tld:
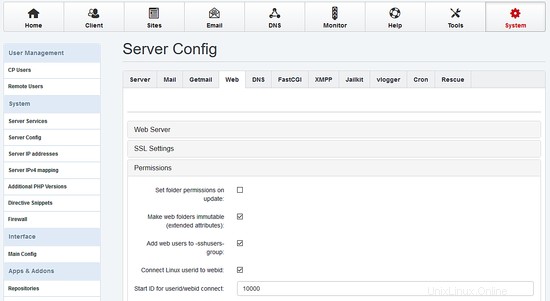
Vai a Configurazione server , scegli Scheda Web e imposta i permessi per entrambi i server:
Se hai già dati (siti web, posta....) in esecuzione sul server1, vai su Strumenti / Risincronizzazione e avvia una risincronizzazione completa (abilita tutte le caselle di controllo).
7 Installa Unison
Quindi installiamo Unison. Unison viene utilizzato per sincronizzare la directory /var/www tra server1 e server2.
Installa unison su server1 e server2 con
apt-get install unison
Ora installiamo un file di configurazione unisono su server1 :
Crea un nuovo file /root/.unison/web:
mkdir /root/.unison
vi /root/.unison/web.prf
... e aggiungi il seguente contenuto:
# Roots of the synchronization
root = /var/www
root = ssh://192.168.0.106//var/www

# Paths to synchronize
#path = www
#path = vmail

# Some regexps specifying names and paths to ignore
#ignore = Path stats    ## ignores /var/www/stats
#ignore = Path stats/*  ## ignores /var/www/stats/*
#ignore = Path */stats  ## ignores /var/www/somedir/stats, but not /var/www/a/b/c/stats
#ignore = Name *stats   ## ignores all files/directories that end with "stats"
#ignore = Name stats*   ## ignores all files/directories that begin with "stats"
#ignore = Name *.tmp    ## ignores all files with the extension .tmp
ignore = Name sess_*
ignore = Name *access.log*
ignore = Name error.log
ignore = Name webalizer.conf

#          When set to true, this flag causes the user interface to skip
#          asking for confirmations on non-conflicting changes. (More
#          precisely, when the user interface is done setting the
#          propagation direction for one entry and is about to move to the
#          next, it will skip over all non-conflicting entries and go
#          directly to the next conflict.)
auto=true

#          When this is set to true, the user interface will ask no
#          questions at all. Non-conflicting changes will be propagated;
#          conflicts will be skipped.
batch=true

#          !When this is set to true, Unison will request an extra
#          confirmation if it appears that the entire replica has been
#          deleted, before propagating the change. If the batch flag is
#          also set, synchronization will be aborted. When the path
#          preference is used, the same confirmation will be requested for
#          top-level paths. (At the moment, this flag only affects the
#          text user interface.) See also the mountpoint preference.
confirmbigdel=true

#          When this preference is set to true, Unison will use the
#          modification time and length of a file as a `pseudo inode
#          number' when scanning replicas for updates, instead of reading
#          the full contents of every file. Under Windows, this may cause
#          Unison to miss propagating an update if the modification time
#          and length of the file are both unchanged by the update.
#          However, Unison will never overwrite such an update with a
#          change from the other replica, since it always does a safe
#          check for updates just before propagating a change. Thus, it is
#          reasonable to use this switch under Windows most of the time
#          and occasionally run Unison once with fastcheck set to false,
#          if you are worried that Unison may have overlooked an update.
#          The default value of the preference is auto, which causes
#          Unison to use fast checking on Unix replicas (where it is safe)
#          and slow checking on Windows replicas. For backward
#          compatibility, yes, no, and default can be used in place of
#          true, false, and auto. See the section "Fast Checking" for more
#          information.
fastcheck=true

#          When this flag is set to true, the group attributes of the
#          files are synchronized. Whether the group names or the group
#          identifiers are synchronizeddepends on the preference numerids.
group=true

#          When this flag is set to true, the owner attributes of the
#          files are synchronized. Whether the owner names or the owner
#          identifiers are synchronizeddepends on the preference
#          extttnumerids.
owner=true

#          Including the preference -prefer root causes Unison always to
#          resolve conflicts in favor of root, rather than asking for
#          guidance from the user. (The syntax of root is the same as for
#          the root preference, plus the special values newer and older.)
#          This preference is overridden by the preferpartial preference.
#          This preference should be used only if you are sure you know
#          what you are doing!
prefer=newer

#          When this preference is set to true, the textual user interface
#          will print nothing at all, except in the case of errors.
#          Setting silent to true automatically sets the batch preference
#          to true.
silent=true

#          When this flag is set to true, file modification times (but not
#          directory modtimes) are propagated.
times=false

#          When this flag is set, Unison will log all changes to the filesystems on a file.
log=false

#          When this flag is set to true, groups and users are synchronized numerically, rather than by name.
#          The special uid 0 and the special group 0 are never mapped via user/group names even if this
#          preference is not set.
numericids=true
Vogliamo automatizzare la sincronizzazione, quindi creiamo un piccolo script e creiamo un cronjob su server1 :
mkdir /root/scripts
vi /root/scripts/unison.sh
e aggiungi il seguente contenuto:
#!/bin/sh
lockdir=/tmp
UNISON=/usr/bin/unison
LOGGER=/usr/bin/logger

if [ ! -f /$lockdir/unison ]; then
        touch $lockdir/unison

        $UNISON -testserver web
        rc=$?
        if [[ $rc != 0 ]] ; then
                echo "error"
                $LOGGER -d -t unison "web - error connecting remote"
        else
                $UNISON web
        fi

        rm $lockdir/unison
else
        $LOGGER -d -t unison "unison already running"
fi
rendere eseguibile lo script:
chmod 700 /root/scripts/unison.sh
Ed esegui la prima sincronizzazione. Per ottenere un output durante la sincronizzazione, impostare silent =false in /root/.unsion/web.prf. Successivamente, inizia all'unisono:
/root/scripts/unison.sh
Finally, we create the cronjob:
crontab -e
# unison
*  * * * *  /root/scripts/unison.sh > /dev/null
8 Sync Emails with Dovecot
Since Dovecot 2 it`s possible to use Dovect's dsync to keep the main base in sync. If you have already mail's on server1, they will be replicated to server2 without any further interaction.
You must use the same port (4711 ) and the same password (replication_password ) on both servers.
server1:
Open /etc/dovecot/dovecot-sql.conf
vi /etc/dovecot/dovecot-sql.conf
and enable the iterate_query:
old:
#iterate_query = SELECT email as user FROM mail_user
new:
iterate_query = SELECT email as user FROM mail_user
Open /etc/dovecot/dovecot.conf
vi /etc/dovecot/dovecot.conf
and add the following content:
# Enable the replication plugin globally
mail_plugins = $mail_plugins notify replication quota

# Both the client and the server need to have a shared secret
doveadm_password = replication_password

# configure how many dsyncs can be run in parallel (10 by default)
replication_max_conns = 10

service aggregator {
        fifo_listener replication-notify-fifo {
                user = vmail
                mode = 0666
        }

        unix_listener replication-notify {
                user = vmail
                mode = 0666
        }
}

service replicator {
        unix_listener replicator-doveadm {
                mode = 0666
        }
}

service doveadm {
        user = vmail
        inet_listener {
                port = 4711
        }
}

service config {
        unix_listener config {
                user = vmail
        }
}

# use tcp:ip as the dsync target
plugin {
        replication_full_sync_interval = 1 hours
        mail_replica = tcp:192.168.0.106:4711
}

protocol imap {
        mail_plugins = quota imap_quota notify replication
}
restart Dovecot:
service dovecot restart
server2:
Open /etc/dovecot/dovecot-sql.conf
vi /etc/dovecot/dovecot-sql.conf
and enable the iterate_query:
old:
#iterate_query = SELECT email as user FROM mail_user
new:
iterate_query = SELECT email as user FROM mail_user
Open /etc/dovecot/dovecot.conf
vi /etc/dovecot/dovecot.conf
and add the following content:
# Enable the replication plugin globally
mail_plugins = $mail_plugins notify replication quota

# Both the client and the server need to have a shared secret
doveadm_password = replication_password

# configure how many dsyncs can be run in parallel (10 by default)
replication_max_conns = 10

service aggregator {
        fifo_listener replication-notify-fifo {
                user = vmail
                mode = 0666
        }

        unix_listener replication-notify {
                user = vmail
                mode = 0666
        }
}

service replicator {
        unix_listener replicator-doveadm {
                mode = 0666
        }
}

service doveadm {
        user = vmail
        inet_listener {
                port = 4711
        }
}

service config {
        unix_listener config {
                user = vmail
        }
}

# use tcp:ip as the dsync target
plugin {
        replication_full_sync_interval = 1 hours
        mail_replica = tcp:192.168.0.105:4711
}

protocol imap {
        mail_plugins = quota imap_quota notify replication
}
restart Dovecot:
service dovecot restart
You can check the replication on each server:
doveadm replicator status '*'
username                                                                                priority fast sync full sync failed
[email protected]                                                                     none     00:16:34  00:16:40  -
9 Additional Notes
When you want to activate a firewall on the master or slave server, ensure that you open port 3306 for MySQL, 22 for SSH and 4711 for Dovecot on both servers.
10 Links
- ISPConfig Website:http://www.ispconfig.org/
- ISPConfig Forum:https://www.howtoforge.com/forums/
- ISPConfig Bugtracker:http://bugtracker.ispconfig.org/