Installazione di un cluster di database Web, e-mail e MySQL su Debian 6.0 con ISPConfig 3
Questo tutorial descrive l'installazione di un server Web, e-mail, database e DNS in cluster da utilizzare per la ridondanza, l'elevata disponibilità e il bilanciamento del carico su Debian 6 con il pannello di controllo ISPConfig 3. La replica MySQL Master/Master verrà utilizzata per replicare i database dei client MySQL tra i server e Unison verrà utilizzato per sincronizzare le cartelle /var/www (siti Web) e /var/vmail (dati account e-mail).
1 Configurazione dei due sistemi di base
In questa configurazione ci sarà un server master (che esegue l'interfaccia del pannello di controllo ISPConfig) e un server slave che rispecchia i servizi web (apache), email (postfix e dovecot) e database (MySQL) del server master.
Per installare la configurazione in cluster, abbiamo bisogno di due server con un'installazione minima di Debian 6.0. La configurazione di base è descritta nel seguente tutorial nei passaggi da 1 a 8:
https://www.howtoforge.com/perfect-server-debian-squeeze-with-bind-and-dovecot-ispconfig-3
Installa solo i passaggi da 1 a 8 del tutorial del server perfetto e non gli altri passaggi poiché differiscono per una configurazione in cluster!
Nel mio esempio utilizzo i seguenti nomi host e indirizzi IP per i due server:
Server principale
Nome host:server1.example.tld
Indirizzo IP:192.168.0.105
Server slave
Nome host:server2.example.tld
Indirizzo IP:192.168.0.106
Ovunque questi nomi host o indirizzi IP si presentino nelle fasi di installazione successive, dovrai cambiarli in modo che corrispondano agli IP e ai nomi host dei tuoi server.
2 Installazione dei due server
I seguenti passaggi devono essere eseguiti sul server master e sul server slave. Se un passaggio specifico è solo per il master o lo slave, ho aggiunto una nota nella descrizione in rosso.
vi /etc/hosts
127.0.0.1       localhost
192.168.0.105   server1.example.tld
192.168.0.106   server2.example.tld

# The following lines are desirable for IPv6 capable hosts
::1     localhost ip6-localhost ip6-loopback
fe00::0 ip6-localnet
ff00::0 ip6-mcastprefix
ff02::1 ip6-allnodes
ff02::2 ip6-allrouters
ff02::3 ip6-allhosts
Imposta il nome host del server:
echo server1.example.tld> /etc/hostname
/etc/init.d/hostname.sh start
Utilizzare server1.example.tld sul primo server e server2.example.tld sul secondo server.
Modifica il file sources.list...
vi /etc/apt/sources.list
... e assicurati che il tuo /etc/apt/sources.list contenga il repository squeeze-updates (questo ti assicura di ricevere sempre gli aggiornamenti più recenti per lo scanner antivirus ClamAV:questo progetto pubblica le versioni molto spesso e talvolta le versioni precedenti smettono di funzionare ).
[...]
deb http://ftp.de.debian.org/debian/ squeeze-updates main
[...]
Corri
apt-get update
apt-get upgrade
per installare gli ultimi aggiornamenti (se presenti).
È una buona idea sincronizzare l'orologio di sistema con un NTP (n rete t ora p rotocol) server su Internet. Esegui semplicemente
apt-get -y install ntp ntpdate
e l'ora del tuo sistema sarà sempre sincronizzata.
Sul server 1:
Ora creiamo una coppia di chiavi privata/pubblica su server1.example.tld:
ssh-keygen -t dsa
[email protected]:~# ssh-keygen -t dsa
Generazione coppia di chiavi dsa pubbliche/private.
Inserisci il file in cui salvare la chiave (/root/.ssh/id_dsa):<- - ENTER
Directory creata '/root/.ssh'.
Inserisci passphrase (vuota per nessuna passphrase):<-- ENTER
Inserisci di nuovo la stessa passphrase:<-- ENTER
La tua identificazione è stata salvata in /root/.ssh/id_dsa.
La tua chiave pubblica è stata salvata in /root/.ssh/id_dsa.pub.
L'impronta digitale della chiave è:
1b:95:bc:4a:f4:9f:d8:ea:24:31:0f:c9:72:d5:a7:80 [email protected]
L'immagine randomart della chiave è:
+- -[ DSA 1024]----+
| |
| o o |
| E*. . |
| o =o o |
| . Così . |
| +O+. |
| + + + |
| o. |
| .o |
+-----------------+
[email protected]:~#
È importante non inserire una passphrase, altrimenti il mirroring non funzionerà senza l'interazione umana, quindi premi semplicemente INVIO!
Quindi, copiamo la nostra chiave pubblica su server2.example.tld:
ssh-copy-id -i $HOME/.ssh/id_dsa.pub [email protected]
[email protected]:~# ssh-copy-id -i $HOME/.ssh/id_dsa.pub [email protected]
L'autenticità dell'host '192.168.0.101 (192.168.0.101)' non può essere stabilito.
L'impronta digitale della chiave RSA è 25:d8:7a:ee:c2:4b:1d:92:a7:3d:16:26:95:56:62:4e.
Sei sicuro vuoi continuare a connetterti (sì/no)? <-- sì (lo vedrai solo se è la prima volta che ti connetti al server2)
Avviso:aggiunto in modo permanente '192.168.0.101' (RSA) all'elenco degli host conosciuti.
esempio@ Password di unixlinux.online:<-- password root server2
Ora prova ad accedere alla macchina, con "ssh '[email protected]'", e controlla:
.ssh/authorized_keys
to make sure we haven't added extra keys that you weren't expecting.
Ora controlla sul server2 se la chiave pubblica del server1 è stata trasferita correttamente:
server2:
cat $HOME/.ssh/authorized_keys
ssh-dss AAAAB3NzaC1kc3MAAACBAPhiAexgEBexnw0rFG8lXwAuIsca/V+lhmv5lhF3BqUfAbL7e2sWlQlGhxZ8I2UnzZK8Ypffq6Ks+lp46yOs7MMXLqb7JBP9gkgqxyEWqOoUSt5hTE9ghupcCvE7rRMhefY5shLUnRkVH6hnCWe6yXSnH+Z8lHbcfp864GHkLDK1AAAAFQDddQckbfRG4C6LOQXTzRBpIiXzoQAAAIEAleevPHwi+a3fTDM2+Vm6EVqR5DkSLwDM7KVVNtFSkAY4GVCfhLFREsfuMkcBD9Bv2DrKF2Ay3OOh39269Z1rgYVk+/MFC6sYgB6apirMlHj3l4RR1g09LaM1OpRz7pc/GqIGsDt74D1ES2j0zrq5kslnX8wEWSHapPR0tziin6UAAACBAJHxgr+GKxAdWpxV5MkF+FTaKcxA2tWHJegjGFrYGU8BpzZ4VDFMiObuzBjZ+LrUs57BiwTGB/MQl9FKQEyEV4J+AgZCBxvg6n57YlVn6OEA0ukeJa29aFOcc0inEFfNhw2jAXt5LRyvuHD/C2gG78lwb6CxV02Z3sbTBdc43J6y [email protected]
Installa postfix, dovecot e mysql con un solo comando:
apt-get -y install postfix postfix-mysql postfix-doc mysql-client mysql-server openssl getmail4 rkhunter binutils dovecot-imapd dovecot-pop3d sudo
Immettere la nuova password per l'utente root MySQL quando richiesto dal programma di installazione. Dovresti scegliere la stessa password per entrambi i server. Quindi rispondi alle domande successive come descritto di seguito:
Tipo di configurazione generale? <-- Sito Internet
Nome e-mail? <-- server1.mydomain.tld
Certificato SSL richiesto <-- Ok
Utilizzare server1.example.tld sul primo server e server2.example.tld sul secondo server.
Vogliamo che MySQL ascolti su tutte le interfacce, non solo su localhost, quindi modifichiamo /etc/mysql/my.cnf e commentiamo la riga bind-address =127.0.0.1:
vi /etc/mysql/my.cnf
[...]

# Instead of skip-networking the default is now to listen only on
# localhost which is more compatible and is not less secure.
#bind-address           = 127.0.0.1

[...]
Quindi riavvia MySQL:
/etc/init.d/mysql restart
Ora prepariamo i server MySQL per la replica mysql master/master.
Sul server 1:
Accedi a MySQL sulla shell con...
mysql -u root -p
... e inserisci la password di root MySQL che hai scelto durante l'installazione di MySQL. Quindi esegui questo comando sulla shell MySQL:
CONCEDERE REPLICA SLAVE SU *.* A 'slaveuser'@'%' IDENTIFICATO DA 'slave_user_password';
FLUSH PRIVILEGES;
chiudi;
Sostituisci 'slave_user_password' con una password sicura che si desidera utilizzare per la connessione dello slave al server master. Sostituisci questo segnaposto nei passaggi successivi con la password che avevi scelto ovunque si trovi il segnaposto.
Ora configuriamo i nostri 2 nodi MySQL:
Sul server 1:
vi /etc/mysql/my.cnf
Cerca la sezione che inizia con [mysqld] e inserisci le seguenti opzioni (commentando tutte le conflitto esistenti opzioni):
[...]
[mysqld]
server-id = 1
replicate-same-server-id = 0
auto-increment-increment = 2
auto-increment-offset = 1

master-host = 192.168.0.106
master-user = slaveuser
master-password = slave_user_password
master-connect-retry = 60

expire_logs_days        = 10
max_binlog_size         = 500M
log_bin                        = /var/log/mysql/mysql-bin.log
[...]
Quindi ferma MySQL:
/etc/init.d/mysql stop
Ora fai quasi lo stesso sul server2...
Sul server 2:
vi /etc/mysql/my.cnf
Cerca la sezione che inizia con [mysqld] e inserisci le seguenti opzioni (commentando tutte le conflitto esistenti opzioni):
[...]
[mysqld]
server-id = 2
replicate-same-server-id = 0
auto-increment-increment = 2
auto-increment-offset = 2

master-host = 192.168.0.105
master-user = slaveuser
master-password = slave_user_password
master-connect-retry = 60

expire_logs_days        = 10
max_binlog_size         = 500M
log_bin                        = /var/log/mysql/mysql-bin.log
[...]
Quindi ferma MySQL:
/etc/init.d/mysql stop
Ora dobbiamo sincronizzare i due server MySQL. Lo facciamo copiando la directory dei dati mysql dal master allo slave e anche il file di configurazione debian che contiene l'utente debian-sys-maint. Questo può essere fatto poiché abbiamo interrotto MySQL in precedenza su entrambi i server.
Sul server 1:
scp -pr /var/lib/mysql/* [email protected]:/var/lib/mysql/
scp -pr /etc/mysql/debian.cnf [email protected]:/etc/mysql/ debian.cnf
Ora avviamo nuovamente MySQL sul server principale:
/etc/init.d/mysql start
Accedi alla shell MySQL come utente root...
mysql -u root -p
... ed esegui questo comando nella shell MySQL...
SHOW MASTER STATUS;
... per ottenere lo stato del master MySQL:
mysql> MOSTRA STATO MASTER;
+----+----------+--------- -----+-------------------+
| File | Posizione | Binlog_Do_DB | Binlog_Ignore_DB |
+------------------+-----------+------------- -------------------+
| mysql-bin.000002 | 106 | | |
+------------------+-----------+-------------- +------------------+
1 riga nel set (0,00 sec)
Le informazioni di cui abbiamo bisogno per il passaggio successivo sono il file binlog mysql-bin.000002 e la posizione binlog 106. Abbiamo bisogno degli stessi dettagli per server2 più avanti.
Ora esegui questo comando nella shell MySQL sul master per connetterlo allo slave:
STOP SLAVE;
CAMBIA MASTER IN MASTER_HOST='192.168.0.106', MASTER_USER='slaveuser', MASTER_PASSWORD='slave_user_password', MASTER_LOG_FILE='mysql-bin.000002', MASTER_LOG_POS=106;
AVVIA SLAVE;
Quindi controlla lo stato dello slave:
SHOW SLAVE STATUS \G
È importante che sia Slave_IO_Running che Slave_SQL_Running abbiano il valore Sì nell'output.
Sul server 2:
Accedi alla shell MySQL come utente root...
mysql -u root -p
... ed esegui questo comando nella shell MySQL:
STOP SLAVE;
CAMBIA MASTER IN MASTER_HOST='192.168.0.105', MASTER_USER='slaveuser', MASTER_PASSWORD='slave_user_password', MASTER_LOG_FILE='mysql-bin.000002', MASTER_LOG_POS=106;
AVVIA SLAVE;
Quindi controlla lo stato dello slave:
SHOW SLAVE STATUS \G
È importante che sia Slave_IO_Running che Slave_SQL_Running abbiano il valore Sì nell'output
La configurazione della replica mysql master/master è ora terminata e si procede all'installazione degli altri pacchetti software.
Installazione di un cluster di database Web, e-mail e MySQL su Debian 6.0 con ISPConfig 3 - Pagina 2
I passaggi successivi devono essere eseguiti sul server 1 e sul server 2.
Per installare amavisd-new, SpamAssassin e ClamAV, eseguiamo:
apt-get install amavisd-new spamassassin clamav clamav-daemon zoo unzip bzip2 arj nomarch lzop cabextract apt-listchanges libnet-ldap-perl libauthen-sasl-perl clamav-docs daemon libio-string-perl libio-socket-ssl-perl libnet-ident-perl zip libnet-dns-perl
La configurazione di ISPConfig 3 utilizza amavisd che carica internamente la libreria dei filtri SpamAssassin, quindi possiamo fermare SpamAssassin per liberare un po' di RAM:
/etc/init.d/spamassassin ferma
update-rc.d -f spamassassin rimuovi
Quindi installa Apache2, PHP5, phpMyAdmin, FCGI, suExec, Pear e mcrypt possono essere installati come segue:
apt-get -y install apache2 apache2.2-common apache2-doc apache2-mpm-prefork apache2-utils libexpat1 ssl-cert libapache2-mod-php5 php5 php5-common php5-curl php5-gd php5-mysql php5-imap phpmyadmin php5-cli php5-cgi libapache2-mod-fcgid apache2-suexec php-pear php-auth php5-mcrypt mcrypt php5-imagick imagemagick libapache2-mod-suphp libruby libapache2-mod-ruby php5-xcache libapache2-mod-perl2 sudo zip wget
Vedrai la seguente domanda:
Server Web da riconfigurare automaticamente:<-- apache2
Configura il database per phpmyadmin con dbconfig-common? <-- No
Quindi esegui il comando seguente per abilitare i moduli Apache suexec, rewrite, ssl, actions e include:
a2enmod suexec rewrite ssl actions include ruby dav_fs dav auth_digest
PureFTPd e quota possono essere installati con il seguente comando:
apt-get -y install pure-ftpd-common pure-ftpd-mysql quota quotatool
Modifica il file /etc/default/pure-ftpd-common...
vi /etc/default/pure-ftpd-common
... e assicurati che la modalità di avvio sia impostata su standalone e imposta VIRTUALCHROOT=true:
[...]
STANDALONE_OR_INETD=standalone
[...]
VIRTUALCHROOT=true
[...]
Modifica il file /etc/inetd.conf per evitare che inetd tenti di avviare ftp:
vi /etc/inetd.conf
Se c'è una riga che inizia con ftp stream tcp, commentala (se non c'è un file del genere, allora va bene e non devi modificare /etc/inetd.conf):
[...]
#:STANDARD: These are standard services.
#ftp    stream  tcp     nowait  root    /usr/sbin/tcpd /usr/sbin/pure-ftpd-wrapper
[...]
Se dovessi modificare /etc/inetd.conf, riavvia inetd ora:
/etc/init.d/openbsd-inetd restart
Ora configuriamo PureFTPd per consentire sessioni FTP e TLS. FTP è un protocollo molto insicuro perché tutte le password e tutti i dati vengono trasferiti in chiaro. Utilizzando TLS, l'intera comunicazione può essere crittografata, rendendo così l'FTP molto più sicuro.
Se desideri consentire sessioni FTP e TLS, esegui:
echo 1 > /etc/pure-ftpd/conf/TLS
Per utilizzare TLS, dobbiamo creare un certificato SSL. Lo creo in /etc/ssl/private/, quindi creo prima quella directory:
mkdir -p /etc/ssl/private/
Successivamente, possiamo generare il certificato SSL come segue:
openssl req -x509 -nodes -days 7300 -newkey rsa:2048 -keyout /etc/ssl/private/pure-ftpd.pem -out /etc/ssl/private/pure-ftpd.pem
Nome del Paese (codice di 2 lettere) [AU]:<-- Inserisci il nome del tuo Paese (ad es. "DE").
Nome Stato o Provincia (nome completo) [Stato-Stato]:<-- Inserisci il tuo Stato o nome della provincia.
Nome località (ad es. città) []:<-- Inserisci la tua città.
Nome organizzazione (ad es. azienda) [Internet Widgits Pty Ltd]:<-- Inserisci il nome dell'organizzazione (ad es. il nome della tua azienda).
Nome dell'unità organizzativa (ad es. sezione) []:<-- Inserisci il nome dell'unità organizzativa (ad es. "Dipartimento IT").
Nome comune (ad es. IL TUO nome) []:<-- Inserisci il nome di dominio completo del sistema (ad es. "server1.example.com").
Indirizzo e-mail []:<-- Inserisci il tuo indirizzo e-mail.
Modifica le autorizzazioni del certificato SSL:
chmod 600 /etc/ssl/private/pure-ftpd.pem
Quindi riavvia PureFTPd:
/etc/init.d/pure-ftpd-mysql restart
Modifica /etc/fstab. Il mio è simile a questo (ho aggiunto ,usrjquota=aquota.user,grpjquota=aquota.group,jqfmt=vfsv0 alla partizione con il punto di montaggio /):
vi /etc/fstab
# /etc/fstab: static file system information.
#
# Use 'blkid' to print the universally unique identifier for a
# device; this may be used with UUID= as a more robust way to name devices
# that works even if disks are added and removed. See fstab(5).
#
# <file system> <mount point>   <type>  <options>       <dump>  <pass>
proc            /proc           proc    defaults        0       0
# / was on /dev/sda1 during installation
UUID=92bceda2-5ae4-4e3a-8748-b14da48fb297 /               ext3    errors=remount-ro,usrjquota=aquota.user,grpjquota=aquota.group,jqfmt=vfsv0 0       1
# swap was on /dev/sda5 during installation
UUID=e24b3e9e-095c-4b49-af27-6363a4b7d094 none            swap    sw              0       0
/dev/scd0       /media/cdrom0   udf,iso9660 user,noauto     0       0
/dev/fd0        /media/floppy0  auto    rw,user,noauto  0       0
Per abilitare la quota, esegui questi comandi:
mount -o remount /
quotacheck -avugm
quotaon -avug
Installa il server DNS BIND:
apt-get -y install bind9 dnsutils
Installa vlogger, webalizer e awstats:
apt-get -y install vlogger webalizer awstats geoip-database
Apri /etc/cron.d/awstats in seguito...
vi /etc/cron.d/awstats
... e commenta entrambi i lavori cron in quel file:
#*/10 * * * * www-data [ -x /usr/share/awstats/tools/update.sh ] && /usr/share/awstats/tools/update.sh

# Generate static reports:
 #10 03 * * * www-data [ -x /usr/share/awstats/tools/buildstatic.sh
Installa Jailkit:Jailkit è necessario solo se vuoi eseguire il chroot degli utenti SSH. Può essere installato come segue (importante:Jailkit deve essere installato prima di ISPConfig - non può essere installato in seguito!):
apt-get -y install build-essential autoconf automake1.9 libtool flex bison
cd /tmp
wget http://olivier.sessink.nl/jailkit/jailkit-2.14.tar.gz
tar xvfz jailkit-2.14.tar.gz
cd jailkit-2.14
./configure
make
make install
cd ..
rm -rf jailkit-2.14*
Installa fail2ban:questo è facoltativo ma consigliato, perché il monitor ISPConfig tenta di mostrare il registro:
apt-get install fail2ban
Per fare in modo che fail2ban controlli PureFTPd e Dovecot, crea il file /etc/fail2ban/jail.local:
vi /etc/fail2ban/jail.local
[pureftpd]
enabled  = true
port     = ftp
filter   = pureftpd
logpath  = /var/log/syslog
maxretry = 3

[dovecot-pop3imap]
enabled = true
filter = dovecot-pop3imap
action = iptables-multiport[name=dovecot-pop3imap, port="pop3,pop3s,imap,imaps", protocol=tcp]
logpath = /var/log/mail.log
maxretry = 5
Quindi crea i seguenti due file di filtro:
vi /etc/fail2ban/filter.d/pureftpd.conf
[Definition]
failregex = .*pure-ftpd: \(.*@<HOST>\) \[WARNING\] Authentication failed for user.*
ignoreregex =
vi /etc/fail2ban/filter.d/dovecot-pop3imap.conf
[Definition]
failregex = (?: pop3-login|imap-login): .*(?:Authentication failure|Aborted login \(auth failed|Aborted login \(tried to use disabled|Disconnected \(auth failed|Aborted login \(\d+ authentication attempts).*rip=(?P<host>\S*),.*
ignoreregex =
Riavvia fail2ban in seguito:
/etc/init.d/fail2ban restart
Per installare il client webmail di SquirrelMail, esegui:
apt-get install squirrelmail
Quindi crea il seguente collegamento simbolico...
ln -s /usr/share/squirrelmail/ /var/www/webmail
... e configura SquirrelMail:
squirrelmail-configure
Dobbiamo dire a SquirrelMail che stiamo usando Dovecot-IMAP/-POP3:
Configurazione di SquirrelMail: Leggi: config.php (1.4.0)
-------------------------------- ------------------------
Menu principale --
1. Preferenze dell'organizzazione
2. Impostazioni server
3. Cartella predefinita
4. Opzioni generali
5. Temi
6. Rubriche di indirizzi
7. Messaggio del giorno (MOTD)
8. Plugin
9. Database
10. Lingue
D. Imposta impostazioni predefinite per server IMAP specifici
C Attiva colore
S Salva dati
Q Esci
Comando >> <-- D
Configurazione di SquirrelMail : Leggi: config.php
---------------------------------------- ------------------------------
Mentre abbiamo costruito SquirrelMail, abbiamo scoperto alcune
preferenze che funzionano meglio con alcuni server che non funzionano quindi
bene con altri. Se seleziona il server IMAP, questa opzione verrà
imposta alcune impostazioni predefinite per quel server.
Tieni nota che dovrai sempre andare attraverso e assicurarti
tutto è corretto. Questo non cambia tutto. Ci sono
solo alcune impostazioni che verranno modificate.
Seleziona il server IMAP:
bincimap =server Bincimap IMAP
courier ==server IMAP Courier
cyrus = Cyrus IMAP server
dovecot = Dovecot Secure IMAP server
exchange = Microsoft Exchange IMAP server
hmailserver = hMailServer
macosx = Mac OS X Mailserver
mercury32 = Mercury /32
uw = server IMAP dell'Università di Washington
gmail =accesso IMAP agli account di posta di Google (Gmail)
chiudi = Non cambiare nulla
Comando >> <-- dovecot
Configurazione di SquirrelMail : Leggi: config.php
------------------------------------- ----------------------------------
Mentre abbiamo costruito SquirrelMail, ne abbiamo scoperto alcuni
preferenze che funzionano meglio con alcuni server che non funzionano quindi
bene con altri. Se seleziona il server IMAP, questa opzione verrà
imposta alcune impostazioni predefinite per quel server.
Tieni nota che dovrai sempre andare attraverso e assicurarti
tutto è corretto. Questo non cambia tutto. Ci sono
solo alcune impostazioni che verranno modificate.
Seleziona il server IMAP:
bincimap =server Bincimap IMAP
courier ==server IMAP Courier
cyrus = Cyrus IMAP server
dovecot = Dovecot Secure IMAP server
exchange = Microsoft Exchange IMAP server
hmailserver = hMailServer
macosx = Mac OS X Mailserver
mercury32 = Mercury /32
uw = server IMAP dell'Università di Washington
gmail =accesso IMAP agli account Google mail (Gmail)
chiudi = Non cambiare nulla
Comando >> dovecot
imap_server_type =dovecot
default_folder_prefix =
cush_folder =cesh
sent_folder =sent
Draft_folder =Draft
show_prefix_option =false
default_sub_of_inbox = false
show_contain_subfolders_option =false
optional_delimiter = rileva
cancella_cartella = false
Premi invio per continuare... <-- premi INVIO
SquirrelMail Configurazione :Leggi: config.php (1.4.0)
------------------------------------- ---------------------
Menu principale --
1. Preferenze dell'organizzazione
2. Impostazioni server
3. Cartella predefinita
4. Opzioni generali
5. Temi
6. Rubriche di indirizzi
7. Messaggio del giorno (MOTD)
8. Plugin
9. Database
10. Lingue
D. Imposta impostazioni predefinite per server IMAP specifici
C Attiva colore
S Salva dati
Q Esci
Comando >> <-- S
Configurazione di SquirrelMail : Leggi: config.php (1.4.0)
---------------------- -----------------------------------
Menu principale --
1. Preferenze dell'organizzazione
2. Impostazioni server
3. Cartella predefinita
4. Opzioni generali
5. Temi
6. Rubriche di indirizzi
7. Messaggio del giorno (MOTD)
8. Plugin
9. Database
10. Lingue
D. Imposta impostazioni predefinite per server IMAP specifici
C Attiva colore
S Salva dati
Q Esci
Comando >> <-- Q
Successivamente abilitiamo un alias /webmail globale per Squirrelmail:
cd /etc/apache2/conf.d/
ln -s ../../squirrelmail/apache.conf squirrelmail.conf
/etc/init.d/apache2 reload
Ora apri /etc/apache2/conf.d/squirrelmail.conf...
vi /etc/apache2/conf.d/squirrelmail.conf
... e aggiungi le seguenti righe al contenitore
[...]
Alias /webmail /usr/share/squirrelmail
<Directory /usr/share/squirrelmail>
   Options FollowSymLinks
<IfModule mod_php5.c>
   AddType application/x-httpd-php .php
   php_flag magic_quotes_gpc Off
   php_flag track_vars On
   php_admin_flag allow_url_fopen Off
   php_value include_path .
   php_admin_value upload_tmp_dir /var/lib/squirrelmail/tmp
   php_admin_value open_basedir /usr/share/squirrelmail:/etc/squirrelmail:/var/lib/squirrelmail:/etc/hostname:/etc/mailname
   php_flag register_globals off
</IfModule>
<IfModule mod_dir.c>
   DirectoryIndex index.php
</IfModule>

# access to configtest is limited by default to prevent information leak
<Files configtest.php>
   order deny,allow
   deny from all
   allow from 127.0.0.1
</Files>
</Directory>
[...]
Crea la directory /var/lib/squirrelmail/tmp...
mkdir /var/lib/squirrelmail/tmp
... e renderlo di proprietà dell'utente www-data:
chown www-data /var/lib/squirrelmail/tmp
Ricarica di nuovo Apache:
/etc/init.d/apache2 reload
Questo è già tutto - /etc/apache2/conf.d/squirrelmail.conf definisce un alias chiamato /squirrelmail che punta alla directory di installazione di SquirrelMail /usr/share/squirrelmail.
Ora puoi accedere a SquirrelMail dal tuo sito web come segue:
http://www.example.com/squirrelmail
Puoi anche accedervi dal pannello di controllo ISPConfig vhost come segue (questo non richiede alcuna configurazione in ISPConfig):
http://server1.example.com:8080/squirrelmail
Quindi installiamo Unison. Unison viene utilizzato per sincronizzare le directory /var/www e /var/vmail tra master e slave
apt-get install unison
Ora installiamo un file di configurazione unisono sul primo server.
Sul server 1:
Crea un nuovo file /root/.unison/default.prf su server1...
mkdir /root/.unison
vi /root/.unison/default.prf
... e aggiungi il seguente contenuto:
# Roots of the synchronization
root = /var
root = ssh://192.168.0.106//var/

# Paths to synchronize
path = www
path = vmail

# Some regexps specifying names and paths to ignore
#ignore = Path stats    ## ignores /var/www/stats
#ignore = Path stats/*  ## ignores /var/www/stats/*
#ignore = Path */stats  ## ignores /var/www/somedir/stats, but not /var/www/a/b/c/stats
#ignore = Name *stats   ## ignores all files/directories that end with "stats"
#ignore = Name stats*   ## ignores all files/directories that begin with "stats"
#ignore = Name *.tmp    ## ignores all files with the extension .tmp

#          When set to true, this flag causes the user interface to skip
#          asking for confirmations on non-conflicting changes. (More
#          precisely, when the user interface is done setting the
#          propagation direction for one entry and is about to move to the
#          next, it will skip over all non-conflicting entries and go
#          directly to the next conflict.)
auto=true

#          When this is set to true, the user interface will ask no
#          questions at all. Non-conflicting changes will be propagated;
#          conflicts will be skipped.
batch=true

#          !When this is set to true, Unison will request an extra
#          confirmation if it appears that the entire replica has been
#          deleted, before propagating the change. If the batch flag is
#          also set, synchronization will be aborted. When the path
#          preference is used, the same confirmation will be requested for
#          top-level paths. (At the moment, this flag only affects the
#          text user interface.) See also the mountpoint preference.
confirmbigdel=true

#          When this preference is set to true, Unison will use the
#          modification time and length of a file as a `pseudo inode
#          number' when scanning replicas for updates, instead of reading
#          the full contents of every file. Under Windows, this may cause
#          Unison to miss propagating an update if the modification time
#          and length of the file are both unchanged by the update.
#          However, Unison will never overwrite such an update with a
#          change from the other replica, since it always does a safe
#          check for updates just before propagating a change. Thus, it is
#          reasonable to use this switch under Windows most of the time
#          and occasionally run Unison once with fastcheck set to false,
#          if you are worried that Unison may have overlooked an update.
#          The default value of the preference is auto, which causes
#          Unison to use fast checking on Unix replicas (where it is safe)
#          and slow checking on Windows replicas. For backward
#          compatibility, yes, no, and default can be used in place of
#          true, false, and auto. See the section "Fast Checking" for more
#          information.
fastcheck=true

#          When this flag is set to true, the group attributes of the
#          files are synchronized. Whether the group names or the group
#          identifiers are synchronizeddepends on the preference numerids.
group=true

#          When this flag is set to true, the owner attributes of the
#          files are synchronized. Whether the owner names or the owner
#          identifiers are synchronizeddepends on the preference
#          extttnumerids.
owner=true

#          Including the preference -prefer root causes Unison always to
#          resolve conflicts in favor of root, rather than asking for
#          guidance from the user. (The syntax of root is the same as for
#          the root preference, plus the special values newer and older.)
#          This preference is overridden by the preferpartial preference.
#          This preference should be used only if you are sure you know
#          what you are doing!
prefer=newer

#          When this preference is set to true, the textual user interface
#          will print nothing at all, except in the case of errors.
#          Setting silent to true automatically sets the batch preference
#          to true.
silent=true

#          When this flag is set to true, file modification times (but not
#          directory modtimes) are propagated.
times=true
Vogliamo automatizzare la sincronizzazione, ecco perché creiamo un cron job su server1.example.tld:
crontab -e
*/5 * * * * /usr/bin/unison &> /dev/null
Installazione di un cluster di database Web, e-mail e MySQL su Debian 6.0 con ISPConfig 3 - Pagina 3
3 Installazione di ISPConfig sul primo server (master)
In questo passaggio installeremo ISPConfig sul server master. Per ottenere l'URL di download dell'ultima versione stabile di ISPConfig 3, visitare il sito Web di ISPConfig:http://www.ispconfig.org/ispconfig-3/download/
Ora dobbiamo aggiungere due nuovi record utente root mysql nel database master per consentire l'accesso come root dal nome host e dall'indirizzo IP del server slave.
Sul server1:
Accedi al database MySQL come utente root...
mysql -u root -p
... ed esegui queste query MySQL:
CREATE USER 'root'@'192.168.0.106' IDENTIFICATO DA 'myrootpassword';
CONCEDERE TUTTI I PRIVILEGI SU * . * A 'root'@'192.168.0.106' IDENTIFICATO DA 'myrootpassword' CON L'OPZIONE GRANT MAX_QUERIES_PER_HOUR 0 MAX_CONNECTIONS_PER_HOUR 0 MAX_UPDATES_PER_HOUR 0 MAX_USER_CONNECTIONS 0;
CREATE USER 'root'@'server2.example.tld' IDENTIFICATO DA 'myrootpassword';
CONCEDERE TUTTI I PRIVILEGI SU * . * A 'root'@'server2.example.tld' IDENTIFICATO DA 'myrootpassword' CON L'OPZIONE GRANT MAX_QUERIES_PER_HOUR 0 MAX_CONNECTIONS_PER_HOUR 0 MAX_UPDATES_PER_HOUR 0 MAX_USER_CONNECTIONS 0;
FLUSH PRIVILEGES;
QUIT;
Nei comandi SQL precedenti, sostituisci 192.168.0.106 con l'indirizzo IP del secondo server, sostituisci server2.example.tld con il nome host del secondo server e 'myrootpassword' con la password di root desiderata.
Ora dovresti tornare sulla shell su server1.example.tld e scaricare l'ultima versione stabile di ISPConfig 3:
cd /tmp
wgethttp://www.ispconfig.org/downloads/ISPConfig-3-stable.tar.gz
tar xfz ISPConfig-3-stable.tar.gz
cd ispconfig3_install/ installa/
Avvia lo script di installazione:
php -q install.php
Selezionare la lingua (en,de) [en]:<-- en
Modalità di installazione (standard,expert) [standard]:<-- standard
Nome host completo (FQDN) del server, ad es. server1 .domain.tld [server1.example.tld]:<-- server1.example.tld
nome host del server MySQL [localhost]:<-- localhost
nome utente radice MySQL [root]:<-- root
Password di root MySQL []:<-- Inserisci qui la tua password di root MySQL
Database MySQL da creare [dbispconfig]:<-- dbispconfig1 (il nome del database ispconfig locale del master e dello slave deve essere diverso, as both servers share the same data directory)
MySQL charset [utf8]:<-- utf8
Country Name (2 letter code) [AU]:<-- DE (Enter the ISO country code where you live here)
State or Province Name (full name) [Some-State]:<-- Niedersachsen (Enter the state where you live here)
Locality Name (eg, city) []:<-- Lueneburg (Enter the city here)
Organization Name (eg, company) [Internet Widgits Pty Ltd]:
Organizational Unit Name (eg, section) []:
Common Name (eg, YOUR name) []:
Email Address []:
Installing ISPConfig
ISPConfig Port [8080]:
Do you want a secure (SSL) connection to the ISPConfig web interface (y,n) [y]:
Generating RSA private key, 4096 bit long modulus
........................++
................++
e is 65537 (0x10001)
You are about to be asked to enter information that will be incorporated
into your certificate request.
What you are about to enter is what is called a Distinguished Name or a DN.
There are quite a few fields but you can leave some blank
For some fields there will be a default value,
If you enter '.', the field will be left blank.
-----
Country Name (2 letter code) [AU]:
State or Province Name (full name) [Some-State]:
Locality Name (eg, city) []:
Organization Name (eg, company) [Internet Widgits Pty Ltd]:
Organizational Unit Name (eg, section) []:
Common Name (eg, YOUR name) []:
Email Address []:
Please enter the following 'extra' attributes
to be sent with your certificate request
A challenge password []:
An optional company name []:
Clean up the install directories:
rm -rf /tmp/ispconfig3_install
rm -f /tmp/ISPConfig-3-stable.tar.gz
Installing A Web, Email &MySQL Database Cluster On Debian 6.0 With ISPConfig 3 - Page 4
4 Installing ISPConfig 3 On The Second Server
In this step we will install ISPConfig on the slave server (server2.example.tld). This time we use the expert mode of the ISPConfig installer to add this node to the master ispconfig server and database. To get the download URL of the latest ISPConfig 3 stable release, please visit the ISPConfig website:http://www.ispconfig.org/ispconfig-3/download/
On server 2:
Download the latest ISPConfig 3 stable release...
cd /tmp
wgethttp://www.ispconfig.org/downloads/ISPConfig-3-stable.tar.gz
tar xfz ISPConfig-3-stable.tar.gz
cd ispconfig3_install/install/
... and start the install script:
php -q install.php
Select language (en,de) [en]:<-- en
Installation mode (standard,expert) [standard]:<-- expert
Full qualified hostname (FQDN) of the server, eg server2.domain.tld [server2.example.tld]:<-- server2.example.tld
MySQL server hostname [localhost]:<-- localhost
MySQL root username [root]:<-- root
MySQL root password []:<-- Enter your mysql root password here
MySQL database to create [dbispconfig]:<-- dbispconfig2 (the local ispconfig database name of the master and slave must be different, as both servers share the same data directory)
MySQL charset [utf8]:<-- utf8
The next two questions are about the internal ISPConfig database user and password.
It is recommended to accept the defaults which are 'ispconfig' as username and a random password.
If you use a different password, use only numbers and chars for the password.
ISPConfig mysql database username [ispconfig]:<-- ispconfig2
ISPConfig mysql database password [54c243fd3f9ca68de7b08527c81dd5ef]:<-- (press return to accept the default)
Shall this server join an existing ISPConfig multiserver setup (y,n) [n]:<-- y
MySQL master server hostname []:<-- server1.example.tld
MySQL master server root username [root]:<-- root
MySQL master server root password []:<-- Enter the root password of the master server here
MySQL master server database name [dbispconfig]:<-- dbispconfig1
Configure Mail (y,n) [y]:<-- y
Country Name (2 letter code) [AU]:<-- DE (Enter the ISO country code where you live here)
State or Province Name (full name) [Some-State]:<-- Niedersachsen (Enter the state where you live here)
Locality Name (eg, city) []:<-- Lueneburg (Enter the city here)
Organization Name (eg, company) [Internet Widgits Pty Ltd]:
Organizational Unit Name (eg, section) []:
Common Name (eg, YOUR name) []:
Email Address []:
Configure Jailkit (y,n) [y]:<-- y
Configure FTP Server (y,n) [y]:<-- y
Configure DNS Server (y,n) [y]:<-- y
Configure Apache Server (y,n) [y]:<-- y
Configure Firewall Server (y,n) [y]:<--y
Install ISPConfig Web-Interface (y,n) [y]:<--y
Installing ISPConfig
ISPConfig Port [8080]:
Enable SSL for the ISPConfig web interface (y,n) [y]:<-- y
Generating RSA private key, 4096 bit long modulus
.................++
.............................................................................................................++
e is 65537 (0x10001)
You are about to be asked to enter information that will be incorporated
into your certificate request.
What you are about to enter is what is called a Distinguished Name or a DN.
There are quite a few fields but you can leave some blank
For some fields there will be a default value,
If you enter '.', the field will be left blank.
-----
Country Name (2 letter code) [AU]:
State or Province Name (full name) [Some-State]:
Locality Name (eg, city) []:
Organization Name (eg, company) [Internet Widgits Pty Ltd]:
Organizational Unit Name (eg, section) []:
Common Name (eg, YOUR name) []:
Email Address []:
Please enter the following 'extra' attributes
to be sent with your certificate request
A challenge password []:
An optional company name []:
Clean up the install directories:
rm -rf /tmp/ispconfig3_install/install
rm -f /tmp/ISPConfig-3-stable.tar.gz
In a last configuration step, we want to connect the ISPConfig interface of the slave directly to the master database. This step is only required if you want to access ISPConfig on port 8080 on the master and on the slave server. Log into the master server as root user on the shell...
On server 1:
... and execute this command:
scp -p /usr/local/ispconfig/interface/lib/config.inc.php [email protected]:/usr/local/ispconfig/interface/lib/config.inc.php
This command has to be excuted after each ISPConfig update again after you updated ISPConfig on the master and on the slave with the normal ISPConfig update command (ispconfig_update.sh).
Installing A Web, Email &MySQL Database Cluster On Debian 6.0 With ISPConfig 3 - Page 5
5 Configure Replication In ISPConfig
Log into ISPConfig on the master server with a webbrowser:
http://192.168.0.105:8080
Click on System> Server Services> server2.example.tld:
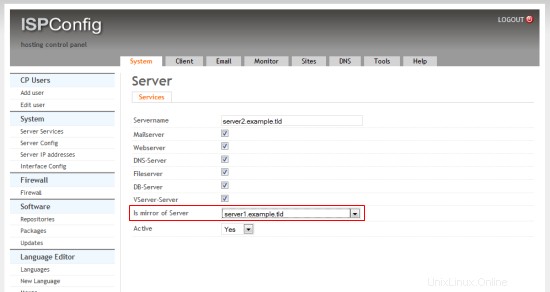
Select "server1.example.tld" in the "is mirror of" field and click on Save.
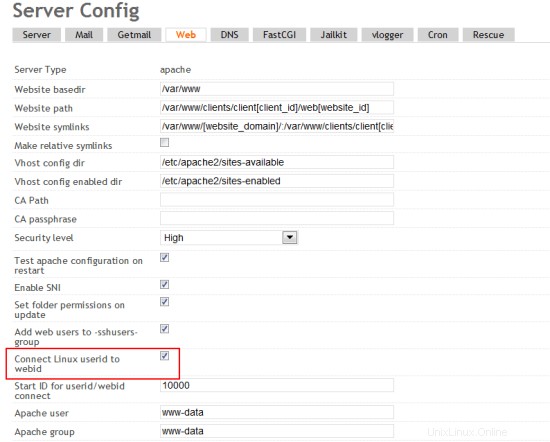
Then open System> Server Config and enable the checkbox "Connect Linux userid to webid" on the "Web" tab:
6 Additional Notes
When you want to activate a firewall on the master or slave server, ensure that you open port 3306 for MySQL on both servers.
7 Links
- ISPConfig Website:http://www.ispconfig.org/
- ISPConfig Forum:https://www.howtoforge.com/forums/
- ISPConfig Bugtracker:http://bugtracker.ispconfig.org/