Questo tutorial è Copyright (c) 2008 di Falko Timme. È derivato da un tutorial di Christoph Haas che puoi trovare su http://workaround.org. Sei libero di utilizzare questo tutorial con la licenza Creative Commons 2.5 o qualsiasi versione successiva.
Questo documento descrive come installare un server di posta basato su Postfix basato su utenti e domini virtuali, ovvero utenti e domini che si trovano in un database MySQL. Dimostrerò anche l'installazione e la configurazione di Courier (Courier-POP3, Courier-IMAP), in modo che Courier possa autenticarsi sullo stesso database MySQL utilizzato da Postfix.
Il server Postfix risultante è in grado di SMTP-AUTH e TLS e quota (quota non è incorporata in Postfix per impostazione predefinita, mostrerò come applicare una patch a Postfix in modo appropriato). Le password sono archiviate in crittografate modulo nel database (la maggior parte dei documenti che ho trovato riguardavano password in testo normale, il che rappresenta un rischio per la sicurezza). In aggiunta a ciò, questo tutorial copre l'installazione di Amavisd , SpamAssassin e ClamAV in modo che le e-mail vengano scansionate alla ricerca di spam e virus. Mostrerò anche come installare SquirrelMail come interfaccia webmail in modo che gli utenti possano leggere e inviare e-mail e modificare le proprie password.
Il vantaggio di tale configurazione "virtuale" (utenti virtuali e domini in un database MySQL) è che è molto più performante di una configurazione basata su utenti di sistema "reali". Con questa configurazione virtuale il tuo server di posta può gestire migliaia di domini e utenti. Inoltre, è più facile da amministrare perché hai a che fare con il database MySQL solo quando aggiungi nuovi utenti/domini o modifichi quelli esistenti. Niente più comandi postmap per creare file db, niente più ricarica di Postfix, ecc. Per l'amministrazione del database MySQL puoi usare strumenti web based come phpMyAdmin che sarà installato anche in questo howto. Il terzo vantaggio è che gli utenti hanno un indirizzo e-mail come nome utente (invece di un nome utente + un indirizzo e-mail) che è più facile da capire e tenere a mente.
Questo howto vuole essere una guida pratica; non copre le basi teoriche. Sono trattati in molti altri documenti nel Web.
Questo documento viene fornito senza garanzie di alcun tipo! Voglio dire che questo non è l'unico modo per creare un sistema del genere. Ci sono molti modi per raggiungere questo obiettivo, ma questo è il modo in cui prendo. Non garantisco che questo funzionerà per te!
1 Nota preliminare
Questo tutorial è basato su Ubuntu 8.10 Server (Intrepid Ibex), quindi dovresti configurare un'installazione di base del server Ubuntu 8.10 prima di continuare con questo tutorial (ad esempio, come mostrato alle pagine 1 - 3 in questo tutorial:The Perfect Server - Ubuntu Intrepid Stambecco (Ubuntu 8.10)). Il sistema dovrebbe avere un indirizzo IP statico. Uso 192.168.0.100 come indirizzo IP in questo tutorial e server1.example.com come nome host.
Assicurati di aver effettuato l'accesso come root (digita
sudo su
per diventare root), perché dobbiamo eseguire tutti i passaggi di questo tutorial come utente root.
È molto importante rendere /bin/sh un collegamento simbolico a /bin/bash...
ln -sf /bin/bash /bin/sh
... e che disabiliti AppArmor:
/etc/init.d/apparmor stop
update-rc.d -f apparmor remove
apt-get remove apparmor apparmor-utils
2 Installa Postfix, Courier, Saslauthd, MySQL, phpMyAdmin
Per installare Postfix, Courier, Saslauthd, MySQL e phpMyAdmin, eseguiamo semplicemente
apt-get install postfix postfix-mysql postfix-doc mysql-client mysql-server courier-authdaemon courier-authlib-mysql courier-pop courier-pop-ssl courier-imap courier-imap-ssl postfix-tls libsasl2-2 libsasl2-modules libsasl2-modules-sql sasl2-bin libpam-mysql openssl phpmyadmin apache2 libapache2-mod-php5 php5 php5-mysql libpam-smbpass
Ti verranno poste alcune domande:
Nuova password per l'utente "root" di MySQL:<-- yourrootsqlpassword
Ripetere la password per l'utente "root" di MySQL:<-- yourrootsqlpassword
Creare directory per l'amministrazione basata sul Web? <-- No
Tipo generale di configurazione della posta:<-- Sito Internet
Nome e-mail del sistema:<-- server1.example.com
Certificato SSL richiesto <-- Ok
Server Web da riconfigurare automaticamente:<-- apache2
3 Applicare la patch di quota a Postfix
Dobbiamo ottenere i sorgenti di Postfix, correggerli con la quota patch, creare nuovi pacchetti Postfix .deb e installare quei pacchetti .deb:
apt-get install build-essential dpkg-dev fakeroot debhelper libgdbm-dev libldap2-dev libpcre3-dev libssl-dev libsasl2-dev postgresql-server-dev-8.3 po-debconf dpatch libmysqlclient15-dev lsb-release libcdb-dev libdb-dev hardening-wrapper
cd /usr/src
apt-get suffisso sorgente
(Assicurati di utilizzare la versione di Postfix corretta nei seguenti comandi. Ho installato Postfix 2.5.5. Puoi scoprire la tua versione di Postfix eseguendo
postconf -d | grep mail_version
L'output dovrebbe essere simile a questo:
[email protetta]:/usr/src# postconf -d | grep mail_version
mail_version =2.5.5
milter_macro_v =$mail_name $mail_version
[email protected]:/usr/src#
)
wget http://vda.sourceforge.net/VDA/postfix-2.5.5-vda-ng.patch.gz
gunzip postfix-2.5.5-vda-ng.patch.gz
cd postfix -2.5.5
patch -p1 <../postfix-2.5.5-vda-ng.patch
dpkg-buildpackage
Potresti vedere un avviso come questo alla fine del comando dpkg-buildpackage:
dpkg-buildpackage: warning: Failed to sign .dsc and .changes file
Puoi ignorare questo messaggio.
Ora andiamo di una directory in alto, ecco dove sono stati creati i nuovi pacchetti .deb:
cd ..
Il comando
ls -l
ti mostra i pacchetti disponibili:
[email protetta]:/usr/src# ls -l
total 5872
drwxr-xr-x 19 root root 4096 2008-11-04 16:19 postfix-2.5.5
- rw-r--r-- 1 root src 230154 2008-11-04 16:16 postfix_2.5.5-1.diff.gz
-rw-r--r-- 1 root src 1170 2008-11- 04 16:16 postfix_2.5.5-1.dsc
-rw-r--r-- 1 root src 3737 2008-11-04 16:21 postfix_2.5.5-1_i386.changes
-rw- r--r-- 1 src root 1230234 2008-11-04 16:21 postfix_2.5.5-1_i386.deb
-rw-r--r-- 1 src root 3157877 2008-09-03 17:04 postfix_2.5.5.orig.tar.gz
-rw-r--r-- 1 root src 58389 2008-09-06 05:02 postfix-2.5.5-vda-ng.patch
- rw-r--r-- 1 root src 41404 2008-11-04 16:21 postfix-cdb_2.5.5-1_i386.deb
-rw-r--r-- 1 root src 140970 2008-11- 04 16:21 postfix-dev_2.5.5-1_all.deb
-rw-r--r-- 1 root src 916504 2008-11-04 16:21 postfix-doc_2.5.5-1_all.deb
-rw-r--r-- 1 src root 48652 2008-11-04 16:21 postfix-ldap_2.5.5-1_i386.deb
-rw-r--r-- 1 src root 43332 2008- 04-11 16:21 postfix-mysql_2.5.5-1_ i386.deb
-rw-r--r-- 1 root src 43256 2008-11-04 16:21 postfix-pcre_2.5.5-1_i386.deb
-rw-r--r-- 1 root src 43412 2008-11-04 16:21 postfix-pgsql_2.5.5-1_i386.deb
[email protetta]:/usr/src#
Scegli i pacchetti postfix e postfix-mysql e installali in questo modo:
dpkg -i postfix_2.5.5-1_i386.deb postfix-mysql_2.5.5-1_i386.deb
4 Creare il database MySQL per Postfix/Courier
Ora creiamo un database chiamato mail:
mysqladmin -u root -p create mail
Successivamente, andiamo alla shell MySQL:
mysql -u root -p
Sulla shell MySQL, creiamo l'utente mail_admin con la password mail_admin_password (sostituirla con la propria password) che ha i privilegi SELECT,INSERT,UPDATE,DELETE sul database di posta. Questo utente sarà utilizzato da Postfix e Courier per connettersi al database di posta:
GRANT SELECT, INSERT, UPDATE, DELETE ON mail.* A 'mail_admin'@'localhost' IDENTIFICATO DA 'mail_admin_password';
GRANT SELECT, INSERT, UPDATE, DELETE ON mail.* TO 'mail_admin'@'localhost. localdomain' IDENTIFICATO DA 'mail_admin_password';
PRIVILEGI FLUSH;
Sempre sulla shell MySQL, creiamo le tabelle necessarie a Postfix e Courier:
USE mail;
domini CREATE TABLE (
dominio varchar(50) NOT NULL,
CHIAVE PRIMARIA (dominio) )
TYPE=MyISAM;
CREATE TABLE inoltri (
source varchar(80) NOT NULL,
destination TEXT NOT NULL,
PRIMARY KEY (source) )
TYPE=MyISAM;
CREATE TABLE utenti (
email varchar(80) NOT NULL,
password varchar(20) NOT NULL,
quota INT(10) DEFAULT '10485760',
PRIMARY KEY (email )
) TYPE=MyISAM;
CREATE TABLE trasporto (
dominio varchar(128) NOT NULL predefinito '',
trasporto varchar(128) NOT NULL predefinito '',
CHIAVE UNICA dominio (dominio)
) TIPO =MyISAM;
quit;
Come avrai notato, con l'abbandono; comando abbiamo lasciato la shell MySQL e siamo tornati sulla shell Linux.
I domini la tabella memorizzerà ogni dominio virtuale per il quale Postfix dovrebbe ricevere e-mail (ad es. example.com ).
| dominio |
| example.com |
Gli inoltri tabella serve per alias un indirizzo e-mail a un altro, ad es. inoltra email per [email protected] a [email protetta] .
| fonte | destinazione |
| [email protetta] | [email protetta] |
Gli utenti la tabella memorizza tutti gli utenti virtuali (ovvero gli indirizzi e-mail, perché l'indirizzo e-mail e il nome utente sono gli stessi) e le password (in crittografato form!) e un valore di quota per ciascuna casella di posta (in questo esempio il valore predefinito è 10485760 byte che significa 10 MB).
| password | quota | |
| [email protetta] | No9.E4skNvGa. ("segreto" in forma crittografata) | 10485760 |
Il trasporto la tabella è facoltativa, è per utenti avanzati. Permette di inoltrare mail per singoli utenti, interi domini o tutte le mail ad un altro server. Ad esempio,
| dominio | trasporto |
| example.com | smtp:[1.2.3.4] |
inoltrerebbe tutte le email per example.com tramite il protocollo smtp al server con indirizzo IP 1.2.3.4 (le parentesi quadre [] significa "non effettuare una ricerca del record DNS MX" (che ha senso per gli indirizzi IP...). Se invece utilizzi un nome di dominio completo (FQDN), non utilizzeresti le parentesi quadre.).
A proposito, (suppongo che l'indirizzo IP del tuo sistema di server di posta sia 192.168.0.100) puoi accedere a phpMyAdmin su http://192.168.0.100/phpmyadmin/ in un browser e accedere come mail_admin. Quindi puoi dare un'occhiata al database. Successivamente puoi usare phpMyAdmin per amministrare il tuo server di posta.
5 Configura Postfix
Ora dobbiamo dire a Postfix dove può trovare tutte le informazioni nel database. Quindi dobbiamo creare sei file di testo. Noterai che dico a Postfix di connettersi a MySQL sull'indirizzo IP 127.0.0.1 anziché su localhost. Questo perché Postfix è in esecuzione in una prigione chroot e non ha accesso al socket MySQL che proverebbe a connettersi se dicessi a Postfix di usare localhost. Se uso 127.0.0.1, Postfix utilizza la rete TCP per connettersi a MySQL, il che non è un problema nemmeno in una jail chroot (l'alternativa sarebbe spostare il socket MySQL nella jail chroot che causa altri problemi).
Assicurati che /etc/mysql/my.cnf contenga la seguente riga:
vi /etc/mysql/my.cnf
[...] bind-address = 127.0.0.1 [...] |
Se dovessi modificare /etc/mysql/my.cnf, riavvia MySQL ora:
/etc/init.d/mysql restart
Corri
netstat -tap | grep mysql
per assicurarsi che MySQL sia in ascolto su 127.0.0.1 (localhost.localdomain):
[email protetta]:/usr/src# netstat -tap | grep mysql
tcp 0 0 localhost.localdo:mysql *:* ASCOLTA 7224/mysqld
[email protected]:/usr/src#
Ora creiamo i nostri sei file di testo.
vi /etc/postfix/mysql-virtual_domains.cf
user = mail_admin password = mail_admin_password dbname = mail query = SELECT domain AS virtual FROM domains WHERE domain='%s' hosts = 127.0.0.1 |
vi /etc/postfix/mysql-virtual_forwardings.cf
user = mail_admin password = mail_admin_password dbname = mail query = SELECT destination FROM forwardings WHERE source='%s' hosts = 127.0.0.1 |
vi /etc/postfix/mysql-virtual_mailboxes.cf
user = mail_admin password = mail_admin_password dbname = mail query = SELECT CONCAT(SUBSTRING_INDEX(email,'@',-1),'/',SUBSTRING_INDEX(email,'@',1),'/') FROM users WHERE email='%s' hosts = 127.0.0.1 |
vi /etc/postfix/mysql-virtual_email2email.cf
user = mail_admin password = mail_admin_password dbname = mail query = SELECT email FROM users WHERE email='%s' hosts = 127.0.0.1 |
vi /etc/postfix/mysql-virtual_transports.cf
user = mail_admin password = mail_admin_password dbname = mail query = SELECT transport FROM transport WHERE domain='%s' hosts = 127.0.0.1 |
vi /etc/postfix/mysql-virtual_mailbox_limit_maps.cf
user = mail_admin password = mail_admin_password dbname = mail query = SELECT quota FROM users WHERE email='%s' hosts = 127.0.0.1 |
Quindi cambia i permessi e il gruppo di questi file:
chmod o=/etc/postfix/mysql-virtual_*.cf
chgrp postfix /etc/postfix/mysql-virtual_*.cf
Ora creiamo un utente e un gruppo chiamato vmail con la directory home /home/vmail. Qui è dove verranno archiviate tutte le caselle di posta.
groupadd -g 5000 vmail
useradd -g vmail -u 5000 vmail -d /home/vmail -m
Quindi eseguiamo alcune configurazioni di Postfix. Assicurati di sostituire server1.example.com con un FQDN valido, altrimenti Postfix potrebbe non funzionare correttamente!
postconf -e 'myhostname =server1.example.com'
postconf -e 'mydestination =server1.example.com, localhost, localhost.localdomain'
postconf -e 'mynetworks =127.0.0.0/8'
postconf -e 'virtual_alias_domains ='
postconf -e 'virtual_alias_maps =proxy:mysql:/etc/postfix/mysql-virtual_forwardings.cf, mysql:/etc/postfix/mysql-virtual_email2email.cf'
postconf -e 'virtual_mailbox_domains =proxy:mysql:/etc/postfix/mysql-virtual_domains.cf'
postconf -e 'virtual_mailbox_maps =proxy:mysql:/etc/postfix/mysql-virtual_mailboxes.cf'
postconf -e 'virtual_mailbox_base =/home/vmail'
postconf -e 'virtual_uid_maps =static:5000'
postconf -e 'virtual_gid_maps =static:5000'
postconf -e ' smtpd_sasl_auth_enable =yes'
postconf -e 'broken_sasl_auth_clients =yes'
postconf -e 'smtpd_sasl_authenticated_header =yes'
postconf -e 'smtpd_recipient_restrictions =permit_mynetworks, permit_sasl_authenticated, require_unauth_postconfification'
-e 'smtpd_use_tls =yes'
postconf -e 'smtpd_tls_cert_file =/etc/postfix/smtpd.cert'
postconf -e 'smtpd_tls_key_file =/etc/postfix/smtpd.key'
postconf -e 'transport_maps =proxy:mysql:/etc/postfix/mysql-virtual_transports.cf'
postconf -e 'virtual_create_maildirsize =yes'
postconf -e 'virtual_maildir_extended =yes'
postconf - e 'virtual_mailbox_limit_maps =proxy:mysql:/etc/postfix/mysql-virtual_mailbox_limit_maps.cf'
postconf -e 'virtual_mailbox_limit_override =yes'
postconf -e 'virtual_maildir_limit_message ="L'utente che stai cercando di raggiungere è oltre quota."'
postconf -e 'virtual_overquota_bounce =yes'
postconf -e 'proxy_read_maps =$local_recipient_maps $mydestination $virtual_alias_maps $virtual_alias_domains $virtual_mailbox_maps $virtual_mailbox_domains $relay_recipient_maps $relay_domains $canonical_maps_maps $senderrecipient_canonical_maps $senderrecipient_canonical_maps relocated_maps $transport_maps $mynetworks $virtual_mailbox_limit_maps'
Successivamente creiamo il certificato SSL necessario per TLS:
cd /etc/postfix
openssl req -new -outform PEM -out smtpd.cert -newkey rsa:2048 -nodes -keyout smtpd.key -keyform PEM -days 365 -x509
Nome del Paese (codice di 2 lettere) [AU]:<-- Inserisci il nome del tuo Paese (ad es. "DE").
Nome Stato o Provincia (nome completo) [Stato-Stato]:<-- Inserisci il tuo Stato o nome della provincia.
Nome località (ad es. città) []:<-- Inserisci la tua città.
Nome organizzazione (ad es. azienda) [Internet Widgits Pty Ltd]:<-- Inserisci il nome dell'organizzazione (ad es. il nome della tua azienda).
Nome dell'unità organizzativa (ad es. sezione) []:<-- Inserisci il nome dell'unità organizzativa (ad es. "Dipartimento IT").
Nome comune (ad es. IL TUO nome) []:<-- Inserisci il nome di dominio completo del sistema (ad es. "server1.example.com").
Indirizzo e-mail []:<-- Inserisci il tuo indirizzo e-mail.
Quindi cambia i permessi di smtpd.key:
chmod o= /etc/postfix/smtpd.key
6 Configura Saslauthd
Prima esecuzione
mkdir -p /var/spool/postfix/var/run/saslauthd
Quindi modifica /etc/default/saslauthd. Imposta START su yes e cambia la riga OPTIONS="-c -m /var/run/saslauthd" in OPTIONS="-c -m /var/spool/postfix/var/run/saslauthd -r":
vi /etc/default/saslauthd
# # Settings for saslauthd daemon # Please read /usr/share/doc/sasl2-bin/README.Debian for details. # # Should saslauthd run automatically on startup? (default: no) START=yes # Description of this saslauthd instance. Recommended. # (suggestion: SASL Authentication Daemon) DESC="SASL Authentication Daemon" # Short name of this saslauthd instance. Strongly recommended. # (suggestion: saslauthd) NAME="saslauthd" # Which authentication mechanisms should saslauthd use? (default: pam) # # Available options in this Debian package: # getpwent -- use the getpwent() library function # kerberos5 -- use Kerberos 5 # pam -- use PAM # rimap -- use a remote IMAP server # shadow -- use the local shadow password file # sasldb -- use the local sasldb database file # ldap -- use LDAP (configuration is in /etc/saslauthd.conf) # # Only one option may be used at a time. See the saslauthd man page # for more information. # # Example: MECHANISMS="pam" MECHANISMS="pam" # Additional options for this mechanism. (default: none) # See the saslauthd man page for information about mech-specific options. MECH_OPTIONS="" # How many saslauthd processes should we run? (default: 5) # A value of 0 will fork a new process for each connection. THREADS=5 # Other options (default: -c -m /var/run/saslauthd) # Note: You MUST specify the -m option or saslauthd won't run! # # WARNING: DO NOT SPECIFY THE -d OPTION. # The -d option will cause saslauthd to run in the foreground instead of as # a daemon. This will PREVENT YOUR SYSTEM FROM BOOTING PROPERLY. If you wish # to run saslauthd in debug mode, please run it by hand to be safe. # # See /usr/share/doc/sasl2-bin/README.Debian for Debian-specific information. # See the saslauthd man page and the output of 'saslauthd -h' for general # information about these options. # # Example for postfix users: "-c -m /var/spool/postfix/var/run/saslauthd" #OPTIONS="-c -m /var/run/saslauthd" OPTIONS="-c -m /var/spool/postfix/var/run/saslauthd -r" |
Quindi crea il file /etc/pam.d/smtp. Dovrebbe contenere solo le due righe seguenti (assicurati di inserire i dettagli del database corretti):
vi /etc/pam.d/smtp
auth required pam_mysql.so user=mail_admin passwd=mail_admin_password host=127.0.0.1 db=mail table=users usercolumn=email passwdcolumn=password crypt=1 account sufficient pam_mysql.so user=mail_admin passwd=mail_admin_password host=127.0.0.1 db=mail table=users usercolumn=email passwdcolumn=password crypt=1 |
Quindi crea il file /etc/postfix/sasl/smtpd.conf. Dovrebbe assomigliare a questo:
vi /etc/postfix/sasl/smtpd.conf
pwcheck_method: saslauthd mech_list: plain login allow_plaintext: true auxprop_plugin: mysql sql_hostnames: 127.0.0.1 sql_user: mail_admin sql_passwd: mail_admin_password sql_database: mail sql_select: select password from users where email = '%u' |
Quindi aggiungi l'utente postfix al gruppo sasl (questo assicura che Postfix abbia il permesso di accedere a saslauthd):
adduser postfix sasl
Quindi riavvia Postfix e Saslauthd:
/etc/init.d/postfix restart
/etc/init.d/saslauthd restart
7 Configura corriere
Ora dobbiamo dire a Courier che dovrebbe autenticarsi sul nostro database MySQL. Per prima cosa, modifica /etc/courier/authdaemonrc e cambia il valore di authmodulelist in modo che legga:
vi /etc/courier/authdaemonrc
[...] authmodulelist="authmysql" [...] |
Quindi fai un backup di /etc/courier/authmysqlrc e svuota il vecchio file:
cp /etc/courier/authmysqlrc /etc/courier/authmysqlrc_orig
cat /dev/null> /etc/courier/authmysqlrc
Quindi apri /etc/courier/authmysqlrc e inserisci le seguenti righe:
vi /etc/courier/authmysqlrc
MYSQL_SERVER localhost MYSQL_USERNAME mail_admin MYSQL_PASSWORD mail_admin_password MYSQL_PORT 0 MYSQL_DATABASE mail MYSQL_USER_TABLE users MYSQL_CRYPT_PWFIELD password #MYSQL_CLEAR_PWFIELD password MYSQL_UID_FIELD 5000 MYSQL_GID_FIELD 5000 MYSQL_LOGIN_FIELD email MYSQL_HOME_FIELD "/home/vmail" MYSQL_MAILDIR_FIELD CONCAT(SUBSTRING_INDEX(email,'@',-1),'/',SUBSTRING_INDEX(email,'@',1),'/') #MYSQL_NAME_FIELD MYSQL_QUOTA_FIELD quota |
Quindi riavvia Courier:
/etc/init.d/courier-authdaemon restart
/etc/init.d/courier-imap restart
/etc/init.d/courier-imap-ssl restart
/etc/ init.d/courier-pop restart
/etc/init.d/courier-pop-ssl restart
Eseguendo
telnet localhost pop3
puoi vedere se il tuo server POP3 funziona correttamente. Dovrebbe restituire +OK Salve. (Digita quit per tornare alla shell di Linux.)
[email protected]:/etc/postfix# telnet localhost pop3
Tentativo 127.0.0.1...
Connesso a localhost.localdomain.
Il carattere di escape è '^]'.
+OK Salve.
chiudi
+OK Migliore fortuna la prossima volta.
Connessione chiusa da host straniero.
[email protetta]:/etc/postfix#
8 Modifica /etc/aliases
Ora dovremmo aprire /etc/alias. Assicurati che postmaster punti a root e root al tuo nome utente o al tuo indirizzo email, ad es. così:
vi /etc/aliases
[...] postmaster: root root: [email protected] [...] |
o in questo modo (se l'amministratore è il tuo nome utente):
[...] postmaster: root root: administrator [...] |
Ogni volta che modifichi /etc/aliases, devi eseguire
newaliases
in seguito e riavvia Postfix:
/etc/init.d/postfix restart
9 Installa amavisd-new, SpamAssassin e ClamAV
Per installare amavisd-new, spamassassin e clamav, eseguire il comando seguente:
apt-get install amavisd-new spamassassin clamav clamav-daemon zoo unzip bzip2 libnet-ph-perl libnet-snpp-perl libnet-telnet-perl nomarch lzop pax
Poiché questo comando installa nuovamente AppArmor come dipendenza, dobbiamo disabilitarlo di nuovo:
/etc/init.d/apparmor stop
update-rc.d -f apparmor remove
apt-get remove apparmor apparmor-utils
Successivamente dobbiamo configurare amavisd-new. La configurazione è suddivisa in vari file che risiedono nella directory /etc/amavis/conf.d. Dai un'occhiata a ciascuno di essi per familiarizzare con la configurazione. La maggior parte delle impostazioni va bene, tuttavia dobbiamo modificare tre file:
Per prima cosa dobbiamo abilitare ClamAV e SpamAssassin in /etc/amavis/conf.d/15-content_filter_mode decommentando le righe @bypass_virus_checks_maps e @bypass_spam_checks_maps:
vi /etc/amavis/conf.d/15-content_filter_mode
Il file dovrebbe assomigliare a questo:
use strict; # You can modify this file to re-enable SPAM checking through spamassassin # and to re-enable antivirus checking. # # Default antivirus checking mode # Uncomment the two lines below to enable it back # @bypass_virus_checks_maps = ( \%bypass_virus_checks, \@bypass_virus_checks_acl, \$bypass_virus_checks_re); # # Default SPAM checking mode # Uncomment the two lines below to enable it back # @bypass_spam_checks_maps = ( \%bypass_spam_checks, \@bypass_spam_checks_acl, \$bypass_spam_checks_re); 1; # ensure a defined return |
E poi dovresti dare un'occhiata alle impostazioni dello spam e alle azioni per spam-/virus-mails in /etc/amavis/conf.d/20-debian_defaults. Non è necessario modificare nulla se le impostazioni predefinite sono ok per te. Il file contiene molte spiegazioni, quindi non è necessario spiegare le impostazioni qui:
vi /etc/amavis/conf.d/20-debian_defaults
[...] $QUARANTINEDIR = "$MYHOME/virusmails"; $quarantine_subdir_levels = 1; # enable quarantine dir hashing $log_recip_templ = undef; # disable by-recipient level-0 log entries $DO_SYSLOG = 1; # log via syslogd (preferred) $syslog_ident = 'amavis'; # syslog ident tag, prepended to all messages $syslog_facility = 'mail'; $syslog_priority = 'debug'; # switch to info to drop debug output, etc $enable_db = 1; # enable use of BerkeleyDB/libdb (SNMP and nanny) $enable_global_cache = 1; # enable use of libdb-based cache if $enable_db=1 $inet_socket_port = 10024; # default listening socket $sa_spam_subject_tag = '***SPAM*** '; $sa_tag_level_deflt = 2.0; # add spam info headers if at, or above that level $sa_tag2_level_deflt = 6.31; # add 'spam detected' headers at that level $sa_kill_level_deflt = 6.31; # triggers spam evasive actions $sa_dsn_cutoff_level = 10; # spam level beyond which a DSN is not sent [...] $final_virus_destiny = D_DISCARD; # (data not lost, see virus quarantine) $final_banned_destiny = D_BOUNCE; # D_REJECT when front-end MTA $final_spam_destiny = D_BOUNCE; $final_bad_header_destiny = D_PASS; # False-positive prone (for spam) [...] |
Infine, modifica /etc/amavis/conf.d/50-user e aggiungi la riga $pax='pax'; nel mezzo:
vi /etc/amavis/conf.d/50-user
use strict; # # Place your configuration directives here. They will override those in # earlier files. # # See /usr/share/doc/amavisd-new/ for documentation and examples of # the directives you can use in this file # $pax='pax'; #------------ Do not modify anything below this line ------------- 1; # ensure a defined return |
Successivamente, esegui questi comandi per aggiungere l'utente clamav al gruppo amavis e riavviare amavisd-new e ClamAV:
adduser clamav amavis
/etc/init.d/amavis restart
/etc/init.d/clamav-daemon restart
/etc/init.d/clamav-freshclam restart
Ora dobbiamo configurare Postfix per reindirizzare la posta in arrivo tramite amavisd-new:
postconf -e 'content_filter =amavis:[127.0.0.1]:10024'
postconf -e 'receive_override_options =no_address_mappings'
Successivamente aggiungi le seguenti righe a /etc/postfix/master.cf:
vi /etc/postfix/master.cf
[...]
amavis unix - - - - 2 smtp
        -o smtp_data_done_timeout=1200
        -o smtp_send_xforward_command=yes

127.0.0.1:10025 inet n - - - - smtpd
        -o content_filter=
        -o local_recipient_maps=
        -o relay_recipient_maps=
        -o smtpd_restriction_classes=
        -o smtpd_client_restrictions=
        -o smtpd_helo_restrictions=
        -o smtpd_sender_restrictions=
        -o smtpd_recipient_restrictions=permit_mynetworks,reject
        -o mynetworks=127.0.0.0/8
        -o strict_rfc821_envelopes=yes
        -o receive_override_options=no_unknown_recipient_checks,no_header_body_checks
-o smtpd_bind_address=127.0.0.1 |
Quindi riavvia Postfix:
/etc/init.d/postfix restart
Ora corri
netstat -tap
e dovresti vedere Postfix (master) in ascolto sulla porta 25 (smtp) e 10025 e amavisd-new sulla porta 10024:
[email protected]:/etc/postfix# netstat -tap
Connessioni Internet attive (server e stabilite)
Proto Recv-Q Send-Q Indirizzo locale Indirizzo estero Stato PID/nome del programma
tcp 0 0 localhost.localdo:10024*:*Ascolta 22356 /Amavisd (Mast
TCP 0 0 localhost.localdo:10025*:*Ascolta 23581 /master
tcp 0 0 localhost.localdo:mysql*:* Ascolta 7224 /mysqld
tcp 0 0*:www*:*ascolta 6237 /apache2
tcp 0 0*:ssh*:*ascolta 3648 /sshd
tcp 0*:smtp*:*Ascolta 23581/Master
TCP 0 148 Server1.example.com:SSH LocalHost:3220 Istituito 3698/0
TCP6 0 [::]:IMAPS [::]:*Ascolta 19408/Couriertcpd
tcp 6 0 0 [::]:pop3s [::]:*Ascolta 19476 /couriertcpd
tcp6 0 0 [::]:pop3 [::]:*ascolta 19439 /couriertcpd
tcp6 0 0 [ ::]:imap2 [::]:*Ascolta 19371/couriertcpd
tcp6 0 0 [::]:ssh [::]:*Ascolta 3648/sshd
[e -mail protetto]:/etc/ suffisso#
10 Installa Razor, Pyzor e DCC e configura SpamAssassin
Razor, Pyzor e DCC sono filtri antispam che utilizzano una rete di filtraggio collaborativa. Per installare Razor e Pyzor, esegui
apt-get install razor pyzor
DCC non è disponibile nei repository di Ubuntu 8.10, quindi lo installiamo come segue:
cd /tmp
wget http://launchpadlibrarian.net/11564361/dcc-server_1.3.42-5_i386.deb
wget http://launchpadlibrarian.net/11564359/dcc-common_1.3.42-5_i386. deb
dpkg -i dcc-common_1.3.42-5_i386.deb
dpkg -i dcc-server_1.3.42-5_i386.deb
Ora dobbiamo dire a SpamAssassin di usare questi tre programmi. Modifica /etc/spamassassin/local.cf e aggiungi le seguenti righe:
vi /etc/spamassassin/local.cf
[...] #dcc use_dcc 1 dcc_path /usr/bin/dccproc #pyzor use_pyzor 1 pyzor_path /usr/bin/pyzor #razor use_razor2 1 razor_config /etc/razor/razor-agent.conf #bayes use_bayes 1 use_bayes_rules 1 bayes_auto_learn 1 |
Quindi dobbiamo abilitare il plug-in DCC in SpamAssassin. Apri /etc/spamassassin/v310.pre e decommenta il loadplugin Mail::SpamAssassin::Plugin::DCC line:
vi /etc/spamassassin/v310.pre
[...] # DCC - perform DCC message checks. # # DCC is disabled here because it is not open source. See the DCC # license for more details. # loadplugin Mail::SpamAssassin::Plugin::DCC [...] |
Puoi controllare la tua configurazione di SpamAssassin eseguendo:
spamassassin --lint
Non dovrebbe mostrare alcun errore.
Riavvia amavisd-new in seguito:
/etc/init.d/amavis restart
Ora aggiorniamo i nostri set di regole SpamAssassin come segue:
sa-update --no-gpg
Creiamo un cron job in modo che i set di regole vengano aggiornati regolarmente. Corri
crontab -e
per aprire l'editor dei lavori cron. Crea il seguente processo cron:
23 4 */2 * * /usr/bin/sa-update --no-gpg &> /dev/null |
Questo aggiornerà i set di regole ogni due giorni alle 4:23.
11 Notifiche di superamento della quota
Se desideri ricevere notifiche su tutti gli account e-mail che superano la quota, procedi come segue:
cd /usr/local/sbin/
wget http://puuhis.net/vhcs/quota.txt
mv quota.txt quota_notify
chmod 755 quota_notify
Apri /usr/local/sbin/quota_notify e modifica le variabili in alto. Più in basso nel file (verso la fine) ci sono due righe in cui dovresti aggiungere un segno %:
vi /usr/local/sbin/quota_notify
[...]
my $POSTFIX_CF = "/etc/postfix/main.cf";
my $MAILPROG = "/usr/sbin/sendmail -t";
my $WARNPERCENT = 80;
my @POSTMASTERS = ('[email protected]');
my $CONAME = 'My Company';
my $COADDR = '[email protected]';
my $SUADDR = '[email protected]';
my $MAIL_REPORT = 1;
my $MAIL_WARNING = 1;
[...]
           print "Subject: WARNING: Your mailbox is $lusers{$luser}% full.\n";
[...]
           print "Your mailbox: $luser is $lusers{$luser}% full.\n\n";
[...] |
Corri
crontab -e
per creare un processo cron per quello script:
0 0 * * * /usr/local/sbin/quota_notify &> /dev/null |
12 Postfix di prova
Per vedere se Postfix è pronto per SMTP-AUTH e TLS, esegui
telnet localhost 25
Dopo aver stabilito la connessione al tipo di server di posta Postfix
ehlo localhost
Se vedi le linee
250-STARTTLS
e
250-AUTH LOGIN PLAIN
va tutto bene:
[email protected]:/usr/local/sbin# telnet localhost 25
Tentativo 127.0.0.1...
Connesso a localhost.localdomain.
Il carattere di escape è '^]'.
/>220 server1.example.com ESMTP Postfix (Ubuntu)
ehlo localhost
250-server1.example.com
250-PIPELINING
250-SIZE 10240000
250 -VRFY
250-ETRN
250-STARTTLS
250-AUTH LOGIN PLAIN
250-AUTH=LOGIN PLAIN
250-ENHANCEDSTATUSCODES
250-8BITMIME
250 DSN
chiudi
221 2.0.0 Ciao
Connessione chiusa da host esterno.
[email protetta]:/usr/local/sbin#
Digita
quit
per tornare alla shell di sistema.
13 Popola il database e verifica
Per popolare il database puoi usare la shell MySQL:
mysql -u root -p
USE mail;
Almeno devi creare voci nelle tabelle domini e utenti :
INSERT INTO `domains` (`domain`) VALUES ('example.com');
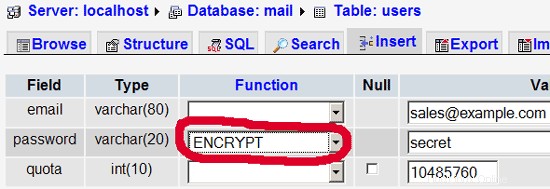
INSERT INTO `users` (`email`, `password`, `quota`) VALUES ('[email protected]', ENCRYPT('segreto'), 10485760);
(Assicurati di utilizzare la sintassi ENCRYPT nella seconda istruzione INSERT per crittografare la password!)
Se vuoi inserire voci nelle altre due tabelle, sarebbe simile a questa:
INSERT INTO `forwardings` (`source`, `destination`) VALUES ('[email protected]', '[email protected]');
INSERT INTO `transport` (`domain`, `transport`) VALUES ('example.com', 'smtp:mail.example.com');
Per uscire dalla shell MySQL, digita
quit;
Per la maggior parte delle persone è più facile se hanno un front-end grafico per MySQL; quindi puoi anche usare phpMyAdmin (in questo esempio sotto http://192.168.0.100/phpmyadmin/ o http://server1.example.com/phpmyadmin/) per amministrare la posta Banca dati. Anche in questo caso, quando crei un utente, assicurati di utilizzare la funzione ENCRYPT per crittografare la password:
Non credo di dover spiegare ulteriormente la tabella dei domini e degli utenti.
La tabella degli inoltri può avere voci come le seguenti:
| fonte | destinazione | |
| [email protetta] | [email protetta] | Reindirizza le email per [email protetta] a [email protetta] |
| @example.com | [email protetta] | Crea un account Catch-All per [email protetta] Tutte le email a example.com arriveranno a [email protetta], ad eccezione di quelle che esistono nella tabella degli utenti (ovvero, se [email protetta] esiste in la tabella degli utenti, i messaggi di posta a [email protetta] arriveranno comunque a [email protetta]). |
| @example.com | @anotherdomain.tld | Questo reindirizza tutte le email a example.com allo stesso utente su un altro dominio.tld. Ad esempio, le email a [email protetta] verranno inoltrate a [email protetta] |
| [email protetta] | [email protetta], [e-mail protetta] | Inoltra email per [email protetta] a due o più indirizzi email. Tutti gli indirizzi e-mail elencati sotto la destinazione ricevono una copia dell'e-mail. |
La tabella di trasporto può avere voci come queste:
| dominio | trasporto | |
| example.com | : | Consegna e-mail per esempio.com localmente. È come se questo record non esistesse affatto in questa tabella. |
| example.com | smtp:mail.anotherdomain.tld | Consegna tutte le email per esempio.com tramite smtp al server mail.anotherdomain.com. |
| example.com | smtp:mail.anotherdomain.tld:2025 | Consegna tutte le email per esempio.com tramite smtp al server mail.anotherdomain.com, ma sulla porta 2025, non 25 che è la porta predefinita per smtp. |
| example.com |
smtp:[1.2.3.4] | Le parentesi quadre impediscono a Postfix di eseguire ricerche del record DNS MX per l'indirizzo tra parentesi quadre. Ha senso per gli indirizzi IP. |
| .example.com | smtp:mail.anotherdomain.tld | La posta per qualsiasi sottodominio di example.com viene consegnata a mail.anotherdomain.tld. |
| * | smtp:mail.anotherdomain.tld | Tutte le email vengono inviate a mail.anotherdomain.tld. |
| [email protetta] | smtp:mail.anotherdomain.tld | Le email per [email protected] vengono inviate a mail.anotherdomain.tld. |
Vedi
man transport
per ulteriori dettagli.
Tieni presente che l'ordine delle voci nella tabella dei trasporti è importante! Le voci saranno seguite dall'alto verso il basso.
Importante: Postfix utilizza un meccanismo di memorizzazione nella cache per i trasporti, quindi potrebbe volerci del tempo prima che le modifiche nella tabella di trasporto abbiano effetto. Se vuoi che abbiano effetto immediato, esegui
postfix reload
dopo aver apportato le modifiche nella tabella di trasporto.
14 Invia un'e-mail di benvenuto per creare una Maildir
Quando crei un nuovo account e-mail e provi a recuperare le e-mail da esso (con POP3/IMAP) probabilmente riceverai messaggi di errore che dicono che la Maildir non esiste. La Maildir viene creata automaticamente quando arriva la prima email per il nuovo account. Pertanto è una buona idea inviare un'e-mail di benvenuto a un nuovo account.
Per prima cosa installiamo il pacchetto mailx:
apt-get install mailx
Per inviare un'email di benvenuto a [email protetta], procediamo come segue:
mailx [email protected]
Ti verrà richiesto l'argomento. Digita l'oggetto (es. Benvenuto), quindi premi INVIO e nella riga successiva digita il tuo messaggio. Al termine del messaggio, premere nuovamente INVIO in modo da trovarsi in una nuova riga, quindi premere CTRL+D; se non vuoi mettere in cc la posta, premi di nuovo ENTER:
[email protetta]:/usr/local/sbin# mailx [email protetta]
Oggetto:Benvenuto <-- INVIO
Benvenuto! Divertiti con il tuo nuovo account di posta. <-- INVIO
<-- CTRL+D
Cc:<-- INVIO
[email protetta]:/usr/local/sbin#
15 Installazione di SquirrelMail
SquirrelMail è un'interfaccia webmail che consentirà ai tuoi utenti di inviare e ricevere e-mail in un browser. Questo capitolo mostra come installarlo e adattarlo alla nostra configurazione in modo che gli utenti possano persino modificare la password del proprio account e-mail dall'interfaccia di SquirrelMail.
Per installare SquirrelMail, eseguiamo:
apt-get install squirrelmail php-pear
Quindi copiamo la configurazione di Apache fornita con il pacchetto SquirrelMail nella directory /etc/apache2/conf.d e riavviamo Apache:
cp /etc/squirrelmail/apache.conf /etc/apache2/conf.d/squirrelmail.conf
/etc/init.d/apache2 restart
SquirrelMail viene fornito con alcuni plug-in preinstallati, sfortunatamente nessuno di essi è in grado di farci cambiare la nostra password e-mail nel nostro database MySQL. Ma c'è il plug-in Cambia password SQL che possiamo installare manualmente:
Il plugin dipende dal pacchetto Pear-DB quindi lo installiamo:
pear install DB
Quindi installiamo il plug-in Change SQL Password stesso:
cd /usr/share/squirrelmail/plugins
wget http://www.squirrelmail.org/countdl.php?fileurl=http%3A%2F%2Fwww.squirrelmail.org%2Fplugins%2Fchange_sqlpass-3.3-1.2. tar.gz
tar xvfz change_sqlpass-3.3-1.2.tar.gz
cd change_sqlpass
cp config.php.sample config.php
Ora dobbiamo modificare config.php e adattarlo alla nostra configurazione. Modifica le variabili $csp_dsn, $lookup_password_query, $password_update_queries, $password_encryption, $csp_salt_static e $csp_delimiter come segue e commenta $csp_salt_query:
vi config.php
[...]
$csp_dsn = 'mysql://mail_admin:[email protected]/mail';
[...]
$lookup_password_query = 'SELECT count(*) FROM users WHERE email = "%1" AND password = %4';
[...]
$password_update_queries = array('UPDATE users SET password = %4 WHERE email = "%1"');
[...]
$password_encryption = 'MYSQLENCRYPT';
[...]
$csp_salt_static = 'LEFT(password, 2)';
[...]
//$csp_salt_query = 'SELECT salt FROM users WHERE username = "%1"';
[...]
$csp_delimiter = '@';
[...] |
Il file completo ha il seguente aspetto:
<?php

/**
  * SquirrelMail Change SQL Password Plugin
  * Copyright (C) 2001-2002 Tyler Akins
  *               2002 Thijs Kinkhorst <[email protected]>
  *               2002-2005 Paul Lesneiwski <[email protected]>
  * This program is licensed under GPL. See COPYING for details
  *
  * @package plugins
  * @subpackage Change SQL Password
  *
  */


   // Global Variables, don't touch these unless you want to break the plugin
   //
   global $csp_dsn, $password_update_queries, $lookup_password_query,
          $force_change_password_check_query, $password_encryption,
          $csp_salt_query, $csp_salt_static, $csp_secure_port,
          $csp_non_standard_http_port, $csp_delimiter, $csp_debug,
          $min_password_length, $max_password_length, $include_digit_in_password,
          $include_uppercase_letter_in_password, $include_lowercase_letter_in_password,
          $include_nonalphanumeric_in_password;


   // csp_dsn
   //
   // Theoretically, any SQL database supported by Pear should be supported
   // here.  The DSN (data source name) must contain the information needed
   // to connect to your database backend. A MySQL example is included below.
   // For more details about DSN syntax and list of supported database types,
   // please see:
   //   http://pear.php.net/manual/en/package.database.db.intro-dsn.php
   //
   //$csp_dsn = 'mysql://user:[email protected]/email_users';
   $csp_dsn = 'mysql://mail_admin:[email protected]/mail';


   // lookup_password_query
   //
   // This plugin will always verify the user's old password
   // against their login password, but an extra check can also
   // be done against the database for more security if you
   // desire.  If you do not need the extra password check,
   // make sure this setting is empty.
   //
   // This is a query that returns a positive value if a user
   // and password pair are found in the database.
   //
   // This query should return one value (one row, one column), the
   // value being ideally a one or a zero, simply indicating that
   // the user/password pair does in fact exist in the database.
   //
   //   %1 in this query will be replaced with the full username
   //      (including domain), such as "[email protected]"
   //   %2 in this query will be replaced with the username (without
   //      any domain portion), such as "jose"
   //   %3 in this query will be replaced with the domain name,
   //      such as "example.com"
   //   %4 in this query will be replaced with the current (old)
   //      password in whatever encryption format is needed per other
   //      plugin configuration settings (Note that the syntax of
   //      the password will be provided depending on your encryption
   //      choices, so you NEVER need to provide quotes around this
   //      value in the query here.)
   //   %5 in this query will be replaced with the current (old)
   //      password in unencrypted plain text.  If you do not use any
   //      password encryption, %4 and %5 will be the same values,
   //      except %4 will have double quotes around it and %5 will not.
   //
   //$lookup_password_query = '';
   // TERRIBLE SECURITY: $lookup_password_query = 'SELECT count(*) FROM users WHERE username = "%1" AND plain_password = "%5"';
   //$lookup_password_query = 'SELECT count(*) FROM users WHERE username = "%1" AND crypt_password = %4';
   $lookup_password_query = 'SELECT count(*) FROM users WHERE email = "%1" AND password = %4';


   // password_update_queries
   //
   // An array of SQL queries that will all be executed
   // whenever a password change attempt is made.
   //
   // Any number of queries may be included here.
   // The queries will be executed in the order given here.
   //
   //   %1 in all queries will be replaced with the full username
   //      (including domain), such as "[email protected]"
   //   %2 in all queries will be replaced with the username (without
   //      any domain portion), such as "jose"
   //   %3 in all queries will be replaced with the domain name,
   //      such as "example.com"
   //   %4 in all queries will be replaced with the new password
   //      in whatever encryption format is needed per other
   //      plugin configuration settings (Note that the syntax of
   //      the password will be provided depending on your
   //      encryption choices, so you NEVER need to provide quotes
   //      around this value in the queries here.)
   //   %5 in all queries will be replaced with the new password
   //      in unencrypted plain text - BEWARE!  If you do not use
   //      any password encryption, %4 and %5 will be the same
   //      values, except %4 will have double quotes around it
   //      and %5 will not.
   //
//   $password_update_queries = array(
//            'UPDATE users SET crypt_password = %4 WHERE username = "%1"',
//            'UPDATE user_flags SET force_change_pwd = 0 WHERE username = "%1"',
//            'UPDATE users SET crypt_password = %4, force_change_pwd = 0 WHERE username = "%1"',
//                                   );
   $password_update_queries = array('UPDATE users SET password = %4 WHERE email = "%1"');


   // force_change_password_check_query
   //
   // A query that checks for a flag that indicates if a user
   // should be forced to change their password.  This query
   // should return one value (one row, one column) which is
   // zero if the user does NOT need to change their password,
   // or one if the user should be forced to change it now.
   //
   // This setting should be an empty string if you do not wish
   // to enable this functionality.
   //
   //   %1 in this query will be replaced with the full username
   //      (including domain), such as "[email protected]"
   //   %2 in this query will be replaced with the username (without
   //      any domain portion), such as "jose"
   //   %3 in this query will be replaced with the domain name,
   //      such as "example.com"
   //
   //$force_change_password_check_query = 'SELECT IF(force_change_pwd = "yes", 1, 0) FROM users WHERE username = "%1"';
   //$force_change_password_check_query = 'SELECT force_change_pwd FROM users WHERE username = "%1"';
   $force_change_password_check_query = '';


   // password_encryption
   //
   // What encryption method do you use to store passwords
   // in your database?  Please use one of the following,
   // exactly as you see it:
   //
   //   NONE          Passwords are stored as plain text only
   //   MYSQLPWD      Passwords are stored using the MySQL password() function
   //   MYSQLENCRYPT  Passwords are stored using the MySQL encrypt() function
   //   PHPCRYPT      Passwords are stored using the PHP crypt() function
   //   MD5CRYPT      Passwords are stored using encrypted MD5 algorithm
   //   MD5           Passwords are stored as MD5 hash
   //
   //$password_encryption = 'MYSQLPWD';
   $password_encryption = 'MYSQLENCRYPT';


   // csp_salt_query
   // csp_salt_static
   //
   // Encryption types that need a salt need to know where to get
   // that salt.  If you have a constant, known salt value, you
   // should define it in $csp_salt_static.  Otherwise, leave that
   // value empty and define a value for the $csp_salt_query.
   //
   // Leave both values empty if you do not need (or use) salts
   // to encrypt your passwords.
   //
   // The query should return one value (one row, one column) which
   // is the salt value for the current user's password.  This
   // query is ignored if $csp_salt_static is anything but empty.
   //
   //   %1 in this query will be replaced with the full username
   //      (including domain), such as "[email protected]"
   //   %2 in this query will be replaced with the username (without
   //      any domain portion), such as "jose"
   //   %3 in this query will be replaced with the domain name,
   //      such as "example.com"
   //
   //$csp_salt_static = 'LEFT(crypt_password, 2)';
   //$csp_salt_static = '"a4"';  // use this format with MYSQLENCRYPT
   //$csp_salt_static = '$2$blowsomefish$';  // use this format with PHPCRYPT
   //$csp_salt_static = '';
   $csp_salt_static = 'LEFT(password, 2)';

   //$csp_salt_query = 'SELECT SUBSTRING_INDEX(crypt_password, '$', 1) FROM users WHERE username = "%1"';
   //$csp_salt_query = 'SELECT SUBSTRING(crypt_password, (LENGTH(SUBSTRING_INDEX(crypt_password, '$', 2)) + 2)) FROM users WHERE username = "%1"';
   //$csp_salt_query = 'SELECT salt FROM users WHERE username = "%1"';
   //$csp_salt_query = '';


   // csp_secure_port
   //
   // You may ensure that SSL encryption is used during password
   // change by setting this to the port that your HTTPS is served
   // on (443 is typical).  Set to zero if you do not wish to force
   // an HTTPS connection when users are changing their passwords.
   //
   // You may override this value for certain domains, users, or
   // service levels through the Virtual Host Login (vlogin) plugin
   // by setting a value(s) for $vlogin_csp_secure_port in the vlogin
   // configuration.
   //
   $csp_secure_port = 0;
   //$csp_secure_port = 443;


   // csp_non_standard_http_port
   //
   // If you serve standard HTTP web requests on a non-standard
   // port (anything other than port 80), you should specify that
   // port number here.  Set to zero otherwise.
   //
   // You may override this value for certain domains, users, or
   // service levels through the Virtual Host Login (vlogin) plugin
   // by setting a value(s) for $vlogin_csp_non_standard_http_port
   // in the vlogin configuration.
   //
   //$csp_non_standard_http_port = 8080;
   $csp_non_standard_http_port = 0;


   // min_password_length
   // max_password_length
   // include_digit_in_password
   // include_uppercase_letter_in_password
   // include_lowercase_letter_in_password
   // include_nonalphanumeric_in_password
   //
   // You can set the minimum and maximum password lengths that
   // you accept or leave those settings as zero to indicate that
   // no limit should be applied.
   //
   // Turn on any of the other settings here to check that the
   // new password contains at least one digit, upper case letter,
   // lower case letter and/or one non-alphanumeric character.
   //
   $min_password_length = 6;
   $max_password_length = 0;
   $include_digit_in_password = 0;
   $include_uppercase_letter_in_password = 0;
   $include_lowercase_letter_in_password = 0;
   $include_nonalphanumeric_in_password = 0;


   // csp_delimiter
   //
   // if your system has usernames with something other than
   // an "@" sign separating the user and domain portion,
   // specify that character here
   //
   //$csp_delimiter = '|';
   $csp_delimiter = '@';


   // debug mode
   //
   $csp_debug = 0;


?> |
Il plug-in Modifica password SQL dipende anche dal plug-in Compatibilità che installiamo come segue:
cd /usr/share/squirrelmail/plugins
wget http://www.squirrelmail.org/countdl.php?fileurl=http%3A%2F%2Fwww.squirrelmail.org%2Fplugins%2Fcompatibility-2.0.11- 1.0.tar.gz
tar xvfz compatibilità-2.0.11-1.0.tar.gz
Ora dobbiamo entrare nella configurazione di SquirrelMail e dire a SquirrelMail che utilizziamo Courier come nostro server POP3 e IMAP e abilitiamo il Cambia password SQL e i plugin di compatibilità:
/usr/sbin/squirrelmail-configure
Vedrai il seguente menu. Naviga attraverso di essa come indicato:
Configurazione di SquirrelMail: Leggi: config.php (1.4.0)
-------------------------------- ------------------------
Menu principale --
1. Preferenze dell'organizzazione
2. Impostazioni server
3. Cartella predefinita
4. Opzioni generali
5. Temi
6. Rubriche di indirizzi
7. Messaggio del giorno (MOTD)
8. Plugin
9. Database
10. Lingue
D. Imposta impostazioni predefinite per server IMAP specifici
C Attiva colore
S Salva dati
Q Esci
Comando >> <-- D
Configurazione di SquirrelMail : Leggi: config.php
---------------------------------------- ------------------------------
Mentre abbiamo costruito SquirrelMail, abbiamo scoperto alcune
preferenze che funzionano meglio con alcuni server che non funzionano quindi
bene con altri. Se seleziona il server IMAP, questa opzione verrà
imposta alcune impostazioni predefinite per quel server.
Tieni nota che dovrai sempre andare attraverso e assicurarti
tutto è corretto. Questo non cambia tutto. Ci sono
solo alcune impostazioni che verranno modificate.
Seleziona il server IMAP:
bincimap =server Bincimap IMAP
courier ==server IMAP Courier
Cyrus =Cyrus IMAP server di
dovecot =Dovecot IMAP server sicuro
scambio =server IMAP di Microsoft Exchange
hMailServer =hMailServer
macosx =Mac OS X server di posta
mercury32 =Mercury /32
uw = server IMAP dell'Università di Washington
chiudi = Non cambiare nulla
Comando >> <-- corriere
IMAP_SERVER_TYPE =Courier
default_folder_prefix =INBOX.
cesh_folder =cesh
sent_folder =ha inviato
draft_folder =bozze
show_prefix_option =false
default_sub_of_inbox =false
show_contain_subfolders_option = false
optional_delimiter = .
delete_folder = true
Premi qualsiasi tasto per continuare... <-- premi un tasto
Configurazione di SquirrelMail : Leggi: config.php (1.4.0)
----------------------------------------------- -----------
Menu principale --
1. Preferenze dell'organizzazione
2. Impostazioni server
3. Cartella predefinita
4. Opzioni generali
5. Temi
6. Rubriche di indirizzi
7. Messaggio del giorno (MOTD)
8. Plugin
9. Database
10. Lingue
D. Imposta impostazioni predefinite per server IMAP specifici
C Attiva colore
S Salva dati
Q Esci
Comando >> <-- 8
Configurazione di SquirrelMail : Leggi: config.php (1.4.0)
---------------------- -----------------------------------
Plugin
Plugin installati
Available Plugins:
1. abook_take
2. administrator
3. bug_report
4. calendar
5. change_sqlpass
6. compatibility
7. delete_move_next
8. demo
9. filters
10. fortune
11. info
12. listcommands
13. mail_fetch
14. message_details
15. newmail
16. sent_subfolders
17. spamcop
18. squirrelspell
19. test
20. translate
R Return to Main Menu
C Turn color on
S Save data
Q Quit
Command >> <-- 6 (or whatever number the compatibility plugin has - it's needed by t he change_sqlpass plugin)
SquirrelMail Configuration : Read: config.php (1.4.0)
---------------------------------------------------------
Plugins
Installed Plugins
1. compatibility
Available Plugins:
2. abook_take
3. administrator
4. bug_report
5. calendar
6. change_sqlpass
7. delete_move_next
8. demo
9. filters
10. fortune
11. info
12. listcommands
13. mail_fetch
14. message_details
15. newmail
16. sent_subfolders
17. spamcop
18. squirrelspell
19. test
20. translate
R Return to Main Menu
C Turn color on
S Save data
Q Quit
Command >> <-- 6 (the number of the change_sqlpass plugin)
SquirrelMail Configuration : Read: config.php (1.4.0)
---------------------------------------------------------
P lugins
Installed Plugins
1. compatibility
2. change_sqlpass
Available Plugins:
3. abook_take
4. administrator
5. bug_report
6. calendar
7. delete_move_next
8. demo
9. filters
10. fortune
11. info
12. listcommands
13. mail_fetch
14. message_details
15. newmail
16. sent_subfolders
17. spamcop
18. squirrelspell
19. test
20. translate
R Return to Main Menu
C Turn color on
S Save data
Q Quit
Command >> <-- S
SquirrelMail Configuration : Read: config.php (1.4.0)
---------------------------------------------------------
Plugins
Installed Plugins
1. compatibility
2. change_sqlpass
Available Plugins:
3. abook_take
4. administrator
5. bug_report
6. calenda r
7. delete_move_next
8. demo
9. filters
10. fortune
11. info
12. listcommands
13. mail_fetch
14. message_details
15. newmail
16. sent_subfolders
17. spamcop
18. squirrelspell
19. test
20. translate
R Return to Main Menu
C Turn color on
S Save data
Q Quit
Command >> S
Data saved in config.php
Press enter to continue... <-- press some key
SquirrelMail Configuration : Read: config.php (1.4.0)
---------------------------------------------------------
Plugins
Installed Plugins
1. compatibility
2. change_sqlpass
Available Plugins:
3. abook_take
4. administrator
5. bug_report
6. calendar
7. delete_move_next
8. demo
9. filters
10. fortune
11. info
12. list commands
13. mail_fetch
14. message_details
15. newmail
16. sent_subfolders
17. spamcop
18. squirrelspell
19. test
20. translate
R Return to Main Menu
C Turn color on
S Save data
Q Quit
Command >> <-- Q
Now you can type in http://server1.example.com/squirrelmail or http://192.168.0.100/squirrelmail in your browser to access SquirrelMail.
Log in with your email address (e.g. [email protected]) and your password:
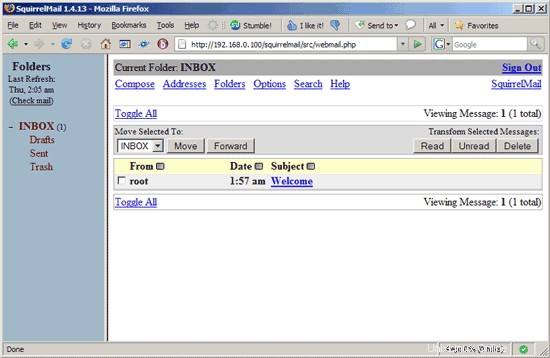
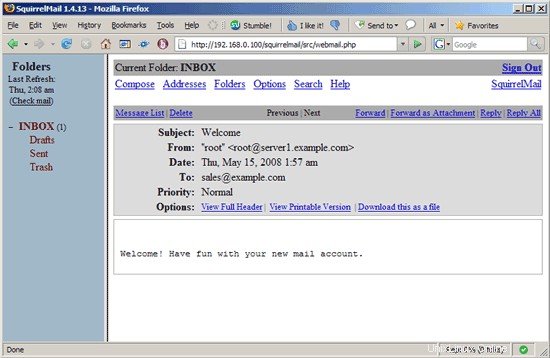
You should find the welcome email in your inbox:
To change your password, go to Options and then select Change Password:

Type in your current password and then your new password twice:

SquirrelMail will tell you if the password has been changed successfully:

16 References
- Tutorial:ISP-style Email Service with Debian-Sarge and Postfix 2.1:http://workaround.org/articles/ispmail-sarge/
- Postfix + Quota:http://vhcs.net/new/modules/newbb/viewtopic.php?topic_id=3496&forum=17
- Mail Passwords Encrypted using saslauthd:http://www.syscp.de/docs/public/contrib/cryptedmailpws
17 Links
- Postfix MTA:http://www.postfix.org/
- Postfix Quota Patch:http://web.onda.com.br/nadal/
- phpMyAdmin:http://www.phpmyadmin.net/
- SquirrelMail:http://www.squirrelmail.org/
- Ubuntu:http://www.ubuntu.com/