Spiderfoot è uno strumento di test delle vulnerabilità gratuito e open source che ti aiuta a ridurre gli attacchi degli hacker. Viene utilizzato per analizzare le vulnerabilità e le funzioni dannose sui server Linux. È uno strumento software multipiattaforma che supporta macchine Linux e Windows e può essere collaborato con GitHub. È scritto in Python e usa SQLite come backend del database. Fornisce un'interfaccia basata sul Web per eseguire test di penetrazione per più target contemporaneamente tramite un browser web.
In questo tutorial, ti mostreremo come installare Spiderfoot sul server Ubuntu 20.04.
Prerequisiti
- Un server che esegue Ubuntu 20.04.
- Una password di root è configurata sul server.
Per iniziare
Prima di iniziare, si consiglia di aggiornare la cache del pacchetto con l'ultima versione. Puoi aggiornarlo con il seguente comando:
apt-get update -y
Una volta che tutto il pacchetto è aggiornato, installa altri pacchetti richiesti con il seguente comando:
apt-get install python3 python3-pip -y
Una volta installati tutti i pacchetti, puoi procedere al passaggio successivo.
Installa Spiderfoot
Innanzitutto, dovrai scaricare l'ultima versione di Spiderfoot dal repository Git. Puoi scaricarlo con il seguente comando:
wget https://github.com/smicallef/spiderfoot/archive/v3.3.tar.gz
Una volta completato il download, estrai il file scaricato con il seguente comando:
tar -xvzf v3.3.tar.gz
Quindi, cambia la directory nella directory estratta e installa tutte le dipendenze Python usando il seguente comando:
cd spiderfoot-3.3
pip3 install -r requirements.txt
Una volta installato, puoi elencare tutte le opzioni disponibili con SpiderFoot usando il seguente comando:
python3 sf.py --help
Dovresti ottenere il seguente output:
usage: sf.py [-h] [-d] [-l IP:port] [-m mod1,mod2,...] [-M] [-s TARGET] [-t type1,type2,...] [-T] [-o tab|csv|json] [-H] [-n] [-r]
             [-S LENGTH] [-D DELIMITER] [-f] [-F type1,type2,...] [-x] [-q]

SpiderFoot 3.3: Open Source Intelligence Automation.

optional arguments:
  -h, --help          show this help message and exit
  -d, --debug         Enable debug output.
  -l IP:port          IP and port to listen on.
  -m mod1,mod2,...    Modules to enable.
  -M, --modules       List available modules.
  -s TARGET           Target for the scan.
  -t type1,type2,...  Event types to collect (modules selected automatically).
  -T, --types         List available event types.
  -o tab|csv|json     Output format. Tab is default. If using json, -q is enforced.
  -H                  Don't print field headers, just data.
  -n                  Strip newlines from data.
  -r                  Include the source data field in tab/csv output.
  -S LENGTH           Maximum data length to display. By default, all data is shown.
  -D DELIMITER        Delimiter to use for CSV output. Default is ,.
  -f                  Filter out other event types that weren't requested with -t.
  -F type1,type2,...  Show only a set of event types, comma-separated.
  -x                  STRICT MODE. Will only enable modules that can directly consume your target, and if -t was specified only those events
                      will be consumed by modules. This overrides -t and -m options.
  -q                  Disable logging. This will also hide errors!
Esegui SpiderFoot in modalità UI Web
A questo punto, SpiderFoot è installato sul tuo server. Ora dovrai avviare SpiderFoot in modalità interfaccia utente web per accedervi tramite un browser web.
Puoi eseguirlo con il seguente comando:
python3 sf.py -l your-server-ip:5001
Dovresti ottenere il seguente output:
2021-03-01 11:16:53,927 [INFO] Starting web server at 45.58.43.9:5001 ...
2021-03-01 11:16:53,937 [WARNING]
********************************************************************
Warning: passwd file contains no passwords. Authentication disabled.
Please consider adding authentication to protect this instance!
Refer to https://www.spiderfoot.net/documentation/#security.
********************************************************************


*************************************************************
 Use SpiderFoot by starting your web browser of choice and
 browse to http://45.58.43.9:5001/
*************************************************************

2021-03-01 11:16:53,996 [INFO] [01/Mar/2021:11:16:53] ENGINE Listening for SIGTERM.
2021-03-01 11:16:53,996 [INFO] [01/Mar/2021:11:16:53] ENGINE Listening for SIGHUP.
2021-03-01 11:16:53,996 [INFO] [01/Mar/2021:11:16:53] ENGINE Listening for SIGUSR1.
2021-03-01 11:16:53,996 [INFO] [01/Mar/2021:11:16:53] ENGINE Bus STARTING
2021-03-01 11:16:54,099 [INFO] [01/Mar/2021:11:16:54] ENGINE Serving on http://45.58.43.9:5001
2021-03-01 11:16:54,100 [INFO] [01/Mar/2021:11:16:54] ENGINE Bus STARTED
Come puoi vedere, SpiderFoot è avviato e rimane in ascolto sulla porta 5001. Premi CTRL+C per fermare SpiderFoot.
Configura l'autenticazione di SpiderFoot
Per impostazione predefinita, è possibile accedere a SpiderFoot senza alcuna autenticazione. Quindi si consiglia di abilitare l'autenticazione di base.
Per farlo, cambia la directory in SpiderFoot con il seguente comando:
cd spiderfoot-3.3
Quindi, aggiungi il tuo nome utente e password nel file passwd con il seguente comando:
echo "admin:yourpassword" > passwd
Ora, riavvia SpiderFoot con la modalità UI web con il seguente comando:
python3 sf.py -l your-server-ip:5001
Dovresti ottenere il seguente output:
2021-03-01 11:17:56,108 [INFO] Starting web server at 45.58.43.9:5001 ...
2021-03-01 11:17:56,118 [INFO] Enabling authentication based on supplied passwd file.

*************************************************************
 Use SpiderFoot by starting your web browser of choice and
 browse to http://45.58.43.9:5001/
*************************************************************

2021-03-01 11:17:56,138 [INFO] [01/Mar/2021:11:17:56] ENGINE Listening for SIGTERM.
2021-03-01 11:17:56,138 [INFO] [01/Mar/2021:11:17:56] ENGINE Listening for SIGHUP.
2021-03-01 11:17:56,138 [INFO] [01/Mar/2021:11:17:56] ENGINE Listening for SIGUSR1.
2021-03-01 11:17:56,138 [INFO] [01/Mar/2021:11:17:56] ENGINE Bus STARTING
2021-03-01 11:17:56,240 [INFO] [01/Mar/2021:11:17:56] ENGINE Serving on http://45.58.43.9:5001
2021-03-01 11:17:56,241 [INFO] [01/Mar/2021:11:17:56] ENGINE Bus STARTED
Accedi a SpiderFoot
Ora apri il tuo browser web e accedi all'interfaccia web di SpiderFoot utilizzando l'URL http://your-server-ip:5001 . Verrai reindirizzato alla pagina di accesso di SpiderFoot:

Fornisci il nome utente e la password dell'amministratore e fai clic su Accedi pulsante. Una volta effettuato l'accesso, dovresti vedere la dashboard di SpiderFoot nella pagina seguente:

Ora, fai clic su Nuova scansione pulsante per creare una nuova scansione. Dovresti vedere la seguente pagina:
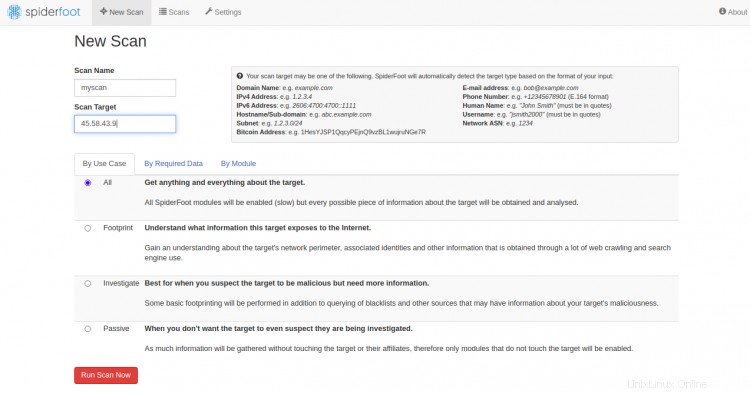
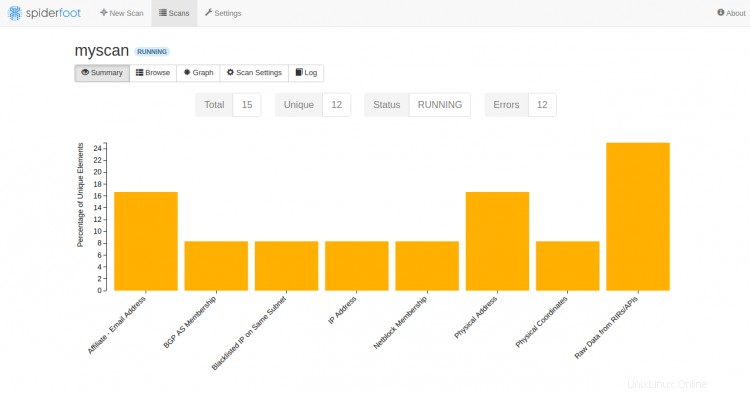
Fornisci l'IP del tuo server di destinazione e fai clic su Esegui scansione ora . Dovresti vedere la seguente pagina:
Conclusione
Hai installato correttamente SpiderFoot sul server Ubuntu 20.04. Ora puoi scansionare il computer remoto per qualsiasi vulnerabilità attraverso il dashboard di SpiderFoot. Sentiti libero di chiedermi se hai domande.