Netbox è uno strumento gratuito e potente per l'indirizzo IP (IPAM) e la gestione dell'infrastruttura del datacenter (DCIM). Viene utilizzato per archiviare informazioni su reti, macchine virtuali, inventari e molti altri. È stato originariamente sviluppato dal team di ingegneri di rete di DigitalOcean. Questo strumento è scritto nel framework Django Python e si basa sul database PostgreSQL. Il suo scopo è fungere da fonte di verità specifica del dominio per le operazioni di rete.
In questo tutorial spiegheremo come installare Netbox con Nginx come proxy inverso su Ubuntu 20.04.
Prerequisiti
- Un server che esegue Ubuntu 20.04.
- Sul tuo server è configurata una password di root.
Per iniziare
Prima di iniziare, dovrai installare alcune dipendenze richieste da Netbox. Puoi installarli tutti eseguendo il seguente comando:
apt-get install nginx git gcc supervisor python3 python3-dev python3-pip python3-setuptools build-essential libxml2-dev libxslt1-dev libffi-dev graphviz libpq-dev libssl-dev zlib1g-dev -y
Una volta installati tutti i pacchetti, puoi procedere al passaggio successivo.
Installa e configura il database PostgreSQL
Netbox si basa sul database PostgreSQL per l'archiviazione dei dati. Puoi installarlo con il seguente comando:
apt-get install postgresql postgresql-contrib -y
Una volta installato PostgreSQL, accedi a PostgreSQL con il seguente comando:
su - postgres
[email protected]:~$ psql
Dovresti ottenere il seguente output:
psql (12.2 (Ubuntu 12.2-4))
Type "help" for help.
Quindi, crea un database e un utente per Netbox con il seguente comando:
postgres=# CREATE DATABASE netbox;
postgres=# CREATE USER netbox WITH PASSWORD 'password';
Quindi, concedi tutti i privilegi al database Netbox con il seguente comando:
postgres=# GRANT ALL PRIVILEGES ON DATABASE netbox TO netbox;
Quindi, esci dalla shell di PostgreSQL con il seguente comando:
postgres=# exit
[email protected]:~$ exit
Installa e configura NetBox
Innanzitutto, cambia la directory in /opt e scarica l'ultima versione di Netbox dal repository Git Hub usando il seguente comando:
cd /opt/
git clone -b master https://github.com/digitalocean/netbox.git
Quindi, crea un collegamento simbolico del binario Python con il seguente comando:
ln -s /usr/bin/python3 /usr/bin/python
Quindi, cambia la directory in /opt/netbox/netbox/ e genera la chiave Django SECRET Key eseguendo il comando seguente:
cd /opt/netbox/netbox/
./generate_secret_key.py
Dovresti ottenere il seguente output:
[email protected])eTDpo(k^f4Sm9bariUnK0syCPMGEIjW6XV_8l5xhB7z
Quindi, cambia la directory in netbox e rinomina il file di configurazione di esempio:
cd netbox
mv configuration.example.py configuration.py
Quindi, modifica il file di configurazione di Netbox e definisci il tuo database, la chiave segreta e gli host consentiti:
nano configuration.py
Apporta le seguenti modifiche:
ALLOWED_HOSTS = ['your-server-ip']

# PostgreSQL database configuration. See the Django documentation for a complete list of available parameters:
#   https://docs.djangoproject.com/en/stable/ref/settings/#databases
DATABASE = {
    'NAME': 'netbox',         # Database name
    'USER': 'netbox',               # PostgreSQL username
    'PASSWORD': 'password',           # PostgreSQL password
    'HOST': 'localhost',      # Database server
    'PORT': '',               # Database port (leave blank for default)
    'CONN_MAX_AGE': 300,      # Max database connection age
}

SECRET_KEY = '[email protected])eTDpo(k^f4Sm9bariUnK0syCPMGEIjW6XV_8l5xhB7z'
Salva e chiudi il file, quindi installa tutte le dipendenze Python con il seguente comando:
pip3 install -r /opt/netbox/requirements.txt
Quindi, migra il database con il seguente comando:
cd /opt/netbox/netbox/
python3 manage.py migrate
Quindi, crea un utente amministrativo Netbox con il seguente comando:
python3 manage.py createsuperuser
Ti verrà chiesto di fornire nome utente e password come mostrato di seguito:
Username (leave blank to use 'root'): netboxadmin
Email address: [email protected]
Password:
Password (again):
Superuser created successfully.
Quindi, raccogli il file statico con il seguente comando:
python3 manage.py collectstatic
Dovresti vedere il seguente output:
976 static files copied to '/opt/netbox/netbox/static'.
Installa e configura Gunicorn
Netbox è un'applicazione basata su Django. Quindi dovrai installare Gunicorn nel tuo sistema. Puoi installarlo eseguendo il seguente comando:
pip3 install gunicorn
Dopo aver installato Gunicorn, crea un nuovo file di configurazione di Gunicorn per Netbox con il seguente comando:
nano /opt/netbox/gunicorn_config.py
Aggiungi le seguenti righe:
command = '/usr/local/bin/gunicorn'
pythonpath = '/opt/netbox/netbox'
bind = 'your-server-ip:8001'
workers = 3
user = 'www-data'
Salva e chiudi il file quando hai finito.
Installa e configura Supervisor
Supervisor è un sistema client/server che consente di monitorare e controllare il servizio NetBox. È possibile creare un nuovo file di configurazione Supervisore per Netbox con il seguente comando:
nano /etc/supervisor/conf.d/netbox.conf
Aggiungi le seguenti righe:
[program:netbox]
command = gunicorn -c /opt/netbox/gunicorn_config.py netbox.wsgi
directory = /opt/netbox/netbox/
user = www-data
Salva e chiudi il file quando hai finito. Quindi, riavvia il servizio Supervisore con il seguente comando:
systemctl restart supervisor
Puoi anche verificare lo stato del servizio Supervisor utilizzando il seguente comando:
systemctl status supervisor
Dovresti ottenere il seguente output:
? supervisor.service - Supervisor process control system for UNIX
     Loaded: loaded (/lib/systemd/system/supervisor.service; enabled; vendor preset: enabled)
     Active: active (running) since Sat 2020-05-30 05:49:08 UTC; 14s ago
       Docs: http://supervisord.org
   Main PID: 550606 (supervisord)
      Tasks: 5 (limit: 4691)
     Memory: 184.3M
     CGroup: /system.slice/supervisor.service
             ??550606 /usr/bin/python3 /usr/bin/supervisord -n -c /etc/supervisor/supervisord.conf
             ??550626 /usr/bin/python3 /usr/local/bin/gunicorn -c /opt/netbox/gunicorn_config.py netbox.wsgi
             ??550628 /usr/bin/python3 /usr/local/bin/gunicorn -c /opt/netbox/gunicorn_config.py netbox.wsgi
             ??550629 /usr/bin/python3 /usr/local/bin/gunicorn -c /opt/netbox/gunicorn_config.py netbox.wsgi
             ??550630 /usr/bin/python3 /usr/local/bin/gunicorn -c /opt/netbox/gunicorn_config.py netbox.wsgi

May 30 05:49:08 ubuntu2004 systemd[1]: Started Supervisor process control system for UNIX.
May 30 05:49:08 ubuntu2004 supervisord[550606]: 2020-05-30 05:49:08,664 CRIT Supervisor is running as root.  Privileges were not dropped becau>
May 30 05:49:08 ubuntu2004 supervisord[550606]: 2020-05-30 05:49:08,664 INFO Included extra file "/etc/supervisor/conf.d/netbox.conf" during p>
May 30 05:49:08 ubuntu2004 supervisord[550606]: 2020-05-30 05:49:08,671 INFO RPC interface 'supervisor' initialized
May 30 05:49:08 ubuntu2004 supervisord[550606]: 2020-05-30 05:49:08,671 CRIT Server 'unix_http_server' running without any HTTP authentication>
May 30 05:49:08 ubuntu2004 supervisord[550606]: 2020-05-30 05:49:08,672 INFO supervisord started with pid 550606
May 30 05:49:09 ubuntu2004 supervisord[550606]: 2020-05-30 05:49:09,676 INFO spawned: 'netbox' with pid 550626
May 30 05:49:11 ubuntu2004 supervisord[550606]: 2020-05-30 05:49:11,060 INFO success: netbox entered RUNNING state, process has stayed up for
Configura Nginx per NetBox
È una buona idea configurare Nginx come proxy inverso per accedere alla Netbox alla porta 80. Puoi creare una nuova configurazione di host virtuale Nginx usando il seguente comando:
nano /etc/nginx/sites-available/netbox.conf
Aggiungi le seguenti righe:
server {
    listen 80;
    server_name your-server-ip;
    client_max_body_size 25m;

    location /static/ {
        alias /opt/netbox/netbox/static/;
    }

    location / {
        proxy_pass http://your-server-ip:8001;
    }
}
Salva e chiudi il file. Quindi, crea un collegamento simbolico alla directory /etc/nginx/sites-enabled/:
ln -s /etc/nginx/sites-available/netbox.conf /etc/nginx/sites-enabled/
Quindi, verifica Nginx per eventuali errori di sintassi con il seguente comando:
nginx -t
Se tutto va bene, dovresti ottenere il seguente output:
nginx: the configuration file /etc/nginx/nginx.conf syntax is ok
nginx: configuration file /etc/nginx/nginx.conf test is successful
Infine, riavvia il servizio Nginx per implementare le modifiche.
systemctl restart nginx
Puoi anche verificare Nginx con il seguente comando:
systemctl status nginx
Dovresti ottenere il seguente output:
? nginx.service - The nginx HTTP and reverse proxy server
   Loaded: loaded (/usr/lib/systemd/system/nginx.service; disabled; vendor preset: disabled)
   Active: active (running) since Sat 2020-05-30 22:28:13 EST; 4min 14s ago
  Process: 984 ExecStart=/usr/sbin/nginx (code=exited, status=0/SUCCESS)
  Process: 982 ExecStartPre=/usr/sbin/nginx -t (code=exited, status=0/SUCCESS)
  Process: 980 ExecStartPre=/usr/bin/rm -f /run/nginx.pid (code=exited, status=0/SUCCESS)
 Main PID: 985 (nginx)
    Tasks: 3 (limit: 25028)
   Memory: 5.5M
   CGroup: /system.slice/nginx.service
           ??985 nginx: master process /usr/sbin/nginx
           ??986 nginx: worker process
           ??987 nginx: worker process

May 30 21:28:12 ubuntu2004 systemd[1]: Starting The nginx HTTP and reverse proxy server...
Mar 30 21:28:12 ubuntu2004 nginx[982]: nginx: the configuration file /etc/nginx/nginx.conf syntax is ok
Mar 30 21:28:12 ubuntu2004 nginx[982]: nginx: configuration file /etc/nginx/nginx.conf test is successful
Mar 30 21:28:13 ubuntu2004 systemd[1]: Started The nginx HTTP and reverse proxy server.
A questo punto, il server web Nginx è configurato per servire Netbox sulla porta 80. Ora puoi procedere per accedere all'interfaccia web di Netbox.
Accedi all'interfaccia Web di Netbox
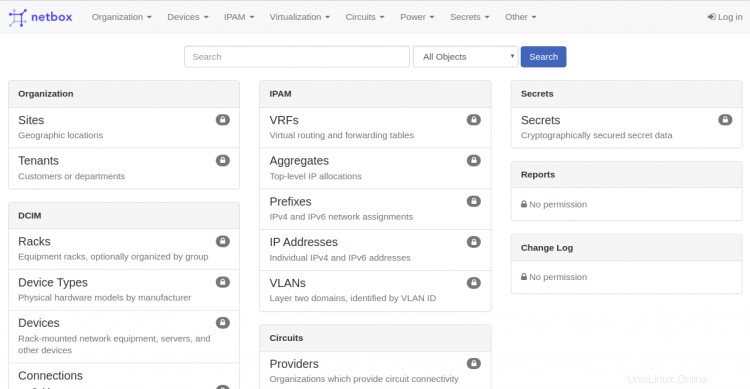
Apri il tuo browser web e visita l'URL http://your-server-ip. Verrai reindirizzato alla seguente pagina:

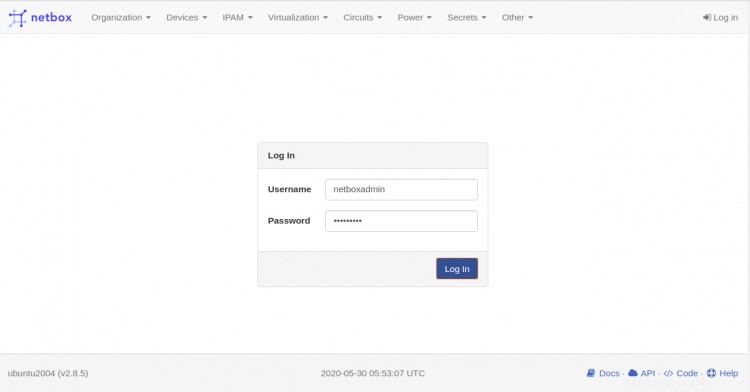
Fai clic sul Registro dentro pulsante. Dovresti vedere la pagina di accesso di Netbox nella schermata seguente:

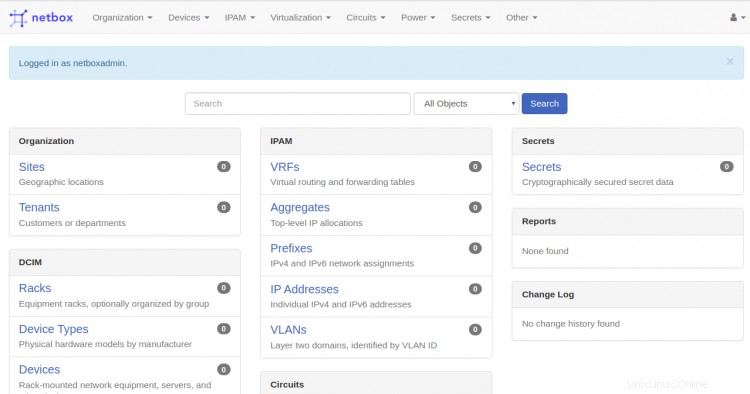
Fornisci il nome utente e la password dell'amministratore Netbox e fai clic su login pulsante. Dovresti vedere la dashboard predefinita di Netbox nella pagina seguente:

Conclusione
In questa guida hai imparato come installare Netbox su Ubuntu 20.04 con Nginx. Ora puoi iniziare a documentare la tua infrastruttura di rete. Per ulteriori informazioni, visita la documentazione ufficiale di Netbox. Non esitare a chiedermi se hai domande.