XWiki è un software wiki gratuito e open source scritto in Java eseguito su un contenitore servlet come Tomcat, JBoss ecc. XWiki utilizza database come MySQL o PostgreSQL per memorizzare le sue informazioni. XWiki ci consente di memorizzare dati strutturati ed eseguire lo script del server all'interno dell'interfaccia wiki. Puoi ospitare più blog e gestire o visualizzare file e cartelle utilizzando XWiki.
XWiki include molte funzionalità, alcune sono elencate di seguito:
- Supporta il controllo della versione e ACL.
- Ti consente di eseguire ricerche nell'intero wiki utilizzando i caratteri jolly.
- Esportare facilmente le pagine wiki in PDF, ODT, RTF, XML e HTML.
- Organizzazione dei contenuti e importazione dei contenuti.
- Modifica della pagina utilizzando l'editor WYSIWYG.
Requisiti
- Un server che esegue Ubuntu 16.04.
- Un utente non root con privilegi sudo.
Aggiorna il sistema
Prima di iniziare, dovrai aggiornare il repository di Ubuntu all'ultima versione. Puoi farlo usando il seguente comando:
sudo apt-get update -y
sudo apt-get upgrade -y
Una volta aggiornato il repository, riavvia il sistema per applicare tutti gli aggiornamenti.
Installa Java
Xwiki è un'applicazione basata su Java, quindi dovrai prima installare Java 8. Per impostazione predefinita Java 8 non è disponibile nel repository di Ubuntu. Puoi installare Java 8 aggiungendo il repository PPA webupd8team al tuo sistema.
Innanzitutto, aggiungi il PPA eseguendo il seguente comando:
sudo add-apt-repository ppa:webupd8team/java
Quindi, aggiorna il repository con il seguente comando:
sudo apt-get update -y
Una volta che il repository è aggiornato, puoi installare Java 8 eseguendo il seguente comando:
sudo apt-get install oracle-java8-installer -y
Dopo aver installato Java, puoi verificare la versione di Java con il seguente comando:
java -version
Dovresti vedere il seguente output:
Java version "1.8.0_91"
Java(TM) SE Runtime Environment (build 1.8.0_91-b14)
Java HotSpot(TM) 64-Bit Server VM (build 25.91-b14, mixed mode)
Scarica e installa Xwiki
Successivamente, dovrai scaricare il file di installazione fornito da XWiki. Puoi scaricarlo usando il seguente comando:
wget http://download.forge.ow2.org/xwiki/xwiki-enterprise-installer-generic-8.1-standard.jar
Una volta completato il download, puoi installare il file del pacchetto scaricato utilizzando il comando java come mostrato di seguito:
sudo java -jar xwiki-enterprise-installer-generic-8.1-standard.jar
Dovresti vedere il seguente output:
28 Jan, 2018 6:57:37 PM INFO: Logging initialized at level 'INFO'
28 Jan, 2018 6:57:37 PM INFO: Commandline arguments:
28 Jan, 2018 6:57:37 PM INFO: Detected platform: ubuntu_linux,version=3.19.0-25-generic,arch=x64,symbolicName=null,javaVersion=1.7.0_151
28 Jan, 2018 6:57:37 PM WARNING: Failed to determine hostname and IP address
Welcome to the installation of XWiki Enterprise 8.1!
The homepage is at: http://xwiki.org/

Press 1 to continue, 2 to quit, 3 to redisplay
Ora premi 1 per continuare l'installazione, dovresti vedere il seguente output:
Please read the following information:

 XWiki Enterprise - Readme


 XWiki Enterprise Overview
XWiki Enterprise is a second generation Wiki engine, features professional features like
 Wiki, Blog, Comments, User Rights, LDAP Authentication, PDF Export, and a lot more.
XWiki Enterprise also includes an advanced form and scripting engine which makes it an ideal
 development environment for constructing data-based intranet applications. It has powerful
 extensibility features, supports scripting, extensions and is based on a highly modular
 architecture. The scripting engine allows to access a powerful API for accessing the XWiki
 repository in read and write mode.
XWiki Enterprise is used by major companies around the world and has strong
 Support for a professional usage of XWiki.
 Pointers
Here are some pointers to get you started with XWiki once you have finished installing it:

The documentation can be found on the XWiki.org web site
If you notice any issue please file a an issue in our issue tracker
If you wish to talk to XWiki users or developers please use our
 Mailing lists & Forum
You can also access XWiki's
 source code
If you need commercial support please visit the
 Support page


Press 1 to continue, 2 to quit, 3 to redisplay
Ora premi 1 per continuare l'installazione, dovresti vedere il seguente output:
See the NOTICE file distributed with this work for additional
information regarding copyright ownership.
This is free software; you can redistribute it and/or modify it
under the terms of the GNU Lesser General Public License as
published by the Free Software Foundation; either version 2.1 of
the License, or (at your option) any later version.
This software is distributed in the hope that it will be useful,
but WITHOUT ANY WARRANTY; without even the implied warranty of
MERCHANTABILITY or FITNESS FOR A PARTICULAR PURPOSE. See the GNU
Lesser General Public License for more details.
You should have received a copy of the GNU Lesser General Public
License along with this software; if not, write to the Free
Software Foundation, Inc., 51 Franklin St, Fifth Floor, Boston, MA
02110-1301 USA, or see the FSF site: http://www.fsf.org.

Press 1 to accept, 2 to reject, 3 to redisplay
Ora premi 1 per accettare il contratto di licenza, dovresti vedere il seguente output:
Select the installation path:  [/usr/local/XWiki Enterprise 8.1]

Press 1 to continue, 2 to quit, 3 to redisplay
Ora premi invio e premi 1 per selezionare il percorso di installazione predefinito, dovresti vedere il seguente output:
  [x] Pack 'Core' required
????????????????????????????????????????????????????????????????????????????????
  [x] Include optional pack 'Default Wiki'
????????????????????????????????????????????????????????????????????????????????
Enter Y for Yes, N for No:
Y
Press 1 to continue, 2 to quit, 3 to redisplay
Ora premi Y e premi 1 per continuare l'installazione, dovresti vedere il seguente output:
[ Starting to unpack ]
[ Processing package: Core (1/2) ]
[ Processing package: Default Wiki (2/2) ]
[ Unpacking finished ]
Ora ti verrà chiesto di creare scorciatoie per l'utente, puoi premere 'Y' per aggiungerli. Successivamente, ti verrà chiesto di generare uno script di installazione automatica, basta premere Invio per selezionare il valore predefinito, una volta terminata l'installazione, dovresti vedere il seguente output:
????????????????????????????????????????????????????????????????????????????????????????????????????????????????????????????????????????????????
Generate an automatic installation script
????????????????????????????????????????????????????????????????????????????????????????????????????????????????????????????????????????????????
Enter Y for Yes, N for No:
Y
Select the installation script (path must be absolute)[/usr/local/XWiki Enterprise 8.1/auto-install.xml]

Installation was successful
application installed on /usr/local/XWiki Enterprise 8.1
[ Writing the uninstaller data ... ]
[ Console installation done ]
Ora, XWiki è installato sul tuo sistema, è ora di avviare lo script di avvio di XWiki come mostrato di seguito:
cd /usr/local/XWiki Enterprise 8.1
sudo bash start_xwiki.sh
Per favore, attendi un po' di tempo per avviare i processi. Ora dovresti vedere alcuni messaggi sul terminale come mostrato di seguito:
start_xwiki.sh: 79: start_xwiki.sh:
Starting Jetty on port 8080, please wait...
2018-01-28 19:12:41.842:INFO::main: Logging initialized @1266ms
2018-01-28 19:12:42.905:INFO:oejs.Server:main: jetty-9.2.13.v20150730
2018-01-28 19:12:42.956:INFO:oejs.AbstractNCSARequestLog:main: Opened /usr/local/XWiki Enterprise 8.1/data/logs/2018_01_28.request.log
2018-01-28 19:12:42.965:INFO:oejdp.ScanningAppProvider:main: Deployment monitor [file:/usr/local/XWiki%20Enterprise%208.1/jetty/contexts/] at interval 0
2018-01-28 19:13:31,485 [main] INFO  o.x.s.s.i.EmbeddedSolrInstance - Starting embedded Solr server...
2018-01-28 19:13:31,507 [main] INFO  o.x.s.s.i.EmbeddedSolrInstance - Using Solr home directory: [data/solr]
2018-01-28 19:13:43,371 [main] INFO  o.x.s.s.i.EmbeddedSolrInstance - Started embedded Solr server.
2018-01-28 19:13:46.556:INFO:oejsh.ContextHandler:main: Started [email protected]{/xwiki,file:/usr/local/XWiki%20Enterprise%208.1/webapps/xwiki/,AVAILABLE}{/xwiki}
2018-01-28 19:13:46.697:INFO:oejsh.ContextHandler:main: Started [email protected]{/,file:/usr/local/XWiki%20Enterprise%208.1/webapps/root/,AVAILABLE}{/root}
2018-01-28 19:13:46.776:INFO:oejs.ServerConnector:main: Started [email protected]{HTTP/1.1}{0.0.0.0:8080}
XWiki è ora attivo e funzionante, è ora di accedere all'interfaccia web di XWiki.
Accedi a XWiki
XWiki funziona sulla porta 8080 , quindi dovrai consentire la porta 8080 attraverso il firewall. Innanzitutto, abilita il firewall UFW con il seguente comando:
sudo ufw enable
Quindi, consenti la porta 8080 attraverso il firewall UFW con il seguente comando:
sudo ufw allow 8080/tcp
Quindi, ricarica le regole del firewall per applicare tutte le modifiche eseguendo il comando seguente:
sudo ufw reload
Puoi ottenere lo stato del firewall UFW con il seguente comando:
sudo ufw status
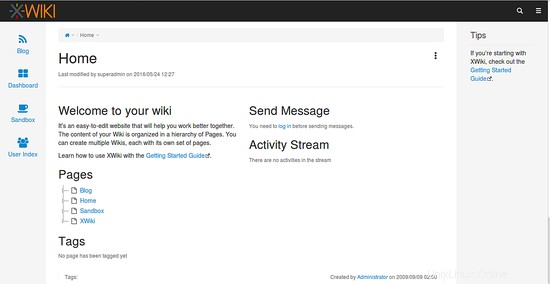
Ora apri il tuo browser web e digita l'URL http://your-server-ip:8080 , verrai reindirizzato alla home page di XWiki come mostrato di seguito:
Puoi interrompere il server XWiki in qualsiasi momento premendo Ctrl + C pulsante nel terminale.
Conclusione
Congratulazioni! hai installato e configurato correttamente XWiki sul server Ubuntu 16.04. Spero che ora tu possa ospitare facilmente il tuo sito wiki usando XWiki sul server Ubuntu 16.04. Per ulteriori informazioni, puoi controllare la pagina della documentazione ufficiale di XWiki su https://www.xwiki.org/xwiki/bin/view/Documentation/. Sentiti libero di commentarmi se hai domande.