Drupal è un sistema di gestione dei contenuti gratuito, open source e scalabile che può essere utilizzato dalle persone per creare e gestire qualsiasi tipo di sito web. È scritto in PHP e utilizza MySQL/MariaDB per memorizzare i suoi dati. Drupal offre un ricco set di funzionalità che possono essere estese con migliaia di componenti aggiuntivi. Drupal supporta molti server Web inclusi Apache, Nginx, IIS, Lighttpd e database MySQL, MariaDB, MongoDB, SQLite, PostgreSQL e MS SQL server. Drupal viene fornito con un'interfaccia utente Web semplice e intuitiva che ti consente di creare siti Web senza alcuna conoscenza di programmazione.
In questo tutorial, ti mostreremo come installare Drupal 8 sul server CentOS 8 e proteggerlo con Let's Encrypt SSL gratuito.
Requisiti
- Un server che esegue CentOS 8.
- Un nome di dominio valido puntato all'IP del tuo server
- Sul server è configurata una password di root.
Installa Nginx, MariaDB e PHP
Prima di iniziare, dovrai installare il server LEMP sul tuo server. Puoi installarlo eseguendo il seguente comando:
dnf install nginx mariadb-server php php-fpm php-cli php-mbstring php-gd php-xml php-curl php-mysqlnd php-pdo php-json php-opcache -y
Una volta installato, avvia il servizio Nginx, MariaDB e php-fpm e abilita l'avvio dopo il riavvio del sistema utilizzando il seguente comando:
systemctl start nginx
 systemctl start php-fpm
 systemctl start mariadb
 systemctl enable nginx
 systemctl enable php-fpm
 systemctl enable mariadb
Configura database
Per impostazione predefinita, MariaDB non è protetto, quindi dovrai proteggerlo. Puoi proteggerlo eseguendo il seguente comando:
mysql_secure_installation
Rispondi a tutte le domande come mostrato di seguito:
Enter current password for root (enter for none):
Set root password? [Y/n] Y
New password:
Re-enter new password:
Remove anonymous users? [Y/n] Y
Disallow root login remotely? [Y/n] Y
Remove test database and access to it? [Y/n] Y
Reload privilege tables now? [Y/n] Y
Una volta terminato, accedi alla shell di MariaDB con il seguente comando:
mysql -u root -p
Fornisci la tua password di root quando richiesto, quindi crea un database e un utente per Drupal con il seguente comando:
MariaDB [(none)]> CREATE DATABASE drupaldb CHARACTER SET utf8mb4 COLLATE utf8mb4_general_ci;
 MariaDB [(none)]> CREATE USER [email protected] IDENTIFIED BY "password";
Quindi, concedi tutti i privilegi a drupaldb con il seguente comando:
MariaDB [(none)]> GRANT ALL ON drupaldb.* TO [email protected] IDENTIFIED BY "password";
Quindi, svuota i privilegi ed esci dalla shell MariaDB con il seguente comando:
MariaDB [(none)]> FLUSH PRIVILEGES;
 MariaDB [(none)]> EXIT;
Scarica Drupal
Innanzitutto, dovrai scaricare l'ultima versione di Drupal dal loro sito Web ufficiale. Puoi scaricarlo con il seguente comando:
wget https://ftp.drupal.org/files/projects/drupal-8.7.10.tar.gz
Una volta scaricato, estrai il file scaricato con il seguente comando:
tar -xvzf drupal-8.7.10.tar.gz
Quindi, sposta la directory estratta nella directory principale web di Nginx con il seguente comando:
mv drupal-8.7.10 /var/www/html/drupal
Quindi, crea una directory in cui archiviare i file del sito Web e rinomina il file default.settings.php come mostrato di seguito:
mkdir /var/www/html/drupal/sites/default/files
 cp /var/www/html/drupal/sites/default/default.settings.php /var/www/html/drupal/sites/default/settings.php
Quindi, cambia la proprietà della directory Drupal in nginx come mostrato di seguito:
chown -R nginx:nginx /var/www/html/drupal/
Configura Nginx per Drupal
Innanzitutto, crea un file di configurazione php-fpm per Drupal con il seguente comando:
nano /etc/php-fpm.d/drupal.conf
Aggiungi le seguenti righe:
[drupal]
user = nginx
group = nginx
listen.owner = nginx
listen.group = nginx
listen = /run/php-fpm/drupal.sock
pm = ondemand
pm.max_children =  50
pm.process_idle_timeout = 10s
pm.max_requests = 500
chdir = /
Salva e chiudi il file quando hai finito. Quindi, crea un file di configurazione dell'host virtuale Nginx per Drupal:
nano /etc/nginx/conf.d/drupal.conf
Aggiungi le seguenti righe:
server {
    listen 80;
    server_name example.com;

    root /var/www/html/drupal;

    access_log /var/log/nginx/example.com.access.log;
    error_log /var/log/nginx/example.com.error.log;

    location = /favicon.ico {
        log_not_found off;
        access_log off;
    }

    location = /robots.txt {
        allow all;
        log_not_found off;
        access_log off;
    }

    location ~ \..*/.*\.php$ {
        return 403;
    }

    location ~ ^/sites/.*/private/ {
        return 403;
    }

    # Block access to scripts in site files directory
    location ~ ^/sites/[^/]+/files/.*\.php$ {
        deny all;
    }
    location ~ (^|/)\. {
        return 403;
    }

    location / {
        try_files $uri /index.php?$query_string;
    }

    location @rewrite {
        rewrite ^/(.*)$ /index.php?q=$1;
    }
    location ~ /vendor/.*\.php$ {
        deny all;
        return 404;
    }


    location ~ '\.php$|^/update.php' {
        fastcgi_split_path_info ^(.+?\.php)(|/.*)$;
        include fastcgi_params;
       	# Block httpoxy attacks. See https://httpoxy.org/.
        fastcgi_param HTTP_PROXY "";
        fastcgi_param SCRIPT_FILENAME $document_root$fastcgi_script_name;
        fastcgi_param PATH_INFO $fastcgi_path_info;
        fastcgi_param QUERY_STRING $query_string;
        fastcgi_intercept_errors on;
        fastcgi_pass unix:/run/php-fpm/drupal.sock;
    }
    location ~ ^/sites/.*/files/styles/ { # For Drupal >= 7
        try_files $uri @rewrite;
    }

    # Handle private files through Drupal. Private file's path can come
    # with a language prefix.
    location ~ ^(/[a-z\-]+)?/system/files/ { # For Drupal >= 7
        try_files $uri /index.php?$query_string;
    }

    location ~* \.(js|css|png|jpg|jpeg|gif|ico|svg)$ {
        try_files $uri @rewrite;
        expires max;
        log_not_found off;
    }
}
Salva e chiudi il file. Quindi, riavvia php-fpm e il servizio Nginx per applicare le modifiche:
systemctl restart php-fpm
 systemctl restart nginx
Configura SELinux e Firewall
Per impostazione predefinita, SELinux è abilitato in CentOS 8. Quindi dovrai configurare SELinux affinché Drupal funzioni correttamente.
Innanzitutto, consente a Drupal di scrivere nelle directory di file pubbliche e private con il seguente comando:
semanage fcontext -a -t httpd_sys_rw_content_t "/var/www/html/drupal(/.*)?"
 semanage fcontext -a -t httpd_sys_rw_content_t '/var/www/html/drupal/sites/default/settings.php'
 semanage fcontext -a -t httpd_sys_rw_content_t '/var/www/html/drupal/sites/default/files'
 restorecon -Rv /var/www/html/drupal
 restorecon -v /var/www/html/drupal/sites/default/settings.php
 restorecon -Rv /var/www/html/drupal/sites/default/files
Successivamente, consente a Drupal di inviare e-mail in uscita con il seguente comando:
setsebool -P httpd_can_sendmail on
Successivamente, dovrai creare una regola firewall per consentire il servizio HTTP e HTTPS da reti esterne. Puoi consentirlo con il seguente comando:
firewall-cmd --permanent --add-service=http
firewall-cmd --permanent --add-service=https
 firewall-cmd --reload
Proteggi Drupal con Let's Encrypt SSL
Drupal è ora installato e configurato. È ora di proteggerlo con Let's Encrypt SSL gratuito.
Per fare ciò, dovrai scaricare il client certbot sul tuo server. Puoi scaricare e impostare l'autorizzazione corretta eseguendo il comando seguente:
wget https://dl.eff.org/certbot-auto
 mv certbot-auto /usr/local/bin/certbot-auto
 chown root /usr/local/bin/certbot-auto
 chmod 0755 /usr/local/bin/certbot-auto
Ora, esegui il comando seguente per ottenere e installare un certificato SSL per il tuo sito Web Drupal.
certbot-auto --nginx -d example.com
Il comando precedente installerà prima tutte le dipendenze richieste sul tuo server. Una volta installato, ti verrà chiesto di fornire un indirizzo email e di accettare i termini del servizio come mostrato di seguito:
Saving debug log to /var/log/letsencrypt/letsencrypt.log
Plugins selected: Authenticator apache, Installer apache
Enter email address (used for urgent renewal and security notices) (Enter 'c' to
cancel): [email protected]

- - - - - - - - - - - - - - - - - - - - - - - - - - - - - - - - - - - - - - - -
Please read the Terms of Service at
https://letsencrypt.org/documents/LE-SA-v1.2-November-15-2017.pdf. You must
agree in order to register with the ACME server at
https://acme-v02.api.letsencrypt.org/directory
- - - - - - - - - - - - - - - - - - - - - - - - - - - - - - - - - - - - - - - -
(A)gree/(C)ancel: A

- - - - - - - - - - - - - - - - - - - - - - - - - - - - - - - - - - - - - - - -
Would you be willing to share your email address with the Electronic Frontier
Foundation, a founding partner of the Let's Encrypt project and the non-profit
organization that develops Certbot? We'd like to send you email about our work
encrypting the web, EFF news, campaigns, and ways to support digital freedom.
- - - - - - - - - - - - - - - - - - - - - - - - - - - - - - - - - - - - - - - -
(Y)es/(N)o: Y


Obtaining a new certificate
Performing the following challenges:
http-01 challenge for example.com
Waiting for verification...
Cleaning up challenges
Deploying Certificate to VirtualHost /etc/nginx/conf.d/drupal.conf
Successivamente, dovrai scegliere se reindirizzare o meno il traffico HTTP su HTTPS come mostrato di seguito:
Please choose whether or not to redirect HTTP traffic to HTTPS, removing HTTP access.
- - - - - - - - - - - - - - - - - - - - - - - - - - - - - - - - - - - - - - - -
1: No redirect - Make no further changes to the webserver configuration.
2: Redirect - Make all requests redirect to secure HTTPS access. Choose this for
new sites, or if you're confident your site works on HTTPS. You can undo this
change by editing your web server's configuration.
- - - - - - - - - - - - - - - - - - - - - - - - - - - - - - - - - - - - - - - -
Select the appropriate number [1-2] then [enter] (press 'c' to cancel): 2
Digita 2 e premi Invio per continuare. Al termine dell'installazione, dovresti vedere il seguente output:
Redirecting all traffic on port 80 to ssl in /etc/nginx/conf.d/drupal.conf

- - - - - - - - - - - - - - - - - - - - - - - - - - - - - - - - - - - - - - - -
Congratulations! You have successfully enabled https://example.com

You should test your configuration at:
https://www.ssllabs.com/ssltest/analyze.html?d=example.com
- - - - - - - - - - - - - - - - - - - - - - - - - - - - - - - - - - - - - - - -

IMPORTANT NOTES:
 - Congratulations! Your certificate and chain have been saved at:
   /etc/letsencrypt/live/example.com/fullchain.pem
   Your key file has been saved at:
   /etc/letsencrypt/live/example.com/privkey.pem
   Your cert will expire on 2020-03-23. To obtain a new or tweaked
   version of this certificate in the future, simply run certbot-auto
   again with the "certonly" option. To non-interactively renew *all*
   of your certificates, run "certbot-auto renew"
 - If you like Certbot, please consider supporting our work by:

   Donating to ISRG / Let's Encrypt:   https://letsencrypt.org/donate
   Donating to EFF:                    https://eff.org/donate-le
Accedi al sito web Drupal
Ora apri il tuo browser web e digita l'URL https://example.com . Verrai reindirizzato alla seguente pagina:
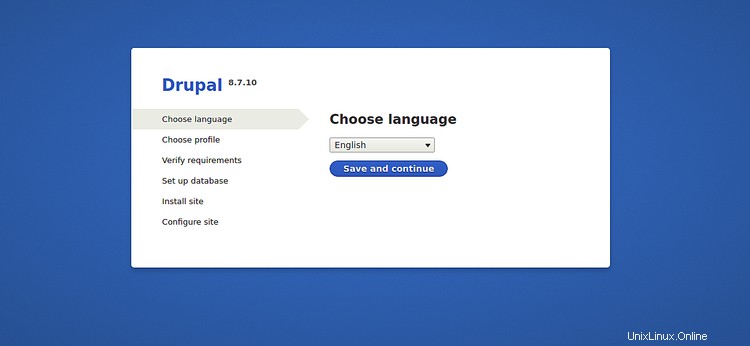
Seleziona la lingua desiderata e fai clic su Salva e continua pulsante. Dovresti vedere la seguente pagina:
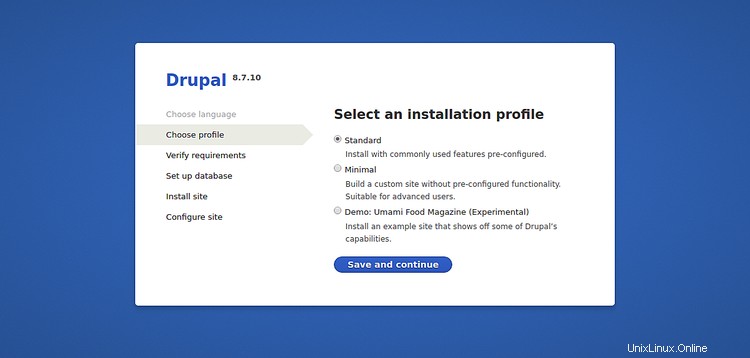
Scegli il tuo profilo di installazione e fai clic su Salva e continua pulsante. Dovresti vedere la seguente pagina:
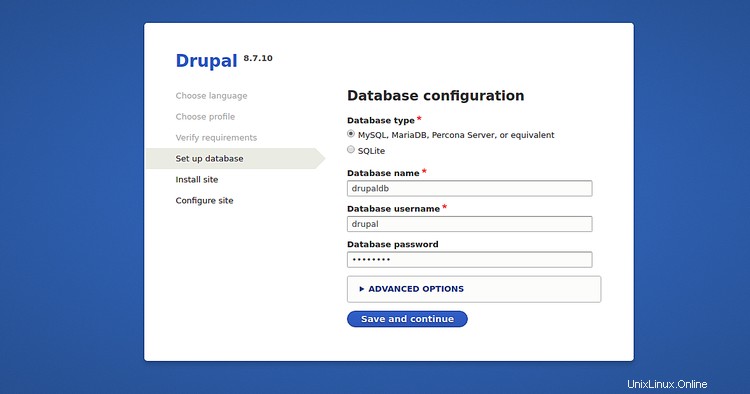
Fornisci i dettagli del tuo database e fai clic su Salva e continua pulsante. Dovresti vedere la seguente pagina:
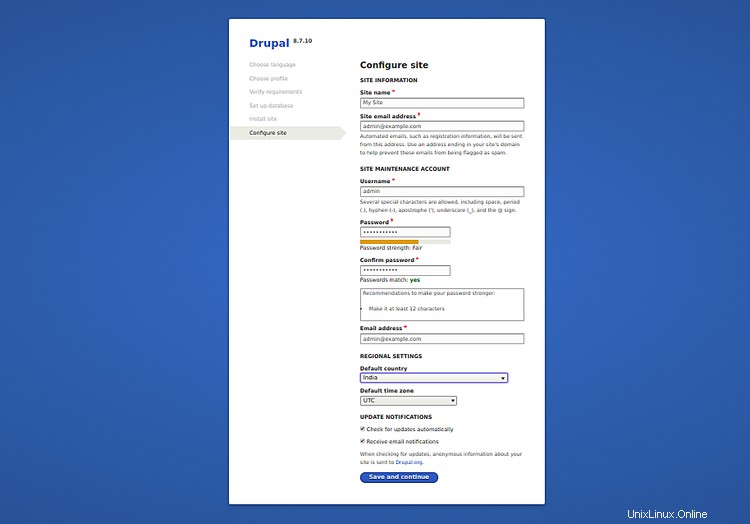
Fornisci il nome del tuo sito, il nome utente amministratore, la password e fai clic su Salva e continua pulsante. Dovresti vedere la tua dashboard Drupal nella pagina seguente:
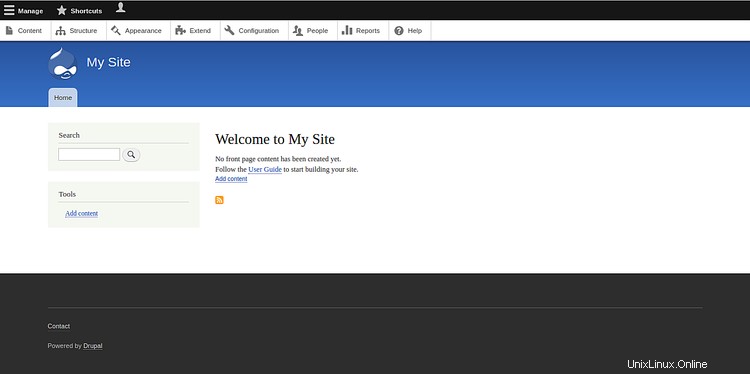
Congratulazioni! hai installato e protetto con successo Drupal sul server CentOS 8.