PrestaShop è un carrello della spesa open source scritto in PHP utilizzato per creare e gestire il tuo business online. Fornisce un'interfaccia semplice e facile da usare che ti aiuta ad avviare il tuo negozio online in un tempo minimo. Fornisce molte funzionalità tra cui un'interfaccia intuitiva, più gateway di pagamento (PayPal, Google Checkout), design mobile-responsive, supporto gratuito, multilingua, analisi, reportistica e altro ancora.
In questo post, ti mostreremo come installare PrestaShop con Apache e un certificato SSL Let's Encrypt gratuito su CentOS 8.
Prerequisiti
- Un server che esegue CentOS 8.
- Un nome di dominio valido puntato all'IP del tuo server.
- Sul tuo server è configurata una password di root.
Installa il server LAMP
Prima di iniziare, il server LAMP deve essere installato nel tuo server. Se non è installato puoi installarlo con altre estensioni PHP usando il seguente comando:
dnf install httpd mariadb-server php php-cli php-bcmath php-mysqli php-gd php-pdo php-xmlrpc php-intl php-posix php-json php-curl php-zip unzip -y
Dopo aver installato tutti i pacchetti richiesti, modifica il file php.ini e cambia alcune impostazioni predefinite:
nano /etc/php.ini
Modifica le seguenti righe:
max_input_vars = 3000
post_max_size = 64M
upload_max_filesize = 64M
max_execution_time = 600
memory_limit = 256M
date.timezone = Asia/Kolkata
Salva e chiudi il file, quindi avvia il servizio Apache e MariaDB e abilita l'avvio al riavvio del sistema:
systemctl start httpd
systemctl start mariadb
systemctl enable httpd
systemctl enable mariadb
A questo punto, il server LAMP è installato nel tuo server.
Crea un database per PrestaShop
PrestaShop utilizza un database MySQL/MariaDB per archiviare i propri dati. Quindi dovrai creare un database e un suer per PrestaShop.
Innanzitutto, accedi a MariaDB con il seguente comando:
mysql
Una volta effettuato l'accesso, crea un database e un utente con il seguente comando:
MariaDB [(none)]> CREATE DATABASE prestashopdb;
MariaDB [(none)]> CREATE USER 'prestashopuser'@'localhost' IDENTIFIED BY 'securepassword';
Quindi, concedi tutti i privilegi a prestashopdb con il seguente comando:
MariaDB [(none)]> GRANT ALL PRIVILEGES ON prestashopdb. * TO 'prestashopuser'@'localhost';
Quindi, svuota i privilegi ed esci da MariaDB con il seguente comando:
MariaDB [(none)]> FLUSH PRIVILEGES;
MariaDB [(none)]> EXIT;
Una volta terminato, puoi procedere al passaggio successivo.
Installa PrestaShop
Successivamente, dovrai scaricare l'ultima versione di PrestaShop dalla loro pagina di download ufficiale. Puoi scaricarlo con il seguente comando:
wget https://download.prestashop.com/download/releases/prestashop_1.7.7.3.zip
Una volta completato il download, decomprimere il file scaricato nella directory principale Web di Apache utilizzando il seguente comando:
unzip prestashop_1.7.7.3.zip -d /var/www/html/prestashop
Quindi, imposta la proprietà corretta sulla directory di prestashop utilizzando il seguente comando:
chown -R apache:apache /var/www/html/prestashop
Una volta terminato, puoi procedere al passaggio successivo.
Configura Apache per PrestaShop
Successivamente, dovrai creare un file di configurazione dell'host virtuale Apache per PrestaShop. Puoi crearlo con il seguente comando:
nano /etc/httpd/conf.d/prestashop.conf
Aggiungi le seguenti righe:
<VirtualHost *:80>
    ServerAdmin [email protected]
    ServerName prestashop.example.com
    DocumentRoot /var/www/html/prestashop

    <Directory /var/www/html/prestashop>
        Options +FollowSymlinks
        AllowOverride All
        Require all granted
    </Directory>

    ErrorLog /var/log/httpd/prestashop-error_log
    CustomLog /var/log/httpd/prestashop-access_log common
</VirtualHost>
Salva e chiudi il file quando hai finito. Quindi, riavvia il servizio Apache per applicare le modifiche:
systemctl restart httpd
Successivamente, verifica lo stato del servizio Apache utilizzando il seguente comando:
systemctl status httpd
Dovresti ottenere il seguente output:
? httpd.service - The Apache HTTP Server
   Loaded: loaded (/usr/lib/systemd/system/httpd.service; disabled; vendor preset: disabled)
  Drop-In: /usr/lib/systemd/system/httpd.service.d
           ??php-fpm.conf
   Active: active (running) since Wed 2021-04-07 01:04:19 EDT; 2h 2min ago
     Docs: man:httpd.service(8)
 Main PID: 47841 (httpd)
   Status: "Total requests: 313; Idle/Busy workers 100/0;Requests/sec: 0.0425; Bytes served/sec: 1.2KB/sec"
    Tasks: 278 (limit: 12524)
   Memory: 35.9M
   CGroup: /system.slice/httpd.service
           ??47841 /usr/sbin/httpd -DFOREGROUND
           ??47843 /usr/sbin/httpd -DFOREGROUND
           ??47844 /usr/sbin/httpd -DFOREGROUND
           ??47845 /usr/sbin/httpd -DFOREGROUND
           ??47846 /usr/sbin/httpd -DFOREGROUND
           ??48061 /usr/sbin/httpd -DFOREGROUND

Apr 07 01:04:19 centos8 systemd[1]: Stopped The Apache HTTP Server.
Apr 07 01:04:19 centos8 systemd[1]: Starting The Apache HTTP Server...
Una volta terminato, puoi procedere al passaggio successivo.
Configura Firewall
Successivamente, dovrai consentire le porte 80 e 443 tramite il firewall. Puoi consentirli con il seguente comando:
firewall-cmd --zone=public --permanent --add-service=http
firewall-cmd --zone=public --permanent --add-service=https
Quindi, ricarica il firewall per applicare le modifiche:
firewall-cmd --reload
Una volta terminato, puoi procedere al passaggio successivo.
Accedi a PrestaShop
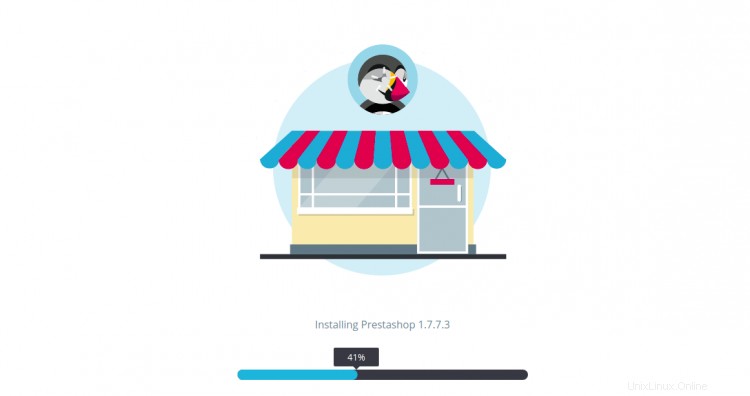
Ora apri il tuo browser web e accedi all'interfaccia web di PrestaShop utilizzando l'URL http://prestashop.example.com . Verrai reindirizzato alla seguente pagina:
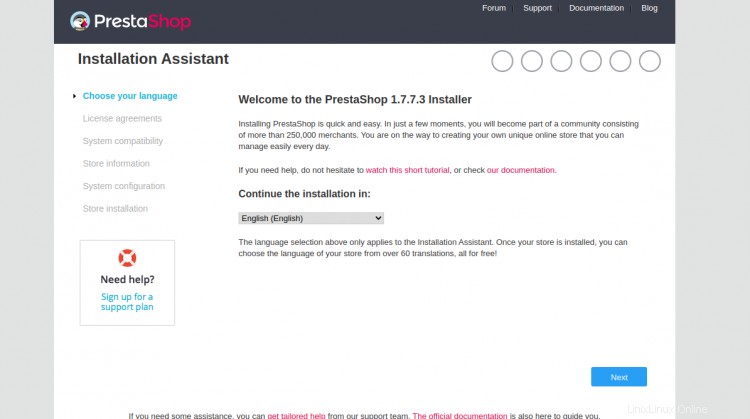
Seleziona la tua lingua e fai clic su Avanti pulsante. Dovresti vedere la seguente pagina:

Accetta il contratto di licenza e fai clic su Avanti pulsante. Dovresti vedere la seguente pagina:

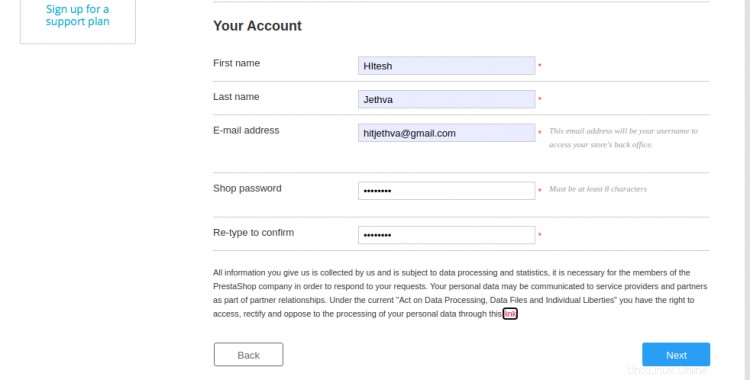
Fornisci il nome del tuo negozio, le informazioni sul paese, le informazioni sull'account e fai clic su Avanti pulsante. Dovresti vedere la seguente pagina:
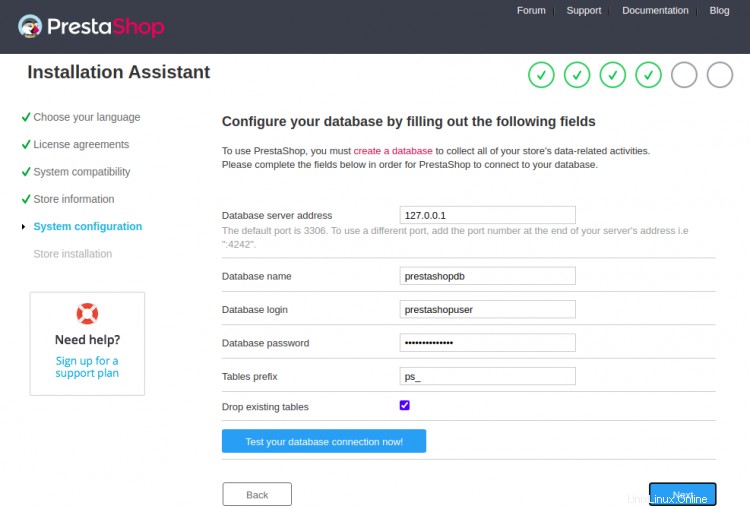
Fornisci il nome del database, il nome utente del database, la password e fai clic su Avanti pulsante. Una volta terminata l'installazione, dovresti vedere la seguente pagina:

Fai clic su Gestisci il tuo negozio pulsante. Dovresti vedere la seguente pagina:

Ora rimuovi la cartella di installazione con il seguente comando:
rm -rf /var/www/html/prestashop/install
Quindi, fai clic sull'URL di amministrazione di PrestaShop . Dovresti vedere la seguente pagina:
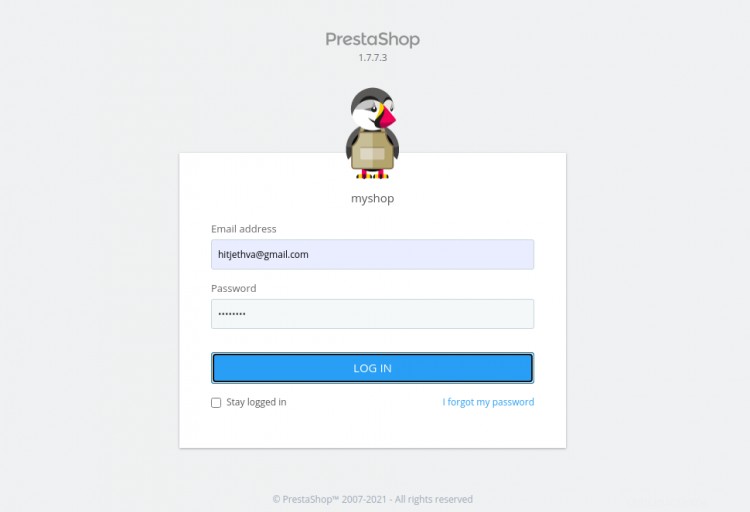
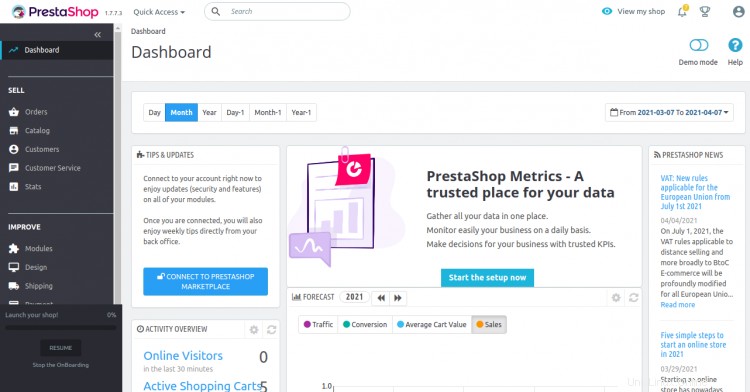
Fornisci il nome utente e la password dell'amministratore e fai clic su ACCEDI pulsante. Dovresti vedere la dashboard di PrestaShop nella pagina seguente:
PrestaShop sicuro con Let's Encrypt SSL
Successivamente, dovrai installare il client Certbot per installare Let's Encrypt SSL per PrestaShop. Puoi installarlo con il seguente comando:
dnf install letsencrypt python3-certbot-apache
Quindi, ottieni e installa un certificato SSL per il tuo dominio Lets con il seguente comando:
certbot --apache -d prestashop.example.com
Ti verrà chiesto di fornire il tuo indirizzo email e di accettare i termini del servizio:
Saving debug log to /var/log/letsencrypt/letsencrypt.log
Plugins selected: Authenticator apache, Installer apache
Enter email address (used for urgent renewal and security notices)
 (Enter 'c' to cancel): [email protected]

- - - - - - - - - - - - - - - - - - - - - - - - - - - - - - - - - - - - - - - -
Please read the Terms of Service at
https://letsencrypt.org/documents/LE-SA-v1.2-November-15-2017.pdf. You must
agree in order to register with the ACME server. Do you agree?
- - - - - - - - - - - - - - - - - - - - - - - - - - - - - - - - - - - - - - - -
(Y)es/(N)o: Y

- - - - - - - - - - - - - - - - - - - - - - - - - - - - - - - - - - - - - - - -
Would you be willing, once your first certificate is successfully issued, to
share your email address with the Electronic Frontier Foundation, a founding
partner of the Let's Encrypt project and the non-profit organization that
develops Certbot? We'd like to send you email about our work encrypting the web,
EFF news, campaigns, and ways to support digital freedom.
- - - - - - - - - - - - - - - - - - - - - - - - - - - - - - - - - - - - - - - -
(Y)es/(N)o: Y
Account registered.
Requesting a certificate for prestashop.example.com
Performing the following challenges:
http-01 challenge for prestashop.example.com
Waiting for verification.
Cleaning up challenges
Deploying Certificate to VirtualHost /etc/httpd/conf.d/prestashop.conf
Redirecting all traffic on port 80 to ssl in /etc/httpd/conf.d/prestashop.conf

- - - - - - - - - - - - - - - - - - - - - - - - - - - - - - - - - - - - - - - -
Congratulations! You have successfully enabled https://prestashop.example.com
- - - - - - - - - - - - - - - - - - - - - - - - - - - - - - - - - - - - - - - -
Subscribe to the EFF mailing list (email: [email protected]).


IMPORTANT NOTES:
 - Congratulations! Your certificate and chain have been saved at:
   /etc/letsencrypt/live/prestashop.example.com/fullchain.pem
   Your key file has been saved at:
   /etc/letsencrypt/live/prestashop.example.com/privkey.pem
   Your certificate will expire on 2021-06-09. To obtain a new or
   tweaked version of this certificate in the future, simply run
   certbot again with the "certonly" option. To non-interactively
   renew *all* of your certificates, run "certbot renew"
 - If you like Certbot, please consider supporting our work by:

   Donating to ISRG / Let's Encrypt:   https://letsencrypt.org/donate
   Donating to EFF:                    https://eff.org/donate-le
Ora puoi accedere al tuo sito web in modo sicuro utilizzando l'URL https://prestashop.example.com.
Conclusione
Congratulazioni! hai installato con successo PrestaShop con Apache e Let's Encrypt SSL su CentOS 8. Ora puoi aggiungere il tuo prodotto a PrestaShop e iniziare a vendere online. Sentiti libero di chiedermi se hai domande.