Il server perfetto - CentOS 6.2 x86_64 con nginx [ISPConfig 3]
Questo tutorial mostra come preparare un server CentOS 6.2 x86_64 per l'installazione di ISPConfig 3 e come installare ISPConfig 3. ISPConfig 3 è un pannello di controllo di webhosting che consente di configurare i seguenti servizi tramite un browser web:nginx web server, Postfix server di posta, MySQL, server dei nomi BIND, PureFTPd, SpamAssassin, ClamAV, Mailman e molti altri. Dalla versione 3.0.4, ISPConfig viene fornito con il supporto completo per il server web nginx oltre ad Apache; questo tutorial copre la configurazione di un server che utilizza nginx, non Apache.
Tieni presente che questa configurazione non funziona per ISPConfig 2 ! È valido solo per ISPConfig 3!
Non garantisco che questo funzionerà per te!
Manuale ISPConfig 3
Per imparare a usare ISPConfig 3, consiglio vivamente di scaricare il manuale ISPConfig 3.
Su circa 300 pagine, copre il concetto alla base di ISPConfig (amministratore, rivenditori, clienti), spiega come installare e aggiornare ISPConfig 3, include un riferimento per tutti i moduli e i campi dei moduli in ISPConfig insieme a esempi di input validi e fornisce tutorial per le attività più comuni in ISPConfig 3. Descrive anche come rendere più sicuro il tuo server e include una sezione per la risoluzione dei problemi alla fine.
App ISPConfig Monitor per Android
Con l'app ISPConfig Monitor, puoi controllare lo stato del tuo server e scoprire se tutti i servizi funzionano come previsto. Puoi controllare le porte TCP e UDP ed eseguire il ping dei tuoi server. In aggiunta a ciò, puoi utilizzare questa app per richiedere dettagli dai server su cui è installato ISPConfig (tieni presente che la versione minima di ISPConfig 3 installata con supporto per l'app ISPConfig Monitor è 3.0.3.3! ); questi dettagli includono tutto ciò che sai dal modulo Monitor nel pannello di controllo di ISPConfig (ad es. servizi, log di posta e di sistema, coda di posta, informazioni su CPU e memoria, utilizzo del disco, quota, dettagli del sistema operativo, registro RKHunter, ecc.) e ovviamente , poiché ISPConfig è compatibile con più server, puoi controllare tutti i server controllati dal tuo server master ISPConfig.
Per le istruzioni di download e utilizzo, visitare http://www.ispconfig.org/ispconfig-3/ispconfig-monitor-app-for-android/.
1 Requisiti
Per installare un tale sistema avrai bisogno di quanto segue:
- Scarica i due DVD di CentOS 6.2 da un mirror accanto a te (l'elenco dei mirror è disponibile qui:http://isoredirect.centos.org/centos/6/isos/x86_64/).
- una connessione Internet veloce.
2 Nota preliminare
In questo tutorial utilizzo l'hostname server1.example.com con l'indirizzo IP 192.168.0.100 e il gateway 192.168.0.1. Queste impostazioni potrebbero differire per te, quindi devi sostituirle dove appropriato.
3 Installa il sistema di base
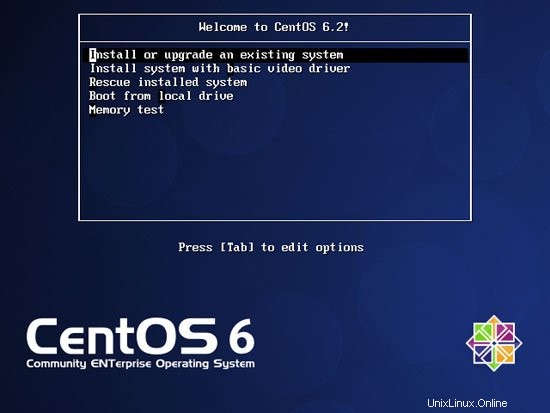
Avvia dal tuo primo DVD CentOS 6.2 (DVD 1). Seleziona Installa o aggiorna un sistema esistente:
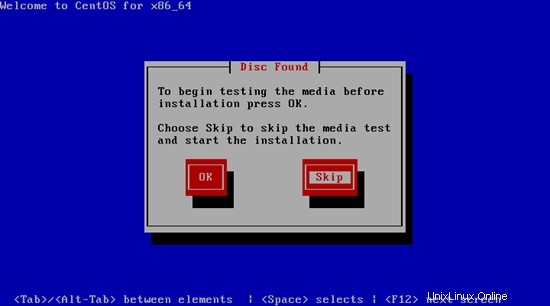
Il test del supporto di installazione può richiedere molto tempo, quindi saltiamo questo test qui:
Viene visualizzata la schermata di benvenuto del programma di installazione di CentOS. Fare clic su Avanti:

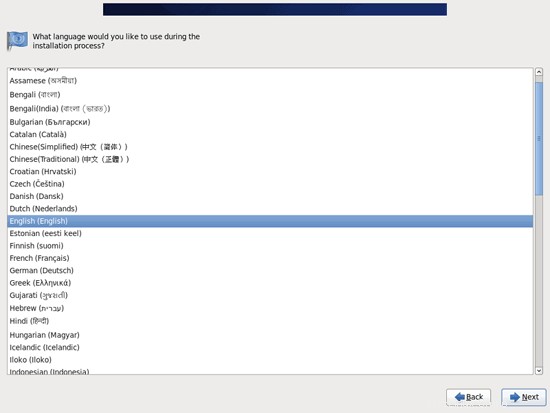
Scegli la lingua successiva:
Seleziona il layout della tastiera:
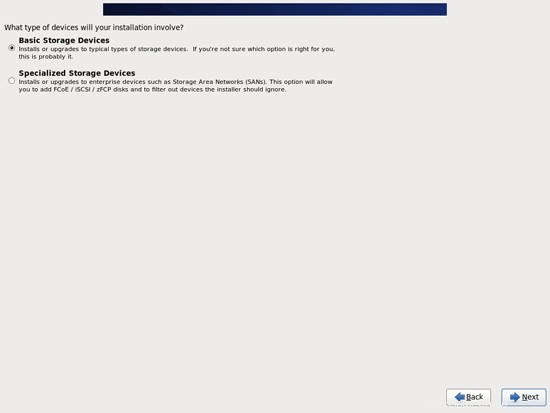
Presumo che utilizzi un disco rigido collegato localmente, quindi dovresti selezionare Dispositivi di archiviazione di base qui:
Potrebbe essere visualizzato il seguente avviso - Avviso dispositivo di archiviazione. Se vedi questo, fai clic sul pulsante Sì, elimina tutti i dati per procedere:
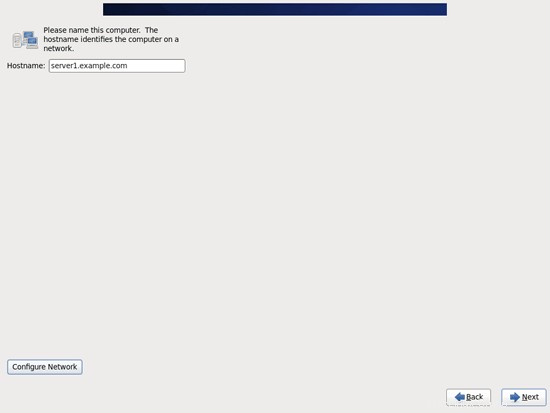
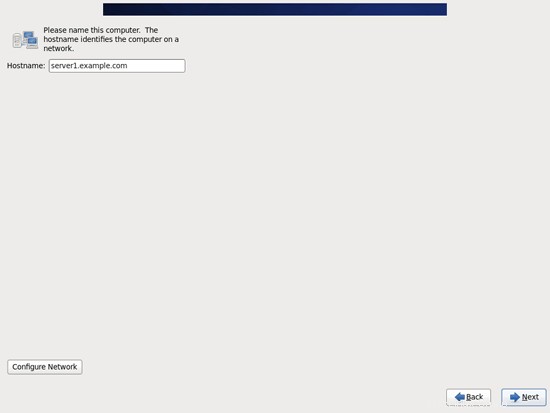
Inserisci il nome host del server (es. server1.example.com), quindi fai clic sul pulsante Configura rete:
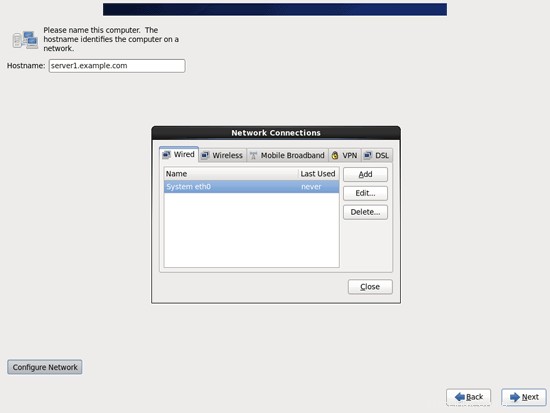
Vai alla scheda Wired, seleziona l'interfaccia di rete (probabilmente eth0) e fai clic su Modifica...:
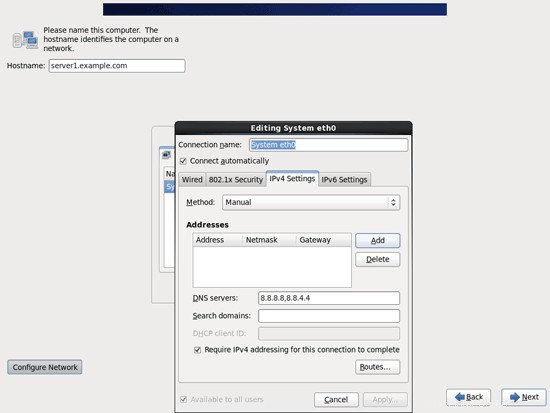
Seleziona la casella di controllo Connetti automaticamente e vai alla scheda Impostazioni IPv4 e seleziona Manuale nel menu a discesa Metodo. Compila uno, due o tre nameserver (separati da virgola) nel campo Server DNS (es. 8.8.8.8,8.8.4.4), quindi clicca sul pulsante Aggiungi accanto all'area Indirizzi:
Ora dai alla tua scheda di rete un indirizzo IP statico e una maschera di rete (in questo tutorial sto usando l'indirizzo IP 192.168.0.100 e la maschera di rete 255.255.255.0 a scopo dimostrativo; se non sei sicuro dei valori corretti, http://www. subnetmask.info potrebbe aiutarti). Compila anche il tuo gateway (es. 192.168.0.1) e fai clic sul pulsante Applica...:
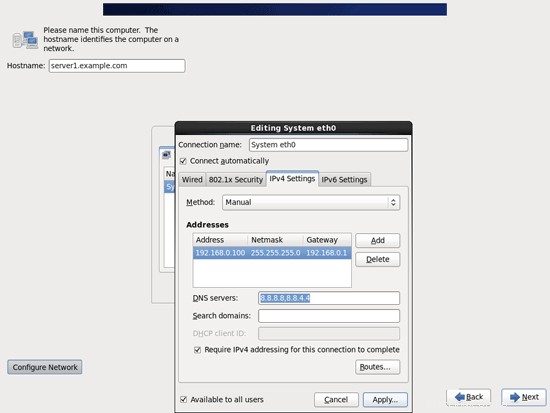
La configurazione di rete è ora terminata. Fare clic sul pulsante Avanti:
Il server perfetto - CentOS 6.2 x86_64 con nginx [ISPConfig 3] - Pagina 2
4 Regola /etc/hosts
Quindi modifichiamo /etc/hosts. Rendilo simile a questo:
vi /etc/hosts
127.0.0.1 localhost localhost.localdomain localhost4 localhost4.localdomain4 192.168.0.100 server1.example.com server1 ::1 localhost localhost.localdomain localhost6 localhost6.localdomain6 |
5 Configura il firewall
(Puoi saltare questo capitolo se hai già disabilitato il firewall al termine dell'installazione di base del sistema.)
Voglio installare ISPConfig alla fine di questo tutorial che viene fornito con il proprio firewall. Ecco perché ora disabilito il firewall CentOS predefinito. Naturalmente, sei libero di lasciarlo acceso e configurarlo in base alle tue esigenze (ma in seguito non dovresti utilizzare nessun altro firewall poiché molto probabilmente interferirà con il firewall CentOS).
Corri
system-config-firewall
e disabilitare il firewall.
Per verificare che il firewall sia stato davvero disabilitato, puoi eseguire
iptables -L
dopo. L'output dovrebbe essere simile a questo:
[[email protected] ~]# iptables -L
Chain INPUT (policy ACCEPT)
target prot opt source destinazione
Chain FORWARD (policy ACCEPT)
target prot opt sorgente destinazione
CHAIN OUTPUT (policy ACCEPT)
target prot opt source destinazione
[[email protected] ~]#
6 Disattiva SELinux
SELinux è un'estensione di sicurezza di CentOS che dovrebbe fornire una sicurezza estesa. Secondo me non è necessario per configurare un sistema sicuro e di solito causa più problemi che vantaggi (pensaci dopo aver fatto una settimana di risoluzione dei problemi perché alcuni servizi non funzionavano come previsto, e quindi scopri che era tutto ok, solo SELinux stava causando il problema). Pertanto lo disabilito (questo è un must se vuoi installare ISPConfig in un secondo momento).
Modifica /etc/selinux/config e imposta SELINUX=disabled:
vi /etc/selinux/config
# This file controls the state of SELinux on the system. # SELINUX= can take one of these three values: # enforcing - SELinux security policy is enforced. # permissive - SELinux prints warnings instead of enforcing. # disabled - No SELinux policy is loaded. SELINUX=disabled # SELINUXTYPE= can take one of these two values: # targeted - Targeted processes are protected, # mls - Multi Level Security protection. SELINUXTYPE=targeted |
Successivamente dobbiamo riavviare il sistema:
reboot
7 Abilita repository aggiuntivi e installa alcuni software
Per prima cosa importiamo le chiavi GPG per i pacchetti software:
rpm --import /etc/pki/rpm-gpg/RPM-GPG-KEY*
Quindi abilitiamo i repository RPMforge ed EPEL sul nostro sistema CentOS poiché molti dei pacchetti che installeremo nel corso di questo tutorial non sono disponibili nei repository CentOS 6.2 ufficiali:
rpm --import http://dag.wieers.com/rpm/packages/RPM-GPG-KEY.dag.txt
cd /tmp
wget http://pkgs.repoforge.org/rpmforge-release/rpmforge-release-0.5.2-2.el6.rf.x86_64.rpm
rpm -ivh rpmforge-release- 0.5.2-2.el6.rf.x86_64.rpm
(Se il link sopra non funziona più, puoi trovare la versione corrente di rpmforge-release qui:http://packages.sw.be/rpmforge-release/)
rpm --import https://fedoraproject.org/static/0608B895.txt
wget http://dl.fedoraproject.org/pub/epel/6/x86_64/epel-release-6-5.noarch. rpm
rpm -ivh epel-release-6-5.noarch.rpm
Dobbiamo anche abilitare il repository RPM Remi che contiene il pacchetto php-fpm che installeremo in seguito:
rpm --import http://rpms.famillecollet.com/RPM-GPG-KEY-remi
rpm -ivh http://rpms.famillecollet.com/enterprise/remi-release-6.rpm
yum install yum-priorities
Modifica /etc/yum.repos.d/epel.repo...
vi /etc/yum.repos.d/epel.repo
... e aggiungi la linea priority=10 alla sezione [epel]:
[epel] name=Extra Packages for Enterprise Linux 6 - $basearch #baseurl=http://download.fedoraproject.org/pub/epel/6/$basearch mirrorlist=https://mirrors.fedoraproject.org/metalink?repo=epel-6&arch=$basearch failovermethod=priority enabled=1 priority=10 gpgcheck=1 gpgkey=file:///etc/pki/rpm-gpg/RPM-GPG-KEY-EPEL-6 [...] |
Quindi fai lo stesso per la sezione [remi] in /etc/yum.repos.d/remi.repo, oltre a modificare abilitato a 1:
vi /etc/yum.repos.d/remi.repo
[remi] name=Les RPM de remi pour Enterprise Linux $releasever - $basearch #baseurl=http://rpms.famillecollet.com/enterprise/$releasever/remi/$basearch/ mirrorlist=http://rpms.famillecollet.com/enterprise/$releasever/remi/mirror enabled=1 priority=10 gpgcheck=1 gpgkey=file:///etc/pki/rpm-gpg/RPM-GPG-KEY-remi failovermethod=priority [remi-test] name=Les RPM de remi en test pour Enterprise Linux $releasever - $basearch #baseurl=http://rpms.famillecollet.com/enterprise/$releasever/test/$basearch/ mirrorlist=http://rpms.famillecollet.com/enterprise/$releasever/test/mirror enabled=0 gpgcheck=1 gpgkey=file:///etc/pki/rpm-gpg/RPM-GPG-KEY-remi |
Quindi aggiorniamo i nostri pacchetti esistenti sul sistema:
yum update
Ora installiamo alcuni pacchetti software che saranno necessari in seguito:
yum groupinstall 'Development Tools'
8 Quota
(Se hai scelto uno schema di partizionamento diverso dal mio, devi modificare questo capitolo in modo che la quota si applichi alle partizioni dove ne hai bisogno.)
Per installare quota, eseguiamo questo comando:
yum install quota
Modifica /etc/fstab e aggiungi ,usrjquota=aquota.user,grpjquota=aquota.group,jqfmt=vfsv0 alla partizione / (/dev/mapper/vg_server1-lv_root):
vi /etc/fstab
# # /etc/fstab # Created by anaconda on Fri Dec 16 00:22:26 2011 # # Accessible filesystems, by reference, are maintained under '/dev/disk' # See man pages fstab(5), findfs(8), mount(8) and/or blkid(8) for more info # /dev/mapper/vg_server1-lv_root / ext4 defaults,usrjquota=aquota.user,grpjquota=aquota.group,jqfmt=vfsv0 1 1 UUID=d995c881-fbc7-409f-bcad-86d255331a3f /boot ext4 defaults 1 2 /dev/mapper/vg_server1-lv_swap swap swap defaults 0 0 tmpfs /dev/shm tmpfs defaults 0 0 devpts /dev/pts devpts gid=5,mode=620 0 0 sysfs /sys sysfs defaults 0 0 proc /proc proc defaults 0 0 |
Quindi esegui
mount -o remount /
quotacheck -avugm
quotaon -avug
per abilitare la quota.
9 Sincronizzare l'orologio di sistema
È una buona idea sincronizzare l'orologio di sistema con un NTP (n rete t ora p rotocol) server su Internet. Esegui semplicemente
yum install ntp
e l'ora del tuo sistema sarà sempre sincronizzata.
10 Installa MySQL
Installa MySQL come segue:
yum install mysql mysql-server
Quindi crea i collegamenti di avvio del sistema per MySQL e avvialo:
chkconfig --levels 235 mysqld su
/etc/init.d/mysqld start
Imposta le password per l'account root MySQL:
mysql_secure_installation
[[email protected] tmp]# mysql_secure_installation
NOTA: L'ESECUZIONE DI TUTTE LE PARTI DI QUESTO SCRIPT È CONSIGLIATA PER TUTTI MySQL
SERVER IN PRODUZIONE UTILIZZO! PER FAVORE, LEGGERE ATTENTAMENTE OGNI PASSO!
Per accedere a MySQL per proteggerlo, avremo necessità della password
corrente per l'utente root. Se hai appena installato MySQL e
non hai impostato la password root, la password sarà vuota,
quindi dovresti premere invio qui.
Invio password corrente per root (inserire per nessuno):
OK, password utilizzata con successo, in corso...
L'impostazione della password di root assicura che nessuno possa accedere alla root di MySQL
utente senza l'appropriata autorizzazione.
Impostare la password di root? [S/n] <-- ENTER
Nuova password: <-- yourrootsqlpassword
Reinserire nuova password: <-- yourrootsqlpassword
Password aggiornata con successo!
Ricaricamento tabelle privilegi. .
... Successo!
Per impostazione predefinita, un'installazione MySQL ha un utente anonimo, consentendo a chiunque
di accedere a MySQL senza deve avere un account utente creato per
loro. Questo è destinato solo a test e a rendere l'installazione
andare un po' più agevole. Dovresti rimuoverli prima di trasferirti in un ambiente di produzione.
Rimuovere utenti anonimi? [S/n] <-- ENTER
... Successo!
Normalmente, a root dovrebbe essere consentito di connettersi da 'localhost'. Questo
garantisce che qualcuno non riesca a indovinare la password root dalla rete.
Disconsentire l'accesso root da remoto? [S/n] <-- ENTER
... Successo!
Per impostazione predefinita, MySQL viene con un database denominato 'test' a cui chiunque può
accedere. Questo è anche destinato solo a test, e dovrebbe essere rimosso
prima di trasferirsi in un ambiente di produzione.
Rimuovere database di test e accedere ad esso? [S/n] <-- ENTER
- Dropping database di test...
... Successo!
- Rimozione privilegi sul database di test...
... Successo !
Ricaricare le tabelle di privilegi garantirà che tutte le modifiche apportate finora
diventeranno immediatamente effettive.
Ricaricare le tabelle privilegi adesso? [S/n] <-- ENTER
... Successo!
Pulizia ...
Fatto! Se hai completato tutti i passaggi precedenti, l'installazione di MySQL
dovrà essere protetta.
Grazie per aver utilizzato MySQL!
[esempio @unixlinux.online tmp]#
Il server perfetto - CentOS 6.2 x86_64 con nginx [ISPConfig 3] - Pagina 4
11 Installa Courier-IMAP, Courier-Authlib e Maildrop
Sfortunatamente non ci sono pacchetti rpm per Courier-IMAP, Courier-Authlib e Maildrop, quindi dobbiamo costruirli noi stessi.
Per prima cosa rimuovi Dovecot (CentOS 6.2 viene fornito con Dovecot 2.x; sfortunatamente, ISPConfig 3 supporta Dovecot 1.2.x, ma non 2.x):
yum remove dovecot dovecot-mysql
Quindi installa i prerequisiti necessari per creare pacchetti rpm Courier:
yum install rpm-build gcc mysql-devel openssl-devel cyrus-sasl-devel pkgconfig zlib-devel pcre-devel openldap-devel postgresql-devel expect libtool-ltdl-devel openldap-servers libtool gdbm-devel pam-devel gamin-devel libidn-devel
I pacchetti RPM non dovrebbero essere compilati come root; Courier-imap rifiuterà anche di compilare se rileva che la compilazione viene eseguita come utente root. Pertanto ora creiamo un normale account utente (falko in questo esempio) e gli diamo una password:
useradd -m -s /bin/bash falko
passwd falko
Avremo bisogno del comando sudo in seguito in modo che l'utente falko possa compilare e installare i pacchetti rpm. Ma prima, dobbiamo consentire a falko di eseguire tutti i comandi usando sudo:
Corri
visudo
Nel file che si apre c'è una riga radice ALL=(ALL) ALL. Aggiungi una linea simile per falko appena sotto quella linea:
[...] ## Allow root to run any commands anywhere root ALL=(ALL) ALL falko ALL=(ALL) ALL [...] |
Ora siamo pronti per costruire il nostro pacchetto rpm. Prima diventa l'utente falko:
su falko
Quindi creiamo il nostro ambiente di costruzione:
mkdir $HOME/rpm
mkdir $HOME/rpm/SOURCES
mkdir $HOME/rpm/SPECS
mkdir $HOME/rpm/BUILD
mkdir $HOME/rpm/BUILDROOT
mkdir $HOME/rpm/SRPMS
mkdir $HOME/rpm/RPMS
mkdir $HOME/rpm/RPMS/i386
mkdir $HOME/rpm/RPMS/x86_64
echo "%_topdir $HOME/rpm" >> $HOME/.rpmmacros
Ora creiamo una directory di download e scarichiamo i file sorgente da http://www.courier-mta.org/download.php:
mkdir $HOME/download
cd $HOME/download
wget https://sourceforge.net/projects/courier/files/authlib/0.63.0/courier-authlib-0.63.0.tar.bz2/download
wget https://sourceforge.net/projects/courier /files/imap/4.9.3/courier-imap-4.9.3.tar.bz2/download
wget https://sourceforge.net/projects/courier/files/maildrop/2.5.5/maildrop-2.5 .5.tar.bz2/scarica
(Nota che uso Courier-IMAP 4.9.3 qui invece del più recente 4.10.0 perché 4.10.0 dipende da systemctl che esiste per Fedora, ma non per CentOS.)
Ora (sempre in $HOME/downloads) possiamo costruire corriere-authlib:
sudo rpmbuild -ta courier-authlib-0.63.0.tar.bz2
Dopo il processo di compilazione, i pacchetti rpm possono essere trovati in /root/rpmbuild/RPMS/x86_64 (/root/rpmbuild/RPMS/i686 se sei su un sistema i686). Il comando
sudo ls -l /root/rpmbuild/RPMS/x86_64
mostra i pacchetti rpm disponibili:
[[email protected] downloads]$ sudo ls -l /root/rpmbuild/RPMS/x86_64
total 528
-rw-r--r-- 1 root root 124008 Dec 16 01:10 courier -authlib-0.63.0-1.el6.x86_64.rpm
-rw-r--r-- 1 root root 270860 16 dic 01:10 courier-authlib-debuginfo-0.63.0-1.el6. x86_64.rpm
-rw-r--r-- 1 root root 35072 dic 16 01:10 courier-authlib-devel-0.63.0-1.el6.x86_64.rpm
-rw-r --r-- 1 root root 17368 16 dic 01:10 courier-authlib-ldap-0.63.0-1.el6.x86_64.rpm
-rw-r--r-- 1 root root 13928 dic 16 01:10 courier-authlib-mysql-0.63.0-1.el6.x86_64.rpm
-rw-r--r-- 1 root root 13076 16 dic 01:10 courier-authlib-pgsql-0.63. 0-1.el6.x86_64.rpm
-rw-r--r-- 1 root root 8312 16 dic 01:10 courier-authlib-pipe-0.63.0-1.el6.x86_64.rpm
-rw-r--r-- 1 root root 34064 16 dec 01:10 courier-authlib-userdb-0.63.0-1.el6.x86_64.rpm
[[email protected] downloads]$
Seleziona quelli che desideri installare e installali in questo modo:
sudo rpm -ivh /root/rpmbuild/RPMS/x86_64/courier-authlib-0.63.0-1.el6.x86_64.rpm /root/rpmbuild/RPMS/x86_64/courier-authlib-mysql-0.63.0-1.el6.x86_64.rpm /root/rpmbuild/RPMS/x86_64/courier-authlib-devel-0.63.0-1.el6.x86_64.rpm
Ora torniamo alla nostra directory dei download:
cd $HOME/downloads
Esegui i seguenti comandi per creare le directory richieste/modificare i permessi delle directory (perché altrimenti il processo di compilazione per Courier-Imap avrà esito negativo):
sudo mkdir -p /var/cache/ccache/tmp
sudo chmod o+rwx /var/cache/ccache/
sudo chmod 777 /var/cache/ccache/tmp
Ora esegui di nuovo rpmbuild, questa volta senza sudo, altrimenti la compilazione fallirà perché è stata eseguita come root:
rpmbuild -ta courier-imap-4.9.3.tar.bz2
Dopo il processo di compilazione, i pacchetti rpm possono essere trovati in $HOME/rpm/RPMS/x86_64 ($HOME/rpm/RPMS/i686 se sei su un sistema i686):
cd $HOME/rpm/RPMS/x86_64
Il comando
ls -l
mostra i pacchetti rpm disponibili:
[[email protected] x86_64]$ ls -l
totale 1116
-rw-rw-r-- 1 falko falko 331908 16 dic 01:33 corriere-imap-4.9.3-1.x86_64 .rpm
-rw-rw-r-- 1 falko falko 800864 16 dic 01:33 corriere-imap-debuginfo-4.9.3-1.x86_64.rpm
[[email protected] x86_64] $
Puoi installare corriere-imap in questo modo:
sudo rpm -ivh courier-imap-4.9.3-1.x86_64.rpm
Ora torniamo alla nostra directory dei download:
cd $HOME/downloads
ed esegui di nuovo rpmbuild, questa volta per creare un pacchetto maildrop:
sudo rpmbuild -ta maildrop-2.5.5.tar.bz2
Dopo il processo di compilazione, i pacchetti rpm possono essere trovati in /root/rpmbuild/RPMS/x86_64 (/root/rpmbuild/RPMS/i686 se sei su un sistema i686). Il comando
sudo ls -l /root/rpmbuild/RPMS/x86_64
mostra i pacchetti rpm disponibili:
[[email protected] downloads]$ sudo ls -l /root/rpmbuild/RPMS/x86_64
total 1712
-rw-r--r-- 1 root root 124008 dic 16 01:10 courier -authlib-0.63.0-1.el6.x86_64.rpm
-rw-r--r-- 1 root root 270860 16 dic 01:10 courier-authlib-debuginfo-0.63.0-1.el6. x86_64.rpm
-rw-r--r-- 1 root root 35072 dic 16 01:10 courier-authlib-devel-0.63.0-1.el6.x86_64.rpm
-rw-r --r-- 1 root root 17368 16 dic 01:10 courier-authlib-ldap-0.63.0-1.el6.x86_64.rpm
-rw-r--r-- 1 root root 13928 dic 16 01:10 courier-authlib-mysql-0.63.0-1.el6.x86_64.rpm
-rw-r--r-- 1 root root 13076 16 dic 01:10 courier-authlib-pgsql-0.63. 0-1.el6.x86_64.rpm
-rw-r--r-- 1 root root 8312 16 dic 01:10 courier-authlib-pipe-0.63.0-1.el6.x86_64.rpm
-rw-r--r-- 1 root root 34064 16 dec 01:10 courier-authlib-userdb-0.63.0-1.el6.x86_64.rpm
-rw-r--r-- 1 root 286480 16 dic 01:40 maildrop-2.5.5-1.x86_64.rpm
-rw-r--r-- 1 root 751376 16 dic 01:40 maildrop-debuginfo-2.5.5- 1.x86_64.r pm
-rw-r--r-- 1 root root 102104 16 dic 01:40 maildrop-devel-2.5.5-1.x86_64.rpm
-rw-r--r-- 1 root root 65940 16 dic 01:40 maildrop-man-2.5.5-1.x86_64.rpm
[[email protected] downloads]$
Ora puoi installare maildrop in questo modo:
sudo rpm -ivh /root/rpmbuild/RPMS/x86_64/maildrop-2.5.5-1.x86_64.rpm
Dopo aver compilato e installato tutti i pacchetti necessari, puoi diventare di nuovo root digitando
exit
Ora avvia Courier-IMAP/-POP3 come segue:
/etc/init.d/courier-imap start
12 Installa Postfix
Postfix può essere installato come segue:
yum install postfix
Quindi disattiva Sendmail e avvia Postfix:
chkconfig --levels 235 sendmail off
chkconfig --levels 235 postfix on
/etc/init.d/sendmail stop
/etc/init.d/postfix restart
13 Installa Getmail
Getmail può essere installato come segue:
yum install getmail
14 Installa Amavisd-new, SpamAssassin e ClamAV
Per installare amavisd-new, spamassassin e clamav, eseguire il comando seguente:
yum install amavisd-new spamassassin clamav clamd unzip bzip2 unrar perl-DBD-mysql
Quindi iniziamo freshclam, amavisd e clamd.amavisd:
sa-update
chkconfig --levels 235 amavisd su
chkconfig --del clamd
chkconfig --levels 235 clamd.amavisd su
/usr/bin/freshclam
/etc/init.d/amavisd start
/etc/init.d/clamd.amavisd start
Il server perfetto - CentOS 6.2 x86_64 con nginx [ISPConfig 3] - Pagina 5
15 Installa Nginx, PHP5 (PHP-FPM) e Fcgiwrap
Nginx è disponibile come pacchetto per CentOS 6.2 (da EPEL) che possiamo installare come segue:
yum install nginx
Se Apache2 è già installato sul sistema, interrompilo ora...
/etc/init.d/httpd stop
... e rimuovi i collegamenti di avvio del sistema di Apache:
chkconfig --del httpd
Quindi creiamo i collegamenti di avvio del sistema per nginx e lo avviamo:
chkconfig --levels 235 nginx su
/etc/init.d/nginx start
(Se sono installati sia Apache2 che nginx, il programma di installazione di ISPConfig 3 ti chiederà quale vuoi usare - rispondi a nginx in questo caso. Se è installato solo uno di entrambi, ISPConfig eseguirà automaticamente la configurazione necessaria.)
Possiamo far funzionare PHP5 in nginx tramite PHP-FPM (PHP-FPM (FastCGI Process Manager) è un'implementazione PHP FastCGI alternativa con alcune funzionalità aggiuntive utili per siti di qualsiasi dimensione, in particolare i siti più affollati). Possiamo installare php-fpm insieme a php-cli e alcuni moduli PHP5 come php-mysql di cui hai bisogno se vuoi usare MySQL dai tuoi script PHP come segue:
yum install php-fpm php-cli php-mysql php-gd php-imap php-ldap php-odbc php-pear php-xml php-xmlrpc php-xcache php-magickwand php-magpierss php-mbstring php-mcrypt php-mssql php-shout php-snmp php-soap php-tidy
Quindi apriamo /etc/php.ini...
vi /etc/php.ini
... e modificare la segnalazione degli errori (in modo che gli avvisi non vengano più visualizzati):
[...] ;error_reporting = E_ALL & ~E_DEPRECATED error_reporting = E_ALL & ~E_NOTICE [...] |
Imposta anche cgi.fix_pathinfo=0:
vi /etc/php.ini
[...] ; cgi.fix_pathinfo provides *real* PATH_INFO/PATH_TRANSLATED support for CGI. PHP's ; previous behaviour was to set PATH_TRANSLATED to SCRIPT_FILENAME, and to not grok ; what PATH_INFO is. For more information on PATH_INFO, see the cgi specs. Setting ; this to 1 will cause PHP CGI to fix its paths to conform to the spec. A setting ; of zero causes PHP to behave as before. Default is 1. You should fix your scripts ; to use SCRIPT_FILENAME rather than PATH_TRANSLATED. ; http://www.php.net/manual/en/ini.core.php#ini.cgi.fix-pathinfo cgi.fix_pathinfo=0 [...] |
(Leggi http://wiki.nginx.org/Pitfalls per scoprire perché dovresti farlo.)
Inoltre, per evitare errori come
[08-Aug-2011 18:07:08] PHP Warning: phpinfo(): It is not safe to rely on the system's timezone settings. You are *required* to use the date.timezone setting or the date_default_timezone_set() function. In case you used any of those methods and you are still getting this warning, you most likely misspelled the timezone identifier. We selected 'Europe/Berlin' for 'CEST/2.0/DST' instead in /usr/share/nginx/html/info.php on line 2
... in /var/log/php-fpm/www-error.log quando chiami uno script PHP nel tuo browser, dovresti impostare date.timezone in /etc/php.ini:
[...] [Date] ; Defines the default timezone used by the date functions ; http://www.php.net/manual/en/datetime.configuration.php#ini.date.timezone date.timezone = "Europe/Berlin" [...] |
Puoi scoprire il fuso orario corretto per il tuo sistema eseguendo:
cat /etc/sysconfig/clock
[[email protected] tmp]# cat /etc/sysconfig/clock
ZONE="Europe/Berlin"
[[email protected] tmp]#
Quindi crea i collegamenti di avvio del sistema per php-fpm e avvialo:
chkconfig --levels 235 php-fpm su
/etc/init.d/php-fpm start
PHP-FPM è un processo demone (con lo script init /etc/init.d/php-fpm) che esegue un server FastCGI sulla porta 9000.
Per ottenere il supporto CGI in nginx, installiamo Fcgiwrap.
Fcgiwrap è un wrapper CGI che dovrebbe funzionare anche per script CGI complessi e può essere utilizzato per ambienti di hosting condiviso perché consente a ciascun vhost di utilizzare la propria directory cgi-bin.
Poiché non esiste un pacchetto fcgiwrap per CentOS 6.2, dobbiamo costruirlo da soli. Per prima cosa installiamo alcuni prerequisiti:
yum install fcgi-devel
Ora possiamo costruire fcgiwrap come segue:
cd /usr/local/src/
git clone git://github.com/gnosek/fcgiwrap.git
cd fcgiwrap
autoreconf -i
./configure
make
make install
Questo installa fcgiwrap su /usr/local/sbin/fcgiwrap.
Quindi installiamo il pacchetto spawn-fcgi che ci permette di eseguire fcgiwrap come demone:
yum install spawn-fcgi
Apri /etc/sysconfig/spawn-fcgi...
vi /etc/sysconfig/spawn-fcgi
... e modifica il file come segue:
# You must set some working options before the "spawn-fcgi" service will work. # If SOCKET points to a file, then this file is cleaned up by the init script. # # See spawn-fcgi(1) for all possible options. # # Example : #SOCKET=/var/run/php-fcgi.sock #OPTIONS="-u apache -g apache -s $SOCKET -S -M 0600 -C 32 -F 1 -P /var/run/spawn-fcgi.pid -- /usr/bin/php-cgi" FCGI_SOCKET=/var/run/fcgiwrap.socket FCGI_PROGRAM=/usr/local/sbin/fcgiwrap FCGI_USER=apache FCGI_GROUP=apache FCGI_EXTRA_OPTIONS="-M 0770" OPTIONS="-u $FCGI_USER -g $FCGI_GROUP -s $FCGI_SOCKET -S $FCGI_EXTRA_OPTIONS -F 1 -P /var/run/spawn-fcgi.pid -- $FCGI_PROGRAM" |
Ora aggiungi l'utente nginx al gruppo apache:
usermod -a -G apache nginx
Crea i collegamenti di avvio del sistema per spawn-fcgi...
chkconfig --levels 235 spawn-fcgi on
... e avvialo come segue:
/etc/init.d/spawn-fcgi start
Ora dovresti trovare il socket fcgiwrap in /var/run/fcgiwrap.socket, di proprietà dell'utente e del gruppo apache (alcuni script, ad esempio Mailman, si aspettano di essere eseguiti dall'utente/gruppo apache, ecco perché non eseguiamo spawn -fcgi come utente/gruppo nginx, ma invece aggiungi nginx al gruppo apache).
16 Installa phpMyAdmin
Quindi installiamo phpMyAdmin:
yum install phpmyadmin
Quindi cambiamo l'autenticazione in phpMyAdmin da cookie a http:
vi /usr/share/phpmyadmin/config.inc.php
[...] /* Authentication type */ $cfg['Servers'][$i]['auth_type'] = 'http'; [...] |
Ora puoi trovare phpMyAdmin nella directory /usr/share/phpmyadmin/.
Dopo aver installato ISPConfig 3, puoi accedere a phpMyAdmin come segue:
The ISPConfig apps vhost on port 8081 for nginx comes with a phpMyAdmin configuration, so you can use http://server1.example.com:8081/phpmyadmin or http://server1.example.com:8081/phpMyAdmin to access phpMyAdmin.
If you want to use a /phpmyadmin or /phpMyAdmin alias that you can use from your web sites, this is a bit more complicated than for Apache because nginx does not have global aliases (i.e., aliases that can be defined for all vhosts). Therefore you have to define these aliases for each vhost from which you want to access phpMyAdmin.
To do this, paste the following into the nginx Directives field on the Options tab of the web site in ISPConfig:
        location /phpmyadmin {
               root /usr/share/;
               index index.php index.html index.htm;
               location ~ ^/phpmyadmin/(.+\.php)$ {
                       try_files $uri =404;
                       root /usr/share/;
                       fastcgi_pass 127.0.0.1:9000;
                       fastcgi_index index.php;
                       fastcgi_param SCRIPT_FILENAME $document_root$fastcgi_script_name;
                       include /etc/nginx/fastcgi_params;
                       fastcgi_buffer_size 128k;
                       fastcgi_buffers 256 4k;
                       fastcgi_busy_buffers_size 256k;
                       fastcgi_temp_file_write_size 256k;
                       fastcgi_intercept_errors on;
               }
               location ~* ^/phpmyadmin/(.+\.(jpg|jpeg|gif|css|png|js|ico|html|xml|txt))$ {
                       root /usr/share/;
               }
        }
        location /phpMyAdmin {
               rewrite ^/* /phpmyadmin last;
} |
If you use https instead of http for your vhost, you should add the line fastcgi_param HTTPS on; to your phpMyAdmin configuration like this:
        location /phpmyadmin {
               root /usr/share/;
               index index.php index.html index.htm;
               location ~ ^/phpmyadmin/(.+\.php)$ {
                       try_files $uri =404;
                       root /usr/share/;
                       fastcgi_pass 127.0.0.1:9000;
                       fastcgi_param HTTPS on; # <-- add this line
                       fastcgi_index index.php;
                       fastcgi_param SCRIPT_FILENAME $document_root$fastcgi_script_name;
                       include /etc/nginx/fastcgi_params;
                       fastcgi_buffer_size 128k;
                       fastcgi_buffers 256 4k;
                       fastcgi_busy_buffers_size 256k;
                       fastcgi_temp_file_write_size 256k;
                       fastcgi_intercept_errors on;
               }
               location ~* ^/phpmyadmin/(.+\.(jpg|jpeg|gif|css|png|js|ico|html|xml|txt))$ {
                       root /usr/share/;
               }
        }
        location /phpMyAdmin {
               rewrite ^/* /phpmyadmin last;
} |
If you use both http and https for your vhost, you need to add the following section to the http {} section in /etc/nginx/nginx.conf (before any include lines) which determines if the visitor uses http or https and sets the $fastcgi_https variable (which we will use in our phpMyAdmin configuration) accordingly:
vi /etc/nginx/nginx.conf
[...]
http {
[...]
    ## Detect when HTTPS is used
    map $scheme $fastcgi_https {
      default off;
      https on;
    }
[...]
}
[...] |
Don't forget to reload nginx afterwards:
/etc/init.d/nginx reload
Then go to the nginx Directives field again, and instead of fastcgi_param HTTPS on; you add the line fastcgi_param HTTPS $fastcgi_https; so that you can use phpMyAdmin for both http and https requests:
        location /phpmyadmin {
               root /usr/share/;
               index index.php index.html index.htm;
               location ~ ^/phpmyadmin/(.+\.php)$ {
                       try_files $uri =404;
                       root /usr/share/;
                       fastcgi_pass 127.0.0.1:9000;
                       fastcgi_param HTTPS $fastcgi_https; # <-- add this line
                       fastcgi_index index.php;
                       fastcgi_param SCRIPT_FILENAME $document_root$fastcgi_script_name;
                       include /etc/nginx/fastcgi_params;
                       fastcgi_buffer_size 128k;
                       fastcgi_buffers 256 4k;
                       fastcgi_busy_buffers_size 256k;
                       fastcgi_temp_file_write_size 256k;
                       fastcgi_intercept_errors on;
               }
               location ~* ^/phpmyadmin/(.+\.(jpg|jpeg|gif|css|png|js|ico|html|xml|txt))$ {
                       root /usr/share/;
               }
        }
        location /phpMyAdmin {
               rewrite ^/* /phpmyadmin last;
} |
17 Install Mailman
Since version 3.0.4, ISPConfig also allows you to manage (create/modify/delete) Mailman mailing lists. If you want to make use of this feature, install Mailman as follows:
yum install mailman
Before we can start Mailman, a first mailing list called mailman must be created:
/usr/lib/mailman/bin/newlist mailman
[[email protected] tmp]# /usr/lib/mailman/bin/newlist mailman
Enter the email of the person running the list: <-- admin email address, e.g. [email protected]
Initial mailman password: <-- admin password for the mailman list
To finish creating your mailing list, you must edit your /etc/aliases (or
equivalent) file by adding the following lines, and possibly running the
`newaliases' program:
## mailman mailing list
mailman: "|/usr/lib/mailman/mail/mailman post mailman"
mailman-admin: "|/usr/lib/mailman/mail/mailman admin mailman"
mailman-bounces: "|/usr/lib/mailman/mail/mailman bounces mailman"
mailman-confirm: "|/usr/lib/mailman/mail/mailman confirm mailman"
mailman-join: "|/usr/lib/mailman/mail/mailman join mailman"
mailman-leave: "|/usr/lib/mailman/mail/mailman leave mailman"
mailman-owner: "|/usr/lib/mailman/mail/mailman owner mailman"
mailman-request: "|/usr/lib/mailman/mail/mailman request mailman"
mailman-subscribe: "|/usr/lib/mailman/mail/mailman subscribe mailman"
mailman-unsubscribe: "|/usr/lib/mailman/mail/mailman unsubscribe mailman"
Hit enter to notify mailman owner... <-- ENTER
[[email protected] tmp]#
Open /etc/aliases afterwards...
vi /etc/aliases
... and add the following lines:
[...] mailman: "|/usr/lib/mailman/mail/mailman post mailman" mailman-admin: "|/usr/lib/mailman/mail/mailman admin mailman" mailman-bounces: "|/usr/lib/mailman/mail/mailman bounces mailman" mailman-confirm: "|/usr/lib/mailman/mail/mailman confirm mailman" mailman-join: "|/usr/lib/mailman/mail/mailman join mailman" mailman-leave: "|/usr/lib/mailman/mail/mailman leave mailman" mailman-owner: "|/usr/lib/mailman/mail/mailman owner mailman" mailman-request: "|/usr/lib/mailman/mail/mailman request mailman" mailman-subscribe: "|/usr/lib/mailman/mail/mailman subscribe mailman" mailman-unsubscribe: "|/usr/lib/mailman/mail/mailman unsubscribe mailman" |
Run
newaliases
afterwards and restart Postfix:
/etc/init.d/postfix restart
Create the system startup links for Mailman and start it:
chkconfig --levels 235 mailman on
/etc/init.d/mailman start
Now we need to create this symlink to make Mailman work with ISPConfig:
cd /usr/lib/mailman/cgi-bin/
ln -s ./ mailman
If you want to use Mailman from your web sites created through ISPConfig, this is a bit more complicated than for Apache because nginx does not have global aliases (i.e., aliases that can be defined for all vhosts). Therefore you have to define these aliases for each vhost from which you want to access Mailman.
To do this, paste the following into the nginx Directives field on the Options tab of the web site in ISPConfig:
        location /cgi-bin/mailman {
               alias /usr/lib/mailman/cgi-bin;
               fastcgi_split_path_info (^/cgi-bin/mailman/[^/]*)(.*)$;
               include /etc/nginx/fastcgi_params;
               fastcgi_param SCRIPT_FILENAME /usr/lib/mailman$fastcgi_script_name;
               fastcgi_param PATH_INFO $fastcgi_path_info;
               fastcgi_param PATH_TRANSLATED /usr/lib/mailman$fastcgi_path_info;
               fastcgi_intercept_errors on;
               fastcgi_pass unix:/var/run/fcgiwrap.socket;
        }
        location /images/mailman {
               alias /usr/lib/mailman/icons;
        }
        location /pipermail {
               alias /var/lib/mailman/archives/public;
               autoindex on;
} |
This defines the alias /cgi-bin/mailman/ for your vhost, which means you can access the Mailman admin interface for a list at http://
Under http://
The Perfect Server - CentOS 6.2 x86_64 With nginx [ISPConfig 3] - Page 6
18 Install PureFTPd
PureFTPd can be installed with the following command:
yum install pure-ftpd
Then create the system startup links and start PureFTPd:
chkconfig --levels 235 pure-ftpd on
/etc/init.d/pure-ftpd start
Now we configure PureFTPd to allow FTP and TLS sessions. FTP is a very insecure protocol because all passwords and all data are transferred in clear text. By using TLS, the whole communication can be encrypted, thus making FTP much more secure.
OpenSSL is needed by TLS; to install OpenSSL, we simply run:
yum install openssl
Open /etc/pure-ftpd/pure-ftpd.conf...
vi /etc/pure-ftpd/pure-ftpd.conf
If you want to allow FTP and TLS sessions, set TLS to 1:
[...] # This option can accept three values : # 0 : disable SSL/TLS encryption layer (default). # 1 : accept both traditional and encrypted sessions. # 2 : refuse connections that don't use SSL/TLS security mechanisms, # including anonymous sessions. # Do _not_ uncomment this blindly. Be sure that : # 1) Your server has been compiled with SSL/TLS support (--with-tls), # 2) A valid certificate is in place, # 3) Only compatible clients will log in. TLS 1 [...] |
In order to use TLS, we must create an SSL certificate. I create it in /etc/ssl/private/, therefore I create that directory first:
mkdir -p /etc/ssl/private/
Afterwards, we can generate the SSL certificate as follows:
openssl req -x509 -nodes -days 7300 -newkey rsa:2048 -keyout /etc/ssl/private/pure-ftpd.pem -out /etc/ssl/private/pure-ftpd.pem
Country Name (2 letter code) [XX]:<-- Enter your Country Name (e.g., "DE").
State or Province Name (full name) []:<-- Enter your State or Province Name.
Locality Name (eg, city) [Default City]:<-- Enter your City.
Organization Name (eg, company) [Default Company Ltd]:<-- Enter your Organization Name (e.g., the name of your company).
Organizational Unit Name (eg, section) []:<-- Enter your Organizational Unit Name (e.g. "IT Department").
Common Name (eg, your name or your server's hostname) []:<-- Enter the Fully Qualified Domain Name of the system (e.g. "server1.example.com").
Email Address []:<-- Enter your Email Address.
Change the permissions of the SSL certificate:
chmod 600 /etc/ssl/private/pure-ftpd.pem
Finally restart PureFTPd:
/etc/init.d/pure-ftpd restart
Questo è tutto. You can now try to connect using your FTP client; however, you should configure your FTP client to use TLS.
19 Install BIND
We can install BIND as follows:
yum install bind bind-utils
Next open /etc/sysconfig/named...
vi /etc/sysconfig/named
... and make sure that the ROOTDIR=/var/named/chroot line is comment out:
# BIND named process options # ~~~~~~~~~~~~~~~~~~~~~~~~~~ # Currently, you can use the following options: # # ROOTDIR="/var/named/chroot" -- will run named in a chroot environment. # you must set up the chroot environment # (install the bind-chroot package) before # doing this. # NOTE: # Those directories are automatically mounted to chroot if they are # empty in the ROOTDIR directory. It will simplify maintenance of your # chroot environment. # - /var/named # - /etc/pki/dnssec-keys # - /etc/named # - /usr/lib64/bind or /usr/lib/bind (architecture dependent) # # Those files are mounted as well if target file doesn't exist in # chroot. # - /etc/named.conf # - /etc/rndc.conf # - /etc/rndc.key # - /etc/named.rfc1912.zones # - /etc/named.dnssec.keys # - /etc/named.iscdlv.key # # Don't forget to add "$AddUnixListenSocket /var/named/chroot/dev/log" # line to your /etc/rsyslog.conf file. Otherwise your logging becomes # broken when rsyslogd daemon is restarted (due update, for example). # # OPTIONS="whatever" -- These additional options will be passed to named # at startup. Don't add -t here, use ROOTDIR instead. # # KEYTAB_FILE="/dir/file" -- Specify named service keytab file (for GSS-TSIG) # # DISABLE_ZONE_CHECKING -- By default, initscript calls named-checkzone # utility for every zone to ensure all zones are # valid before named starts. If you set this option # to 'yes' then initscript doesn't perform those # checks. |
Make a backup of the existing /etc/named.conf file and create a new one as follows:
cp /etc/named.conf /etc/named.conf_bak
cat /dev/null> /etc/named.conf
vi /etc/named.conf
//
// named.conf
//
// Provided by Red Hat bind package to configure the ISC BIND named(8) DNS
// server as a caching only nameserver (as a localhost DNS resolver only).
//
// See /usr/share/doc/bind*/sample/ for example named configuration files.
//
options {
        listen-on port 53 { any; };
        listen-on-v6 port 53 { any; };
        directory       "/var/named";
        dump-file       "/var/named/data/cache_dump.db";
        statistics-file "/var/named/data/named_stats.txt";
        memstatistics-file "/var/named/data/named_mem_stats.txt";
        allow-query     { any; };
        recursion no;
        allow-recursion { none; };
};
logging {
        channel default_debug {
                file "data/named.run";
                severity dynamic;
        };
};
zone "." IN {
        type hint;
        file "named.ca";
};
include "/etc/named.conf.local"; |
Create the file /etc/named.conf.local that is included at the end of /etc/named.conf (/etc/named.conf.local will later on get populated by ISPConfig if you create DNS zones in ISPConfig):
touch /etc/named.conf.local
Then we create the startup links and start BIND:
chkconfig --levels 235 named on
/etc/init.d/named start
20 Install Vlogger, Webalizer, And AWStats
Vlogger, webalizer, and AWStats can be installed as follows:
yum install webalizer awstats perl-DateTime-Format-HTTP perl-DateTime-Format-Builder
cd /tmp
wget http://n0rp.chemlab.org/vlogger/vlogger-1.3.tar.gz
tar xvfz vlogger-1.3.tar.gz
mv vlogger-1.3/vlogger /usr/sbin/
rm -rf vlogger*
21 Install Jailkit
Jailkit is needed only if you want to chroot SSH users. It can be installed as follows (important:Jailkit must be installed before ISPConfig - it cannot be installed afterwards!):
cd /tmp
wget http://olivier.sessink.nl/jailkit/jailkit-2.14.tar.gz
tar xvfz jailkit-2.14.tar.gz
cd jailkit-2.14
./configure
make
make install
cd ..
rm -rf jailkit-2.14*
22 Install fail2ban
This is optional but recommended, because the ISPConfig monitor tries to show the log:
yum install fail2ban
We must configure fail2ban to log to the log file /var/log/fail2ban.log because this is the log file that is monitored by the ISPConfig Monitor module. Open /etc/fail2ban/fail2ban.conf...
vi /etc/fail2ban/fail2ban.conf
... and comment out the logtarget =SYSLOG line and add logtarget =/var/log/fail2ban.log:
[...] # Option: logtarget # Notes.: Set the log target. This could be a file, SYSLOG, STDERR or STDOUT. # Only one log target can be specified. # Values: STDOUT STDERR SYSLOG file Default: /var/log/fail2ban.log # #logtarget = SYSLOG logtarget = /var/log/fail2ban.log [...] |
Then create the system startup links for fail2ban and start it:
chkconfig --levels 235 fail2ban on
/etc/init.d/fail2ban start
23 Install rkhunter
rkhunter can be installed as follows:
yum install rkhunter
The Perfect Server - CentOS 6.2 x86_64 With nginx [ISPConfig 3] - Page 7
24 Install SquirrelMail
To install the SquirrelMail webmail client, run...
yum install squirrelmail
Then configure SquirrelMail:
/usr/share/squirrelmail/config/conf.pl
We must tell SquirrelMail that we are using Courier-IMAP/-POP3:
SquirrelMail Configuration : Read: config.php (1.4.0)
---------------------------------------------------------
Main Menu --
1. Organization Preferences
2. Server Settings
3. Folder Defaults
4. General Options
5. Themes
6. Address Books
7. Message of the Day (MOTD)
8. Plugins
9. Database
10. Languages
D. Set pre-defined settings for specific IMAP servers
C Turn color off
S Save data
Q Quit
Command >> <-- D
SquirrelMail Configuration : Read: config.php
---------------------------------------------------------
While we have been building SquirrelMail, we have discovered some
preferences that work better with some servers that don't work so
well with others. If you select your IMAP server, this option will
set some pre-defined settings for that server.
Please note that you will still need to go through and make sure
everything is correct. This does not change everything. There are
only a few settings that this will change.
Please select your IMAP server:
bincimap = Binc IMAP server
courier = Courier IMAP server
cyrus = Cyrus IMAP server
dovecot = Dovecot Secure IMAP server
exchange = Microsoft Exchange IMAP server
hmailserver = hMailServer
macosx = Mac OS X Mailserver
mercury32 = Mercury/32
uw = University of Washington's IMAP server
gmail = IMAP access to Google mail (Gmail) accounts
quit = Do not change anything
Command >> <-- courier
SquirrelMail Configuration : Read: config.php
---------------------------------------------------------
While we have been building SquirrelMail, we have discovered some
preferences that work better with some servers that don't work so
well with others. If you select your IMAP server, this option will
set some pre-defined settings for that server.
Please note that you will still need to go through and make sure
everything is correct. This does not change everything. There are
only a few settings that this will change.
Please select your IMAP server:
bincimap = Binc IMAP server
courier = Courier IMAP server
cyrus = Cyrus IMAP server
dovecot = Dovecot Secure IMAP server
exchange = Microsoft Exchange IMAP server
hmailserver = hMailServer
macosx = Mac OS X Mailserver
mercury32 = Mercury/32
uw = University of Washington's IMAP server
gmail = IMAP access to Google mail (Gmail) accounts
quit = Do not change anything
Command >> courier
imap_server_type = courier
default_folder_prefix = INBOX.
trash_folder = Trash
sent_folder = Sent
draft_folder = Drafts
show_prefix_option = false
default_sub_of_inbox = false
show_contain_subfolders_option = false
optional_delimiter = .
delete_folder = true
Press enter to continue... <-- press ENTER
SquirrelMail Configuration : Read: config.php (1.4.0)
---------------------------------------------------------
Main Menu --
1. Organization Preferences
2. Server Settings
3. Folder Defaults
4. General Options
5. Themes
6. Address Books
7. Message of the Day (MOTD)
8. Plugins
9. Database
10. Languages
D. Set pre-defined settings for specific IMAP servers
C Turn color off
S Save data
Q Quit
Command >> <--S
SquirrelMail Configuration : Read: config.php (1.4.0)
---------------------------------------------------------
Main Menu --
1. Organization Preferences
2. Server Settings
3. Folder Defaults
4. General Options
5. Themes
6. Address Books
7. Message of the Day (MOTD)
8. Plugins
9. Database
10. Languages
D. Set pre-defined settings for specific IMAP servers
C Turn color off
S Save data
Q Quit
Command >> <--Q
One last thing we need to do is modify the file /etc/squirrelmail/config_local.php and comment out the $default_folder_prefix variable - if you don't do this, you will see the following error message in SquirrelMail after you've logged in:Query:CREATE "Sent" Reason Given:Invalid mailbox name.
vi /etc/squirrelmail/config_local.php
<?php /** * Local config overrides. * * You can override the config.php settings here. * Don't do it unless you know what you're doing. * Use standard PHP syntax, see config.php for examples. * * @copyright © 2002-2006 The SquirrelMail Project Team * @license http://opensource.org/licenses/gpl-license.php GNU Public License * @version $Id: config_local.php,v 1.2 2006/07/11 03:33:47 wtogami Exp $ * @package squirrelmail * @subpackage config */ //$default_folder_prefix = ''; ?> |
You can now find SquirrelMail in the /usr/share/squirrelmail/ directory.
After you have installed ISPConfig 3, you can access SquirrelMail as follows:
The ISPConfig apps vhost on port 8081 for nginx comes with a SquirrelMail configuration, so you can use http://server1.example.com:8081/squirrelmail or http://server1.example.com:8081/webmail to access SquirrelMail.
If you want to use a /webmail or /squirrelmail alias that you can use from your web sites, this is a bit more complicated than for Apache because nginx does not have global aliases (i.e., aliases that can be defined for all vhosts). Therefore you have to define these aliases for each vhost from which you want to access SquirrelMail.
To do this, paste the following into the nginx Directives field on the Options tab of the web site in ISPConfig:
        location /squirrelmail {
               root /usr/share/;
               index index.php index.html index.htm;
               location ~ ^/squirrelmail/(.+\.php)$ {
                       try_files $uri =404;
                       root /usr/share/;
                       fastcgi_pass 127.0.0.1:9000;
                       fastcgi_index index.php;
                       fastcgi_param SCRIPT_FILENAME $document_root$fastcgi_script_name;
                       include /etc/nginx/fastcgi_params;
                       fastcgi_buffer_size 128k;
                       fastcgi_buffers 256 4k;
                       fastcgi_busy_buffers_size 256k;
                       fastcgi_temp_file_write_size 256k;
                       fastcgi_intercept_errors on;
               }
               location ~* ^/squirrelmail/(.+\.(jpg|jpeg|gif|css|png|js|ico|html|xml|txt))$ {
                       root /usr/share/;
               }
        }
        location /webmail {
               rewrite ^/* /squirrelmail last;
} |
If you use https instead of http for your vhost, you should add the line fastcgi_param HTTPS on; to your SquirrelMail configuration like this:
        location /squirrelmail {
               root /usr/share/;
               index index.php index.html index.htm;
               location ~ ^/squirrelmail/(.+\.php)$ {
                       try_files $uri =404;
                       root /usr/share/;
                       fastcgi_pass 127.0.0.1:9000;
                       fastcgi_param HTTPS on; # <-- add this line
                       fastcgi_index index.php;
                       fastcgi_param SCRIPT_FILENAME $document_root$fastcgi_script_name;
                       include /etc/nginx/fastcgi_params;
                       fastcgi_buffer_size 128k;
                       fastcgi_buffers 256 4k;
                       fastcgi_busy_buffers_size 256k;
                       fastcgi_temp_file_write_size 256k;
                       fastcgi_intercept_errors on;
               }
               location ~* ^/squirrelmail/(.+\.(jpg|jpeg|gif|css|png|js|ico|html|xml|txt))$ {
                       root /usr/share/;
               }
        }
        location /webmail {
               rewrite ^/* /squirrelmail last;
} |
If you use both http and https for your vhost, you need to add the following section to the http {} section in /etc/nginx/nginx.conf (before any include lines) which determines if the visitor uses http or https and sets the $fastcgi_https variable (which we will use in our SquirrelMail configuration) accordingly (please note that you don't need to do this if you have added this section before, for example when you configured phpMyAdmin - see chapter 16):
vi /etc/nginx/nginx.conf
[...]
http {
[...]
    ## Detect when HTTPS is used
    map $scheme $fastcgi_https {
      default off;
      https on;
    }
[...]
}
[...] |
Don't forget to reload nginx afterwards:
/etc/init.d/nginx reload
Then go to the nginx Directives field again, and instead of fastcgi_param HTTPS on; you add the line fastcgi_param HTTPS $fastcgi_https; so that you can use SquirrelMail for both http and https requests:
        location /squirrelmail {
               root /usr/share/;
               index index.php index.html index.htm;
               location ~ ^/squirrelmail/(.+\.php)$ {
                       try_files $uri =404;
                       root /usr/share/;
                       fastcgi_pass 127.0.0.1:9000;
                       fastcgi_param HTTPS $fastcgi_https; # <-- add this line
                       fastcgi_index index.php;
                       fastcgi_param SCRIPT_FILENAME $document_root$fastcgi_script_name;
                       include /etc/nginx/fastcgi_params;
                       fastcgi_buffer_size 128k;
                       fastcgi_buffers 256 4k;
                       fastcgi_busy_buffers_size 256k;
                       fastcgi_temp_file_write_size 256k;
                       fastcgi_intercept_errors on;
               }
               location ~* ^/squirrelmail/(.+\.(jpg|jpeg|gif|css|png|js|ico|html|xml|txt))$ {
                       root /usr/share/;
               }
        }
        location /webmail {
               rewrite ^/* /squirrelmail last;
} |
25 Install ISPConfig 3
Before you start the ISPConfig installation, make sure that Apache is stopped (if it is installed - it is possible that some of your installed packages have installed Apache as a dependency without you knowing). If Apache2 is already installed on the system, stop it now...
/etc/init.d/httpd stop
... and remove Apache's system startup links:
chkconfig --del httpd
Make sure that nginx is running:
/etc/init.d/nginx restart
(If you have both Apache and nginx installed, the installer asks you which one you want to use:Apache and nginx detected. Select server to use for ISPConfig:(apache,nginx) [apache]:
Type nginx. If only Apache or nginx are installed, this is automatically detected by the installer, and no question is asked.)
Download the current ISPConfig 3 version and install it. The ISPConfig installer will configure all services like Postfix, Courier, etc. for you. A manual setup as required for ISPConfig 2 is not necessary anymore.
You now also have the possibility to let the installer create an SSL vhost for the ISPConfig control panel, so that ISPConfig can be accessed using https:// instead of http://. To achieve this, just press ENTER when you see this question:Do you want a secure (SSL) connection to the ISPConfig web interface (y,n) [y]:.
To install ISPConfig 3 from the latest released version, do this:
cd /tmp
wget http://www.ispconfig.org/downloads/ISPConfig-3-stable.tar.gz
tar xfz ISPConfig-3-stable.tar.gz
cd ispconfig3_install/install/
The next step is to run
php -q install.php
This will start the ISPConfig 3 installer:
[[email protected] install]# php -q install.php
--------------------------------------------------------------------------------
_____ ___________ _____ __ _ ____
|_ _/ ___| ___ \ / __ \ / _(_) /__ \
| | \ `--.| |_/ / | / \/ ___ _ __ | |_ _ __ _ _/ /
| | `--. \ __/ | | / _ \| '_ \| _| |/ _` | |_ |
_| |_/\__/ / | | \__/\ (_) | | | | | | | (_| | ___\ \
\___/\____/\_| \____/\___/|_| |_|_| |_|\__, | \____/
__/ |
|___/
--------------------------------------------------------------------------------
>> Initial configuration
Operating System: Redhat or compatible, unknown version.
Following will be a few questions for primary configuration so be careful.
Default values are in [brackets] and can be accepted with
Tap in "quit" (without the quotes) to stop the installer.
Select language (en,de) [en]: <-- ENTER
Installation mode (standard,expert) [standard]: <-- ENTER
Full qualified hostname (FQDN) of the server, eg server1.domain.tld [server1.example.com]: <-- ENTER
MySQL server hostname [localhost]: <-- ENTER
MySQL root username [root]: <-- ENTER
MySQL root password []: <- - yourrootsqlpassword
MySQL database to create [dbispconfig]: <-- ENTER
MySQL charset [utf8]: <-- ENTER
Apache and nginx detected. Select server to use for ISPConfig: (apache,nginx) [apache]: <-- nginx
Generating a 2048 bit RSA private key
....+++
.................................+++
writing new private key to 'smtpd.key'
-----
You are about to be asked to enter information that will be incorporated
into your certificate request.
What you are about to enter is what is called a Distinguished Name or a DN.
There are quite a few fields but you can leave some blank
For some fields there will be a default value,
If you enter '.', the field will be left blank.
-----
Country Name (2 letter code) [XX]: <-- ENTER
State or Province Name (full name) []: <-- ENTER
Locality Name (eg, city) [Default City]: <-- ENTER
Organization Name (eg, company) [Default Company Ltd]: <-- ENTER
Organizational Unit Name (eg, section) []: <-- ENTER
Common Name (eg, your name or your server's hostname) []: <-- ENTER
Email Address []: <-- ENTER
Configuring Jailkit
Configuring SASL
Configuring PAM
Configuring Courier
Configuring Spamassassin
Configuring Amavisd
Configuring Getmail
Configuring Pureftpd
Configuring BIND
Configuring nginx
Configuring Vlogger
Configuring Apps vhost
Configuring Bastille Firewall
Configuring Fail2ban
Installing ISPConfig
ISPConfig Port [8080]: <-- ENTER
Do you want a secure (SSL) connection to the ISPConfig web interface (y,n) [y]: <-- ENTER
Generating RSA private key, 4096 bit long modulus
...............................................................................
...........................................................................................++
..............................................................
.....................................................++
e is 65537 (0x10001)
You are about to be asked to enter information that will be incorporatedinto your certificate request.
What you are about to enter is what is called a Distinguished Name or a DN.
There are quite a few fields but you can leave some blank
For some fields there will be a default value,
If you enter '.', the field will be left blank.
-----
Country Name (2 letter code) [XX]: <-- ENTER
State or Province Name (full name) []: <-- ENTER
Locality Name (eg, city) [Default City]: <-- ENTER
Organization Name (eg, company) [Default Company Ltd]: <-- ENTER
Organizational Unit Name (eg, section) []: <-- ENTER
Common Name (eg, your name or your server's hostname) []: <-- ENTER
Email Address []: <-- ENTER
Please enter the following 'extra' attributes
to be sent with your certificate request
A challenge password []: <-- ENTER
An optional company name []: <-- ENTER
writing RSA key
Configuring DBServer
Installing ISPConfig crontab
no crontab for root
no crontab fo r getmail
Restarting services ...
Stopping mysqld: [ OK ]
Starting mysqld: [ OK ]
Shutting down postfix: [ OK ]
Starting postfix: [ OK ]
Stopping saslauthd: [FAILED]
Starting saslauthd: [ OK ]
Shutting down amavisd: Daemon [1503] terminated by SIGTERM
[ OK ]
amavisd stopped
Starting amavisd: [ OK ]
Stopping clamd.amavisd: [ OK ]
Starting clamd.amavisd: [ OK ]
Stopping Courier authentication services: authdaemond
Starting Courier authentication services: authdaemond
Stopping Courier- IMAP server: imap imap-ssl pop3 pop3-ssl
Starting Courier-IMAP server: imap imap-ssl pop3 pop3-ssl
Stopping Courier-IMAP server: imap imap-ssl pop3 pop3-ssl
Starting Courier-IMAP server: imap imap-ssl pop3 pop3-ssl
Stopping Courier-IMAP server: imap imap-ssl pop3 pop3-ssl
Starting Courier-IMAP server: imap imap-ssl pop3 pop3-ssl
Stopping Courier-IMAP server: imap imap-ssl pop3 pop3-ssl
Starting Courier-IMAP server: imap imap-ssl pop3 pop3-ssl
SyntaxError: ('invalid syntax', ('/usr/lib/mailman/Mailman/mm_cfg.py', 76, 27, 'DEFAULT_SERVER_LANGUAGE = \n'))
Traceback (most recent call last):
File "/usr/lib/mailman/bin/mailmanctl", line 109, in
from Mailman import mm_cfg
File "/usr/lib/mailman/Mailman/mm_cfg.py", line 76
DEFAULT_SERVER_LANGUAGE =
^
SyntaxError: invalid syntax
Shutting down mailman: [FAILED]
SyntaxErro r: ('invalid syntax', ('/usr/lib/mailman/Mailman/mm_cfg.py', 76, 27, 'DEFAULT_SERVER_LANGUAGE = \n'))
Traceback (most recent call last):
File "/usr/lib/mailman/bin/mailmanctl", line 109, in
from Mailman import mm_cfg
File "/usr/lib/mailman/Mailman/mm_cfg.py", line 76
DEFAULT_SERVER_LANGUAGE =
^
SyntaxError: invalid syntax
Starting mailman: [FAILED]
Reloading php-fpm: [ OK ]
Reloading nginx: [ OK ]
Stopping pure-ftpd: [ OK ]
Starting pure-ftpd: [ OK ]
Installation completed.
[[email protected] install]#
To fix the Mailman errors you might get during the ISPConfig installation, open /usr/lib/mailman/Mailman/mm_cfg.py...
vi /usr/lib/mailman/Mailman/mm_cfg.py
... and set DEFAULT_SERVER_LANGUAGE ='en':
[...] #------------------------------------------------------------- # The default language for this server. DEFAULT_SERVER_LANGUAGE = 'en' [...] |
Restart Mailman:
/etc/init.d/mailman restart
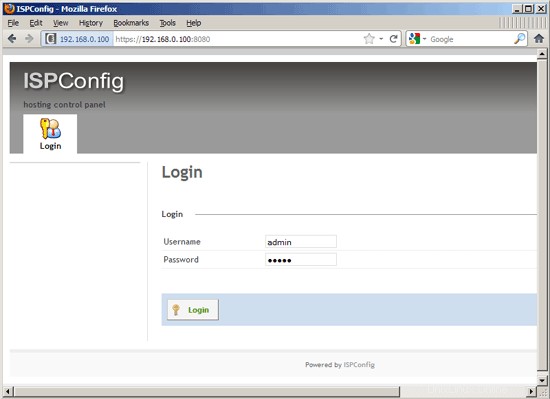
Afterwards you can access ISPConfig 3 under http(s)://server1.example.com:8080/ or http(s)://192.168.0.100:8080/ (http or https depends on what you chose during installation). Log in with the username admin and the password admin (you should change the default password after your first login):
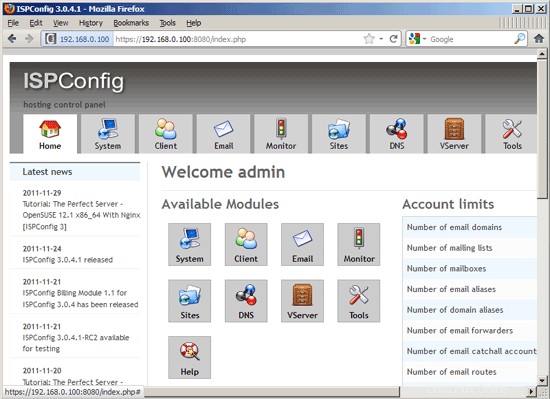
The system is now ready to be used.
25.1 ISPConfig 3 Manual
In order to learn how to use ISPConfig 3, I strongly recommend to download the ISPConfig 3 Manual.
On about 300 pages, it covers the concept behind ISPConfig (admin, resellers, clients), explains how to install and update ISPConfig 3, includes a reference for all forms and form fields in ISPConfig together with examples of valid inputs, and provides tutorials for the most common tasks in ISPConfig 3. It also lines out how to make your server more secure and comes with a troubleshooting section at the end.
25.2 ISPConfig Monitor App For Android
With the ISPConfig Monitor App, you can check your server status and find out if all services are running as expected. You can check TCP and UDP ports and ping your servers. In addition to that you can use this app to request details from servers that have ISPConfig installed (please note that the minimum installed ISPConfig 3 version with support for the ISPConfig Monitor App is 3.0.3.3! ); these details include everything you know from the Monitor module in the ISPConfig Control Panel (e.g. services, mail and system logs, mail queue, CPU and memory info, disk usage, quota, OS details, RKHunter log, etc.), and of course, as ISPConfig is multiserver-capable, you can check all servers that are controlled from your ISPConfig master server.
For download and usage instructions, please visit http://www.ispconfig.org/ispconfig-3/ispconfig-monitor-app-for-android/.
26 Links
- CentOS:http://www.centos.org/
- Configurazione ISP:http://www.ispconfig.org/
About The Author

Falko Timme is the owner of  Timme Hosting (ultra-fast nginx web hosting). He is the lead maintainer of HowtoForge (since 2005) and one of the core developers of ISPConfig (since 2000). He has also contributed to the O'Reilly book "Linux System Administration".