Il server perfetto - OpenSUSE 12.1 x86_64 con Nginx [ISPConfig 3]
Questo tutorial mostra come preparare un OpenSUSE 12.1 64bit (x86_64) server con nginx per l'installazione di ISPConfig 3 e come installare ISPConfig 3. Dalla versione 3.0.4, ISPConfig viene fornito con il supporto completo per il server web nginx oltre ad Apache, e questo tutorial copre la configurazione di un server che utilizza nginx invece di Apache. ISPConfig 3 è un pannello di controllo di webhosting che permette di configurare i seguenti servizi attraverso un browser web:server web nginx e Apache, server di posta Postfix, MySQL, Dovecot POP3/IMAP, server dei nomi BIND o MyDNS, PureFTPd, SpamAssassin, ClamAV e molti altri Di Più.
Se vuoi usare nginx invece di Apache con ISPConfig, tieni presente che la tua versione di nginx deve essere almeno 0.8.21 e devi anche installare PHP-FPM. Per il supporto CGI/Perl, devi usare fcgiwrap. Questo è tutto coperto da questo tutorial.
Userò il seguente software:
- Server Web:nginx con PHP 5
- Server di database:MySQL
- Server di posta:Postfix con utenti virtuali
- Server DNS:BIND
- Server FTP:pureftpd
- POP3/IMAP:Dovecot
- Webalizer e AWStats per le statistiche del sito web
Alla fine dovresti avere un sistema che funziona in modo affidabile e facilmente gestibile con il pannello di controllo ISPConfig 3. La seguente guida è per la versione a 64 bit di OpenSUSE.
Voglio dire in primo luogo che questo non è l'unico modo per impostare un tale sistema. Ci sono molti modi per raggiungere questo obiettivo, ma questo è il modo in cui prendo. Non garantisco che questo funzionerà per te!
Avviso:questa guida è per ISPConfig 3.0.4 o versioni successive. Non è adatto per ISPConfig 2.x!
Manuale ISPConfig 3
Per imparare a usare ISPConfig 3, consiglio vivamente di scaricare il manuale ISPConfig 3.
Su circa 300 pagine, copre il concetto alla base di ISPConfig (amministratore, rivenditori, clienti), spiega come installare e aggiornare ISPConfig 3, include un riferimento per tutti i moduli e i campi dei moduli in ISPConfig insieme a esempi di input validi e fornisce tutorial per le attività più comuni in ISPConfig 3. Descrive anche come rendere più sicuro il tuo server e include una sezione per la risoluzione dei problemi alla fine.
App ISPConfig Monitor per Android
Con l'app ISPConfig Monitor, puoi controllare lo stato del tuo server e scoprire se tutti i servizi funzionano come previsto. Puoi controllare le porte TCP e UDP ed eseguire il ping dei tuoi server. In aggiunta a ciò, puoi utilizzare questa app per richiedere dettagli dai server su cui è installato ISPConfig (tieni presente che la versione minima di ISPConfig 3 installata con supporto per l'app ISPConfig Monitor è 3.0.3.3! ); questi dettagli includono tutto ciò che sai dal modulo Monitor nel pannello di controllo di ISPConfig (ad es. servizi, log di posta e di sistema, coda di posta, informazioni su CPU e memoria, utilizzo del disco, quota, dettagli del sistema operativo, registro RKHunter, ecc.) e ovviamente , poiché ISPConfig è compatibile con più server, puoi controllare tutti i server controllati dal tuo server master ISPConfig.
Per le istruzioni di download e utilizzo, visitare http://www.ispconfig.org/ispconfig-3/ispconfig-monitor-app-for-android/.
1 Requisiti
Per installare un tale sistema avrai bisogno di quanto segue:
- Il DVD di OpenSUSE 12.1 . Puoi scaricarlo qui:http://download.opensuse.org/distribution/12.1/iso/openSUSE-12.1-DVD-x86_64.iso
- Una connessione Internet veloce...
2 Nota preliminare
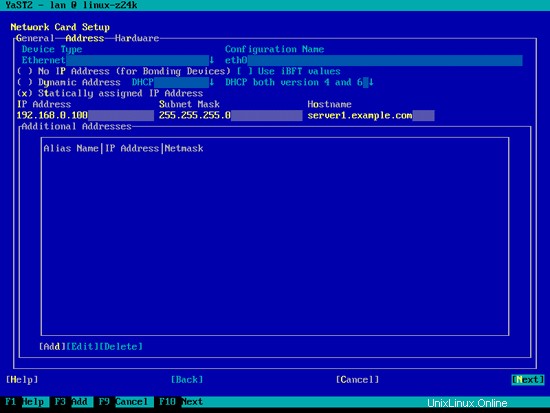
In questo tutorial utilizzo l'hostname server1.example.com con l'indirizzo IP 192.168.0.100 e il gateway 192.168.0.1. Queste impostazioni potrebbero differire per te, quindi devi sostituirle dove appropriato.
3 Il sistema base
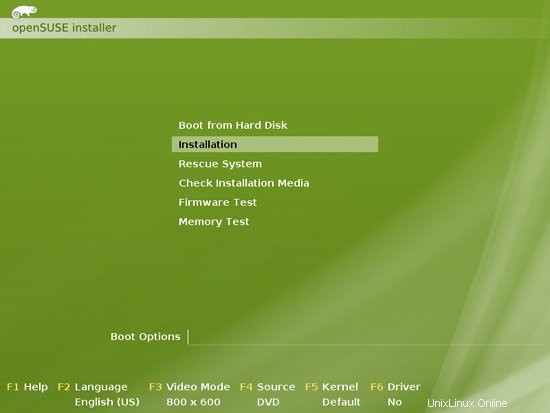
Avvia dal tuo DVD OpenSUSE 12.1 e seleziona Installazione:
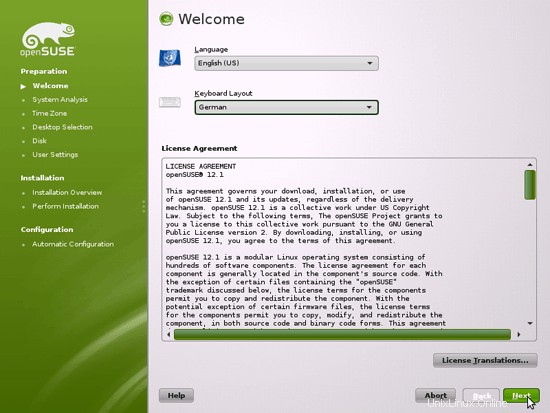
Seleziona la lingua, il layout della tastiera e accetta i termini della licenza:
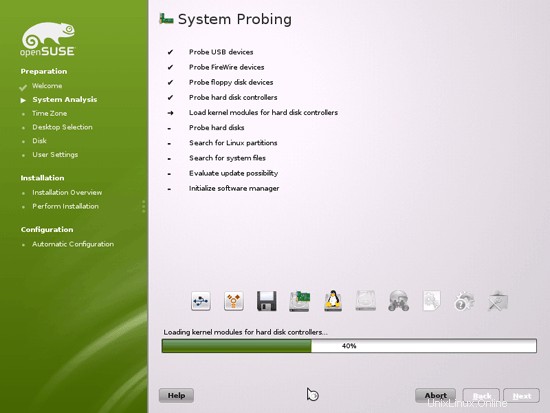
Il programma di installazione analizza l'hardware e crea la cache del repository del software:
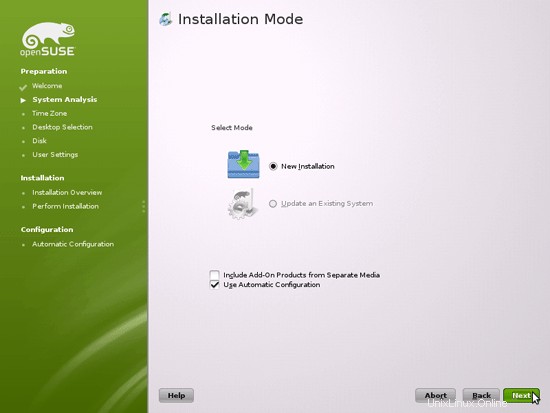
Seleziona Nuova installazione:
Seleziona la regione e il fuso orario:

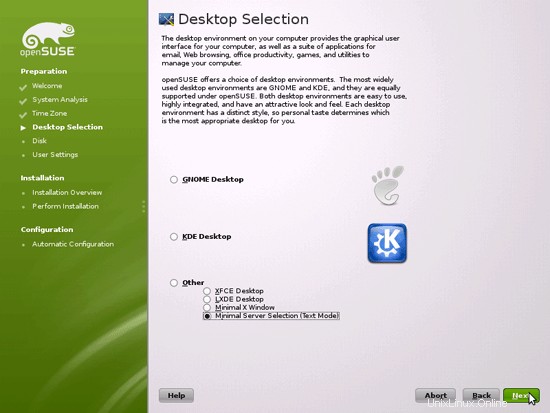
Selezioniamo Altro> Selezione server minima (modalità testo) qui poiché vogliamo installare un server senza desktop X-Window. Il sistema X-Window non è necessario per eseguire il server e rallenterebbe il sistema. Effettueremo tutte le attività di amministrazione sulla shell o tramite una connessione SSH, ad es. tramite PuTTY da un desktop remoto.
Il server perfetto - OpenSUSE 12.1 x86_64 con Nginx [ISPConfig 3] - Pagina 2
4 Configura le impostazioni di rete
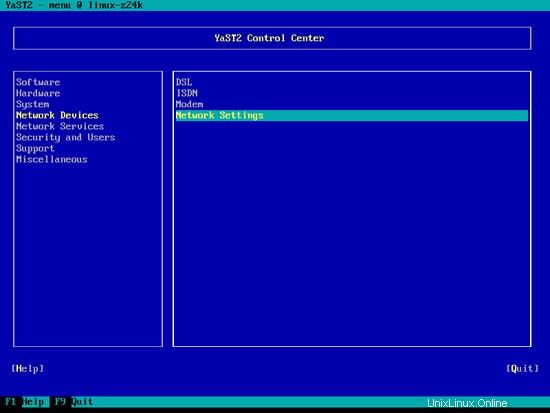
Usiamo Yast, lo strumento di gestione del sistema OpenSuSE per riconfigurare le impostazioni della scheda di rete. Dopo il primo avvio, il sistema è configurato per ottenere l'indirizzo IP con DHCP. Per un server lo passeremo a un indirizzo IP statico.
Corri
yast2
Seleziona Dispositivi di rete> Impostazioni di rete:
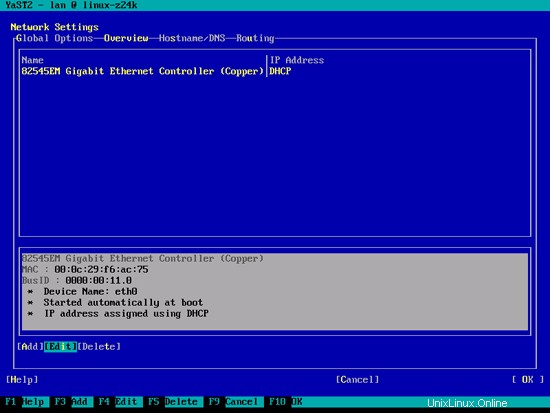
Seleziona la tua scheda di rete e poi Modifica:
Seleziona Indirizzo IP assegnato staticamente e inserisci l'indirizzo IP, la subnet mask e il nome host e salva le modifiche selezionando Avanti:
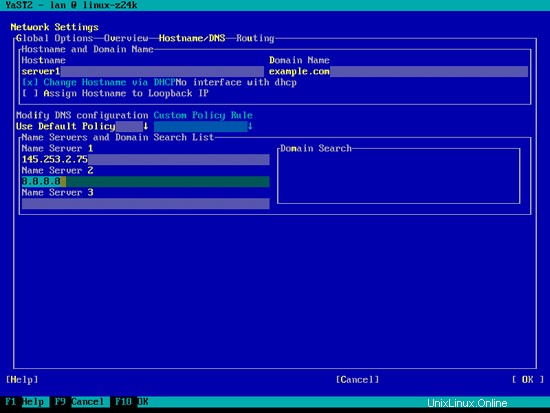
Ora seleziona Hostname/DNS e inserisci il nome host (es. server1.example.com) e i nameserver (es. 145.253.2.75 e 8.8.8.8):
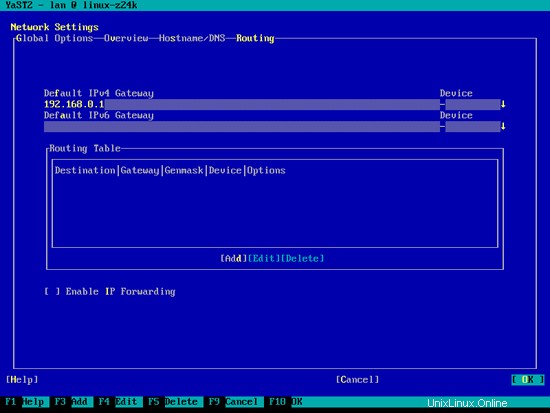
Ora seleziona Routing e inserisci il gateway predefinito e premi OK:
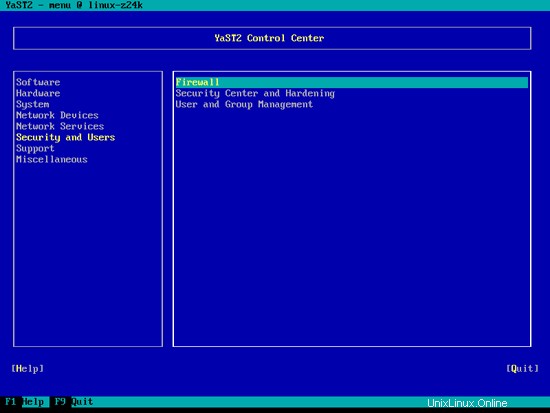
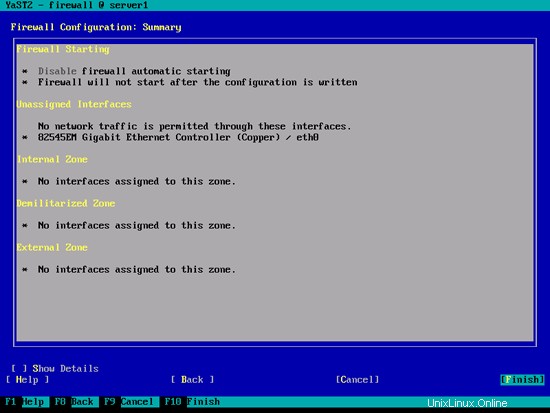
Per configurare il firewall (se non lo hai configurato durante l'installazione di base), seleziona Sicurezza e utenti> Firewall in Yast:
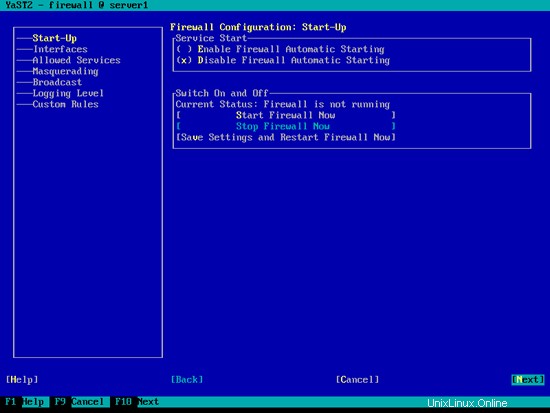
Voglio installare ISPConfig alla fine di questo tutorial che viene fornito con il proprio firewall. Ecco perché ora disabilito il firewall OpenSUSE predefinito. Naturalmente, sei libero di lasciarlo acceso e configurarlo secondo le tue esigenze (ma in seguito non dovresti usare nessun altro firewall in quanto molto probabilmente interferirà con il firewall di OpenSUSE).
Seleziona Disabilita l'avvio automatico del firewall e Arresta il firewall ora, quindi premi Avanti:
Premi Fine e lascia Yast:
Successivamente, dovresti verificare con
ifconfig
se la configurazione di rete è corretta. In caso contrario (ad esempio, se manca eth0), riavvia il sistema...
reboot
... e controlla di nuovo la configurazione di rete in seguito:ora dovrebbe essere corretta.
5 Installa aggiornamenti
Ora installiamo gli ultimi aggiornamenti dai repository di openSUSE. Corri
zypper update
E quindi riavvia il server poiché molto probabilmente hai installato anche alcuni aggiornamenti del kernel:
reboot
6 Installa alcuni pacchetti di base
Corri
yast2 -i findutils readline glibc-devel findutils-locate gcc flex lynx compat-readline4 db-devel wget gcc-c++ subversion make vim telnet cron iptables iputils man man-pages nano pico sudo perl-TimeDate
7 quota su journal
Per installare la quota, esegui
yast2 -i quota
Modifica /etc/fstab in modo che assomigli a questo (ho aggiunto ,usrjquota=aquota.user,grpjquota=aquota.group,jqfmt=vfsv0 ai punti di montaggio / e /srv):
vi /etc/fstab
/dev/sda1 swap swap defaults 0 0 /dev/sda2 / ext4 acl,user_xattr,usrjquota=aquota.user,grpjquota=aquota.group,jqfmt=vfsv0 1 1 /dev/sda3 /srv ext4 acl,user_xattr,usrjquota=aquota.user,grpjquota=aquota.group,jqfmt=vfsv0 1 2 proc /proc proc defaults 0 0 sysfs /sys sysfs noauto 0 0 debugfs /sys/kernel/debug debugfs noauto 0 0 devpts /dev/pts devpts mode=0620,gid=5 0 0 |
Quindi esegui:
mount -o remount /
mount -o remount /srv
quotacheck -avugm
quotaon -avug
Non preoccuparti se vedi questi messaggi di errore:sono normali quando esegui quotacheck per la prima volta:
server1:~ # quotacheck -avugm
quotacheck:Scansione /dev/sda2 [/] eseguita
quotacheck:Impossibile stabilire il vecchio file di quota utente:Nessun file o directory di questo tipo
quotacheck:Impossibile stabilire il vecchio gruppo quota file:nessun file o directory di questo tipo
quotacheck:impossibile stabilire il vecchio file di quota dell'utente:nessun file o directory di questo tipo
quotacheck:impossibile stabilire il vecchio file di quota del gruppo:nessun file o directory di questo tipo
quotacheck:Verificate 3872 directory e 32991 file
quotacheck:vecchio file non trovato.
quotacheck:vecchio file non trovato.
quotacheck:scansione /dev/sda3 [/srv] eseguita
quotacheck:Impossibile stabilire il vecchio file di quota utente:nessun file o directory di questo tipo
quotacheck:Impossibile eseguire il controllo del vecchio file di quota del gruppo:nessun file o directory di questo tipo
quotacheck:Impossibile stabilire il file di quota del vecchio utente:nessun file o directory di questo tipo
quotacheck:impossibile stabilire il vecchio file di quota del gruppo:nessun file o directory di questo tipo
quotacheck:6 directory e 0 file selezionati
quotacheck:vecchio file non trovato.
quotacheck:vecchio file non trovato.
ser ver1:~ #
Il server perfetto - OpenSUSE 12.1 x86_64 con Nginx [ISPConfig 3] - Pagina 4
8 Installa Postfix, Dovecot, MySQL
Corri
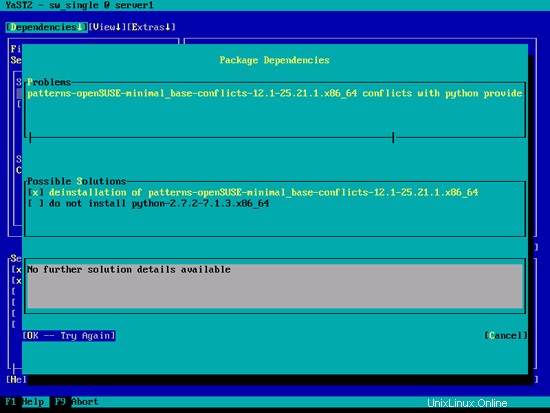
yast2 -i postfix postfix-mysql mysql mysql-community-server mysql-client libmysqlclient-devel dovecot12 dovecot12-backend-mysql pwgen cron python
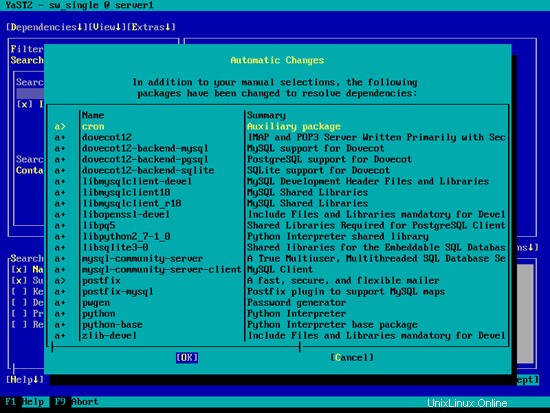
Se ricevi l'errore patterns-openSUSE-minimal_base-conflicts-12.1-25.21.1.x86_64 in conflitto con python fornito da python-2.7.2-7.1.3.x86_64, seleziona l'opzione disinstallazione di patterns-openSUSE-minimal_base-conflicts- 12.1-25.21.1.x86_64 e premi OK -- Riprova:
Premi Accetta nella schermata successiva...
... e infine OK:
Apri /etc/postfix/master.cf...
vi /etc/postfix/master.cf
... e decommenta la seguente riga:
[...] tlsmgr unix - - n 1000? 1 tlsmgr [...] |
Crea il seguente collegamento simbolico:
ln -s /usr/lib64/dovecot/modules /usr/lib/dovecot
Avvia MySQL, Postfix e Dovecot e abilita l'avvio dei servizi all'avvio.
systemctl abilita mysql.service
systemctl avvia mysql.service
systemctl abilita postfix.service
systemctl avvia postfix.service
systemctl abilita dovecot.service
systemctl avvia dovecot.service
Ora installo il pacchetto getmail:
yast2 -i getmail
Per proteggere l'installazione di MySQL, eseguire:
mysql_secure_installation
Ora ti verranno poste diverse domande:
server1:~ # mysql_secure_installation
NOTA: L'ESECUZIONE DI TUTTE LE PARTI DI QUESTO SCRIPT È CONSIGLIATA PER TUTTI MySQL
SERVER IN PRODUZIONE UTILIZZATA! PER FAVORE, LEGGERE ATTENTAMENTE OGNI PASSO!
Per accedere a MySQL per proteggerlo, avremo necessità della password
corrente per l'utente root. Se hai appena installato MySQL e
non hai impostato la password root, la password sarà vuota,
quindi dovresti premere invio qui.
Invio password corrente per root (inserire per nessuno):<-- ENTER
OK, password utilizzata con successo, andando avanti...
L'impostazione della password di root assicura che nessuno possa accedere a MySQL
utente root senza l'autorizzazione appropriata.
Impostare la password root? [S/n] <-- S
Nuova password: <-- yourrootsqlpassword
Reinserire nuova password: <-- yourrootsqlpassword
Password aggiornata con successo!
Ricaricamento delle tabelle dei privilegi. .
... Successo!
Per impostazione predefinita, un'installazione MySQL ha un utente anonimo, consentendo a chiunque
di accedere a MySQL senza deve avere un account utente creato per
loro. Questo è destinato solo a test e a rendere l'installazione
andare un po' più agevole. Dovresti rimuoverli prima di trasferirti in un ambiente di produzione.
Rimuovere utenti anonimi? [S/n] <-- S
... Successo!
Normalmente, a root dovrebbe essere consentito di connettersi da 'localhost'. Questo
garantisce che qualcuno non riesca a indovinare la password root dalla rete.
Disconsentire l'accesso root da remoto? [S/n] <-- S
... Successo!
Per impostazione predefinita, MySQL viene con un database denominato 'test' a cui chiunque può
accedere. Questo è anche destinato solo a test, e dovrebbe essere rimosso
prima di trasferirsi in un ambiente di produzione.
Rimuovere database di test e accedere ad esso? [S/n] <-- S
- Dropping database di test...
... Successo!
- Rimozione privilegi sul database di test...
... Successo !
Ricaricare le tabelle di privilegi garantirà che tutte le modifiche apportate finora
diventeranno immediatamente effettive.
Ricaricare le tabelle privilegi adesso? [S/n] <-- S
... Successo!
Pulizia ...
Tutto fatto! Se hai completato tutti i passaggi precedenti, l'installazione di MySQL
dovrebbe essere protetta.
Grazie per utilizzare MySQL!
server1:~ #
Ora la tua configurazione MySQL dovrebbe essere protetta.
9 Amavisd-new, Spamassassin e Clamav
Installa gli antivirus Amavisd-new, Spamassassin e Clamav. Corri
yast2 -i amavisd-new clamav clamav-db zoo unzip unrar bzip2 unarj perl-DBD-mysql
Apri /etc/amavisd.conf...
vi /etc/amavisd.conf
... e aggiungi la riga $myhostname con il tuo hostname corretto sotto la riga $mydomain:
[...] $mydomain = 'example.com'; # a convenient default for other settings $myhostname = "server1.$mydomain"; [...] |
Quindi crea un collegamento simbolico da /var/run/clamav/clamd a /var/lib/clamav/clamd-socket:
mkdir -p /var/run/clamav
ln -s /var/lib/clamav/clamd-socket /var/run/clamav/clamd
OpenSUSE 12.1 ha una directory /run per la memorizzazione dei dati di runtime. /run è ora un tmpfs e /var/run è ora collegato a /run da tmpfs e quindi svuotato al riavvio.
Ciò significa che dopo un riavvio, la directory /var/run/clamav che abbiamo appena creato non esisterà più e quindi clamd non si avvierà. Quindi creiamo ora il file /etc/tmpfiles.d/clamav.conf che creerà questa directory all'avvio del sistema (vedi http://0pointer.de/public/systemd-man/tmpfiles.d.html per maggiori dettagli):
vi /etc/tmpfiles.d/clamav.conf
D /var/run/clamav 0755 root root - |
Prima di avviare amavisd e clamd, dobbiamo modificare lo script init /etc/init.d/amavis - Non sono stato in grado di avviare, arrestare e riavviare amavisd in modo affidabile con lo script init predefinito:
vi /etc/init.d/amavis
Commenta le seguenti righe nella sezione di inizio e fine:
[...]
    start)
        # ZMI 20100428 check for stale pid file
        #if test -f $AMAVIS_PID ; then
        #       checkproc -p $AMAVIS_PID amavisd
        #       if test $? -ge 1 ; then
        #               # pid file is stale, remove it
        #               echo -n "(stale amavisd pid file $AMAVIS_PID found, removing. Did amavisd crash?)"
        #               rm -f $AMAVIS_PID
        #       fi
        #fi
        echo -n "Starting virus-scanner (amavisd-new): "
        $AMAVISD_BIN start
        #if ! checkproc amavisd; then
        #    rc_failed 7
        #fi
        rc_status -v
        #if [ "$AMAVIS_SENDMAIL_MILTER" == "yes" ]; then
        #    rc_reset
        #    echo -n "Starting amavis-milter:"
        #    startproc -u vscan $AMAVIS_MILTER_BIN -p $AMAVIS_MILTER_SOCK > /dev/null 2>&1
        #    rc_status -v
        #fi
        ;;
    stop)
        echo -n "Shutting down virus-scanner (amavisd-new): "
        #if checkproc amavisd; then
        #    rc_reset
            $AMAVISD_BIN stop
        #else
        #    rc_reset
        #fi
        rc_status -v
        #if [ "$AMAVIS_SENDMAIL_MILTER" == "yes" ]; then
        #    rc_reset
        #    echo -n "Shutting down amavis-milter: "
        #    killproc -TERM $AMAVIS_MILTER_BIN
        #    rc_status -v
        #fi
        ;;
[...] |
Poiché abbiamo modificato lo script init, dobbiamo eseguire
systemctl --system daemon-reload
adesso.
Per abilitare i servizi, eseguire:
systemctl abilita amavis.service
systemctl abilita clamd.service
systemctl avvia amavis.service
systemctl avvia clamd.service
10 Installa Nginx, PHP5 (PHP-FPM) e Fcgiwrap
Nginx è disponibile come pacchetto per OpenSUSE che possiamo installare come segue:
yast2 -i nginx-1.0
Se Apache2 è già installato sul sistema, interrompilo ora...
systemctl stop apache2.service
... e rimuovi i collegamenti di avvio del sistema di Apache:
systemctl disable apache2.service
Quindi creiamo i collegamenti di avvio del sistema per nginx e lo avviamo:
systemctl abilita nginx.service
systemctl avvia nginx.service
(Se sono installati sia Apache2 che nginx, il programma di installazione di ISPConfig 3 ti chiederà quale vuoi usare - rispondi a nginx in questo caso. Se è installato solo uno di entrambi, ISPConfig eseguirà automaticamente la configurazione necessaria.)
Possiamo far funzionare PHP5 in nginx tramite PHP-FPM (PHP-FPM (FastCGI Process Manager) è un'implementazione PHP FastCGI alternativa con alcune funzionalità aggiuntive utili per siti di qualsiasi dimensione, soprattutto quelli più frequentati) che installiamo come segue:
yast2 -i php5-fpm
Prima di avviare PHP-FPM, rinomina /etc/php5/fpm/php-fpm.conf.default in /etc/php5/fpm/php-fpm.conf:
mv /etc/php5/fpm/php-fpm.conf.default /etc/php5/fpm/php-fpm.conf
Modifica i permessi della directory di sessione di PHP:
chmod 1733 /var/lib/php5
Quindi apri /etc/php5/fpm/php-fpm.conf...
vi /etc/php5/fpm/php-fpm.conf
... e cambia error_log in /var/log/php-fpm.log e decommenta pm.min_spare_servers e pm.max_spare_servers:
[...] error_log = /var/log/php-fpm.log [...] pm.min_spare_servers = 5 [...] pm.max_spare_servers = 35 [...] |
Quindi crea i collegamenti di avvio del sistema per php-fpm e avvialo:
systemctl abilita php-fpm.service
systemctl avvia php-fpm.service
PHP-FPM è un processo demone che esegue un server FastCGI sulla porta 9000, come puoi vedere nell'output di
netstat -tapn
server1:~ # netstat -tapn
Connessioni Internet attive (server e stabilite)
Proto Recv-Q Send-Q Indirizzo locale Indirizzo estero Stato PID/nome programma
tcp 0 0. 127. 3310 0.0.0.0:* ASCOLTA 10357 /CLAMD
TCP 0 0 0.0.0.0:143 0.0.0.0:* Ascolta 9869 /Dovecot
TCP 0 0 0.0.0:80 0.0.0.0.0:** ASCOLTA 10521 /nginx
TCP 0 0 0.0.0.0:22 0.0.0.0:* Ascolta 1275 /sshd
TCP 0 0 127.0.0.1:25 0.0.0.0:* Ascolta 9816 /Master
TCP 0 0 127.0.0.1:9000 0.0.0.0:* Ascolta 10695 /php-fpm.conf)
TCP 0 0 127.0.0.1:10024 0.0.0.0 :* Ascolta 10337 /Amavisd (Mast
TCP 0 0 0.0.0.0:3306 0.0.0.0:* ASCOLTA 9694/mysqld
tcp 0 0 192.168.0.100:22 192.168.0.199:4630 Fondata 1332/0
TCP 0 0 :::::::*Ascolta 1275 /sshd
TCP 0 ::1:25 ::::* ASCOLTA 9816/master
server1:~ #
Per ottenere il supporto MySQL in PHP, possiamo installare il pacchetto php5-mysql. È una buona idea installare alcuni altri moduli PHP5 così come potresti averne bisogno per le tue applicazioni:
yast2 -i php5-mysql php5-bcmath php5-bz2 php5-calendar php5-ctype php5-curl php5-dom php5-ftp php5-gd php5-gettext php5-gmp php5-iconv php5-imap php5-ldap php5-mbstring php5-mcrypt php5-odbc php5-openssl php5-pcntl php5-pgsql php5-posix php5-shmop php5-snmp php5-soap php5-sockets php5-sqlite php5-sysvsem php5-tokenizer php5-wddx php5-xmlrpc php5-xsl php5-zlib php5-exif php5-pear php5-sysvmsg php5-sysvshm
Ora riavvia PHP-FPM:
systemctl restart php-fpm.service
Per ottenere il supporto CGI in nginx, installiamo Fcgiwrap.
Fcgiwrap è un wrapper CGI che dovrebbe funzionare anche per script CGI complessi e può essere utilizzato per ambienti di hosting condiviso perché consente a ciascun vhost di utilizzare la propria directory cgi-bin.
Poiché non esiste un pacchetto fcgiwrap per OpenSUSE, dobbiamo costruirlo noi stessi. Per prima cosa installiamo alcuni prerequisiti:
yast2 -i git patch automake glibc-devel gcc flex compat-readline4 db-devel wget gcc-c++ make vim libtool FastCGI-devel
Crea i seguenti collegamenti simbolici:
ln -s /usr/include/fastcgi/fastcgi.h /usr/local/include/
ln -s /usr/include/fastcgi/fcgi_config.h /usr/local/include/
ln - s /usr/include/fastcgi/fcgi_stdio.h /usr/local/include/
ln -s /usr/include/fastcgi/fcgiapp.h /usr/local/include/
ln -s / usr/include/fastcgi/fcgimisc.h /usr/local/include/
ln -s /usr/include/fastcgi/fcgio.h /usr/local/include/
ln -s /usr/ include/fastcgi/fcgios.h /usr/local/include/
Ora possiamo costruire fcgiwrap come segue:
cd /usr/local/src/
git clone git://github.com/gnosek/fcgiwrap.git
cd fcgiwrap
autoreconf -i
./configure
make
make install
Questo installa fcgiwrap su /usr/local/sbin/fcgiwrap.
Quindi installiamo il pacchetto spawn-fcgi che ci permette di eseguire fcgiwrap come demone:
yast2 -i spawn-fcgi
Ora possiamo avviare fcgiwrap come segue:
spawn-fcgi -u wwwrun -g www -s /var/run/fcgiwrap.socket -S -M 0770 -F 1 -P /var/run/spawn-fcgi.pid -- /usr/local/sbin/fcgiwrap
Ora dovresti trovare il socket fcgiwrap in /var/run/fcgiwrap.socket, di proprietà dell'utente wwwrun e del gruppo www. Ora dobbiamo aggiungere l'utente nginx al gruppo www:
usermod -A www nginx
Ricarica nginx in seguito:
systemctl reload nginx.service
Se non vuoi avviare fcgiwrap manualmente ogni volta che avvii il tuo sistema, apri /etc/init.d/boot.local...
vi /etc/init.d/boot.local
... e aggiungi il comando spawn-fcgi alla fine del file - questo avvierà automaticamente fcgiwrap alla fine del processo di avvio:
[...] /usr/bin/spawn-fcgi -u wwwrun -g www -s /var/run/fcgiwrap.socket -S -M 0770 -F 1 -P /var/run/spawn-fcgi.pid -- /usr/local/sbin/fcgiwrap |
Questo è tutto! Ora, quando crei un vhost nginx, ISPConfig si occuperà della corretta configurazione del vhost.
10.1 Installa phpMyAdmin
Quindi installiamo phpMyAdmin:
yast2 -i phpMyAdmin
Poiché questo installa Apache come dipendenza, rimuovi i collegamenti di avvio del sistema di Apache:
systemctl disable apache2.service
phpMyAdmin ora si trova nella directory /srv/www/htdocs/phpMyAdmin, ma lo vogliamo nella directory /usr/share/phpmyadmin/, quindi creiamo un collegamento simbolico:
ln -s /srv/www/htdocs/phpMyAdmin /usr/share/phpmyadmin
Dopo aver installato ISPConfig 3, puoi accedere a phpMyAdmin come segue:
L'app ISPConfig vhost sulla porta 8081 per nginx viene fornita con una configurazione phpMyAdmin, quindi puoi utilizzare http://server1.example.com:8081/phpmyadmin o http://server1.example.com:8081/phpMyAdmin per accedere a phpMyAdmin.
Se vuoi usare un alias /phpmyadmin o /phpMyAdmin che puoi usare dai tuoi siti web, questo è un po' più complicato rispetto ad Apache perché nginx non ha alias globali (cioè alias che possono essere definiti per tutti i vhost). Pertanto devi definire questi alias per ciascuno vhost da cui vuoi accedere a phpMyAdmin.
Per fare ciò, incolla quanto segue nel campo Direttive nginx nella scheda Opzioni del sito Web in ISPConfig:
        location /phpmyadmin {
               root /usr/share/;
               index index.php index.html index.htm;
               location ~ ^/phpmyadmin/(.+\.php)$ {
                       try_files $uri =404;
                       root /usr/share/;
                       fastcgi_pass 127.0.0.1:9000;
                       fastcgi_index index.php;
                       fastcgi_param SCRIPT_FILENAME $document_root$fastcgi_script_name;
                       include /etc/nginx/fastcgi_params;
                       fastcgi_buffer_size 128k;
                       fastcgi_buffers 256 4k;
                       fastcgi_busy_buffers_size 256k;
                       fastcgi_temp_file_write_size 256k;
                       fastcgi_intercept_errors on;
               }
               location ~* ^/phpmyadmin/(.+\.(jpg|jpeg|gif|css|png|js|ico|html|xml|txt))$ {
                       root /usr/share/;
               }
        }
        location /phpMyAdmin {
               rewrite ^/* /phpmyadmin last;
} |
Se utilizzi https invece di http per il tuo vhost, dovresti aggiungere la riga fastcgi_param HTTPS su; alla tua configurazione di phpMyAdmin in questo modo:
        location /phpmyadmin {
               root /usr/share/;
               index index.php index.html index.htm;
               location ~ ^/phpmyadmin/(.+\.php)$ {
                       try_files $uri =404;
                       root /usr/share/;
                       fastcgi_pass 127.0.0.1:9000;
                       fastcgi_param HTTPS on; # <-- add this line
                       fastcgi_index index.php;
                       fastcgi_param SCRIPT_FILENAME $document_root$fastcgi_script_name;
                       include /etc/nginx/fastcgi_params;
                       fastcgi_buffer_size 128k;
                       fastcgi_buffers 256 4k;
                       fastcgi_busy_buffers_size 256k;
                       fastcgi_temp_file_write_size 256k;
                       fastcgi_intercept_errors on;
               }
               location ~* ^/phpmyadmin/(.+\.(jpg|jpeg|gif|css|png|js|ico|html|xml|txt))$ {
                       root /usr/share/;
               }
        }
        location /phpMyAdmin {
               rewrite ^/* /phpmyadmin last;
} |
Se utilizzi sia http che https per il tuo vhost, devi aggiungere la seguente sezione alla sezione http {} in /etc/nginx/nginx.conf (prima di qualsiasi riga di inclusione) che determina se il visitatore usa http o https e imposta la variabile $fastcgi_https (che useremo nella nostra configurazione phpMyAdmin) di conseguenza:
vi /etc/nginx/nginx.conf
[...]
http {
[...]
        ## Detect when HTTPS is used
        map $scheme $fastcgi_https {
          default off;
          https on;
        }
[...]
}
[...] |
Non dimenticare di ricaricare nginx in seguito:
systemctl reload nginx.service
Quindi vai di nuovo nel campo Direttive nginx e invece di fastcgi_param HTTPS su; aggiungi la riga fastcgi_param HTTPS $fastcgi_https; in modo da poter utilizzare phpMyAdmin sia per le richieste http che per https:
        location /phpmyadmin {
               root /usr/share/;
               index index.php index.html index.htm;
               location ~ ^/phpmyadmin/(.+\.php)$ {
                       try_files $uri =404;
                       root /usr/share/;
                       fastcgi_pass 127.0.0.1:9000;
                       fastcgi_param HTTPS $fastcgi_https; # <-- add this line
                       fastcgi_index index.php;
                       fastcgi_param SCRIPT_FILENAME $document_root$fastcgi_script_name;
                       include /etc/nginx/fastcgi_params;
                       fastcgi_buffer_size 128k;
                       fastcgi_buffers 256 4k;
                       fastcgi_busy_buffers_size 256k;
                       fastcgi_temp_file_write_size 256k;
                       fastcgi_intercept_errors on;
               }
               location ~* ^/phpmyadmin/(.+\.(jpg|jpeg|gif|css|png|js|ico|html|xml|txt))$ {
                       root /usr/share/;
               }
        }
        location /phpMyAdmin {
               rewrite ^/* /phpmyadmin last;
} |
Il server perfetto - OpenSUSE 12.1 x86_64 con Nginx [ISPConfig 3] - Pagina 5
11 postino
Dalla versione 3.0.4, ISPConfig permette anche di gestire (creare/modificare/cancellare) le mailing list di Mailman. Se vuoi utilizzare questa funzione, installa Mailman come segue:
yast2 -i mailman
Prima di poter avviare Mailman, è necessario creare una prima mailing list chiamata mailman:
/usr/lib/mailman/bin/newlist mailman
server1:~ # /usr/lib/mailman/bin/newlist mailman
Inserisci l'e-mail della persona che gestisce l'elenco:<-- indirizzo e-mail admin, ad es. [email protected]
Password iniziale del postino:<-- password admin per l'elenco del postino
Premi invio per avvisare il proprietario del postino... <-- INVIO
server1:~ #
Crea i collegamenti di avvio del sistema per Mailman...
systemctl enable mailman.service
... e avvialo:
systemctl start mailman.service
Prossimo riavvio Postfix:
systemctl restart postfix.service
Ora dobbiamo creare questo collegamento simbolico per far funzionare Mailman con ISPConfig:
cd /usr/lib/mailman/cgi-bin/
ln -s ./ mailman
Se vuoi usare Mailman dai tuoi siti web creati tramite ISPConfig, questo è un po' più complicato rispetto ad Apache perché nginx non ha alias globali (cioè alias che possono essere definiti per tutti i vhost). Pertanto devi definire questi alias per ciascuno vhost da cui vuoi accedere a Mailman.
Per fare ciò, incolla quanto segue nel campo Direttive nginx nella scheda Opzioni del sito Web in ISPConfig:
        location /mailman {
               root /usr/lib/mailman/cgi-bin/;
               fastcgi_split_path_info (^/mailman/[^/]*)(.*)$;
               include /etc/nginx/fastcgi_params;
               fastcgi_param SCRIPT_FILENAME $document_root$fastcgi_script_name;
               fastcgi_param PATH_INFO $fastcgi_path_info;
               fastcgi_param PATH_TRANSLATED $document_root$fastcgi_path_info;
               fastcgi_intercept_errors on;
               fastcgi_pass unix:/var/run/fcgiwrap.socket;
        }

        location /mailmanicons {
               alias /usr/lib/mailman/icons;
        }

        location /pipermail {
               alias /var/lib/mailman/archives/public;
               autoindex on;
} |
Questo definisce l'alias /mailman/ per il tuo vhost, il che significa che puoi accedere all'interfaccia di amministrazione di Mailman per una lista su http://
Sotto http://
12 Installa PureFTPd
Installa il demone FTP pure-ftpd. Corri:
yast2 -i pure-ftpd
systemctl abilita pure-ftpd.service
systemctl avvia pure-ftpd.service
Ora configuriamo PureFTPd per consentire sessioni FTP e TLS. FTP è un protocollo molto insicuro perché tutte le password e tutti i dati vengono trasferiti in chiaro. Utilizzando TLS, l'intera comunicazione può essere crittografata, rendendo così l'FTP molto più sicuro.
OpenSSL è necessario per TLS; per installare OpenSSL, eseguiamo semplicemente:
yast2 -i openssl
Apri /etc/pure-ftpd/pure-ftpd.conf...
vi /etc/pure-ftpd/pure-ftpd.conf
Se vuoi consentire FTP e Sessioni TLS, imposta TLS su 1:
[...] # This option can accept three values : # 0 : disable SSL/TLS encryption layer (default). # 1 : accept both traditional and encrypted sessions. # 2 : refuse connections that don't use SSL/TLS security mechanisms, # including anonymous sessions. # Do _not_ uncomment this blindly. Be sure that : # 1) Your server has been compiled with SSL/TLS support (--with-tls), # 2) A valid certificate is in place, # 3) Only compatible clients will log in. TLS 1 [...] |
If you want to accept TLS sessions only (no FTP), set TLS to 2:
[...] # This option can accept three values : # 0 : disable SSL/TLS encryption layer (default). # 1 : accept both traditional and encrypted sessions. # 2 : refuse connections that don't use SSL/TLS security mechanisms, # including anonymous sessions. # Do _not_ uncomment this blindly. Be sure that : # 1) Your server has been compiled with SSL/TLS support (--with-tls), # 2) A valid certificate is in place, # 3) Only compatible clients will log in. TLS 2 [...] |
To not allow TLS at all (only FTP), set TLS to 0:
[...] # This option can accept three values : # 0 : disable SSL/TLS encryption layer (default). # 1 : accept both traditional and encrypted sessions. # 2 : refuse connections that don't use SSL/TLS security mechanisms, # including anonymous sessions. # Do _not_ uncomment this blindly. Be sure that : # 1) Your server has been compiled with SSL/TLS support (--with-tls), # 2) A valid certificate is in place, # 3) Only compatible clients will log in. TLS 0 [...] |
Per utilizzare TLS, dobbiamo creare un certificato SSL. Lo creo in /etc/ssl/private/, quindi creo prima quella directory:
mkdir -p /etc/ssl/private/
Successivamente, possiamo generare il certificato SSL come segue:
openssl req -x509 -nodes -days 7300 -newkey rsa:2048 -keyout /etc/ssl/private/pure-ftpd.pem -out /etc/ssl/private/pure-ftpd.pem
Country Name (2 letter code) [AU]:<-- Enter your Country Name (e.g., "DE").
State or Province Name (full name) [Some-State]:<-- Enter your State or Province Name.
Locality Name (eg, city) []:<-- Enter your City.
Organization Name (eg, company) [Internet Widgits Pty Ltd]:<-- Enter your Organization Name (e.g., the name of your company).
Organizational Unit Name (eg, section) []:<-- Enter your Organizational Unit Name (e.g. "IT Department").
Common Name (eg, YOUR name) []:<-- Enter the Fully Qualified Domain Name of the system (e.g. "server1.example.com").
Email Address []:<-- Enter your Email Address.
Change the permissions of the SSL certificate:
chmod 600 /etc/ssl/private/pure-ftpd.pem
Finally restart PureFTPd:
systemctl restart pure-ftpd.service
Questo è tutto. You can now try to connect using your FTP client; however, you should configure your FTP client to use TLS - see the next chapter how to do this with FileZilla.
13 Install BIND
The BIND nameserver can be installed as follows:
yast2 -i bind
Create the BIND system startup links and start it:
systemctl enable named.service
systemctl start named.service
14 Install Webalizer And AWStats
Since ISPConfig 3 lets you choose if you want to use Webalizer or AWStats to create your web site statistics, we install both:
yast2 -i webalizer perl-DateManip
zypper install http://download.opensuse.org/repositories/network:/utilities/openSUSE_12.1/noarch/awstats-7.0-14.1.noarch.rpm
15 Install fail2ban
fail2ban can be installed as follows:
yast2 -i fail2ban
16 Install Jailkit
Jailkit can be installed like this:
zypper install http://download.opensuse.org/repositories/security/openSUSE_12.1/x86_64/jailkit-2.13-1.1.x86_64.rpm
17 Synchronize The System Clock
If you want to have the system clock synchronized with an NTP server do the following:
yast2 -i xntp
Then add system startup links for ntp and start ntp:
systemctl enable ntp.service
systemctl start ntp.service
18 Install rkhunter
rkhunter can be installed as follows:
yast2 -i rkhunter
The Perfect Server - OpenSUSE 12.1 x86_64 With Nginx [ISPConfig 3] - Page 6
19 Install SquirrelMail
To install the SquirrelMail webmail client, run:
zypper installhttp://download.opensuse.org/repositories/server:/php:/applications/openSUSE_12.1/noarch/squirrelmail-1.4.22-1.1.noarch.rpm
Then configure SquirrelMail:
/srv/www/htdocs/squirrelmail/config/conf.pl
We must tell SquirrelMail that we are using Dovecot:
SquirrelMail Configuration : Read: config.php (1.4.0)
---------------------------------------------------------
Main Menu --
1. Organization Preferences
2. Server Settings
3. Folder Defaults
4. General Options
5. User Interface
6. Address Books
7. Message of the Day (MOTD)
8. Plugins
9. Database
10. Language settings
11. Tweaks
D. Set pre-defined settings for specific IMAP servers
C Turn color on
S Save data
Q Quit
Command >> <-- D
SquirrelMail Configuration : Read: config.php
---------------------------------------------------------
While we have been building SquirrelMail, we have discovered some
preferences that work better with some servers that don't work so
well with others. If you select your IMAP server, this option will
set some pre-defined settings for that server.
Please note that you will still need to go through and make sure
everything is correct. Questo non cambia tutto. There are
only a few settings that this will change.
Please select your IMAP server:
bincimap = Binc IMAP server
courier = Courier IMAP server
cyrus = Cyrus IMAP server
dovecot = Dovecot Secure IMAP server
exchange = Microsoft Exchange IMAP server
hmailserver = hMailServer
macosx = Mac OS X Mailserver
mercury32 = Mercury/32
uw = University of Washington's IMAP server
gmail = IMAP access to Google mail (Gmail) accounts
quit = Do not change anything
Command >> <-- dovecot
SquirrelMail Configuration : Read: config.php
---------------------------------------------------------
While we have been building SquirrelMail, we have discovered some
preferences that work better with some servers that don't work so
well with others. If you select your IMAP server, this option will
set some pre-defined settings for that server.
Please note that you will still need to go through and make sure
everything is correct. Questo non cambia tutto. There are
only a few settings that this will change.
Please select your IMAP server:
bincimap = Binc IMAP server
courier = Courier IMAP server
cyrus = Cyrus IMAP server
dovecot = Dovecot Secure IMAP server
exchange = Microsoft Exchange IMAP server
hmailserver = hMailServer
macosx = Mac OS X Mailserver
mercury32 = Mercury/32
uw = University of Washington's IMAP server
gmail = IMAP access to Google mail (Gmail) accounts
quit = Do not change anything
Command >> dovecot
imap_server_type = dovecot
default_folder_prefix =
trash_folder = Trash
sent_folder = Sent
draft_folder = Drafts
show_prefix_option = false
default_sub_of_inbox = false
show_contain_subfolders_op tion = false
optional_delimiter = detect
delete_folder = false
force_username_lowercase = true
Press enter to continue... <-- ENTER
SquirrelMail Configuration : Read: config.php (1.4.0)
---------------------------------------------------------
Main Menu --
1. Organization Preferences
2. Server Settings
3. Folder Defaults
4. General Options
5. User Interface
6. Address Books
7. Message of the Day (MOTD)
8. Plugins
9. Database
10. Language settings
11. Tweaks
D. Set pre-defined settings for specific IMAP servers
C Turn color on
S Save data
Q Quit
Command >> <-- S
SquirrelMail Configuration : Read: config.php (1.4.0)
---------------------------------------------------------
Main Menu --
1. Organization Preferences
2. Server Settings
3. Folder Defaults
4. General Options
5. User Interface
6. Address Books
7. Message of the Day (MOTD)
8. Plugins
9. Database
10. Language settings
11. Tweaks
D. Set pre-defined settings for specific IMAP servers
C Turn color on
S Save data
Q Quit
Command >> S
Data saved in config.php
Done activating plugins; registration data saved in plugin_hooks.php
Press enter to continue... <-- ENTER
SquirrelMail Configuration : Read: config.php (1.4.0)
---------------------------------------------------------
Main Menu --
1. Organization Preferences
2. Server Settings
3. Folder Defaults
4. General Options
5. User Interface
6. Address Books
7. Message of the Day (MOTD)
8. Plugins
9. Database
10. Language settings
11. Tweaks
D. Set pre-defined settings for specific IMAP servers
C Turn color on
S Save data
Q Quit
Command >> <-- Q
SquirrelMail is located in the /srv/www/htdocs/squirrelmail directory, but we need it in the /usr/share/squirrelmail/ directory. Therefore we create a symlink:
ln -s /srv/www/htdocs/squirrelmail /usr/share/squirrelmail
In addition to that, we change the owner of the /srv/www/htdocs/squirrelmail/data/ directory to nobody:
chown nobody /srv/www/htdocs/squirrelmail/data/
After you have installed ISPConfig 3, you can access SquirrelMail as follows:
The ISPConfig apps vhost on port 8081 for nginx comes with a SquirrelMail configuration, so you can use http://server1.example.com:8081/squirrelmail or http://server1.example.com:8081/webmail to access SquirrelMail.
If you want to use a /webmail or /squirrelmail alias that you can use from your web sites, this is a bit more complicated than for Apache because nginx does not have global aliases (i.e., aliases that can be defined for all vhosts). Therefore you have to define these aliases for each vhost from which you want to access SquirrelMail.
To do this, paste the following into the nginx Directives field on the Options tab of the web site in ISPConfig:
        location /squirrelmail {
               root /usr/share/;
               index index.php index.html index.htm;
               location ~ ^/squirrelmail/(.+\.php)$ {
                       try_files $uri =404;
                       root /usr/share/;
                       fastcgi_pass 127.0.0.1:9000;
                       fastcgi_index index.php;
                       fastcgi_param SCRIPT_FILENAME $document_root$fastcgi_script_name;
                       include /etc/nginx/fastcgi_params;
                       fastcgi_buffer_size 128k;
                       fastcgi_buffers 256 4k;
                       fastcgi_busy_buffers_size 256k;
                       fastcgi_temp_file_write_size 256k;
                       fastcgi_intercept_errors on;
               }
               location ~* ^/squirrelmail/(.+\.(jpg|jpeg|gif|css|png|js|ico|html|xml|txt))$ {
                       root /usr/share/;
               }
        }
        location /webmail {
               rewrite ^/* /squirrelmail last;
} |
If you use https instead of http for your vhost, you should add the line fastcgi_param HTTPS on; to your SquirrelMail configuration like this:
        location /squirrelmail {
               root /usr/share/;
               index index.php index.html index.htm;
               location ~ ^/squirrelmail/(.+\.php)$ {
                       try_files $uri =404;
                       root /usr/share/;
                       fastcgi_pass 127.0.0.1:9000;
                       fastcgi_param HTTPS on; # <-- add this line
                       fastcgi_index index.php;
                       fastcgi_param SCRIPT_FILENAME $document_root$fastcgi_script_name;
                       include /etc/nginx/fastcgi_params;
                       fastcgi_buffer_size 128k;
                       fastcgi_buffers 256 4k;
                       fastcgi_busy_buffers_size 256k;
                       fastcgi_temp_file_write_size 256k;
                       fastcgi_intercept_errors on;
               }
               location ~* ^/squirrelmail/(.+\.(jpg|jpeg|gif|css|png|js|ico|html|xml|txt))$ {
                       root /usr/share/;
               }
        }
        location /webmail {
               rewrite ^/* /squirrelmail last;
} |
If you use both http and https for your vhost, you need to add the following section to the http {} section in /etc/nginx/nginx.conf (before any include lines) which determines if the visitor uses http or https and sets the $fastcgi_https variable (which we will use in our SquirrelMail configuration) accordingly:
vi /etc/nginx/nginx.conf
[...]
http {
[...]
        ## Detect when HTTPS is used
        map $scheme $fastcgi_https {
          default off;
          https on;
        }
[...]
}
[...] |
Don't forget to reload nginx afterwards:
systemctl reload nginx.service
Then go to the nginx Directives field again, and instead of fastcgi_param HTTPS on; you add the line fastcgi_param HTTPS $fastcgi_https; so that you can use SquirrelMail for both http and https requests:
        location /squirrelmail {
               root /usr/share/;
               index index.php index.html index.htm;
               location ~ ^/squirrelmail/(.+\.php)$ {
                       try_files $uri =404;
                       root /usr/share/;
                       fastcgi_pass 127.0.0.1:9000;
                       fastcgi_param HTTPS $fastcgi_https; # <-- add this line
                       fastcgi_index index.php;
                       fastcgi_param SCRIPT_FILENAME $document_root$fastcgi_script_name;
                       include /etc/nginx/fastcgi_params;
                       fastcgi_buffer_size 128k;
                       fastcgi_buffers 256 4k;
                       fastcgi_busy_buffers_size 256k;
                       fastcgi_temp_file_write_size 256k;
                       fastcgi_intercept_errors on;
               }
               location ~* ^/squirrelmail/(.+\.(jpg|jpeg|gif|css|png|js|ico|html|xml|txt))$ {
                       root /usr/share/;
               }
        }
        location /webmail {
               rewrite ^/* /squirrelmail last;
} |
20 ISPConfig 3
Before we install ISPConfig 3, make sure that the /var/vmail/ directory exists:
mkdir /var/vmail/
Before you start the ISPConfig installation, make sure that Apache is stopped (if it is installed - it is possible that some of your installed packages have installed Apache as a dependency without you knowing). If Apache2 is already installed on the system, stop it now...
systemctl stop apache2.service
... and remove Apache's system startup links:
systemctl disable apache2.service
Make sure that nginx is running:
systemctl restart nginx.service
(If you have both Apache and nginx installed, the installer asks you which one you want to use:Apache and nginx detected. Select server to use for ISPConfig:(apache,nginx) [apache]:
Type nginx. If only Apache or nginx are installed, this is automatically detected by the installer, and no question is asked.)
Download the current ISPConfig 3 version and install it. The ISPConfig installer will configure all services like Postfix, Dovecot, etc. for you. A manual setup as required for ISPConfig 2 is not necessary anymore.
You now also have the possibility to let the installer create an SSL vhost for the ISPConfig control panel, so that ISPConfig can be accessed using https:// instead of http://. To achieve this, just press ENTER when you see this question:Do you want a secure (SSL) connection to the ISPConfig web interface (y,n) [y]:.
cd /tmp
wget http://www.ispconfig.org/downloads/ISPConfig-3-stable.tar.gz
tar xfz ISPConfig-3-stable.tar.gz
cd ispconfig3_install/install/
Now start the installation process by executing:
php -q install.php
server1:/tmp/ispconfig3_install/install # php -q install.php
--------------------------------------------------------------------------------
_____ ___________ _____ __ _ ____
|_ _/ ___| ___ \ / __ \ / _(_) /__ \
| | \ `--.| |_/ / | / \/ ___ _ __ | |_ _ __ _ _/ /
| | `--. \ __/ | | / _ \| '_ \| _| |/ _` | |_ |
_| |_/\__/ / | | \__/\ (_) | | | | | | | (_| | ___\ \
\___/\____/\_| \____/\___/|_| |_|_| |_|\__, | \____/
__/ |
|___/
--------------------------------------------------------------------------------
>> Initial configuration
Operating System: openSUSE or compatible, unknown version.
Following will be a few questions for primary configuration so be careful.
Default values are in [brackets] and can be accepted with
Tap in "quit" (without the quotes) to stop the installer.
Select language (en,de) [en]: <-- ENTER
Installation mode (standard,expert) [standard]: <-- ENTER
Full qualified hostname (FQDN) of the server, eg server1.domain.tld [server1.example.com]: <-- ENTER
MySQL server hostname [localhost]: <-- ENTER
MySQL root username [root]: <-- ENTER
MySQL root password []: <-- yourrootsqlpassword
MySQL database to create [dbispconfig]: <-- ENTER
MySQL charset [utf8]: <-- ENTER
Apache and nginx detected. Select server to use for ISPConfig: (apache,nginx) [apache]: <-- nginx
Generating a 2048 bit RSA private key
...................................................................................+++
...+++
writing new private key to 'smtpd.key'
-----
You are about to be asked to enter information that will be incorporated
into your certificate request.
What you are about to enter is what is called a Distinguished Name or a DN.
There are quite a few fields but you can leave some blank
For some fields there will be a default value,
If you enter '.', the field will be left blank.
-----
Country Name (2 letter code) [AU]: <-- ENTER
State or Province Name (full name) [Some-State]: <-- ENTER
Locality Name (eg, city) []: <-- ENTER
Organization Name (eg, company) [Internet Widgits Pty Ltd]: <-- ENTER
Organizational Unit Name (eg, section) []: <-- ENTER
Common Name (eg, YOUR name) []: <-- ENTER
Emai l Address []: <-- ENTER
Configuring Jailkit
Configuring Dovecot
chmod: cannot access `/etc/dovecot/dovecot-sql.conf~': No such file or directory
Configuring Spamassassin
Configuring Amavisd
Configuring Getmail
Configuring Pureftpd
Configuring BIND
Configuring nginx
Configuring Vlogger
Configuring Apps vhost
Configuring Bastille Firewall
Configuring Fail2ban
Installing ISPConfig
ISPConfig Port [8080]: <-- ENTER
Do you want a secure (SSL) connection to the ISPConfig web interface (y,n) [y]:<-- ENTER
Generating RSA private key, 4096 bit long modulus
.++
...............++
e is 65537 (0x10001)
You are about to be asked to enter information that will be incorporated
into your certificate request.
What you are about to enter is what is called a Distinguished Name or a DN.
There are quite a few fields but you can leave some blank
For some fields there will be a default value,
If you enter '.', the field will be left blank.
-----
Country Name (2 letter code) [AU]: <-- ENTER
State or Province Name (full name) [Some-State]: <-- ENTER
Locality Name (eg, city) []: <-- ENTER
Organization Name (eg, company) [Internet Widgits Pty Ltd]: <-- ENTER
Organizational Unit Name (eg, section) []: <-- ENTER
Common Name (eg, YOUR name) []: <-- ENTER
Email Address []: <-- ENTER
Please enter the following 'extra' attributes
to be sent with your certificate request
A challenge password []: <-- ENTER
An optional company name []: <-- ENTER
writing RSA key
Configuring DBServer
Installing ISPConfig crontab
no crontab for root
no crontab for getmail
Restarting services ...
redirecting to systemctl
redirecting to systemctl
redirecting to systemctl
redirecting to systemctl
redirecting to systemctl
redirecting to systemctl
redirectin g to systemctl
redirecting to systemctl
redirecting to systemctl
Installation completed.
server1:/tmp/ispconfig3_install/install #
Clean up the /tmp directory:
cd /tmp
rm -rf /tmp/ispconfig3_install
rm -f /tmp/ISPConfig-3-stable.tar.gz
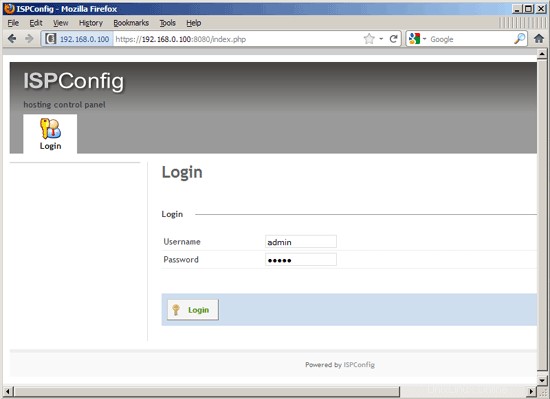
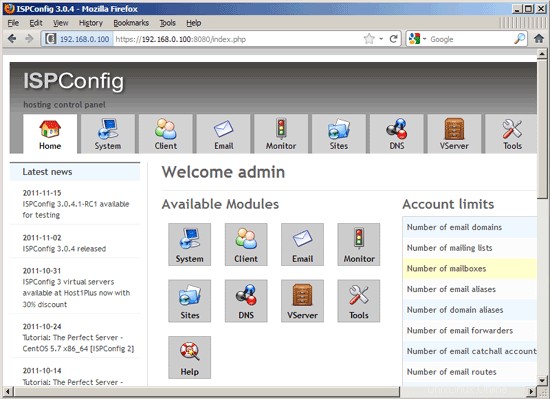
Afterwards you can access ISPConfig 3 under http(s)://server1.example.com:8080/ or http(s)://192.168.0.100:8080/ (http or https depends on what you chose during installation). Log in with the username admin and the password admin (you should change the default password after your first login):
If you want to use IPv6 addresses with your nginx vhosts, please do the following before you create IPv6 vhosts in ISPConfig:
Open /etc/sysctl.conf...
vi /etc/sysctl.conf
... and add the line net.ipv6.bindv6only =1:
[...] net.ipv6.bindv6only = 1 |
Run...
sysctl -p
... afterwards for the change to take effect.
20.1 ISPConfig 3 Manual
In order to learn how to use ISPConfig 3, I strongly recommend to download the ISPConfig 3 Manual.
Su circa 300 pagine, copre il concetto alla base di ISPConfig (amministratore, rivenditori, clienti), spiega come installare e aggiornare ISPConfig 3, include un riferimento per tutti i moduli e i campi dei moduli in ISPConfig insieme a esempi di input validi e fornisce tutorial per le attività più comuni in ISPConfig 3. Descrive anche come rendere più sicuro il tuo server e include una sezione per la risoluzione dei problemi alla fine.
20.2 ISPConfig Monitor App For Android
Con l'app ISPConfig Monitor, puoi controllare lo stato del tuo server e scoprire se tutti i servizi funzionano come previsto. Puoi controllare le porte TCP e UDP ed eseguire il ping dei tuoi server. In aggiunta a ciò, puoi utilizzare questa app per richiedere dettagli dai server su cui è installato ISPConfig (tieni presente che la versione minima di ISPConfig 3 installata con supporto per l'app ISPConfig Monitor è 3.0.3.3! ); these details include everything you know from the Monitor module in the ISPConfig Control Panel (e.g. services, mail and system logs, mail queue, CPU and memory info, disk usage, quota, OS details, RKHunter log, etc.), and of course, as ISPConfig is multiserver-capable, you can check all servers that are controlled from your ISPConfig master server.
Per le istruzioni di download e utilizzo, visitare http://www.ispconfig.org/ispconfig-3/ispconfig-monitor-app-for-android/.
21 Links
- OpenSUSE:http://www.opensuse.org/
- ISPConfig:http://www.ispconfig.org/
About The Author

Falko Timme is the owner of  Timme Hosting (ultra-fast nginx web hosting). He is the lead maintainer of HowtoForge (since 2005) and one of the core developers of ISPConfig (since 2000). He has also contributed to the O'Reilly book "Linux System Administration".