In questa pagina viene fornita un'introduzione di base all'e-mail, seguita da una descrizione del server di posta di Sendmail e il modulo Webmin per configurarlo.
Il modulo di configurazione di Sendmail
Sendmail è l'MTA più popolare in uso oggi su Internet e lo è stato sin dal suo primo sviluppo. È incluso come standard in quasi tutte le varianti del sistema operativo Unix e funziona allo stesso modo su tutte. Ha molte funzioni utili per il routing e l'elaborazione della posta elettronica, come alias, routing di dominio e file di inoltro creabili dall'utente.
Sendmail ha una mappatura uno-a-uno tra gli utenti Unix e le cassette postali. Ogni utente ha il proprio file di posta, in genere nella directory /var/mail o /var/spool/mail. Ogni volta che un messaggio viene consegnato a un utente, viene aggiunto al file con lo stesso nome dell'utente in quella directory, come /var/mail/jcameron. Sendmail non ha il concetto di "utenti di posta":se desideri creare una nuova casella di posta, dovrai aggiungere un nuovo utente Unix come spiegato in Utenti e gruppi.
Sendmail può accettare e-mail in due modi diversi:da una connessione SMTP o da un altro programma invocando il comando sendmail con i parametri corretti e inviandogli l'e-mail come input. In entrambi i casi, il messaggio viene recapitato alla cassetta postale di un utente locale o inviato a un altro sistema. Come ci si aspetterebbe, se il processo del server Sendmail non è in esecuzione, è impossibile inviare e-mail al proprio sistema tramite SMTP. Inoltre, le email in coda non verranno consegnate.
Il file di configurazione principale di Sendmail è opportunamente chiamato sendmail.cf e si trova nella directory /etc o /etc/mail. Inoltre, sono disponibili file in formato testo e DBM separati per domini locali, alias di inoltro della posta, mappature di indirizzi e altre funzionalità discusse più avanti in questo capitolo. Quasi tutti questi file aggiuntivi sono in realtà nel formato del database Unix DBM, ma sono costruiti da un file di testo corrispondente che l'amministratore di sistema (e Webmin) possono modificare. Sendmail però legge solo i file DBM e li ricontrolla per ogni messaggio ricevuto in modo che qualsiasi modifica a uno dei file del database diventi immediatamente attiva.
Per configurare Sendmail utilizzando Webmin dovrai visitare il modulo Configurazione di Sendmail, che si trova nella categoria Server. Supponendo che tu abbia installato il server, la pagina principale del modulo sarà simile all'esempio mostrato di seguito.
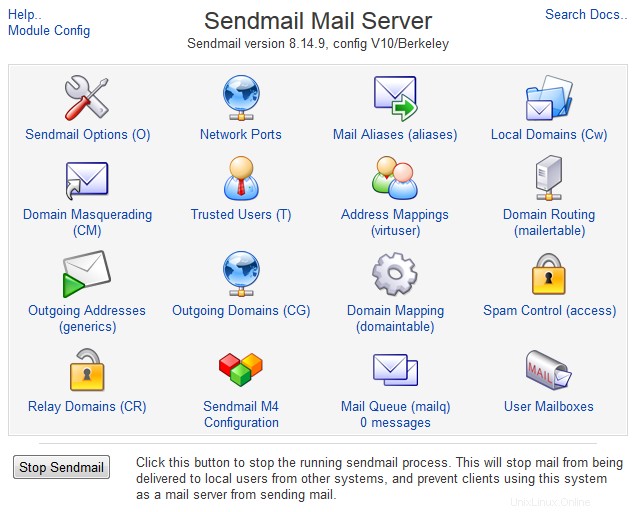 La schermata principale del server di posta di Sendmail
 Se il modulo non riesce a trovare il programma del server Sendmail o il file di configurazione principale sul sistema, verrà visualizzato un messaggio di errore in tal senso. Controllare il CD di distribuzione Linux o il sito Web per il pacchetto sendmail e installarlo utilizzando il modulo Pacchetti software. Se sono disponibili altri pacchetti i cui nomi iniziano con sendmail- (come sendmail-cf o sendmail-docs), installali anche loro.
Questo errore può verificarsi anche nell'improbabile eventualità che tu abbia installato Sendmail o il suo file di configurazione in una posizione diversa da quella prevista dal modulo. Per impostazione predefinita, presuppone che utilizzerai i pacchetti forniti con il tuo sistema operativo, ma spesso questi non sono aggiornati. Per questo motivo, potresti aver compilato e installato l'ultima versione in una directory diversa. In tal caso, vedere il Configurazione del modulo di configurazione di Sendmail sezione seguente per istruzioni su come modificare il programma e i percorsi dei file di configurazione.
Sendmail ha subito molti rilasci diversi nel corso degli anni, e in quel periodo il suo file di configurazione principale (di solito trovato in /etc/sendmail.cf) è cambiato. Se stai eseguendo una versione molto vecchia o stai usando un vecchio file di configurazione, la pagina principale del modulo visualizzerà un messaggio di errore che indica che il formato del file non è supportato. Le configurazioni precedenti alla versione 7 attivano questo errore, ma fortunatamente si trovano raramente sui moderni sistemi Unix.
Se nella pagina principale non viene visualizzato alcun messaggio di errore, verrà visualizzata la tabella delle icone mostrata nell'immagine sopra. Ciascuno può essere cliccato per accedere a una delle funzioni di Sendmail, come l'aliasing della posta, l'instradamento del dominio o la coda della posta. Il resto di questo capitolo spiega come utilizzare le pagine ei moduli sotto ciascuna delle icone. Accanto al nome di ciascuna icona (come Mappatura indirizzi ) è il nome interno della funzione di configurazione di Sendmail tra parentesi che controlla, ad esempio virtuser. Questi nomi sono per lo più utili ad amministratori esperti che vogliono sapere come le icone nel modulo si riferiscono ai file di configurazione e alle direttive effettive.
Alcune delle icone quando vengono cliccate possono visualizzare un messaggio come *La configurazione di Sendmail non ha la funzione di mappatura degli indirizzi (virtuser) abilitata*. Su molti sistemi operativi, il file di configurazione principale di Sendmail non ha tutte le funzionalità disponibili attivate per impostazione predefinita. Per rendere disponibili le pagine dell'icona scelta, seguire le istruzioni nella sezione *Aggiunta di funzioni di Sendmail con M4* più avanti in questo capitolo.
Se il processo del server Sendmail è in esecuzione, un pulsante con l'etichetta Interrompi Sendmail apparirà in fondo alla pagina principale. Come suggerisce il nome, facendo clic su questo pulsante si spegnerà il server in modo che il sistema non accetti più connessioni SMTP e non esegua più la scansione della coda di posta. Al contrario, quando Sendmail non esegue un Avvia Sendmail apparirà invece il pulsante, che può essere utilizzato per avviare il processo del server.
Se vuoi che Sendmail sia sempre in esecuzione, usa il modulo Bootup and Shutdown per avviare il processo del server all'avvio. La maggior parte dei pacchetti includerà uno script di azione che può essere abilitato e potrebbe anche essere abilitato per impostazione predefinita. Altrimenti, dovrai creare un'azione che esegua il comando /usr/sbin/sendmail -bd -q30m all'avvio.
Modifica di domini locali e mascheramento di domini
Quando Sendmail riceve un messaggio di posta elettronica tramite una connessione SMTP, deve capire se deve essere consegnato localmente o inoltrato a un altro server. Questo viene fatto guardando l'indirizzo A del messaggio, in particolare la parte del dominio dopo il @. Il dominio viene confrontato con un elenco di domini locali e, se viene trovata una corrispondenza, l'e-mail viene consegnata alla casella di posta dell'utente il cui nome si trova a sinistra della @ nell'indirizzo A. Oppure, se tale utente non esiste, viene generato un messaggio di rimbalzo e inviato al mittente originale.
Se il dominio non è locale, Sendmail cercherà il server di posta per il dominio e tenterà di connettersi ad esso per trasferire il messaggio. Questo è ciò che di solito accade quando un client sulla stessa rete si connette per inviare e-mail. Tuttavia, si verificherà un problema se Sendmail tenta di riconnettersi a se stesso, cosa che può verificarsi se il DNS dice che è il server di posta per un dominio che non è nell'elenco dei domini locali. Se ciò accade, un messaggio di rimbalzo verrà rispedito al mittente, contenente testo come se la posta mi tornasse indietro.
Per impostazione predefinita, questo elenco di domini locali contiene solo il nome host completo del tuo sistema, come server.example.com . Se stai configurando un server per ricevere e-mail da Internet per alcuni domini (come example.com ), dovrà essere aggiunto all'elenco. I passaggi per farlo sono:
- Nella pagina principale del modulo, fare clic su Domini locali icona. Verrà visualizzata una pagina contenente una casella di testo in cui sono elencati tutti i domini locali correnti.
- Aggiungi all'elenco tutti i nomi di dominio o host aggiuntivi che desideri, uno per riga. È del tutto possibile che un server accetti la posta per diversi domini, specialmente se verrà utilizzato per l'hosting virtuale. Come spiega l'introduzione, la posta verrà inviata al tuo sistema in primo luogo solo se esiste un record DNS MX appropriato per ciascun dominio.
- Fai clic su Salva pulsante in fondo alla pagina per renderli attivi.
Sendmail accetterà sempre per la consegna locale messaggi di posta elettronica in cui l'indirizzo A non contiene un dominio, solo un nome utente. Questi vengono spesso inviati da programmi in esecuzione sul sistema stesso, come il demone Cron o il comando mail.
Il rovescio della medaglia dell'elenco dei domini locali è il mascheramento del dominio. Questa funzione di Sendmail ti consente di impostare il dominio che viene aggiunto all'invio di e-mail dal tuo sistema quando nessuno è specificato, ad esempio dal comando mail. È anche possibile fare in modo che Sendmail modifichi i domini degli indirizzi Da dei messaggi ricevuti tramite SMTP, come quelli inviati dai client di posta.
Per impostare il masquerading del dominio, i passaggi da seguire sono:
- Nella pagina principale del modulo, fai clic su Domain Masquerading icona.
- Compila il Mascherato come dominio campo con il nome del dominio da accodare agli indirizzi From in uscita che ne sono privi, ad esempio example.com . Se il campo viene lasciato vuoto, Sendmail non effettuerà alcuna modifica al dominio.
- Per fare in modo che Sendmail riscriva gli indirizzi Da dei messaggi di altri domini, compila i Domini da mascherare campo. Questo può essere utile se alcuni dei client di posta che inviano messaggi tramite il tuo server insistono nell'utilizzare il dominio sbagliato.
- Fai clic su Salva pulsante per rendere attivo il masquerading.
Sulla maggior parte dei server di posta, non è necessario preoccuparsi di configurare il mascheramento poiché tutta la posta viene inviata dai programmi client tramite SMTP. Tutti i client di posta consentono all'utente di specificare un indirizzo Da completo, che dovrebbe includere il dominio corretto.
Gestione degli alias email
Un alias di posta specifica che l'e-mail ricevuta dal tuo server per una particolare casella di posta dovrebbe invece essere inoltrata a una destinazione diversa. Tale destinazione può essere un altro indirizzo e-mail, un file di indirizzi, un file locale o persino l'input di un programma. Possono essere utili per configurare pseudo caselle di posta che in realtà inviano e-mail a una persona reale, come sales@example.com o webmaster@example.com . Un alias può avere lo stesso nome di un utente Unix, nel qual caso intercetterà tutta la posta inviata a quell'utente e la inoltrerà invece a una destinazione diversa.
Sulla maggior parte dei sistemi operativi, Sendmail ha diversi alias definiti di default per gli utenti del sistema come bin, nessuno e uucp, che inoltrano tutti la posta a root. Ci sarà anche un alias postmaster, che ogni server di posta deve avere, e che dovrebbe inoltrare i messaggi a qualcuno responsabile del server di posta. In genere, questo sarà anche l'utente root.
Per creare un alias di posta personale utilizzando Webmin, i passaggi da seguire sono:
- Nella pagina principale del modulo, fai clic su Alias di posta icona. Verrai indirizzato a una pagina che elenca tutti gli alias esistenti e le loro destinazioni, con un modulo in alto per aggiungerne uno nuovo. Lo screenshot qui sotto mostra un esempio.
- Nell'Indirizzo campo di Crea alias modulo, inserisci il nome dell'utente o della casella di posta per questo alias (la parte dell'indirizzo a sinistra della @). Se il tuo server ospita più domini, l'alias inoltrerà l'e-mail inviata al nome inserito in uno qualsiasi di quei domini. Ad esempio, se il tuo server accetta la posta per foo.com e bar.com , quindi un alias chiamato vendite inoltrerà l'e-mail a entrambi sales@foo.com e sales@bar.com . Se desideri essere in grado di inoltrare lo stesso nome della casella di posta a più domini in modo diverso, consulta la sezione seguente intitolata *Gestione delle mappature degli indirizzi virtuali*.
- Supponendo che tu voglia effettivamente che questo alias venga utilizzato da Sendmail, lascia il campo Abilitato? campo impostato su Sì . Modificandolo in No farà sì che l'alias venga ignorato. Questo campo può essere utilizzato durante la modifica di un alias per disabilitarlo temporaneamente anziché eliminarlo completamente.
- L'Alias per campo determina dove verrà inviata l'e-mail a questo alias. Dal menu sono disponibili le seguenti opzioni:
- Non verrà fatto nulla con l'e-mail ricevuta. Non ha senso selezionare questa opzione durante la creazione di un nuovo alias.
- Indirizzo email
- L'e-mail verrà inoltrata all'utente o all'indirizzo inserito nel campo adiacente. Fai attenzione a non impostare un ciclo di inoltro inviando nuovamente l'e-mail all'indirizzo dell'alias! Se stai creando un alias con lo stesso nome di un utente Unix e desideri davvero che l'e-mail venga recapitata alla sua casella di posta e ad altre destinazioni, inserisci il nome utente preceduto da una barra rovesciata (come \jcameron ) in questo campo. La barra rovesciata dice a Sendmail di ignorare il controllo dell'alias.
- Indirizzi nel file
- L'e-mail all'alias verrà inviata a tutti gli indirizzi nel file di testo il cui percorso del file è inserito nel campo di testo adiacente. Ciascun indirizzo deve trovarsi su una riga separata. Questa opzione può essere utile per creare una semplice mailing list e gli alias di questo tipo sono usati dal gestore di liste Majordomo (trattato su MajordomoListManager).
- Scrivi su file
- Il testo completo, comprese tutte le intestazioni delle e-mail ricevute dall'alias, verrà aggiunto al file il cui percorso è inserito nella casella di testo.
- Feed per programmare
- Verrà eseguito il programma il cui percorso e parametri sono stati immessi nella casella di testo e il testo completo, comprese tutte le intestazioni delle e-mail ricevute dall'alias, gli verrà inviato come input. Questo tipo di alias è particolarmente utile per i programmatori che desiderano eseguire la propria elaborazione personalizzata o il filtraggio dei messaggi di posta elettronica. Il programma viene solitamente eseguito come demone utente Unix, non root o utente con lo stesso nome dell'alias.
- Risposta automatica da file
- Quando l'e-mail viene inviata all'alias, il contenuto del file specificato nella casella di testo adiacente verrà rispedito al mittente originale. Per ulteriori informazioni sull'utilizzo di alias di questo tipo, vedere la sezione *Creazione di alias di risposta automatica*.
- Applica file filtro
- L'e-mail inviata all'alias verrà elaborata secondo le regole del file filtro inserito nella casella di testo, che può inoltrare a destinazioni diverse a seconda del contenuto del messaggio. Per maggiori dettagli, vedere la sezione *Creazione di alias di filtro* più avanti nel capitolo. È possibile che un alias abbia più destinazioni. Per aggiungerne più di uno, dovrai modificare nuovamente questo alias dopo averlo salvato e compilare la riga con
selezionato in fondo a Alias a tavolo.
- Fai clic su Salva per aggiungere l'alias all'elenco e renderlo immediatamente attivo.

L'elenco degli alias di posta
Come di consueto in Webmin, puoi modificare un alias esistente facendo clic sul suo nome nell'elenco nella pagina Alias di posta. Verrà visualizzato un modulo di modifica che contiene tutti gli stessi campi del modulo di creazione, ma ha Salva e Elimina pulsanti in basso invece. Il primo aggiornerà l'alias con le modifiche che hai apportato, mentre il secondo lo cancellerà definitivamente.
Se un utente Unix ha un file chiamato .forward nella sua home directory, l'e-mail che normalmente verrebbe consegnata al suo file di posta verrà invece inviata agli indirizzi elencati nel file .forward. In molti modi, questi file equivalgono ad alias che possono essere creati da singoli utenti invece che dall'amministratore di sistema. È anche possibile che un file .forward contenga voci che indicano a Sendmail di inviare e-mail a un elenco di indirizzi in un altro file, inviarlo a un programma come input o aggiungerlo a un file.
Tuttavia, questo modulo non supporta la modifica di file .forward. Tuttavia, Usermain consente agli utenti normali di modificare i propri file di inoltro utilizzando un'interfaccia basata sul Web quasi identica a quella descritta in questa sezione.
Configurazione dell'inoltro
Agli albori di Internet, i server di posta potevano consegnare in sicurezza la posta ai domini locali e inoltrare tutte le altre e-mail a un altro MTA, indipendentemente dalla sua origine. Oggi, consentire al tuo server di inoltrare qualsiasi e-mail che riceve è un invito agli spammer a utilizzare il tuo sistema come inoltro. Un server ben configurato dovrebbe accettare solo e-mail per domini non locali da host client affidabili, come quelli sulla rete aziendale o sulla LAN domestica. Le email inviate ai domini locali sono sicure e possono essere accettate ovunque.
Se Sendmail sul tuo sistema è un relay aperto (che accetta e-mail non locali da qualsiasi luogo), le persone che inviano milioni di messaggi e-mail di spam possono usarlo per coprire le proprie tracce. Anche se stai eseguendo un piccolo server di posta per una piccola azienda di cui pensi che nessuno spammer verrà mai a conoscenza, è comunque una pessima idea lasciare il tuo sistema aperto all'inoltro.
Per questo motivo, i pacchetti Sendmail forniti con le moderne distribuzioni Linux sono configurati per impostazione predefinita per impedire al server di accettare e-mail non locali da qualsiasi luogo eccetto lo stesso sistema. Se stai configurando un server di posta per un'azienda o per la tua LAN domestica, dovrai consentire anche ad altri host di inoltrare la posta:
- Nella pagina principale del modulo, fai clic su Domini di inoltro icona per visualizzare un modulo per l'immissione di reti e domini di inoltro.
- Nei Domini a cui inoltrare è consentito, aggiungere l'indirizzo della rete da cui si desidera consentire l'inoltro ai client. Dovrebbe essere inserito senza zeri finali, ad esempio 192.168.1 . È possibile inserire più di una rete, così come indirizzi IP specifici. Puoi anche inserire nomi di dominio come foo.com a cui Sendmail consentirà l'inoltro. Qualsiasi messaggio di posta elettronica ricevuto (indipendentemente dalla sua origine) destinato a un dominio specificato verrà consegnato al server appropriato. Questo può essere utile se il tuo sistema è un gateway di posta per altri domini che non possono essere raggiunti direttamente dal resto di Internet, come spiegato nella sezione *Configurazione dell'instradamento del dominio*.
- Fai clic su Salva pulsante per attivare il nuovo elenco di domini di inoltro.
Un effetto collaterale delle restrizioni di inoltro di Sendmail è che non c'è modo di utilizzare il tuo sistema come server per la posta in uscita quando ti connetti da una rete non affidabile - in effetti, questo è il punto. A volte può essere fastidioso, ad esempio se ci si collega a molti ISP diversi e non si desidera riconfigurare il client di posta per utilizzare un server di posta in uscita diverso per ciascuno di essi. In un mondo ideale, sarebbe possibile utilizzare il proprio server di posta per la posta in uscita, indipendentemente da dove ci si connette, ma questo è normalmente impossibile senza disattivare del tutto le restrizioni di inoltro.
La migliore soluzione a questo problema è l'autenticazione SMTP, in cui i client accedono a Sendmail prima di inoltrare la posta elettronica. Sfortunatamente, Webmin non ha ancora un modo semplice per configurarlo. Un'altra soluzione prevede l'affidabilità dei client che effettuano una connessione POP3 prima di SMTP, cosa che fa la maggior parte dei programmi client di posta. Tuttavia, ciò richiede la cooperazione tra il server POP3 e Sendmail, che di solito sono programmi non correlati. Al momento in cui scrivo, Webmin non supporta nemmeno la sua configurazione.
Gestione delle mappature degli indirizzi virtuali
Le mappature degli indirizzi sono simili agli alias, tranne per il fatto che si applicano solo alle e-mail inviate a un utente e dominio specifici, piuttosto che a un utente in qualsiasi dominio come fanno gli alias. Un'altra differenza è che le mappature degli indirizzi possono inoltrare e-mail solo a un singolo indirizzo, anziché a un programma, file o elenco di indirizzi. Tuttavia, questa limitazione può essere superata combinando sia le mappature che gli alias.
Puoi utilizzare le mappature degli indirizzi per inviare e-mail a sales@foo.com e sales@bar.com inviato a diverse destinazioni finali, anche se entrambi i domini sono ospitati dal tuo server. Ciò è particolarmente utile se gestisci un numero elevato di domini di posta elettronica per clienti diversi, molti dei quali desiderano avere indirizzi simili (come vendite ) nei loro domini.
Le mappature degli indirizzi possono essere utilizzate anche per reindirizzare tutte le e-mail a un particolare dominio agli stessi utenti in un dominio diverso, in modo che ad esempio posta a bob@foo.com e fred@foo.com verrà inviato a bob@bar.com e fred@bar.com rispettivamente. Meglio ancora, puoi fare in modo che tutte le email a qualsiasi indirizzo di un dominio vengano inviate a un unico altro indirizzo, il che è utile per il client di posta POP3 Fetchmail Mail Retrieval. Per creare una nuova mappatura degli indirizzi, i passaggi da seguire sono:
- Nella pagina principale del modulo, fai clic su Mappatura degli indirizzi icona. Verrà visualizzata una pagina che elenca tutte le mappature esistenti, con un modulo in alto con l'etichetta Crea mappatura per aggiungerne uno nuovo.
- Se desideri creare una mappatura per le email a un solo indirizzo, seleziona Indirizzo nella Posta per campo e inserire l'indirizzo nella casella di testo adiacente. A differenza di un alias, deve essere inserito per intero come fred@example.com . Se stai creando una mappatura per tutte le email a un dominio, seleziona il Dominio opzione e inserisci il dominio completo o il nome host nel campo di testo accanto ad esso, ad esempio example.com . In ogni caso, il dominio nell'indirizzo o il dominio inserito deve apparire nell'elenco dei domini locali di Sendmail, spiegato in Modifica dei domini locali sezione precedente in questo capitolo.
- Se la destinazione della mappatura è un unico indirizzo, in Invia a campo seleziona Indirizzo e compila la casella di testo accanto ad essa con un indirizzo completo (come jcameron@foo.com ) o il nome di una casella di posta (come solo jcameron ). Se Dominio è stato selezionato per Posta per campo, puoi selezionare il Dominio opzione anche per questo campo. In tal caso, devi inserire un nome di dominio (come foo.com ) nella casella di testo adiacente alla quale verranno inoltrate tutte le email inviate al dominio originale. L'ultimo Errore di ritorno nell'opzione Invia a è possibile selezionare il campo se si desidera che un messaggio di errore specifico venga restituito ai mittenti. Se scelto, è necessario selezionare un tipo di errore dal menu accanto ad esso e inserire un messaggio di errore più dettagliato nella casella di testo. Questa opzione può essere utile per inviare messaggi di rimbalzo che spiegano perché un determinato indirizzo o l'intero dominio non è più raggiungibile.
- Fai clic su Crea pulsante per aggiungere la mappatura degli indirizzi all'elenco di quelli mostrati sotto il modulo. Verrà immediatamente attivato.
Come con gli alias, puoi modificare o eliminare le mappature esistenti facendo clic sui loro indirizzi nell'elenco. Verrà visualizzato un modulo identico a quello utilizzato per creare una mappatura, ma con Salva e Elimina pulsanti in basso.
Se esiste una mappatura sia per un dominio che per un indirizzo in quel dominio, Sendmail utilizzerà la seconda per l'e-mail a quell'indirizzo specifico e la prima per l'e-mail a qualsiasi altra casella di posta nel dominio. In effetti, mappature di indirizzi più specifiche hanno la precedenza su quelle più generali. Il loro ordinamento nell'elenco nella pagina Mapping indirizzi non ha alcuna importanza.
Se desideri creare una mappatura che inoltri le email a un programma, un file o un elenco di indirizzi, dovrai creare anche un alias. La mappatura dell'indirizzo invierà un'e-mail all'alias, quindi l'alias lo inoltrerà alla destinazione reale. In genere l'alias dovrebbe nominare un nome correlato alla mappatura degli indirizzi, come jcameron-example-com per la mappatura dell'indirizzo virtuale jcameron@webmin.com .
In un sistema con molti domini e utenti, è molto probabile che due persone vogliano avere lo stesso nome della casella di posta in domini diversi, come bob@foo.com e bob@bar.com . Poiché Sendmail alla fine consegna e-mail solo ai file di posta degli utenti Unix e due utenti Unix non possono avere lo stesso nome, questo può essere un problema. La solita soluzione è creare utenti con nomi come bob-foo e bob-bar e impostare mappature di indirizzi appropriate per inoltrare loro la posta elettronica. L'unico lato negativo è che gli utenti dovranno accedere al server POP3 come bob-foo o bob-bar invece di solo bob .
Configurazione dell'instradamento del dominio
La funzione di instradamento del dominio di Sendmail può essere utilizzata per inoltrare tutte le e-mail a un particolare dominio a un server diverso. È molto utile se il DNS è impostato per inviare e-mail per alcuni domini al tuo sistema, che dovrebbero quindi essere inoltrati a un altro MTA irraggiungibile dal resto di Internet. Il routing può anche essere utilizzato per ignorare il normale metodo con cui Sendmail determina a quale host inviare e-mail, il che può essere utile su reti in cui la connettività è incompleta o alcune informazioni DNS non sono disponibili per tutti gli host.
Per aggiungere una nuova regola di routing del dominio, procedi nel seguente modo:
- Nella pagina principale del modulo, fai clic su Instradamento del dominio icona. Verrà visualizzata una pagina che elenca i percorsi esistenti (se presenti), sopra la quale è presente un modulo per aggiungerne uno nuovo.
- Per fare in modo che l'email venga indirizzata solo a un dominio o host specifico, seleziona l'Host opzione nella Posta per campo e inserisci il dominio o il nome host nel campo adiacente. In alternativa, se desideri che l'email di tutti gli host all'interno di un dominio venga instradata, seleziona Dominio invece e inserisci il nome di dominio nel suo campo. Un routing di questo tipo per il dominio example.com non effettuerà l'invio di email a un indirizzo nel dominio (come jcameron@example.com ), ma solo email a indirizzi su host sotto il dominio (come jcameron@foo.example.com ). Normalmente, questo non è quello che vuoi. Qualsiasi dominio o nome host che inserisci deve essere nell'elenco per cui Sendmail consente l'inoltro, come spiegato nella Configurazione dell'inoltro sezione precedente in questo capitolo.
- Dalla Consegna menu, seleziona SMTP . Questo campo indica a Sendmail quale protocollo utilizzare per l'instradamento della posta elettronica per il dominio. La maggior parte delle altre opzioni sono inutili, in quanto si riferiscono all'UUCP che non viene più utilizzato.
- Nella sezione Invia a campo, inserire il nome host del sistema a cui inoltrare la posta. Ignora MX per la consegna SMTP anche la casella dovrebbe essere selezionata, in modo che Sendmail recapiti sempre direttamente a questo host invece di provare un'altra ricerca DNS per determinare la destinazione corretta.
- Premi Crea pulsante per aggiungere e attivare il nuovo routing del dominio. Dovresti testarlo per assicurarti che funzioni davvero, come piccoli errori (come selezionare Dominio invece di Ospite ) può impedire il funzionamento di un percorso.
Come in altre pagine simili del modulo, una regola di routing esistente può essere modificata o eliminata facendo clic sul suo nome di dominio nell'elenco nella pagina Routing del dominio. Tuttavia, non è possibile disabilitare temporaneamente una regola, come accade con gli alias.
Sendmail può anche essere configurato per inoltrare tutte le e-mail non locali a un server specifico, piuttosto che solo e-mail a domini particolari. Questo è utile se la tua azienda o ISP ha un server di posta centrale a cui vuoi trasferire la posta, piuttosto che avere il tuo sistema connesso al server di destinazione reale. La sezione successiva spiega come configurarlo.
Modifica delle opzioni globali di Sendmail
Le opzioni globali controllano cose come la dimensione massima del messaggio, il numero di giorni per riprovare la posta elettronica, i limiti medi di caricamento e il server di posta in uscita. I passaggi seguenti spiegano come modificare alcuni dei più utili:
- Nella pagina principale del modulo, fai clic su Opzioni di invio e-mail icona. Verrà visualizzato un modulo per la modifica delle opzioni globali (mostrato di seguito).
- Quando Invia la posta in uscita tramite host il campo è impostato su *Consegna direttamente*, Sendmail cercherà il server di posta corretto per i messaggi non locali e si connetterà ad esso per consegnare la posta. Tuttavia, se selezioni la seconda opzione e inserisci un nome host nella casella di testo, tutti i messaggi tranne quelli per gli utenti locali verranno invece inviati a quell'host. In genere, questo sarà un server di posta centrale presso il tuo ISP o sulla rete della tua azienda. Se esiste una regola di routing del dominio per un indirizzo, avrà la precedenza su qualsiasi server impostato in questo campo.
- La Modalità di consegna il campo controlla il modo in cui Sendmail elabora i messaggi in arrivo. Le opzioni disponibili sono :Sfondo o *Predefinito *In questa modalità, l'e-mail viene immediatamente accettata dai client e quindi consegnata alla destinazione tramite un processo in background separato. Di solito è quello che vuoi. *Solo coda* o *Deferred *Quando viene scelta una di queste modalità, Sendmail aggiungerà semplicemente i messaggi in arrivo alla sua coda di posta. Solo quando la coda viene svuotata in modo esplicito verranno inviati alle loro destinazioni. Questo può essere utile se il tuo sistema non è sempre connesso a Internet o se desideri un controllo esplicito su quando il server invia i messaggi. Quando un messaggio viene ricevuto in una di queste modalità, Sendmail non esegue alcuna convalida dell'indirizzo di origine o di destinazione, che altrimenti causerebbero problemi se il sistema è disconnesso dalla rete. *Interattivo *Questa modalità è simile a Sfondo, tranne per il fatto che l'e-mail viene consegnata dallo stesso processo che la accetta dal client. Ciò significa che i client devono attendere fino a quando Sendmail non ha trasferito i propri messaggi al server successivo o di destinazione, operazione che potrebbe richiedere del tempo. Tuttavia, riduce il numero di processi che Sendmail deve avviare.
- Le opzioni della porta SMTP può essere utilizzato per impostare le porte TCP su cui Sendmail è in ascolto per le connessioni SMTP. Il valore effettivo che può essere inserito può essere piuttosto complesso, ma se vuoi che il tuo sistema accetti connessioni da qualsiasi punto della porta SMTP standard, dovresti inserire solo Nome=MTA. Su alcuni sistemi operativi questa non è l'impostazione predefinita e Sendmail accetta solo connessioni da localhost.
- Il carico massimo medio per l'invio può essere utilizzato per impostare una media di carico al di sopra della quale Sendmail non invierà messaggi. La media del carico è una stima approssimativa del numero di processi in esecuzione sul tuo sistema in un determinato momento, come spiegato nel capitolo 11. Questa opzione e la successiva sono utili per limitare la quantità di tempo della CPU che Sendmail può consumare sul tuo sistema , sebbene quest'ultimo sia più utile. Se Predefinito è selezionato, il server continuerà a elaborare la coda di posta e a inviare messaggi indipendentemente dal carico medio.
- Per impostare una media di carico al di sopra della quale Sendmail non accetterà più nuovi messaggi, inserisci un valore per la Media di carico massima per la ricezione campo. Quando viene raggiunto questo livello, il server chiuderà la porta SMTP finché il carico non scenderà nuovamente al di sotto di essa. In genere, qualsiasi cosa tu inserisca dovrebbe essere inferiore al limite impostato per il Carico massimo medio per l'invio campo, in modo che la coda di posta venga ancora elaborata anche quando il carico è elevato. Quando Predefinito è selezionato, Sendmail accetterà nuove connessioni indipendentemente dal carico medio.
- Il tempo prima di arrendersi campo specifica la quantità di tempo durante la quale Sendmail tenterà di inviare un'e-mail a un server remoto non contattabile prima di restituire un messaggio di rimbalzo al mittente. Il valore immesso deve essere un numero seguito da d per giorni o h per ore. Dovrebbe essere modificato solo se è probabile che il tuo sistema venga disconnesso da Internet per un periodo superiore ai 5 giorni predefiniti e non desideri che i messaggi nella coda rimbalzino.
- Il simile Tempo prima dell'invio dell'avviso campo specifica per quanto tempo Sendmail conserverà un messaggio in coda prima di inviare un avviso al mittente originale. Se il tuo sistema è un server di posta secondario per alcuni domini o è spesso disconnesso dalla rete, dovrebbe essere aumentato allo stesso tempo del campo precedente.
- Per modificare l'indirizzo a cui Sendmail invia messaggi irreversibili o con doppio rimbalzo, inserisci un nuovo indirizzo nel campo *Invia messaggi di errore a*. Quando Postmaster è selezionato, verranno invece inviati alla casella di posta Postmaster, che di solito è un alias per root.
- To limit the amount of disk space that Sendmail will use up for queued messages, fill in the Min free disk space campo. If the number of free blocks drops below this level, new incoming messages will no longer be accepted. The exact size of a block depends on the type of filesystem in use, but they are typically
- kB or 512 bytes in size.
- To stop large messages being sent via your mail server, fill in the Max message size campo. Any email larger than the number of bytes entered will be rejected when it is received. If you have a slow network connection and un-trusted client users, this option can be useful to save on bandwidth.
- Finally, click Save and Apply to save the new global options. Webmin will automatically re-start Sendmail for you to activate them.

The Sendmail options page
Viewing the mail queue
When Sendmail receives a message, it is placed into the mail queue. If it can be send to its destination immediately, then it will be removed from the queue almost at once - however, if some temporary error occurs when ending then it will remain queued for later processing. The Sendmail server process makes periodic checks of messages in the queue, re-trying each one at longer and longer intervals. Finally after a message has been in the queue for too long (usually 5 days), it will be removed and a bounce email sent back to the original sender.
Most messages that are in the queue for a long time are there because the destination mail server is down or unreachable. Another common cause is a temporary error reported by the remote MTA, such as a lack of disk space. Webmin allows you to view messages in the queue and even delete them by following these steps :
- On the module's main page, click on the Mail Queue icon to go to a page listing the details of queued messages. The number of emails in the queue is displayed below the icon, so that you can see how long it is at a glance.
- On the mail queue page the ID, sender, destination, subject and size of all queued messages are displayed in a table. In the final column is the current status, which indicates what Sendmail is trying to do with the message at the moment. Sending will appear when Sendmail is trying to connect to the remote server, and Deferred will be shown along with a reason when a connection has been tried and failed. If the queue contains more than 20 messages, only the first 20 will be displayed. To page through the rest, use the left and right arrow buttons that appear above the list.
- To view the actual contents of an email, click on its ID in the queue listing. All headers, the text body and any attachments will be displayed. To view an attachment, just click on its icon. To remove just this message from the queue, hit the Delete pulsante in fondo alla pagina. If the email is locked because it is currently being sent, Webmin will display an error message along with a button labelled Force deletion anyway that you can click to override the lock. This may cause the message to be only partially sent though, and so is not recommended.
- To remove multiple messages from the queue, first select them using checkboxes next to their IDs and the Select all and Invert selection links on the queue list page. Then click the Delete selected messages button to get rid of those that you have chosen. To override any locks on the selected emails, check the Even if locked box first. After you hit the Delete button, a page listing the ID and deletion result of each chosen message will be displayed. Deletion can fail if the message is no longer in the queue, or if it is currently locked.
Even though Sendmail will re-try messages in the queue automatically, you can force it to attempt delivery of all queued messages immediately using Webmin. This can be useful if you have a dial-up Internet connection and have queued up several emails while disconnected. The steps to flush the queue are:
- On the module's main page, click on the Mail Queue icon to bring a list of queued messages.
- As long as the queue is not empty, a button labelled *Flush Mail Queue* will be visible at the bottom of the page. Click it begin immediate processing of all waiting messages.
- A page showing the output from Sendmail as it attempts to deliver queued email will be displayed. If you have a large queue containing messages for down remote servers, it may take a long time to completely appear.
Reading users' email
As the introduction explains, Sendmail stores messages received by users in files in the /var/mail or /var/spool/mail directory. These are read and emptied by the POP3 server, command-line mail clients like pine or elm, or web-based mail clients like Usermin. However, this Webmin module can also act as a simple mail client, allowing you the system administrator to read any user's email.
This feature is useful for deleting large messages is user mailboxes that would otherwise take a long time to download over a dialup POP3 connection. It also allows you to read email for system users such as root without needing to telnet in or run a separate mail client. More controversially, on a multi-user system you can even invade people's privacy by reading their personal email - assuming they have not downloaded and deleted it via POP3 yet.
The steps to check the contents of a user's mailbox are:
- On the module's main page, click on the User Mailboxes icon. A page listing all of the users on your system and the sizes of their mailboxes will be displayed, unless you have more than 200 users. In that case, a small form for entering a username will appear instead.
- Click on the name of a user to bring up a list of messages in his mailbox, an example of which is shown in Figure 37-4. By default, the most recent messages are shown first, even though they are actually at the end of the actual mail file. If the mailbox contains more than 20 emails, only the first 20 will be displayed. To page though the rest, use the left and right arrow buttons above the list.
- To view an actual message, click on the sender's name in the From colonna. A page showing the important headers, body text and attachments will appear. Click on an attachment icon to view it, assuming that the data type is supported by your browser or some external program. To remove just this email from the user's mailbox, click the Delete pulsante in fondo alla pagina. This can take quite some time if the mailbox is extremely large (over 10 MB) or contains lots of messages, as Webmin needs to re-write the entire mail file.
- To delete multiple messages, first select them using the checkboxes and Select all and Invert selection links on the mail list page. Then click the Delete button above or below the list - once again, this can take a while for large mailboxes.
- To search the user's mailbox for messages matching some criteria, use the Find messages where form below the list. The following types of search can be selected from the menu :From:matches , Subject:matches , To:matches or Cc:matches Finds messages in which the From, Subject, To or Cc field contains the text entered into the adjacent text box. The comparison is case-insensitive, but regular expression characters cannot be used. Date:matches Finds messages in which the sending date header contains the entered text. This header will not be converted to local format, so whatever you enter must match the date format used by the sender. Body matches Finds messages whose body contains the entered text. The body includes all attachments in their un-encoded form, not just the text that is shown when you read an email. *Size is greater than* Finds messages whose total size is greater than the number of bytes entered into the adjacent field. For each of the above search types, an inverse type is also available, such as From:doesn't match or *Size is less than*. After choosing your search type and entering text to match, hit the Search pulsante. A page listing all matching messages will be displayed, from which you can view the contents of emails or select some or all to delete, just like in the normal mail list.

The contents of a user's mailbox
The mail reading section of the module actually allows you to compose new messages and reply to or forward existing ones. In fact, it can be used as a full-featured email client, although it is not the best program for the job. The default From address for sent messages is determined from the mailbox user's name and the system hostname, but this can be changed on the module access control page on a per-Webmin user basis. It is even possible to create Webmin users who can use this module to read only their own mailbox and send email from only their address. However, you should really use a program like Usermin if you want to give the same mail-reading web interface to a large number of users on your system.
By default, the module assumes that that mail for each user will be stored in a file with the user's name in the /var/mail or /var/spool/mail directory. It is possible to configure Sendmail to use a different file path instead though, such as the mbox file in each user's home directory. If this is the case on your system, you will need to re-configure the module, as explained in the section Sendmail Configuration module. Otherwise all the mailbox will show up empty, because Webmin is looking in the wrong place for them.
Adding Sendmail features with M4
The primary Sendmail configuration file sendmail.cf is extremely complex, and almost impossible to edit manually. Fortunately, it is usually built from a series of M4 macro files that are much simpler and can be modified using this module or by manual editing. M4, for those who have not heard of it before, is a program that parses text files and expands macros in them. These macros can include other text files, define variables and functions or exclude text based on certain conditions. M4 is very similar to the pre-processor used by the C programming language which handles #include and #define statements. Fortunately, this module hides most of the complex details from you.
Often, the default Sendmail configuration that comes with your operating system will not have some features enabled, such as address mapping or domain routing. Webmin can detect this, and will display an error message if you try to use a module page for a Sendmail feature that is not enabled in the primary configuration file. To turn on a missing feature, an entry must be added to the primary M4 configuration file, from which sendmail.cf is re-built. Then Sendmail will be able to use it, and this module will be able to configure it.
Before you can manage your Sendmail M4 configuration, this module must know where to find the M4 files. To check if it has the correct paths and to set them if not, follow these steps:
- On the module's main page, click on the Sendmail M4 Configuration icon.
- If an error message like *The Sendmail M4 configuration file /etc/sendmail.mc was not found* or The locations of the Sendmail M4 base directory and M4 config* files have not been set* is displayed, then module cannot find the M4 files. However, if a table of entries from the file is displayed instead then everything is configured OK and you can skip the rest of these steps.
- If you are running Linux, check your distribution CD or website to make sure that all the packages whose names start with sendmail are installed. Sometimes the M4 files are in a separate package named something like sendmail-cf. If you do find and install such as package, go back to step 1 and check again to see if the module has found the configuration files.
- If you are using the Sendmail package that came with your version of Unix and cannot find any M4 files on your system, then this feature of the module cannot be used. This is unfortunately the case on some operating systems.
Once the Sendmail M4 Configuration page displays the contents of your primary M4 file, you can use it to add new features such as address mapping or domain routing. The page can in fact be used to modify any of the M4 macros in the file, but unless you are any experienced Sendmail administrator it is best to stick to these instructions for adding features:
- From the menu next to the Add new entry of type button at the bottom of the page, select Feature and then hit the button to go to the feature creation form.
- Select the one that you want to add from the Feature menu. The most commonly used features have names next to them in brackets that correspond to their icons on the module's main page.
- In the Parameters field, enter hash -o followed by the path that should be used for the feature's text and DBM files. For example, if adding a virtusertable feature you should enter hash -o /etc/mail/virtusertable (assuming your system has an /etc/mail directory).
- Login to your system as root via SSH, telnet or at the console and create the empty text file with a command like touch /etc/mail/virtusertable. Naturally, this is not necessary if it already exists.
- Fai clic su Crea button to update the M4 file and be returned to the previous page.
- At the very bottom of the M4 file contents list, click the *Rebuild Sendmail Configuration* button. A confirmation page showing the exact changes that will be made to your sendmail.cf file will be displayed - typically they will be limited to directives for the new feature. If the confirmation form indicates that a huge number of lines are going to be changed, it is likely that the M4 file being edited was not originally used to built your current sendmail.cf file, and so should not be used in future.
- To go ahead and use the newly rebuilt Sendmail configuration, click the Yes, replace it now pulsante. Your sendmail.cf file will be updated and the server process re-started to immediately activate it.
- Go back to the module's main page, and click on the icon for the feature that you have just enabled. You will not be able to add and edit address mappings or whatever it was that you added support for.
As you can see from looking at the existing M4 file entries, editing or adding to it can still be quite complex. For this reason, the book does not cover all of the possible features or other macro types that you can add. However, for most people the defaults will work just fine - at most, all you should need to do is add a feature or two as explained above. If you want to learn more about editing the M4 configuration, you should buy a book dedicated to Sendmail administration.
One problem with using the M4 page to re-build your Sendmail configuration is that any changes that have been made directly to sendmail.cf will be overwritten. The module's Sendmail Options page unfortunately does precisely this, so if you follow the instructions above to add a new feature any changes made on that page will be lost! The only real solution is to edit the entries in the M4 file that correspond to those on the Sendmail Options page - for example, the Send outgoing mail via host field is set by the SMART_HOST define.
Creating autoreply aliases
The Sendmail Configuration module lets you easily create an alias that triggers an automatic reply to anyone who sends email to it. When you do this, Webmin creates a simple script that is run from the alias and receives the contents of email sent to it as input, just like a command specified using the Feed to program alias type.
To set up an autoreply alias, follow these steps:
- On the module's main page, click on the Mail Aliases icon.
- In the Create Alias form, enter a name for the alias and select Autoreply from file from the type menu. The name can be that of an existing Unix user if you want to set up an automatic reply to any message send to him, for example if he is on holidays.
- In the field next to the type menu, enter the path to a file that will contain the autoreply message, such as /home/someuser/autoreply.txt . The file does not have to exist yet.
- Fai clic su Crea button to add the alias, and then click on its name in the list to edit again.
- Follow the Edit link next to the autoreply filename field. This will bring up a page containing a large text box for entering the contents of the reply message.
- After entering the text that you want sent back to any sender, click Save at the bottom of the page. The autoreply alias is now fully active.
The reply text can contain several special macros that start with $, such as $SUBJECT, $TO, $FROM, $DATE and $BODY. When the reply is sent, these will be replaced with the original message's subject, destination address, sender address, sending date or body respectively. Be careful using the $BODY macro though, as it will be replaced with the entire un-encoded contents of the email being replied to.
You can also add to or override the headers used in the reply message by starting the autoreply text with one or more lines in standard SMTP header format, followed by a blank line. For example, to set the subject of the automatic reply you could enter _Subject:This is an automatic reply_ at the top of the text box, with an empty line after it.
One problem with Webmin's autoreply script is its inability to reliably determine the From address to use when sending the reply. Normally this is just taken from the To address of the original message, but this is not possible when replying to a message that was sent to multiple people. Even though the code attempts to find the right address automatically, it can sometimes get the wrong one and send an automatic reply that appears to be from the wrong person. For this reason, you should include a header line like From:Jamie Cameron
If you are setting up an automatic reply alias for a Unix user, it is usually a good idea to have a copy of all email sent to the user stored in his mailbox as well. To do this, re-edit the alias and select Email address from the second type menu. Then enter the user's name preceded by a backslash into the text field next to it (like \jcameron ) and hit Save .
Creating filter aliases
Sendmail aliases normally forward email messages to their destinations regardless of their content. However, it is possible to use this Webmin module to create an alias that forwards to different addresses or files depending on the headers or body of a message send to it. When you create an alias like this, the module internally creates a script that is passed the contents of email to the alias as input, just like a command specified using the Feed to program alias type.
A filter consists of a series of rules, each of which has a condition and action. The condition specifies a header to check and text to check if the header contains, while the action specifies an address to forward to or a file to append the message to. When a message is received by the filter, it is checked against the rules in order until one that matches is found and its action performed. At the end of the list is a default action, which determines where to forward email that does not match any of the conditions.
Compared to other mail filtering or classification programs like Procmail Mail Filter and SpamAssassin Mail Filter, Webmin's filters are limited in their functionality and flexibility. However, they are easy to create and require no additional software. To create one, the steps to follow are:
- On the module's main page, click on the Mail Aliases icon.
- In the Create Alias form, enter a name for the alias and select Apply filter file from the type menu. The alias name can be that of an existing Unix user if you want to filter his email before delivery.
- In the field next to the type menu, enter the path to a file that will contain the filter rules, such as /home/someuser/filter.rules . Because the file format is fairly complex, you should not enter the name of any existing file unless it was created by following these same steps.
- Fai clic su Crea button to add the alias, and then click on its name in the list to edit again.
- Follow the Edit link next to the filter rules file field. This will take you to the form shown in Figure 37-5, which contains a table of empty rows for entering new rules and a text field for the default action address.
- In the first row, select the header that you want to filter on from the menu next to If the . Or to check the entire un-decoded email body, select body from the list instead. To have the action performed if some text is found in the header or body, select matches from the second menu. Alternately, to perform the action only when some text is not found, choose *doesn't match* instead. In the field next to this menu, enter the text that the filter should check the header or body for. The comparison will always be case-insensitive, and Perl regular expression characters like [, ., + and * can be used. In the *then forward to* field, enter the email address or mailbox name to which messages matching the condition that you specified will be sent. It is also possible to enter an absolute file path like /home/someuser/mail/somefolder to which email will be appended instead. This could be another user's mail file, or a mail folder - however, it must be writable by the Unix user daemon that Sendmail runs as.
- To enter another rule, fill in the second blank row by repeating the instructions in the previous step again. Only five empty rows are displayed, but you can create more than five rules by saving and re-editing the filter file.
- In the Otherwise forward to field at the bottom of the table, enter an address or filename to which messages that do no match any of the rules will be sent or appended. If this is left blank, unmatched email will be thrown away!
- Finally, click the Save button to activate the new filter rules. To make sure they are really working, you should send a few text messages to the alias and check that they are delivered correctly.

The filter creation form
To have email forwarded to multiple addresses by a single rule or the default action, just enter them separated by commas into one of the forward to fields. Or enter the name of another alias as the destination, which can then send messages to multiple files, addresses and/or programs.
When creating a filter alias with the same name as a Unix user, it is often useful to specify that messages matching some rule be delivered to the user's normal mailbox. However, just entering the user's name as the destination would be a big mistake, as this would trigger an endless loop through the filter! Instead, you should prepend a backslash to the username, like \jcameron . As with aliases, this tells Sendmail to ignore any aliases for this mailbox.
Because it can often be difficult to work out what a filter alias is doing and why it is doing it, the filter script creates a log file in the same directory as the rules file. The log has the same name as the filter file, but with .log appended. Every message received by the alias and delivered to some destination by the filter causes a line to be added to the log, containing the date, time, sender, destination and rule matched. The log file will only be created if the directory or log itself is writable by the daemon user though.
Module access control
The Sendmail Configuration module probably has the most powerful access control features of any module in Webmin. You can use them to limit the aliases and virtual addresses a Webmin user can edit, or restrict him to reading only the mailboxes of certain Unix users. These features are most useful in a virtual hosting environment, where customers own email domains and the user accounts. On this kind of system, you can create one Webmin user per customer who can only manage the address mappings, aliases and mailboxes for his own domains, while not being able to use other features of the module or touch other customers' information.
Once you have created a Webmin user who has access to the module (as explained in WebminUsers), follow these steps to restrict what he can do:
- In the Webmin Users module, click on Sendmail Configuration next to the name of the user that you want to restrict.
- Change the Can edit module configuration? field to No , so that he cannot modify paths to Sendmail programs and files.
- Set all of the Yes/No fields in the second section to No , which will prevent the user from seeing most of the module's icons.
- Select No from the Can manage mail queue? menu, or *View only* if you just want the module user to be able to see the contents of the queue. Selezionando Sì would be a bad idea, as it would allow him to delete queued email belonging to other domains.
- For the Address mappings this user can edit field, select the Matching option and enter a Perl regular expression for allowable mapping sources into the text field next to it. For example, to let him create and edit mappings in the domains foo.com and example.com , you should enter (@foo.com|@bar.com)$.
- It is safe to select all of the checkboxes in the *Address mapping types this user can edit* field.
- To limit the number of mappings that the user can create, select the second radio button in the *Maximum number of address mappings* field and enter a number into the box next to it. This can be useful for preventing a single customer from more address mappings than he has paid for.
- In the Aliases this user can edit field, select Matching and enter a regular expression that only lets him modify or create aliases starting with the customer's domain names. For example, if the user owns the domains foo.com and example.com you should enter ^(foo|example)- to limit him to aliases like foo-jcameron or example-fred . This naming convention ensures that users cannot step on each others' aliases.
- In the Alias types this user can edit field, de-select the checkboxes for types of aliases that the Webmin user should not be allowed to create. Good candidates to deny access to are Write to file , Feed to program , Autoreply and *Filter file*, as they use the permissions of the Sendmail daemon user and thus may be a security risk.
- To limit the number of aliases that the customer can create, select the second radio button in the Maximum number of aliases field and enter the maximum into the box next to it.
- To stop the Webmin user creating aliases that run programs, append to files or use address files outside a certain directory, enter it into the Limit files and program to directory campo. Unfortunately, this can be subverted by the clever use of symbolic links and so is not a very strong security measure.
- In the Outgoing addresses this user can edit field, select Matching and enter the same regular expression as in the Address mappings this user can edit campo. This will limit the user to re-writing addresses for only his own domains. Or to prevent the editing of outgoing addresses at all, select None - in most cases, there is no need for a Sendmail administrator to edit them anyway.
- In the Users whose mail can be read field, select one of the last five options to limit the customer to only those Unix users who belong to him. If he has been given limited access to the Users and Groups module as well, then you should allow him to read the email of the same users that he can create an edit in that module.
- Leave the rest of the fields on the form set to their defaults - they are only really useful if you are setting up the module as a web- based mail reading interface. Although this is possible, there are much better alternatives such as Usermin.
- Fai clic su Salva button to make the restrictions for the user active.
Even though it is possible to configure this module to limit a user to certain domains, the module's interface is not particularly friendly compared to products like Plesk or Cpanel. These are web-based virtual server management interfaces that have been designed from the ground up for that purpose, unlike Webmin which was design to allow the management of everything on a system.
Configuring the Sendmail Configuration module
The Module Config link on the main page takes you to a form seen in many other modules for editing settings that apply to the operation of the module itself. Those listed under Configurable options relate to its user interface, while those under System configuration define the paths to the Sendmail programs and files.
Settings in the latter group do not usually need to be changed, as by default they are set to match the Sendmail package supplied with your operating system. However, if you have compiled and installed the MTA yourself from the source code, then it is quite possible that they will be incorrect.
Contenuti
Vedi anche
- Introduction to Internet Mail