La Condivisione file di Windows Samba pagina spiega il protocollo SMB (spesso indicato come CIFS - Common Internet File System) tramite il quale i sistemi Windows condividono i file e spiega come configurare Samba programma per rendere i file sul tuo server Unix disponibili per i client Windows.
È disponibile un'introduzione a Samba.
Il modulo Samba Windows File Sharing
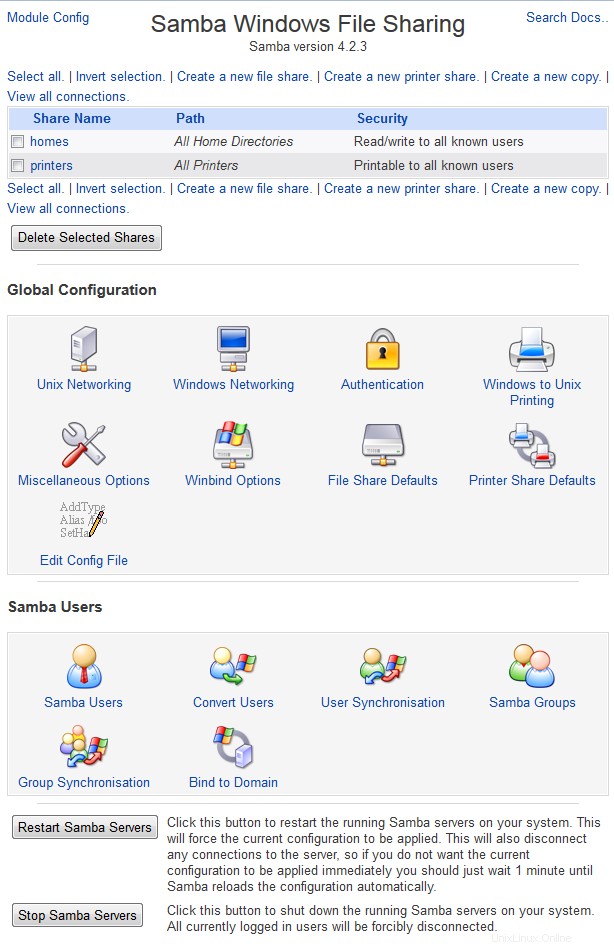
La Condivisione file di Windows Samba Il modulo consente di specificare le directory e le stampanti da condividere con i client Windows utilizzando il protocollo SMB (Server Message Blocks). Può essere trovato nella categoria Server e quando si fa clic sul suo collegamento verrà visualizzata la pagina principale come mostrato nello screenshot qui sotto. Vengono elencate tutte le condivisioni esistenti, insieme ai relativi percorsi e agli utenti a cui sono disponibili. Sotto di loro ci sono icone per impostare varie opzioni globali che si applicano a tutte le condivisioni, collegamenti per gestire gli utenti Samba e un pulsante per avviare o riavviare i processi del server.
Nel corso degli anni, Samba ha acquisito una vasta gamma di opzioni configurabili. Questo modulo però non ti permette di configurarli tutti, solo quelli utili per un piccolo server su una rete semplice. Ad esempio, le impostazioni relative agli script di accesso, ai domini NT e SSL non possono essere modificate. Tuttavia, se li aggiungi manualmente al tuo file smb.conf, il modulo non li modificherà.
Come tutti gli altri moduli che configurano alcuni server, questo può essere utilizzato solo se il server Samba è effettivamente installato. Se il modulo non riesce a trovarlo, un messaggio di errore come L'eseguibile del server Samba /usr/sbin/smbd non è stato trovato apparirà invece nella pagina principale. Se hai Samba installato ma in una posizione diversa da quella prevista dal modulo, consulta Configurazione della condivisione di file di Samba in Windows sezione modulo più avanti in questo capitolo per istruzioni su come riconfigurarlo per utilizzare i percorsi corretti. In caso contrario, dovrai installarlo.
La maggior parte delle distribuzioni Linux e molti altri sistemi operativi includono uno o più pacchetti Samba, che possono essere facilmente installati utilizzando il modulo Pacchetti software (trattato nel capitolo 12). In caso contrario, dovrai scaricare il codice sorgente da www.samba.org e poi compilarlo e installarlo manualmente. Il modulo si aspetta che tu usi il pacchetto se disponibile o il codice sorgente in caso contrario, quindi se non l'hai fatto e un messaggio di errore è ancora visualizzato nella pagina principale, la configurazione del modulo dovrà essere modificata per utilizzare i percorsi corretti.
Indipendentemente da come sia installato Samba, il suo file di configurazione predefinito includerà almeno due condivisioni (le case speciali e le stampanti), oltre a diverse impostazioni globali. Ciò significa che anche se non hai mai utilizzato questo modulo prima o configurato Samba manualmente, l'elenco nella pagina principale non sarà vuoto. Ovviamente, se hai aggiunto condivisioni modificando direttamente il file di configurazione, verranno visualizzate anche queste.
Se Webmin rileva che Samba è già in esecuzione, un pulsante denominato Riavvia server Samba verrà visualizzato in fondo alla pagina. Com'era prevedibile, fare clic su di esso ucciderà tutti i processi del server in esecuzione e li riavvierà, forzando il ricaricamento della configurazione corrente. Questo di solito non è però necessario, poiché Samba rileggerà i file di configurazione non appena rileva che sono stati modificati.
Se il modulo rileva che entrambi i processi del server Samba non sono in esecuzione, visualizzerà Avvia server pulsanti invece, che una volta cliccati avvieranno sia smbd che nmbd. Nessun file PID viene controllato per determinare se sono in esecuzione o meno, il modulo cerca invece i processi in esecuzione con quei nomi.
 Condivisione file di Windows Samba
 Gestire gli utenti Samba
Come accennato nell'introduzione, il protocollo SMB utilizza un formato di crittografia della password incompatibile con il formato Unix standard. Un tempo questo non era un problema, poiché le versioni precedenti di Windows (95 e precedenti) inviavano le password ai server SMB non crittografate. Ciò ha consentito a Samba di crittografarli e verificarli rispetto all'elenco delle password Unix, proprio come fanno i server FTP o telnet. Sfortunatamente, le versioni recenti di Windows invieranno solo le password nel nuovo formato crittografato NTLM, a meno che non venga modificata una particolare chiave di registro oscura. Ciò significa che Samba deve mantenere un elenco separato di password per convalidare i client moderni.
A meno che al tuo server non accedano solo vecchi host Windows o sistemi Linux, dovrai abilitare questo elenco di password crittografate separato. I passaggi per farlo sono :
- Nella pagina principale del modulo, fare clic su Autenticazione icona.
- Nel modulo visualizzato, modifica Utilizzare password crittografate? campo su Sì .
- Fai clic su Salva in fondo al form per tornare ad attivare la nuova impostazione e tornare alla pagina principale del modulo. Se non è apparso prima, le Password crittografate la sezione contenente tre collegamenti dovrebbe ora essere visibile.
Ora che l'elenco di password separato di Samba è abilitato, dovrai aggiungervi alcuni dei tuoi utenti Unix esistenti. Questo può essere fatto facilmente utilizzando Webmin seguendo i passaggi seguenti:
- Nella pagina principale del modulo Samba, fare clic sul collegamento *Converti utenti Unix in utenti Samba* in Password crittografate sezione per visualizzare il modulo di conversione.
- Il Non convertire o rimuovere questi utenti campo elenca gli utenti che verranno esclusi dalla conversione e per impostazione predefinita contiene tutti gli account di sistema. Potresti volerne aggiungere altri, tuttavia non c'è nulla di male nella conversione di account che non verranno mai utilizzati.
- Se hai già utilizzato questo modulo, l'opzione *Aggiorna gli utenti Samba esistenti dai loro dettagli Unix* può essere verificata per avere gli utenti Samba esistenti aggiornati in modo che corrispondano agli utenti Unix corrispondenti.
- Allo stesso modo, è possibile selezionare *Cancella utenti Samba che non esistono in Unix* per eliminare gli utenti Samba che non hanno più un corrispondente utente Unix.
- Il Per gli utenti appena creati, imposta la password su campo determina la password che verrà assegnata, poiché non è possibile convertire le password esistenti degli utenti. La scelta migliore è *Account bloccato*, che impedisce l'utilizzo degli utenti convertiti fino a quando non viene impostata una password in un secondo momento. Puoi anche scegliere Nessuna password per lasciare nuovi account senza password (una pessima idea dal punto di vista della sicurezza) oppure Utilizza questa password per specificare una password per tutti gli utenti convertiti.
- Fai clic su Converti utenti pulsante per iniziare il processo. Verrà visualizzata una pagina che elenca ogni utente convertito, ignorato o aggiornato.
Dopo la conversione probabilmente dovrai impostare le password per i nuovi utenti Samba. Questo deve essere fatto uno per uno, seguendo queste istruzioni per ciascun utente:
- Nella pagina principale del modulo, fare clic sul collegamento *Modifica utenti e password Samba* per visualizzare un elenco di utenti esistenti.
- Fare clic sul nome dell'utente di cui si desidera impostare la password.
- Nella Password campo, seleziona Nuova password opzione e compilare la casella di testo accanto ad essa. Puoi anche scegliere Nessun accesso per bloccare tutti gli accessi Samba di questo utente, Nessuna password per consentire gli accessi senza password o Password corrente per lasciare la password invariata.
- Nessuno degli altri campi del modulo deve essere modificato:fai semplicemente clic su Salva pulsante per tornare all'elenco utenti.
- Ora dovresti essere in grado di accedere al tuo server Samba come questo utente con la password scelta e accedere ai file in alcune condivisioni. Supponendo che le speciali case condivisione esiste, ogni utente avrà accesso alla condivisione con lo stesso nome del proprio nome utente.
Poiché convertire e impostare la password per ogni nuovo utente è uno spreco di fatica faticoso, puoi configurare il modulo per creare automaticamente un utente Samba per ogni utente Unix creato in Webmin. È anche possibile che gli utenti Samba vengano rinominati, eliminati o che le loro password vengano modificate quando il loro account utente Unix corrispondente viene modificato nel modulo Utenti e gruppi. I passaggi da seguire per impostare questa sincronizzazione sono :
- Nella pagina principale del modulo Samba, fare clic sul collegamento *Configura la sincronizzazione automatica degli utenti Unix e Samba* nella sezione *Password crittografate*.
- Nel modulo di sincronizzazione, seleziona *Aggiungi un utente Samba quando viene aggiunto un utente Unix* per creare un utente Samba con l'UID e la password corretti per ogni nuovo utente Unix.
- Per fare in modo che l'utente Samba corrispondente venga rinominato o che la sua password venga modificata quando un utente Unix viene modificato, selezionare la casella *Cambia l'utente Samba quando un utente Unix viene modificato*.
- Per fare in modo che Webmin rimuova l'utente Samba corrispondente quando viene rimosso un utente Unix, selezionare *Elimina l'utente Samba quando un utente Unix viene eliminato*.
- Fai clic su Applica pulsante per salvare le impostazioni. Qualsiasi azione eseguita nel modulo Utenti e Gruppi (quando vengono utilizzate le opzioni *in altri moduli*) modificherà anche l'elenco utenti Samba.
| Nota: | Purtroppo, questa sincronizzazione si applica solo ai moduli Utenti e gruppi, Modifica password e Utenti e gruppi cluster in Webmin. Se aggiungi un utente con adduser comando shell o modificare una password con passwd comando shell, nessun utente Samba verrà aggiunto o aggiornato |
Aggiunta di una nuova condivisione file
Nella sua consueta configurazione predefinita, Samba consentirà a qualsiasi utente Unix di accedere e accedere ai file nella propria directory home. Le speciali case share fornisce questa funzionalità, che in molti casi è tutto ciò che serve agli utenti per archiviare i propri file sul server. Tuttavia, spesso è utile condividere una directory a cui tutti hanno accesso, in modo da rendere disponibili i documenti di interesse per l'intera organizzazione. Una condivisione come questa può essere configurata per consentire l'accesso guest (il che significa che non è richiesto alcun login per accedervi) o per richiedere un login valido al server.
Per creare una condivisione file, i passaggi da seguire sono :
- Innanzitutto, scegli la directory che desideri condividere e creala se non esiste già. Deve ricevere le autorizzazioni Unix appropriate in modo che gli utenti possano leggerlo e/o scriverci.
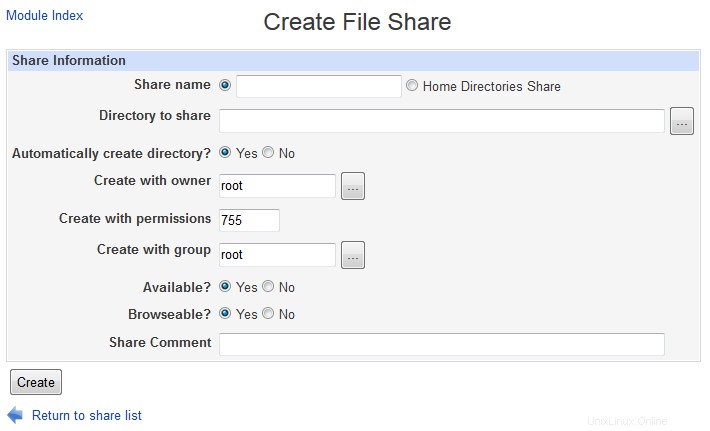
- Nella pagina principale del modulo, fai clic su Crea una nuova condivisione file link sopra o sotto la tabella. Questo ti porterà al modulo di creazione della condivisione mostrato nello screenshot qui sotto.
- Nel Nome condivisione campo, assicurati che il primo pulsante sia selezionato e inserisci un nome alfanumerico univoco per la tua condivisione nella casella di testo, come documenti . Se inserisci il nome di un utente Unix, la sua condivisione automatica della home directory verrà sovrascritta.
- Nella Directory da condividere campo, inserire o selezionare con il pulsantino il percorso completo della directory scelta al punto 1
- Per disabilitare questa condivisione in modo che non possa essere utilizzata, modificare Disponibile? campo su No . Questo può essere utile se vuoi portarlo offline fino a quando tutte le opzioni non sono state impostate correttamente.
- Per nascondere questa condivisione dall'elenco di condivisioni visualizzato quando si esplora il server, modificare Browseable? campo su No . Sarà comunque accessibile direttamente utilizzando un percorso \\nomeserver\nomecondivisione.
- Nel Commento Condividi campo, inserisci una breve descrizione per questa condivisione file, ad esempio Documenti aziendali .
- Fai clic su Crea per aggiungerlo alla configurazione di Samba. Il tuo browser tornerà alla pagina principale del modulo, in cui sarà elencata la nuova condivisione.
- Fare clic sul nuovo nome della condivisione per visualizzare la sua pagina di modifica.
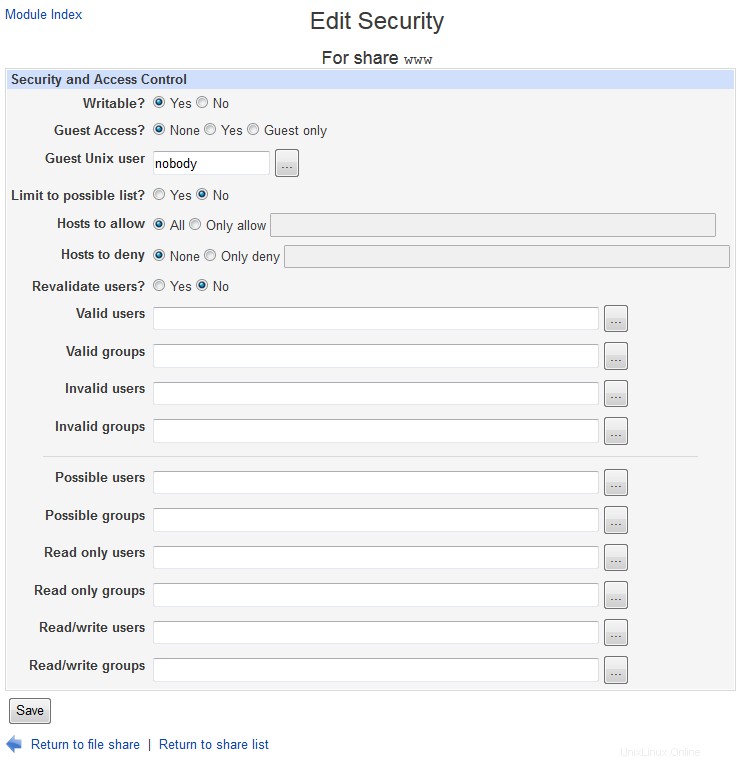
- Fai clic su Sicurezza e controllo accessi icona per visualizzare il modulo di sicurezza della condivisione.
- Se i file in questa condivisione devono essere di sola lettura, impostare Writable? campo su No - in caso contrario, assicurati di Sì è selezionato.
- L'Accesso degli ospiti? campo determina se i client possono accedere a questa condivisione senza accedere al server. Le opzioni disponibili sono :Nessuna Solo gli utenti autenticati potranno accedere. Sì Chiunque potrà accedere alla condivisione, ma i clienti non autenticati verranno trattati come ospiti. I client che hanno effettuato l'accesso avranno i normali diritti di accesso ai file. Solo ospite Tutti i clienti, autenticati o meno, saranno trattati come ospiti.
- Per impostare l'utente Unix con cui i guest leggono e scrivono i file, cambia l'Utente unix ospite campo. Normalmente dovrebbe essere un account con accesso di sola lettura.
- Fai clic su Salva pulsante in fondo al modulo. La condivisione è ora pronta per l'utilizzo da parte dei client e dovrebbe essere visualizzata quando si esplora il server.
-
 Crea condivisione file
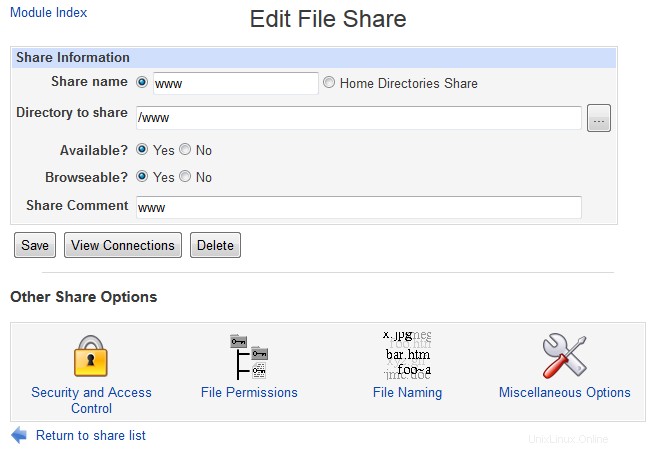
Una condivisione può essere modificata dopo la creazione facendo clic sul suo nome nell'elenco nella pagina principale del modulo per visualizzare il modulo di modifica, modificando dettagli come il percorso o la descrizione e premendo il pulsante Salva pulsante. Oppure può essere eliminato completamente facendo clic su Elimina sulla stessa forma. È inoltre possibile modificare parametri aggiuntivi facendo clic sulle icone in fondo alla pagina di modifica:le sezioni successive di questo capitolo spiegano più dettagliatamente cosa fanno.
Anche la condivisione home può essere modificata, sebbene di solito non disponga di un percorso (o, in tal caso, conterrà il codice speciale %U che viene sostituito dalla directory home dell'utente che si connette).
 Modifica File Condividi
 Aggiunta di una nuova condivisione stampante
La configurazione predefinita di Samba di solito contiene le speciali stampanti share, che indica che tutte le stampanti del sistema sono disponibili per i client SMB. Tuttavia, una stampante specifica può essere invece condivisa in modo esplicito. Potrebbe essere meglio che averli tutti condivisi automaticamente, in quanto consente di impostare opzioni diverse per ciascuna stampante o escluderne alcune dalla condivisione del tutto.
Prima che la stampa e la navigazione delle stampanti in Samba funzionino correttamente, è necessario configurarlo per utilizzare il sistema di stampa corretto per la tua scatola Unix. Vedi la Configurazione delle stampanti sezione più avanti nel capitolo per i dettagli su come impostarlo. Se è impostato in modo errato, il server utilizzerà i comandi errati per elencare le stampanti e inviare i lavori, il che potrebbe causare il vuoto dell'elenco di stampanti generato automaticamente o l'esito negativo delle richieste di stampa.
Per rendere disponibile una stampante ai client SMB, i passaggi da seguire sono :
- Nella pagina principale del modulo, fare clic sul collegamento *Crea una nuova condivisione stampante* sopra o sotto la tabella. Questo ti porterà al modulo di creazione della condivisione di stampa mostrato di seguito.
- Nel Nome condivisione campo, assicurati che il primo pulsante sia selezionato e inserisci un nome alfanumerico univoco per la tua condivisione nella casella di testo, come hplaser . Dovrebbe essere lo stesso del nome della stampante Unix selezionata nel passaggio successivo per evitare confusione. Se esiste già una condivisione stampante creata automaticamente con lo stesso nome, questa nuova la sovrascriverà.
- Dalla stampante Unix menu, selezionare la stampante da rendere disponibile ai client SMB. Questo elenco è tratto dal modulo Amministrazione stampante (trattato nel capitolo 22). Se Predefinito viene selezionata verrà utilizzata la stampante predefinita del sistema di stampa.
- Per disabilitare questa stampante in modo che non possa essere utilizzata, modificare Disponibile? campo su No .
- Per nascondere questa stampante dall'elenco visualizzato durante la navigazione del server, modificare Browseable? campo su No . Sarà comunque accessibile direttamente utilizzando un percorso \\servername\printername.
- Nella directory di spool campo è possibile inserire il nome di una directory in cui sono archiviati i file temporanei per la stampa. Lascialo vuoto per usare l'impostazione predefinita di Samba, che di solito funzionerà bene.
- Nel Commento Condividi campo, immettere una breve descrizione per questa stampante, ad esempio Office HP Laserjet 5 .
- Fai clic su Crea pulsante per aggiungere la condivisione alla configurazione di Samba. Il tuo browser tornerà alla pagina principale del modulo che ora includerà la nuova stampante nella tabella.
- Fare clic sul nuovo nome della condivisione per visualizzare la sua pagina di modifica.
- Fai clic su Sicurezza e controllo accessi icona per visualizzare il modulo di sicurezza della condivisione.
- L'Accesso degli ospiti? campo determina se i client possono stampare su questa stampante senza accedere al server. Le opzioni disponibili sono :Nessuna Solo gli utenti autenticati potranno accedere. Sì Chiunque potrà accedere alla condivisione, ma i clienti non autenticati verranno trattati come ospiti. I clienti che hanno effettuato l'accesso avranno i lavori di stampa inviati con i loro nomi di accesso. Solo ospite Tutti i clienti, autenticati o meno, saranno trattati come ospiti.
- Per impostare l'utente Unix con cui gli ospiti inviano i lavori di stampa, cambia l'Utente unix ospite campo. Questo non ha molta importanza, a meno che il tuo sistema di stampa non sia configurato per bloccare determinati utenti.
- Fai clic su Salva pulsante nella parte inferiore del modulo per tornare alla pagina di modifica della stampante.
- Fare clic su Opzioni stampante icona.
- Se questa stampante deve essere utilizzata da client Windows e non dispone di un driver Unix installato, immettere la marca e il modello completi nel Driver della stampante campo. Deve corrispondere esattamente al nome con cui Windows fa riferimento alla stampante, in modo che i client sappiano quale driver installare. Se Nessuno è selezionato, agli utenti che aggiungono questa stampante ai loro sistemi Windows verrà chiesto di scegliere il modello di stampante da un elenco. Se la stampante Unix selezionata nel passaggio 3 è già configurata con un driver, i client devono inviare i lavori in formato Postscript anziché nel formato dati nativo utilizzato dalla stampante (perché il driver eseguirà la conversione). In questo caso, puoi inserire il nome di una stampante che utilizza Postscript in modo nativo, come Apple LaserJet II .
- Infine, fai clic su Salva pulsante su questo modulo. La condivisione stampante è ora pronta per essere utilizzata dai client Windows.
Crea condivisione file Proprio come con le condivisioni di file, le stampanti possono essere modificate ed eliminate facendo clic sui loro nomi nella tabella nella pagina principale del modulo. Le speciali stampanti anche la condivisione può essere modificata, tuttavia, molte opzioni non hanno senso impostarle, come la stampante Unix o Driver della stampante .
Visualizzazione e disconnessione dei client
Ogni client che sta accedendo a una condivisione di file o stampanti sul tuo sistema ha una connessione al server Samba e tali connessioni possono essere visualizzate utilizzando questo modulo. I client possono anche bloccare i file che hanno aperto per la modifica, impedendo ad altri di aprirli. Una delle attività del server è la manutenzione di questi blocchi, che sono associati alle sessioni e che puoi anche visualizzare. Se un client si arresta in modo anomalo senza disconnettersi correttamente, tutti i blocchi in esso contenuti rimarranno fino al timeout della connessione TCP, che può richiedere del tempo. Per questo motivo, il modulo consente di uccidere le sessioni client e quindi di rilasciare i loro blocchi.
Per visualizzare ed eliminare le sessioni client, segui questi passaggi :
- Nella pagina principale del modulo, fai clic su Visualizza tutte le connessioni collegamento sopra o sotto la tabella delle condivisioni per visualizzare un elenco di tutte le connessioni al server. In alternativa, puoi fare clic su una stampante o su una condivisione file e quindi su Visualizza connessioni nella relativa pagina di modifica per visualizzare un elenco di sole connessioni a quella particolare condivisione.
- In entrambi i casi, la pagina che appare elencherà le condivisioni attualmente in uso e per ciascuna mostrerà il nome dell'utente connesso, l'host da cui si è connesso, l'ora della connessione ed eventuali file bloccati. Nella colonna più a sinistra c'è l'ID del processo secondario del server Samba che gestisce questa connessione. In genere, più connessioni dallo stesso sistema client a condivisioni diverse verranno gestite da un unico processo.
- Per terminare un processo e quindi interrompere tutte le connessioni che sta gestendo, fare clic sul suo ID processo nella prima colonna. Eventuali blocchi detenuti dal client verranno rilasciati, liberando i file per l'utilizzo da parte di altri. Dovresti eliminare solo le connessioni dei client che si sono effettivamente bloccati:l'interruzione della sessione per un client attivo potrebbe causare il danneggiamento di tutti i file aperti. Tuttavia, è generalmente sicuro interrompere una connessione a un client Windows senza file aperti, poiché verrà ristabilita immediatamente e in modo trasparente dal client alla successiva apertura di un file nella condivisione.
Modifica delle opzioni di sicurezza della condivisione
Dopo aver creato una stampante o una condivisione file, è possibile modificare varie opzioni relative alla sicurezza che controllano chi ha accesso ad essa e da quali host possono connettersi. Questo può essere utile se alcune condivisioni contengono file a cui solo alcune persone dovrebbero avere accesso, o se il tuo server Samba è per l'uso da parte dei client solo sulla tua rete interna.
Per modificare le opzioni di sicurezza della condivisione, i passaggi da seguire sono :
- Nella pagina principale del modulo, fare clic sul nome della condivisione nella tabella per visualizzare il modulo di modifica, quindi sull'icona *Sicurezza e controllo accessi*.
- Come spiegato in Aggiunta di una nuova condivisione file sezione, il Scrivibile? e Accesso ospite? i campi determinano se è possibile scrivere nella condivisione e se è necessaria l'autenticazione. L'utente Unix ospite campo imposta l'utente che i file vengono letti e scritti come dai client guest. Cambiali di nuovo qui se lo desideri.
- Per consentire solo a determinati host di accedere a questa condivisione, seleziona il secondo pulsante di opzione in Host da consentire campo e inserisci un elenco di nomi host e indirizzi IP nella casella di testo adiacente. IP parziali come 192.168.1. o indirizzi di rete come 192.168.1.0/255.255.255.0 possono essere utilizzati per consentire un'intera rete. Se il tuo sistema è un client NIS, puoi inserire un nome netgroup preceduto da un @_ (come _@server ) per consentire a tutti i membri del gruppo. Se Tutti è selezionato, a tutti gli host verrà concesso l'accesso, a meno che non si compili il campo successivo. Indipendentemente da ciò che inserisci, le connessioni dall'host locale (127.0.0.1) sono sempre consentite a meno che non sia specificamente elencato nel campo *Host da negare*.
- Per impedire a host specifici di accedere a questa condivisione, compila i campi Host da negare campo con un elenco simile di nomi host, indirizzi IP, reti o gruppi di rete. Se entrambi i campi sono compilati, Host da consentire ha la precedenza. Se Nessuno è selezionato, tutti gli host saranno autorizzati.
- Per consentire solo a determinati utenti di accedere a questa condivisione, compila i campi Utenti validi campo con un elenco di nomi utente separato da uno spazio. Puoi anche compilare i Gruppi validi campo con un elenco di gruppi i cui membri primari e secondari avranno accesso. Solo se entrambi gli elenchi sono vuoti, tutti gli utenti saranno ammessi.
- In alternativa, per negare utenti specifici e membri di gruppi, compilare Utenti non validi e Gruppi non validi campi. Se un utente compare sia nell'elenco valido che in quello non valido, gli verrà negato l'accesso.
- Per limitare l'accesso di sola lettura ad alcuni utenti per questa condivisione, inserisci un elenco di nomi utente in Utenti di sola lettura campo. Puoi anche inserire un elenco di gruppi Unix nei Gruppi di sola lettura limitare i loro membri primari. Tutti gli altri avranno pieno accesso in lettura/scrittura, supponendo che la condivisione sia effettivamente scrivibile e che Lettura/scrittura i campi non sono stati compilati.
- Per concedere solo a determinati utenti il permesso di scrivere nella condivisione e limitare a tutti gli altri l'accesso in sola lettura, inserisci un elenco di nomi utente in Utenti di lettura/scrittura campo. Come al solito, i Gruppi di lettura/scrittura campo può essere utilizzato per inserire un elenco di gruppi i cui membri primari potranno anche scrivere. Naturalmente, le normali autorizzazioni per i file Unix che potrebbero impedire la scrittura su file o directory si applicano ancora a tutti gli utenti. Se un utente appare in entrambi i Sola lettura e Leggi/scrivi liste, sarà autorizzato a scrivere. I campi in questo e nel passaggio precedente non hanno effetto sulle condivisioni stampante. Tutti gli utenti autorizzati potranno invece stampare.
- Quando hai finito di modificare le opzioni di sicurezza dei file, fai clic su Salva pulsante in fondo alla pagina per attivare le nuove impostazioni.
Oltre a impostare le opzioni di sicurezza per una singola condivisione, puoi impostare i valori predefiniti per tutte le condivisioni che verranno applicate a meno che non vengano sostituite nelle singole condivisioni. Per fare ciò, fai clic su Impostazioni predefinite di condivisione file icona nella pagina principale del modulo al posto del nome di una condivisione, quindi su Sicurezza e controllo accessi . Alcune impostazioni come gli elenchi di host da consentire o negare in realtà dovrebbero essere impostate a livello globale, poiché probabilmente si desidera limitare l'accesso all'intero server solo a una rete affidabile. Vedi la Modifica delle impostazioni predefinite di condivisione sezione più avanti nel capitolo per ulteriori informazioni su come funzionano le impostazioni predefinite.
 Modifica condivisione di sicurezza
 Modifica delle impostazioni di autorizzazione dei file
Le condivisioni file hanno diverse impostazioni relative alle autorizzazioni Unix e alla proprietà dei file al loro interno che possono essere impostate a livello globale o per condivisione. Poiché i client Windows e il protocollo SMB non hanno il concetto di autorizzazioni, è utile disporre di un modo per impostare le impostazioni predefinite per i nuovi file e directory in base alla condivisione. I passaggi per farlo sono :
- Nella pagina principale del modulo, fai clic sul nome della condivisione per cui desideri impostare i permessi, quindi su Autorizzazioni file icona nella sua pagina di modifica.
- Nella Modalità Nuovo file Unix campo, inserire i permessi ottali (come usati dal comando chmod) che dovrebbero essere assegnati ai file appena creati. Ad esempio, modalità 600 consentirebbe la lettura e la scrittura da parte del proprietario ma negherebbe completamente l'accesso a chiunque altro.
- Nella modalità Nuova directory Unix campo, immettere i permessi ottali per le directory appena create. Ad esempio, 755 consentirebbe l'elenco e la lettura da parte di tutti, ma consentirebbe solo al proprietario di creare file nella directory.
- Per fare in modo che alcune directory appaiano sempre vuote ai client SMB, immettere un elenco di percorsi completi separati da virgole nel campo *Directory da non elencare*. Ad esempio, puoi inserire /proc,/dev per nascondere il contenuto di queste due directory, generalmente inutili per i client Windows.
- Per forzare tutti i client ad accedere ai file come un utente Unix specifico (invece dell'utente con cui hanno effettuato l'accesso), compilare il campo *Forza utente Unix*. Questo può essere molto utile per una condivisione in cui persone diverse modificano i documenti dell'altro, in quanto evita i problemi di autorizzazione Unix che possono verificarsi se i file sono effettivamente di proprietà dei loro creatori. Per impostazione predefinita, il gruppo a cui si accede ai file sarà il gruppo principale dell'utente specificato. Per cambiarlo, compila il gruppo Forza Unix campo pure.
- Poiché i client Windows SMB non supportano i collegamenti simbolici Unix, Samba leggerà o scriverà sempre il file collegato quando un client tenta di leggere o scrivere un collegamento. Sfortunatamente, questo presenta un potenziale rischio per la sicurezza, poiché potrebbe essere creato un collegamento simbolico che punta a un file normalmente inaccessibile al di fuori della directory condivisa. Per evitare ciò, cambia il campo *Consenti collegamenti simbolici al di fuori della condivisione?* in No .
- Sui filesystem Unix, i file che sono di sola lettura per un utente possono ancora essere eliminati se la directory è scrivibile. Questo non è il caso dei normali filesystem di Windows, motivo per cui Samba impedisce che ciò accada. Per modificare questa impostazione e consentire l'applicazione della semantica del filesystem Unix, modificare il campo *Può eliminare i file di sola lettura?* su Sì .
- Fai clic su Salva pulsante in fondo alla pagina per attivare le nuove opzioni di sicurezza dei file.
Come Impostazioni predefinite condivisione di modifica la sezione spiega in modo più dettagliato, puoi modificare le impostazioni di autorizzazione dei file per tutte le condivisioni facendo clic su Impostazioni predefinite condivisione file icona nella pagina principale, seguita da Autorizzazioni file . Questi si applicheranno a meno che non vengano sostituiti per una quota dalle istruzioni di cui sopra.
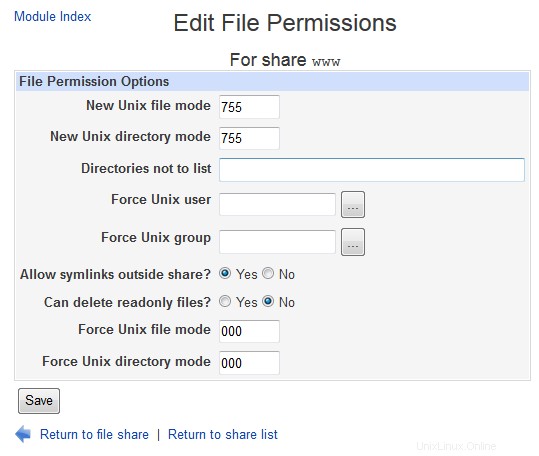 Modifica autorizzazioni file
 Modifica delle opzioni di denominazione dei file
Samba ha diverse opzioni che controllano come i nomi dei file Unix vengono convertiti in nomi adatti ai sistemi Windows. Al giorno d'oggi, la maggior parte di essi non è più necessaria, poiché le versioni di Windows 95 e successive sono state in grado di supportare correttamente nomi di file lunghi. Solo Windows 3.1 e DOS erano bloccati con il vecchio formato di nome file 8.3 e non vengono più utilizzati.
Per modificare le opzioni di denominazione per una condivisione rilevanti per i clienti moderni, segui questi passaggi :
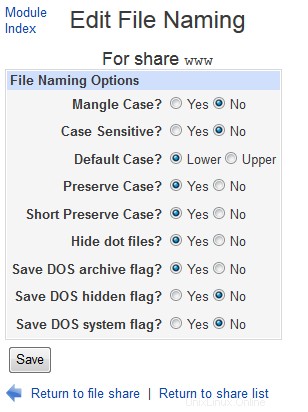
- Fare clic sul nome della condivisione nella pagina principale del modulo, quindi su Nome file icona.
- Quando il Maiuscole/minuscole? il campo è impostato su No , il server ignorerà maiuscole e minuscole all'apertura dei file richiesti dai client. Questo è il modo in cui funzionano i filesystem di Windows e quindi questo è il comportamento predefinito anche per Samba. Tuttavia, consuma più tempo CPU e larghezza di banda IO a causa della necessità di scansionare le directory, poiché tutti i filesystem Unix fanno distinzione tra maiuscole e minuscole. Per questo motivo, potresti voler selezionare Sì invece se tutti i tuoi client sono sistemi Linux che si aspettano che si applichi normalmente la regola del caso Unix.
- Normalmente, Samba creerà file con il caso esatto specificato dai client. Per modificare questa impostazione e forzare invece l'uso di maiuscole o minuscole, modificare Preservare maiuscole? campo su No e seleziona una delle opzioni in Maiuscole predefinite? campo. Questo può essere utile se i client Windows stanno creando molti file maiuscoli quando si preferisce seguire il normale standard Unix minuscolo.
- Sui filesystem Windows, ogni file ha un attributo nascosto che determina se è normalmente visibile ai programmi o meno. Non esiste alcun attributo di questo tipo sui sistemi Unix - invece, i file i cui nomi iniziano con un punto sono nascosti da ls e altri comandi. Per questo motivo, Samba imposta l'attributo nascosto sui file dot quando Nascondi file dot? il campo è impostato su Sì , come è per impostazione predefinita. L'alternativa è utilizzare il bit di esecuzione mondiale dei permessi del file Unix come flag nascosto, poiché i permessi di esecuzione non sono altrimenti utilizzati da Samba. Per abilitare questo comportamento, modificare il Salva flag nascosto DOS? campo su Sì . Poiché ciò rovinerà le autorizzazioni per i programmi Unix che accedono ai file nella condivisione, dovrebbe essere utilizzato solo se la directory condivisa è accessibile solo dai client SMB.
- I file di Windows hanno altri due attributi:il flag di archivio che indica che è stato eseguito il backup di un file e il flag di sistema che contrassegna un file di sistema normalmente intoccabile. Samba può essere configurato per memorizzare questi attributi nei bit di file di esecuzione utente ed esecuzione di gruppo se il Salva il flag dell'archivio DOS? e Salvare il flag di sistema DOS? i campi sono impostati su Sì rispettivamente. Se i tuoi client Windows non hanno bisogno di queste informazioni o se trovi che le autorizzazioni su eseguibili e script Unix sono incasinati, impostali entrambi su No invece.
- Per attivare le nuove impostazioni di denominazione dei file, fai clic su Salva pulsante in fondo alla pagina.
Anche in questo caso, queste opzioni possono essere impostate per tutte le condivisioni facendo clic su Impostazioni predefinite condivisione file icona nella pagina principale, seguita da *Nome file*.
 Modifica denominazione file
 Modifica di altre opzioni di condivisione file
Ci sono alcune altre opzioni di condivisione file relative al blocco e all'esecuzione automatica di comandi che puoi impostare anche usando questo modulo. Quelli utilizzati per il blocco controllano il comportamento di Samba quando un client Windows tenta di bloccare un file per ottenere l'accesso esclusivo, in modo che possa memorizzare nella cache i dati nel file senza dover contattare il server per ogni lettura o scrittura. By default, locking is fully enabled and implemented in exactly the same way as it is on Windows servers, so there is generally no need to change these settings.
Samba can also be configured to run shell commands when a client connects or disconnects, either as root or as the connecting Unix user. This can be useful if you want to move newly added files to some other directory or perform some kind of processing on them.
To edit the module's other file sharing options, follow these steps :
- Click on the name of the share to edit on the main page, and then on the Miscellaneous Options icon on the share editing page that appears.
- If this share is exclusively for read-only use (for example if you are sharing some kind of read-only media like a CD), then the Fake oplocks? field can be safely changed to Yes to boost performance. This tells Samba to simply grant all lock requests by clients and not to bother actually keeping track of who has locked what, which can boost performance. None of the other locking fields should be touched unless you really know what you are doing, as the defaults will work fine and any other settings may lead to data corruption if multiple clients try to access the same files.
- To limit the number of clients that can be connected to this share at any one time, select the second radio button in the Max connections field and enter a number into the adjacent text box. This can be useful if you want to limit the load on your system. If Unlimited is selected, no maximum will be placed on the number of concurrent connections.
- The fields Command to run on connect and *Command to run on disconnect* allow you to enter shell commands that will be run by Samba as the authenticated user at connection and disconnection time. They will always be run in the share directory, and special % codes like %U for the connecting user or %S for the server name can be used in the command.
- Similarly, the Command to run on connect as root and *Command to run on disconnect as root* fields can be used to enter shell commands that will always be run as the Unix root user. However, they will be run in root's home directory instead.
- Hit the Save button to activate the new locking and command settings.
One thing to remember about locking and Samba is that locks taken out by SMB clients will not generally effect or be detectable by Unix programs or NFS clients. This means that data corruption can still happen if Unix and Windows programs open the same file, or if the same NFS exported directory is shared by two different Samba servers.
-
 Samba - Miscelleanous File Defaults
Editing printer share options
Once a printer share has been created, there are several options that you can set for it. Most of them relate to the commands that Samba will run to print a new job, list the queue or cancel a job. By default, appropriate commands for the print system in use (explained in the Configuring printers section) will be used - however, there are times that you will want to specify additional parameters or even use a completely different command.
To edit printer options for a share, follow these instructions :
- On the module's main page, click on the name in the table of the printer share that you want to edit. On the form that appears, hit the Printer Options icon at the bottom of the page.
- To prevent clients using up all the disk space in the printer's spool directory with large jobs, change the *Minimum free space* field. You must enter a number of kilobytes that will always be left free on the filesystem.
- To change the command that Samba will run to print a submitted file, edit the Print command campo. The special codes %f (for the temporary file to print) and %p (for the printer name) can and should be used in the command, so that you can enter for example something like lpr -P%p %f ; rm %f . Your command must always delete the temporary file (as the example does), as the server will not do this for you. All the usual shell meta-characters like ;, &and> can be used, which allows you to enter quite complex series of commands. Whatever command you enter will always be run as the Unix user connected to the printer share.
- To edit the command that Samba uses to list jobs waiting to be printed on some printer, select the second radio button in the Display queue command field and fill in its text box. Whatever you enter must produce output in the format generated by the standard BSD lpr command so that Samba can parse. If the special code %p appears in the command, it will be replaced with the name of the printer.
- Similarly, you can change the commands that Samba runs to delete, pause and un-pause a print job by editing the *Delete job command*, Pause job command and Unresume job command fields respectively. All can and should use the codes %p for the printer name, and %j for the job ID. For most print systems, there are no defaults for the pause and un-pause commands as those features are not supported. Generally you will not need to change these fields.
- As the Adding a new printer share section explains, the Printer driver field can be used to enter the model of the attached printer (as recognized by Windows) so that clients can automatically select the right driver.
- When you are done with this page, hit the Save button to update the Samba configuration file and thus activate the new settings.
You can also edit these settings for all shares by clicking on the Printer Share Defaults icon on the module's main page and then on Printer Options . In fact, all of the command options make much more sense to edit globally as the same commands are likely to be needed for all printers.
Editing share defaults
As the previous few sections in this chapter have mentioned, the Samba configuration allows you to define defaults that apply to all shares unless specifically overridden. This can be done by clicking on either the File Share Defaults or Printer Share Defaults icon on the main page, editing the contents of the form that appears and hitting Save . However, most of the options in this form are not particularly useful to set globally, except maybe Available? and Browseable? .
More usefully, you can click on one of the icons on the defaults page and change settings that will apply to all file or printer shares. In the case of the Security and Access Control icon (which appears on both pages), and global defaults that you set will apply to both file and printer shares, as Samba does not differentiate between them.
Any option that is set globally will appear as the default on per-share forms. For example, if you fill in the Delete job command field under Printer Options on the Printer Share Defaults page and then went to the same page for a specific printer, the same value would appear. Even though the command does not actually appear in the configuration file for the printer, Webmin still displays it because as the default it will be used. Of course, if you enter a different command for the share, it will override the global setting and thus be used and display instead. This behavior may be a little confusing, as it is not the way that other Webmin modules usually work.
Configuring networking
This module can be used to set various Samba options that control how the entire server appears to and behaves for Windows clients. You can change the workgroup (under which the system is listed in the network neighborhood display), the server's name and any aliases, and the description that appears next to the name. Options related to the file sharing protocol and authentication method used can also be edited, in order to support old clients.
-
 Windows Networking options
It is even possible to set up your system as a WINS server or client, a protocol that some Windows clients use to find IP addresses for SMB server names if DNS is not available. The biggest difference between WINS and DNS is that clients can register their own names and IP addresses with a WINS server, rather than having it done by an administrator. It is most useful on small file-sharing networks that do not have a DNS server.
To edit these windows networking options, the instructions to follow are :
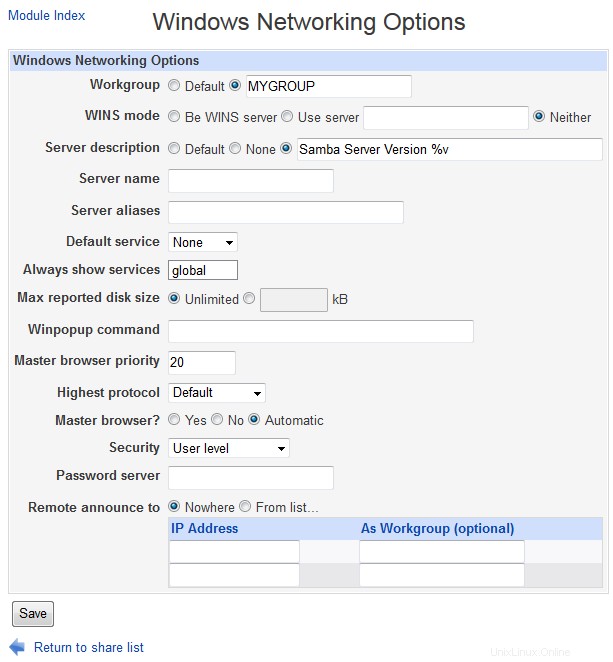
- On the module's main page, click on the Windows Networking icon in the Global Configuration section to bring up the form shown in the screenshot below.
- To set a workgroup for your server, select the second radio button in the Workgroup field and enter a short name into the text box next to it. If your network already has a few SMB servers that are members of a workgroup, this server should be made a member too.
- If your network already has a WINS protocol server, select Use server in the WINS mode field and enter its IP address. If not, you should choose Be WINS server so that Windows clients can use your system to lookup IP addresses for SMB server names. More recent versions of Windows (and Linux clients) do not need to use WINS, as they can look up server names in the DNS - assuming your network has a DNS server that has entries for all your hosts.
- To set a description for your system, fill in the Server description field with something like Corporate file server .
- Normally, Samba will use the first part of your system's DNS name as the SMB server name. To change this, enter something else in the Server name campo. Clients will be able to refer to this server by whatever name you specify.
- To define alternate names that clients can use to refer to your server, fill in the Server aliases field with a space-separate list of names.
- If you want your system to be the master browser for a network (the server that maintains lists of other SMB servers and clients on the network, as seen in Window's network neighborhood), change the Master browser? field to Yes . If you are running multiple Samba servers on the same subnet, this option should be set for only one. If there are other Windows or Samba servers on the network that want to be master browsers, the one with the highest operating system level will win the 'election' that decides who gets the job. You can increase your system's change of winning by increasing the Master browser priority field - the default of 20 will win against Windows 95 systems, but you would need to enter 65 to beat Windows NT servers.
- To have your Samba server contact another SMB server to validate passwords instead of checking its own user list, select *Password server* from the Security menu and enter the other server's hostname or IP address in the Password server campo. Otherwise, leave the field set to Default or User level . Share level security is rarely used anymore with modern clients, and Domain security is too advanced to cover in this chapter.
- Normally, an SMB server broadcasts information about itself to other servers on the network so that it can be included in browse lists. However, if your network spans multiple subnets then broadcasts from one system may not reach others. To get around this problem, the Remote announce to table can be used to specify the addresses of browser master servers to which this server's IP address and workgroup should be sent. To configure remote announcements on this page, first select the From list option above the table. Then in the IP address field of each row enter the hostname or IP address of a server to announce to, and in the As workgroup field the name of the workgroup that your server should appear under. If the second field is left empty, the servers real workgroup (set in step 2) will be used. To enter more than two remote servers you will need to save and re-open this page so that more empty rows appear in the table.
- Infine, fai clic su Salva button to activate the new networking settings.
-
 Unix Networking options
Samba also has numerous global options related to networking that control such things as the IP address to listen on, whether to send keep-alive packets and how long clients can be idle for before they are disconnected. These can be used to tune your server's performance, or limit access to only clients on a local network. To edit them, follow these steps :
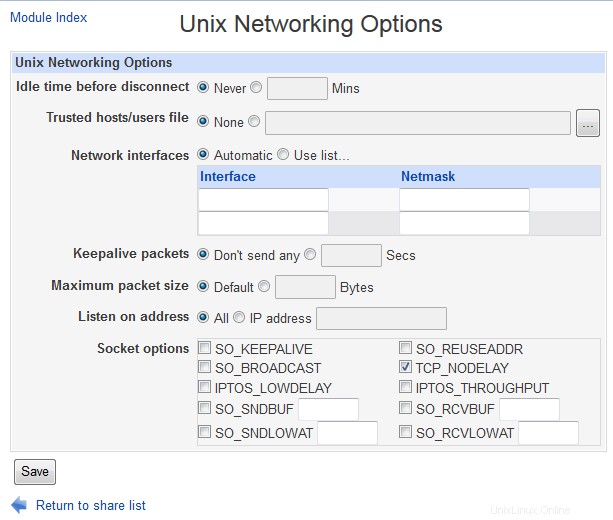
- Click on the Unix Networking icon on the module's main page.
- To have Samba disconnect clients that have been inactive for too long and do not have any files open, select the second radio button in the Idle time before disconnect field and enter a number of minutes into the adjacent text box. If Never is selected instead, clients will never be automatically cut off. Because Samba starts one server sub-process per client, this feature is useful for cutting down the amount of memory that they use up. And Windows clients will automatically re-connect if disconnected, so there is no down side to using it.
- To have Samba send packets to detect if clients have crashed without properly disconnect, select the Send every option in the Keepalive packets field and enter the number of seconds (such as 60) that a packet should be sent. Because clients can hold locks on files, a dead client may end up locking a file that other people need access to, even though it is clearly not using it. The same thing can be achieved by selecting the SO_KEEPALIVE checkbox in the Socket options campo. This tells the operating system kernel to do basically the same thing, and so should be used in preference. The only problem is that you cannot specify the keep-alive packet interval.
- To restrict Samba to listening for connections on a single one of your system's IP addresses, fill in the Listen on address campo. On a machine with one interface connected to an internal network and one connected to the Internet, this feature can be used to prevent outsiders connecting to your Samba server.
- Hit the Save button at the bottom of the page to activate the new network settings.
As you will see when you look at the actual form, there are many more fields on it than those documented above. However, the rest have extremely specialized uses and thus do not need to be touched by the average administrator.
Configuring authentication
-
 Authentication
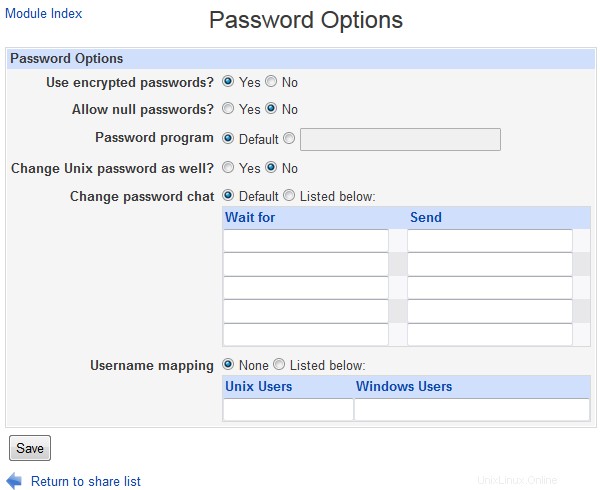
The SMB protocol allows users to change their passwords for a server from a client system. For a Samba server, this causes the encrypted passwords file to be updated, assuming one is in use (as is usually the case). You can also configure the server to change the user's Unix password as well, which makes sense if they are being kept synchronized.
Another authentication-related feature supported by Webmin is username mapping. This allows you to map fake client login names to real Unix usernames, and can be useful if users prefer to use their full names to login (like Jamie Cameron instead of jcameron ) or if you have a client that is regularly moved between two different networks, each of which has different SMB accounts.
To set these global authentication options using this module, the steps to follow are :
- On the module's main page, click on the Authentication icona.
- As explained in the Managing Samba users section, the *Use encrypted passwords?* field determines if Samba uses its own separate password file or the standard Unix user database. Because all recent versions of Windows use a password encryption format that is incompatible with the Unix format, this field should generally be set to Yes .
- To allow logins by users who have no password set, select Yes for the Allow null passwords? campo.
- The Password program field sets the program that Samba will use to change a user's Unix password if synchronization is enabled. If Default is selected /bin/passwd will be used, which is correct for most Unix systems. You can enter a different command by selecting the second radio button and fill in the text box with something like _/usr/bin/yppasswd %u_. The %u code is replaced with the name of the user whose password is being changed, and is required because the command is run as root.
- To have same change a user's Unix password when his SMB password is changed over the network, set the *Change Unix password as well?* field to Yes . Synchronization in the other direction is unaffected though - see the Managing Samba users section for more details on how that works.
- To define 'fake' SMB accounts, select Listed below in the Username mapping campo. In the table below it, each row specifies a mapping - the first field must contain a valid Unix username, and the second an SMB login name of your choice. Clients logging in with one of these made-up account names must of course provide the correct password for the associated Unix user.
- Hit the Save button at the bottom of the page to activate your new authentication settings.
Configuring printers
If you are sharing printers from your server, you will probably need to adjust the global printing options. These determine the print system commands that Samba will use to submit, list and delete jobs, the file it gets the list of printers from, and other related settings. To edit them, the steps to follow are :
- Click on the Windows To Unix Printing icon on the module's main page to bring up the printer options form.
- From the Unix print style menu select the type of print system in use on your box. Unfortunately, practically every different flavor of Unix has its own set of programs and configuration files for handling printers and print drivers, each of which must be treated differently by Samba. The options that you may want to select from are :
- BSD The traditional Unix print software, found on FreeBSD, NetBSD and older Linux distributions.
- SYSV The print system used on Solaris, UnixWare and a few other versions of Unix.
- HPUX The print system shipped with HP/UX.
- AIX The print software that comes with AIX, IBM's version of Unix.
- CUPS The superior Common Unix Print System, which is included with many new Linux distributions.
- LPRNG An improved version of the old BSD print system, used on all Linux systems that do not run CUPS. Most packages of Samba will have this option set correctly in the default configuration file. The PrinterAdministration page explains in more detail what the differences between the various print systems are, and how to select the right one for your operating system.
- Normally, Samba will find all the printers on your system and make them visible to clients when the special printers share exists. To disable this, change the Show all printers? campo su No invece. The printers will still be accessible using an explicit \\_servername_\_printername_ path though.
- When the Printcap file field is set to Default , Samba will get the list of printers available on your system from the standard /etc/printcap file. This is fine if you want them to all show up, but sometimes you want to hide some printers from users. To do this, create a fake printers file that looks {| border="1" |- like :printer1||Description for printer 1:printer2||Description |} of second printer:And set this field to the path to this file. Only the printers listed in it will be available automatically when a printers share exists.
- Samba caches the output from whatever command is used to list waiting print jobs (such as lpq) in order to reduce the frequency with which it is run. By default this cache time is 10 seconds, but you can increase or decrease it using the *Printer status cache time* field. If your lpq command is very slow you may want to increase it.
- Hit the Save button to activate your new printing settings.
Controllo dell'accesso al modulo
As WebminUsers explains, once a Webmin user has been granted access to a module he can be further restricted to only a subset of its functions. For the Samba module, you can allow a user to edit only certain types of settings in certain shares while denying him the ability to create new shares or edit global options. This can be useful if you want to let someone edit the settings that apply to the sharing of only his own directory, while protecting the rest of the Samba server's configuration.
I would advise against granting even limited access to this module to un-trusted users though, as it has many features that could be used by a malicious to gain root access to your system. For example, someone could allow guest access to a share with root permissions, allowing the remote modification of any file. Or they could set the command run as root at client connection time to something that changes the root password.
Instead, these access control features are should only be used to limit the changes that an in-experienced but still trusted user can make. To restrict such a user to only editing a few shares, the steps to follow are :
- In the Webmin Users module, create a user with access to the module, or modify an existing user to give him access.
- Click on Samba Windows File Sharing next to the name of the user to bring up the module access control form.
- Modificare Puoi modificare la configurazione del modulo? campo su No .
- Set all the fields from *Can apply changes? *down to *Can maintain auto UNIX to SAMBA users sync?* to No as well, as they control access to global settings that the user should not touch.
- To hide shares that he cannot access from the user, change the Hide inaccessible objects? field to Yes . Leaving it set to No lets him see other shares, but if he tries to click on any of them an error message will appear.
- In the Access file shares field, de-select create but leave read and write selected. Do the same for the *Access print shares* field. This does not mean that he can edit all shares - later fields control exactly which ones he can configure.
- Change the Enable per-file_share acls? and *Enable per-print-share acls?* fields to Yes , so that the options set in the next step are used.
- In the Per-share ACLs table, select n/a under *Access share* and Connections for all the shares that he should not be allowed to configure. You should definitely do this for the global share as well, as it sets the defaults for all others. For the shares that you do want the user to manage, select read write in the Access share colonna. To allow the user to kill clients connected to this share, select kill in the Connections column - or to let him only see connected clients, choose view invece. The former option is not a good idea security-wise though, as it allows the user to terminate any process on your system. The radio buttons in the security , permissions , file naming and *miscellaneous or printer* columns control which of the sub-icons on the share editing form the user has access to. For each you can choose either edit to allow editing, view to only let him look at the settings or n/a to deny access altogether.
- Hit the Save button at the bottom of the page to activate the new access control settings.
Configuring the Samba Windows File Sharing module
The module assumes that you have installed the Samba package available for your operating system or Linux distribution, or have compiled Samba from source code if no such package is available. If this is not the case (for example if you have compiled the latest version instead of using a package), the paths that it uses for the Samba programs and configuration files will be wrong. This will cause the module's main page to incorrectly display an error message about Samba not being installed.
Fortunately, these paths can be easily changed by clicking on the standard Module Config link in the top-left corner of the main page. On the form that appears if you follow this link are fields that control the module's user interface (under *Configurable options*) as well as the fields for configuration file and program paths (under System configuration ). The first group of settings can be safely changed at any time, but those that set paths do not generally need to be adjusted as the defaults are usually correct.
Contenuti
Edit Config File
The samba configuration file can be manually edited as well:
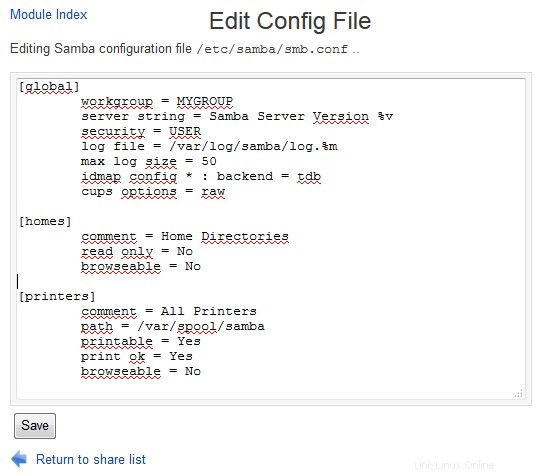 Samba - Edit Config File
 Accessing SWAT from Webmin
| Note: | Samba 4 does not contain SWAT anymore. |
SWAT (which stands for Samba Web Administration Tool) is a program similar to Webmin's Samba module, but included as standard with Samba itself. It provides a web-based administration interface to the configuration file that allows you to create and edit shares and global settings. SWAT is usually run from a super-server like inetd or xinetd, which makes it appear as a web server, usually on port 901 . Most Samba packages for Linux include the program and an xinetd service for it, but have it disabled by default.
You can also access SWAT through this Webmin module, instead of needing to set it up to be run from inetd or xinetd. Unfortunately, this will not work if Samba has been configured to only allow connections from some IP addresses (using the Hosts to allow field) on the global Security and Access Control page. Because SWAT also uses Samba's configuration files, any IP restrictions that apply globally will apply to it as well. When it is run from Webmin, SWAT is unable to determine the connecting IP address and fails if any IP restrictions are in force.
Assuming that this is not the case on your system, you can use it by following these steps :
- On the module's main page, click on the SWAT icona. If this is the first time you have done so, the SWAT Login form will appear.
- If you do get the login form, enter root in the Username field and the root user's password in the Password campo. Because it can be used to totally re-configure your Samba server, SWAT requires users to authenticate first. Webmin will remember the login and password that you enter so that the login form will be bypassed in future.
- After you have logged in the SWAT main menu will appear. Along the top are icons for various parts of the Samba configuration, which when clicked on bring up forms for editing settings. Some things that can be configured in Webmin cannot be in SWAT, and vice versa - so you may find it superior to the Webmin interface for some tasks.
- To return to the module's main page, click on the *Return to share list* link at the bottom of any page. To have Webmin forget your SWAT password so that you can login again, hit the *Logout of SWAT* link in the bottom-right corner.
Be aware that when you login to SWAT through this module, the username and password that you enter are stored un-encrypted in the file /etc/webmin/samba/swat which is readable only by root. If this bothers you for security reasons, either do not use this feature of the module, or remember to click the Logout of SWAT link after you are done using it so that the window of exposure is limited.