MySQL è il più popolare sistema di gestione di database relazionali. Come presupposto MySQL viene utilizzato da ogni terzo sito Web in esecuzione su Internet. Il team ufficiale di MySQL fornisce i pacchetti Debian per MySQL 8 da installare sui sistemi Ubuntu.
Questo tutorial ti aiuterà a installare il server MySQL su sistemi Ubuntu 18.04 Bionic Beaver.
Prerequisiti
Accedi al tuo sistema Ubuntu 18.04 usando l'accesso alla shell. Per i sistemi remoti, connettersi con SSH. Gli utenti Windows possono utilizzare Putty o altre applicazioni alternative per la connessione SSH.
ssh [email protected]
Esegui i comandi seguenti per aggiornare i pacchetti correnti all'ultima versione.
sudo apt update && sudo apt upgrade
Fase 1 – Configura MySQL PPA
Il team MySQL fornisce MySQL PPA ufficiale per i sistemi operativi Ubuntu. Puoi scaricare e installare il pacchetto sul tuo sistema Ubuntu 18.04, che aggiungerà il file PPA al tuo sistema. Esegui il comando seguente per abilitare PPA.
wget http://repo.mysql.com/mysql-apt-config_0.8.10-1_all.deb
sudo dpkg -i mysql-apt-config_0.8.10-1_all.deb
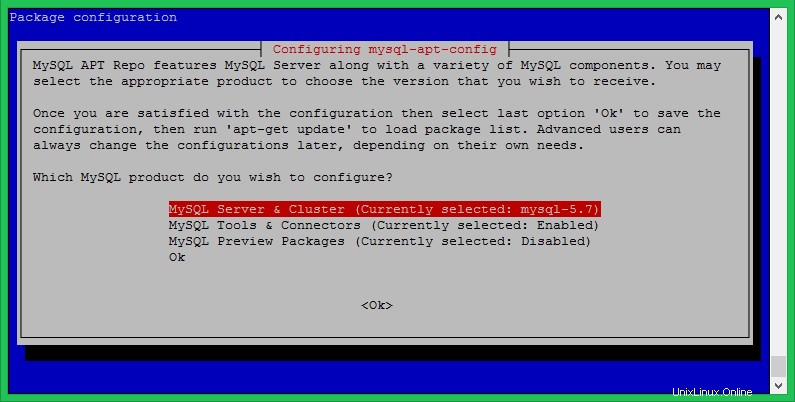
Durante l'installazione del pacchetto MySQL apt config. Seleziona la prima riga come mostra lo screenshot qui sotto e premi invio. Qui puoi selezionare la versione di MySQL (8.0 o 5.7) da installare sul tuo sistema. Dopodiché seleziona, l'ultima riga con il testo Ok e premi invio per completare questo.
Passaggio 2:installa MySQL 8 su Ubuntu 18.04
Il tuo sistema è pronto per l'installazione di MySQL. Esegui i seguenti comandi per installare MySQL sul sistema Ubuntu 18.04.
sudo apt-key adv --keyserver keys.gnupg.net --recv-keys 8C718D3B5072E1F5
sudo apt update
sudo apt install mysql-server
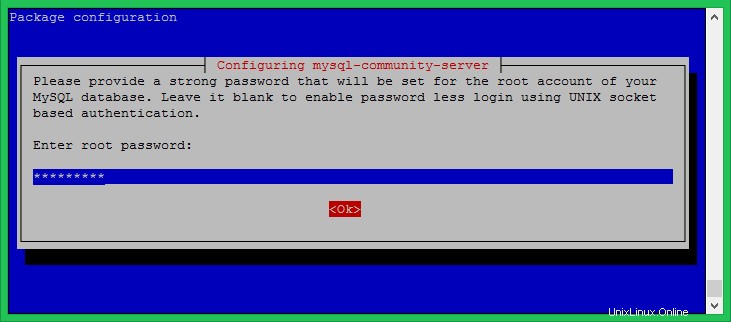
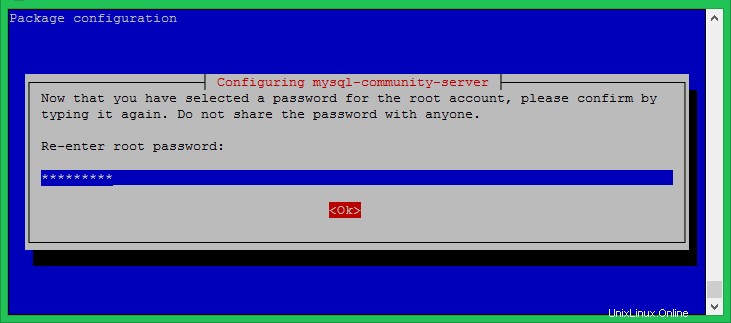
Il processo di installazione richiederà l'impostazione della password di root come predefinita. Immettere una password sicura e lo stesso per confermare la finestra della password. Questa sarà la password utente root MySQL richiesta per accedere al server MySQL.
Fase 3:installazione sicura di MySQL
Esegui il comando seguente sul tuo sistema per apportare modifiche alla sicurezza sul tuo server di database. Questo solleverà alcune domande. L'elevata sicurezza fornisce tutte le risposte a sì .
sudo mysql_secure_installation
Qui puoi abilitare/disabilitare il plug-in di convalida della password, impostare la forza richiesta per le password, rimuovere gli utenti anonimi, impedire l'accesso root in remoto, rimuovere il database di prova e accedervi e ricaricare i privilegi di ricarica dopo le modifiche applicate.
Vedi l'output di seguito e l'azione intrapresa da me:
Securing the MySQL server deployment.

Enter password for user root:

VALIDATE PASSWORD PLUGIN can be used to test passwords
and improve security. It checks the strength of password
and allows the users to set only those passwords which are
secure enough. Would you like to setup VALIDATE PASSWORD plugin?

Press y|Y for Yes, any other key for No: y

There are three levels of password validation policy:

LOW    Length >= 8
MEDIUM Length >= 8, numeric, mixed case, and special characters
STRONG Length >= 8, numeric, mixed case, special characters and dictionary file

Please enter 0 = LOW, 1 = MEDIUM and 2 = STRONG: 2
Using existing password for root.

Estimated strength of the password: 50
Change the password for root ? ((Press y|Y for Yes, any other key for No) : y

New password:

Re-enter new password:

Estimated strength of the password: 100
Do you wish to continue with the password provided?(Press y|Y for Yes, any other key for No) : y
By default, a MySQL installation has an anonymous user,
allowing anyone to log into MySQL without having to have
a user account created for them. This is intended only for
testing, and to make the installation go a bit smoother.
You should remove them before moving into a production
environment.

Remove anonymous users? (Press y|Y for Yes, any other key for No) : y
Success.


Normally, root should only be allowed to connect from
'localhost'. This ensures that someone cannot guess at
the root password from the network.

Disallow root login remotely? (Press y|Y for Yes, any other key for No) : y
Success.

By default, MySQL comes with a database named 'test' that
anyone can access. This is also intended only for testing,
and should be removed before moving into a production
environment.


Remove test database and access to it? (Press y|Y for Yes, any other key for No) : y
 - Dropping test database...
Success.

 - Removing privileges on test database...
Success.

Reloading the privilege tables will ensure that all changes
made so far will take effect immediately.

Reload privilege tables now? (Press y|Y for Yes, any other key for No) : y
Success.

All done!
Fase 4:connessione a MySQL
Il server MySQL è stato installato sul tuo sistema. Ora connettiti al database MySQL usando la riga di comando. Usa la password dell'account root impostata nel passaggio precedente.
 mysql -u root -p

Enter password:
Welcome to the MySQL monitor.  Commands end with ; or \g.
Your MySQL connection id is 8
Server version: 8.0.17 MySQL Community Server - GPL

Copyright (c) 2000, 2019, Oracle and/or its affiliates. All rights reserved.

Oracle is a registered trademark of Oracle Corporation and/or its
affiliates. Other names may be trademarks of their respective
owners.

Type 'help;' or '\h' for help. Type '\c' to clear the current input statement.

mysql>
Conclusione
Questo tutorial ti ha aiutato a installare MySQL 8 sul sistema Linux Ubuntu 18.04 LTS.