Passbolt è un gestore di password gratuito, open source, self-hosted ed estensibile che ti aiuta a condividere e archiviare in modo sicuro le credenziali di accesso, come password del router, sito Web, Wi -Fi e altro ancora. È diverso dagli altri gestori di password. si concentra sull'utilizzo del team piuttosto che sugli individui. È disponibile sia in versione community che a pagamento. Offre molte funzionalità, alcune delle quali sono elencate di seguito:
- Fornisce estensioni per Firefox e Google Chrome.
- Usa OpenPGP per crittografare la password.
- Interfaccia web semplice e intuitiva.
- Consente di importare ed esportare password.
- Consente di aggiungere manualmente le credenziali di accesso.
In questo tutorial spiegheremo come installare Passbolt Password manager con Apache e Let's Encrypt su Ubuntu 20.04.
Prerequisiti
- Un server che esegue Ubuntu 20.04.
- Un nome di dominio valido puntato all'IP del tuo server.
- Una password di root è configurata sul server.
Installa il server LAMP
Innanzitutto, dovrai installare il server Apache e MariaDB nel tuo sistema. Puoi installarli con il seguente comando:
apt-get install apache2 mariadb-server -y
Dopo aver installato i pacchetti di cui sopra, dovrai anche installare PHP e altri pacchetti richiesti nel tuo sistema.
Per impostazione predefinita, Ubuntu 20.04 viene fornito con PHP7.4 nel suo repository predefinito. Tuttavia, Passbolt non supporta PHP7.4. Quindi dovrai aggiungere il repository PHP nel tuo sistema.
Innanzitutto, installa i pacchetti richiesti con il seguente comando:
apt-get install software-properties-common gnupg -y
Quindi, aggiungi il repository PHP con il seguente comando:
add-apt-repository ppa:ondrej/php --yes
Quindi, installa la versione PHP 7.3 con Composer e altre estensioni richieste con il seguente comando:
apt-get install php7.3 php7.3-mysql libapache2-mod-php7.3 php7.3-intl php7.3-mbstring php7.3-gd php7.3-imagick php7.3-xml php7.3-common php7.3-curl php7.3-json php7.3-ldap php7.3-gnupg zlib1g unzip git composer curl -y
Una volta installati tutti i pacchetti, puoi procedere al passaggio successivo.
Configura il database MariaDB
Innanzitutto, dovrai proteggere l'installazione di MariaDB e impostare la password di root di MariaDB. Puoi farlo con il seguente comando:
mysql_secure_installation
Questo script imposterà la password di root di MariaDB, rimuoverà gli utenti anonimi, non consentirà l'accesso come root in remoto e rimuoverà il database di test e accederà ad esso come mostrato di seguito:
Enter current password for root (enter for none):
OK, successfully used password, moving on...
Set root password? [Y/n] Y
Remove anonymous users? [Y/n] Y
Disallow root login remotely? [Y/n] Y
Remove test database and access to it? [Y/n] Y
Reload privilege tables now? [Y/n] Y
Una volta che MariaDB è protetto, accedi alla shell MariaDB con il seguente comando:
mysql -u root -p
Fornisci la tua password di root quando richiesto, quindi crea un database e un utente per Passbolt con il seguente comando:
MariaDB [(none)]> CREATE DATABASE passboltdb CHARACTER SET utf8mb4 COLLATE utf8mb4_unicode_ci;
MariaDB [(none)]> GRANT ALL on passboltdb.* to [email protected] identified by 'password';
Quindi, svuota i privilegi ed esci da MariaDB con il seguente comando:
MariaDB [(none)]> FLUSH PRIVILEGES;
MariaDB [(none)]> EXIT;
Una volta terminato, puoi procedere al passaggio successivo.
Scarica e configura Passbolt
In questa sezione impareremo come scaricare e configurare passbolt:
Scarica Passbolt
Innanzitutto, scarica l'ultima versione di Passbolt nella directory principale web di Apache con il seguente comando:
mkdir /var/www/passbolt
git clone https://github.com/passbolt/passbolt_api.git /var/www/passbolt
Una volta scaricato, cambia la proprietà del passbolt in www-data con il seguente comando:
chown -R www-data:www-data /var/www/
Quindi, cambia la directory in passbolt e installa le dipendenze richieste con il comando seguente:
cd /var/www/passbolt
sudo -u www-data composer install --no-dev
Dovresti ottenere il seguente output:
> Cake\Composer\Installer\PluginInstaller::postAutoloadDump
9 packages you are using are looking for funding.
Use the `composer fund` command to find out more!
thadafinser/package-info:  Generating class...
thadafinser/package-info: ...generating class
> App\Console\Installer::postInstall
Created `config/app.php` file
Created `/var/www/passbolt/logs` directory
Created `/var/www/passbolt/tmp/cache/models` directory
Created `/var/www/passbolt/tmp/cache/persistent` directory
Created `/var/www/passbolt/tmp/cache/views` directory
Created `/var/www/passbolt/tmp/sessions` directory
Created `/var/www/passbolt/tmp/tests` directory
Set Folder Permissions ? (Default to Y) [Y,n]? Y
Digita Y e premi Invio per impostare i permessi della cartella.
Genera chiave OpenPGP
Successivamente, dovrai generare la chiave OpenPGP per autenticare e firmare le richieste JSON in uscita. Puoi generarlo con il seguente comando:
cd /var/www/passbolt
gpg --full-generate-key
Durante il processo, ti verrà richiesta la passphrase, premi semplicemente il tasto Tab, seleziona OK e conferma che non vuoi impostarlo., perché il modulo php-gnupg non supporta l'uso della passphrase al momento.
gpg (GnuPG) 2.2.19; Copyright (C) 2019 Free Software Foundation, Inc.
This is free software: you are free to change and redistribute it.
There is NO WARRANTY, to the extent permitted by law.

gpg: directory '/root/.gnupg' created
gpg: keybox '/root/.gnupg/pubring.kbx' created
Please select what kind of key you want:
   (1) RSA and RSA (default)
   (2) DSA and Elgamal
   (3) DSA (sign only)
   (4) RSA (sign only)
  (14) Existing key from card
Your selection? 1
RSA keys may be between 1024 and 4096 bits long.
What keysize do you want? (3072) 4096
Requested keysize is 4096 bits
Please specify how long the key should be valid.
         0 = key does not expire
        = key expires in n days
      w = key expires in n weeks
      m = key expires in n months
      y = key expires in n years
Key is valid for? (0) 0
Key does not expire at all
Is this correct? (y/N) y

GnuPG needs to construct a user ID to identify your key.

Real name: Hitesh
Email address: [email protected]
Comment: Hi
You selected this USER-ID:
    "Hitesh (Hi) <[email protected]>"

Change (N)ame, (C)omment, (E)mail or (O)kay/(Q)uit? O
We need to generate a lot of random bytes. It is a good idea to perform
some other action (type on the keyboard, move the mouse, utilize the
disks) during the prime generation; this gives the random number
generator a better chance to gain enough entropy.
We need to generate a lot of random bytes. It is a good idea to perform
some other action (type on the keyboard, move the mouse, utilize the
disks) during the prime generation; this gives the random number
generator a better chance to gain enough entropy.
gpg: /root/.gnupg/trustdb.gpg: trustdb created
gpg: key 2DA8E7FB8E23B2FD marked as ultimately trusted
gpg: directory '/root/.gnupg/openpgp-revocs.d' created
gpg: revocation certificate stored as '/root/.gnupg/openpgp-revocs.d/9622291A72D99A4EC78ABCB92DA8E7FB8E23B2FD.rev'
public and secret key created and signed.

pub   rsa4096 2020-07-25 [SC]
      D2394A45B7CBBAB7F00CC79B23D4750486780854
uid                      Hitesh (Hi) <[email protected]>
sub   rsa4096 2020-07-25 [E]
Ricorda l'impronta digitale della chiave pubblica di cui sopra poiché sarà necessaria più avanti nella configurazione.
Quindi, esporta la chiave pubblica e privata nella directory '/var/www/passbolt' con i seguenti comandi:
gpg --armor --export-secret-keys [email protected] > /var/www/passbolt/config/gpg/serverkey_private.asc
gpg --armor --export [email protected] > /var/www/passbolt/config/gpg/serverkey.asc
Successivamente, dovrai inizializzare il keyring della chiave gpg per l'utente Apache. Puoi farlo con il seguente comando:
sudo su -s /bin/bash -c "gpg --list-keys" www-data
Dovresti ottenere il seguente output:
gpg: directory '/var/www/.gnupg' created
gpg: keybox '/var/www/.gnupg/pubring.kbx' created
gpg: /var/www/.gnupg/trustdb.gpg: trustdb created
Configura Passbolt
Per prima cosa, copia il file di configurazione di Passbolt di esempio con il comando seguente:
cp /var/www/passbolt/config/passbolt{.default,}.php Quindi, modifica il file di configurazione di Passbolt con il seguente comando::
nano /var/www/passbolt/config/passbolt.php
Definisci il tuo fullbaseurl, database e impronta digitale della chiave pubblica come mostrato di seguito:
        'fullBaseUrl' => 'https://passbolt.linuxbuz.com',
    // Database configuration.

    'Datasources' => [
        'default' => [
            'host' => 'localhost',
            //'port' => 'non_standard_port_number',
            'username' => 'passbolt',
            'password' => 'password',
            'database' => 'passboltdb',
            'serverKey' => [
            // Server private key fingerprint.
            'fingerprint' => 'D2394A45B7CBBAB7F00CC79B23D4750486780854',
            'public' => CONFIG . 'gpg' . DS . 'serverkey.asc',
            'private' => CONFIG . 'gpg' . DS . 'serverkey_private.asc',
Salva e chiudi il file quando hai finito.
Se non ricordi la tua impronta digitale della chiave pubblica puoi recuperarla con il seguente comando:
gpg --list-keys --fingerprint | grep -i -B 2 [email protected]
Dovresti ottenere il seguente output:
gpg: checking the trustdb
gpg: marginals needed: 3  completes needed: 1  trust model: pgp
gpg: depth: 0  valid:   1  signed:   0  trust: 0-, 0q, 0n, 0m, 0f, 1u
pub   rsa4096 2020-07-25 [SC]
      D239 4A45 B7CB BAB7 F00C  C79B 23D4 7504 8678 0854
uid           [ultimate] Hitesh (Hi) <[email protected]>
Configura Apache per Passbolt
Successivamente, dovrai creare un file di configurazione dell'host virtuale Apache per Passbolt. Puoi crearlo con il seguente comando:
nano /etc/apache2/sites-available/passbolt.conf
Aggiungi le seguenti righe:
<VirtualHost *:80>

        ServerName passbolt.linuxbuz.com
        DocumentRoot /var/www/passbolt

        ErrorLog ${APACHE_LOG_DIR}/passbolt_error.log
        CustomLog ${APACHE_LOG_DIR}/passbolt_access.log combined


      <Directory /var/www/passbolt/>
                Options FollowSymLinks MultiViews
                AllowOverride All
                Require all granted
        </Directory>

</VirtualHost>
Salva e chiudi il file quindi attiva il file host virtuale e riavvia il servizio Apache con il seguente comando:
a2ensite passbolt
systemctl restart apache2
Al termine, puoi procedere al passaggio successivo.
Passbolt protetto con Let's Encrypt
Per proteggere il tuo sito Web con Let's Encrypt SSL, dovrai installare l'utilità client Certbot nel tuo sistema per gestire il certificato SSL.
Puoi installarlo con il seguente comando:
apt-get install python3-certbot-apache -y
Una volta installato, esegui il seguente comando per proteggere il tuo sito Web con Let's Encrypt SSL:
certbot --apache -d passbolt.linuxbuz.com
Ti verrà chiesto di fornire la tua email e di accettare i termini del servizio come mostrato di seguito:
Saving debug log to /var/log/letsencrypt/letsencrypt.log
Plugins selected: Authenticator standalone, Installer None
Enter email address (used for urgent renewal and security notices) (Enter 'c' to
cancel): [email protected]

- - - - - - - - - - - - - - - - - - - - - - - - - - - - - - - - - - - - - - - -
Please read the Terms of Service at
https://letsencrypt.org/documents/LE-SA-v1.2-November-15-2017.pdf. You must
agree in order to register with the ACME server at
https://acme-v02.api.letsencrypt.org/directory
- - - - - - - - - - - - - - - - - - - - - - - - - - - - - - - - - - - - - - - -
(A)gree/(C)ancel: A

- - - - - - - - - - - - - - - - - - - - - - - - - - - - - - - - - - - - - - - -
Would you be willing to share your email address with the Electronic Frontier
Foundation, a founding partner of the Let's Encrypt project and the non-profit
organization that develops Certbot? We'd like to send you email about our work
encrypting the web, EFF news, campaigns, and ways to support digital freedom.
- - - - - - - - - - - - - - - - - - - - - - - - - - - - - - - - - - - - - - - -
(Y)es/(N)o: Y
Plugins selected: Authenticator apache, Installer apache
Obtaining a new certificate
Performing the following challenges:
http-01 challenge for passbolt.linuxbuz.com
Enabled Apache rewrite module
Waiting for verification...
Cleaning up challenges
Created an SSL vhost at /etc/apache2/sites-available/passbolt-le-ssl.conf
Enabled Apache socache_shmcb module
Enabled Apache ssl module
Deploying Certificate to VirtualHost /etc/apache2/sites-available/passbolt-le-ssl.conf
Enabling available site: /etc/apache2/sites-available/passbolt-le-ssl.conf
Quindi, seleziona se reindirizzare o meno il traffico HTTP su HTTPS come mostrato di seguito:
Please choose whether or not to redirect HTTP traffic to HTTPS, removing HTTP access.
- - - - - - - - - - - - - - - - - - - - - - - - - - - - - - - - - - - - - - - -
1: No redirect - Make no further changes to the webserver configuration.
2: Redirect - Make all requests redirect to secure HTTPS access. Choose this for
new sites, or if you're confident your site works on HTTPS. You can undo this
change by editing your web server's configuration.
- - - - - - - - - - - - - - - - - - - - - - - - - - - - - - - - - - - - - - - -
Select the appropriate number [1-2] then [enter] (press 'c' to cancel): 2
Digita 2 e premi Invio per installare Let's Encrypt SSL per il tuo sito web:
Enabled Apache rewrite module
Redirecting vhost in /etc/apache2/sites-enabled/passbolt.conf to ssl vhost in /etc/apache2/sites-available/passbolt-le-ssl.conf

- - - - - - - - - - - - - - - - - - - - - - - - - - - - - - - - - - - - - - - -
Congratulations! You have successfully enabled https://passbolt.linuxbuz.com

You should test your configuration at:
https://www.ssllabs.com/ssltest/analyze.html?d=passbolt.linuxbuz.com
- - - - - - - - - - - - - - - - - - - - - - - - - - - - - - - - - - - - - - - -

IMPORTANT NOTES:
 - Congratulations! Your certificate and chain have been saved at:
   /etc/letsencrypt/live/passbolt.linuxbuz.com/fullchain.pem
   Your key file has been saved at:
   /etc/letsencrypt/live/passbolt.linuxbuz.com/privkey.pem
   Your cert will expire on 2020-10-23. To obtain a new or tweaked
   version of this certificate in the future, simply run certbot again
   with the "certonly" option. To non-interactively renew *all* of
   your certificates, run "certbot renew"
 - If you like Certbot, please consider supporting our work by:

   Donating to ISRG / Let's Encrypt:   https://letsencrypt.org/donate
   Donating to EFF:                    https://eff.org/donate-le
A questo punto, il tuo sito web è protetto con Let's Encrypt SSL.
Installa Passbolt
Successivamente, puoi installare Passbolt eseguendo lo script di installazione di Passbolt.
Innanzitutto, cambia la directory in /var/www/passbolt:
cd /var/www/passbolt
Quindi, esegui lo script di installazione di Passbolt con il seguente comando:
sudo su -s /bin/bash -c "./bin/cake passbolt install --no-admin" www-data
Una volta completata l'installazione, dovresti ottenere il seguente output:
All Done. Took 1.6533s

Import the server private key in the keyring
---------------------------------------------------------------
Importing /var/www/passbolt/config/gpg/serverkey_private.asc
Keyring init OK

Passbolt installation success! Enjoy! ?
Successivamente, dovrai finalizzare la configurazione di Passbolt dal browser. Apri il tuo browser web e visita l'URL https://passbolt.linuxbuz.com. Dovresti vedere la seguente schermata:
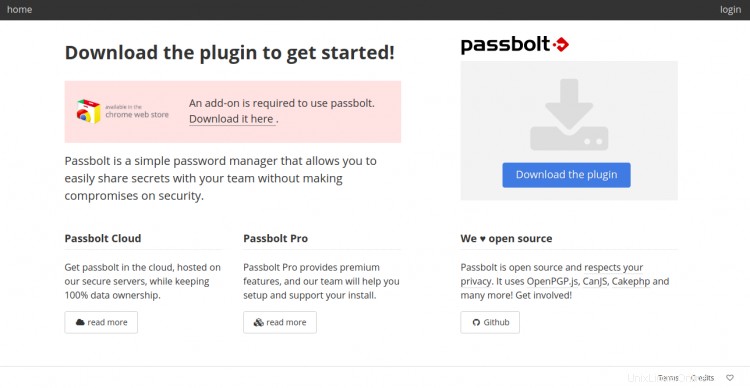
Qui dovrai scaricare e installare un plugin per il tuo browser. Fai clic su Scarica il plug-in per scaricare e installare il plug-in Passbolt. Una volta installato, puoi procedere al passaggio successivo.
Accesso all'interfaccia Web Passbolt
Prima di iniziare, dovrai creare un utente amministratore e impostare una password per Passbolt. Puoi farlo con il seguente comando:
cd /var/www/passbolt
sudo su -s /bin/bash -c "./bin/cake passbolt register_user -u [email protected] -f howtoforge -l Demo -r admin" www-data
Dovresti ottenere il seguente output:
     ____                  __          ____
    / __ \____  _____ ____/ /_  ____  / / /_
   / /_/ / __ `/ ___/ ___/ __ \/ __ \/ / __/
  / ____/ /_/ (__  |__  ) /_/ / /_/ / / /
 /_/    \__,_/____/____/_.___/\____/_/\__/

 Open source password manager for teams
---------------------------------------------------------------
User saved successfully.
To start registration follow the link provided in your mailbox or here:
https://passbolt.linuxbuz.com/setup/install/5bcfb186-3d9f-448f-8388-f705abd855c8/a2ba80dc-5ef2-433a-9138-11282747b377
Ora, copia il collegamento dall'output sopra e utilizzalo per finalizzare l'installazione di Passbolt sul browser. Dovresti vedere la seguente schermata:
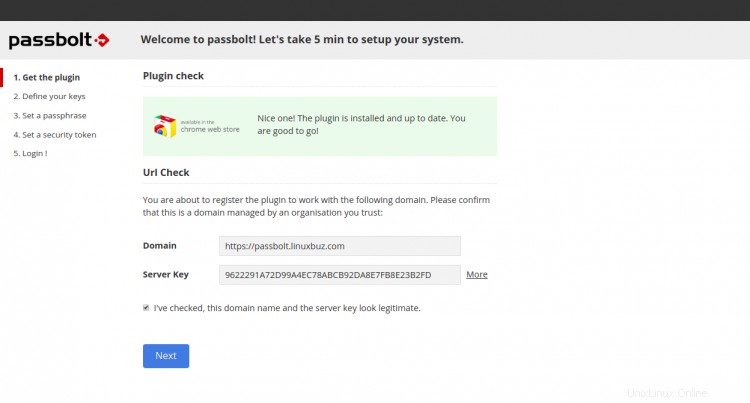
Conferma che l'URL e l'impronta digitale della chiave GPG sono a posto e fai clic su Avanti pulsante. Dovresti vedere la seguente schermata:
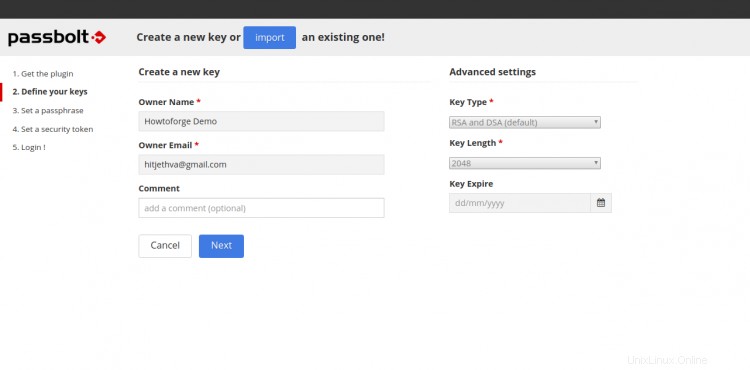
Fornisci il nome del proprietario, l'e-mail e fai clic su Avanti pulsante. Dovresti vedere la seguente schermata:
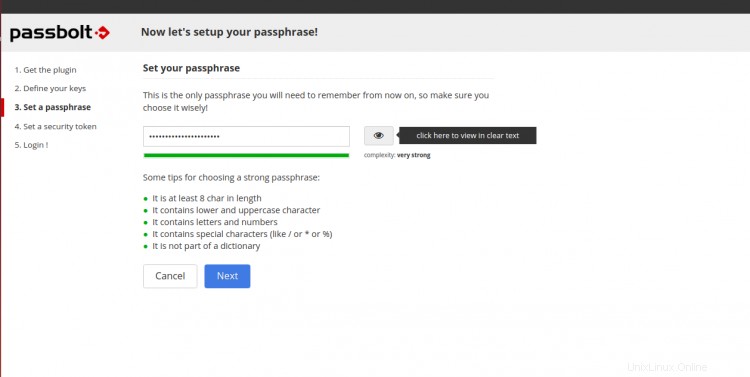
Imposta la tua password e fai clic su Avanti pulsante. Dovresti vedere la seguente schermata:
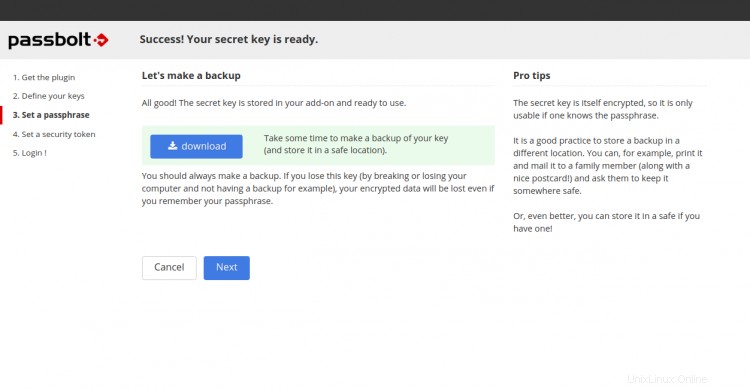
Scarica la tua chiave segreta e fai clic su Avanti pulsante. Dovresti vedere la seguente schermata:
Imposta un token di sicurezza e fai clic su Avanti pulsante. Dovresti vedere la seguente schermata:
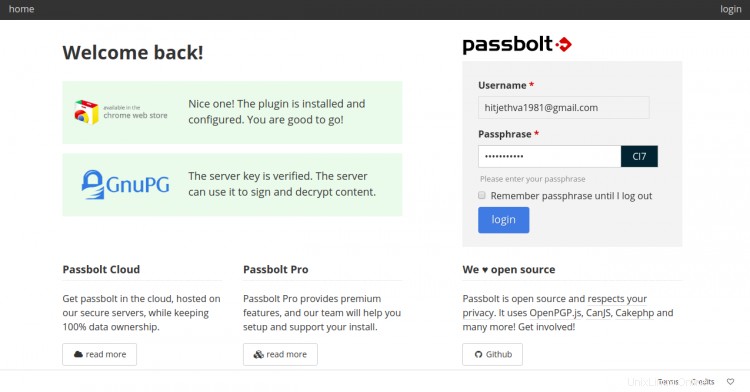
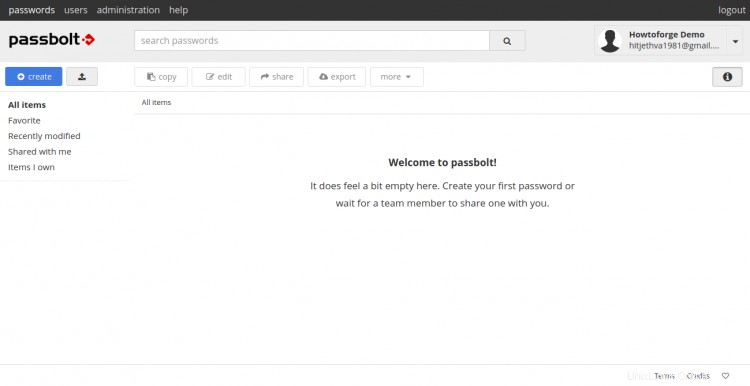
Fornisci il tuo nome utente, password e fai clic su accesso pulsante. Dovresti vedere la dashboard Passbolt nella schermata seguente:
Conclusione
Congratulazioni! hai installato correttamente il gestore password Passbolt con Let's Encrypt SSL sul server Ubuntu 20.04. Ora puoi archiviare e condividere le tue password con i tuoi team e i singoli utenti. Sentiti libero di chiedermi se hai domande.