OpenLiteSpeed è una versione leggera e open source di LiteSpeed Server sviluppata da LiteSpeed Technologies. Viene fornito con un pannello di amministrazione basato su WebGUI che lo rende diverso dagli altri server e più facile da gestire.
In questo tutorial impareremo come installare OpenLiteSpeed Server su Ubuntu 20.04 insieme a PHP 7.4 e server MariaDB.
Prerequisiti
-
Server web basato su Ubuntu 20.04.
-
Un account utente non root con privilegi sudo.
Aggiorna il tuo sistema.
$ sudo apt update
$ sudo apt upgrade
Passaggio 1:configurazione del firewall
Prima di iniziare con il tutorial, dobbiamo configurare Uncomplicated Firewall(UFW) che di solito è abilitato per impostazione predefinita. Controlliamo prima lo stato del firewall.
Dobbiamo abilitare SSH, HTTP, HTTPS e le porte 7080, 8088 per il firewall.
$ sudo ufw allow OpenSSH
$ sudo ufw allow http
$ sudo ufw allow https
$ sudo ufw allow 7080/tcp
$ sudo ufw allow 8088/tcp
Controlla lo stato del firewall.
$ sudo ufw status
Status: active

To                         Action      From
--                         ------      ----
OpenSSH                    ALLOW       Anywhere
80/tcp                     ALLOW       Anywhere
443/tcp                    ALLOW       Anywhere
7080/tcp                   ALLOW       Anywhere
8088/tcp                   ALLOW       Anywhere
OpenSSH (v6)               ALLOW       Anywhere (v6)
80/tcp (v6)                ALLOW       Anywhere (v6)
443/tcp (v6)               ALLOW       Anywhere (v6)
7080/tcp (v6)              ALLOW       Anywhere (v6)
8088/tcp (v6)              ALLOW       Anywhere (v6)
Se non funziona, avvia il firewall.
$ sudo ufw enable
Fase 2:installa OpenLiteSpeed
Ci sono varie versioni di OpenLiteSpeed che puoi installare. Le versioni consigliate sono della serie 1.6.xo 1.7.x al momento della stesura di questo tutorial.
Utilizzeremo il repository ufficiale di OpenLiteSpeed per il nostro tutorial che mantiene solo la versione 1.6.x.
Aggiungi la chiave del repository OpenLiteSpeed.
$ wget -qO - https://rpms.litespeedtech.com/debian/lst_repo.gpg | sudo apt-key add -
Aggiungi il repository.
$ echo "deb http://rpms.litespeedtech.com/debian/ focal main" | sudo tee /etc/apt/sources.list.d/openlitespeed.list
Aggiorna il repository.
$ sudo apt update
Installa OpenLiteSpeed
$ sudo apt install openlitespeed
Controlla lo stato del server.
$ sudo /usr/local/lsws/bin/lswsctrl status
litespeed is running with PID 21825.
Se non è in esecuzione, puoi iniziare con il seguente comando.
$ sudo /usr/local/lsws/bin/lswsctrl start
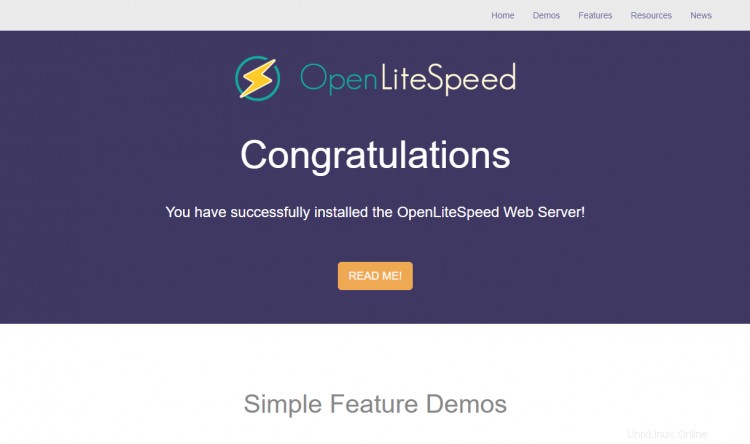
Apri http://<YOURSERVERIP>:8088 per accedere al tuo server web. Dovresti vedere la seguente pagina.
Fase 3 - Installa PHP
Il server OpenLiteSpeed viene fornito con PHP 7.3 che è pre-abilitato. Ma vogliamo usare PHP 7.4, quindi installeremo la nostra copia.
Installa PHP 7.4 insieme ad alcuni pacchetti aggiuntivi.
$ sudo apt install lsphp74 lsphp74-common lsphp74-mysql lsphp74-curl
Verifica la tua installazione di PHP.
$ /usr/local/lsws/lsphp74/bin/php7.4 -v
PHP 7.4.5 (cli) (built: May  7 2020 23:08:38) ( NTS )
Copyright (c) The PHP Group
Zend Engine v3.4.0, Copyright (c) Zend Technologies
    with Zend OPcache v7.4.5, Copyright (c), by Zend Technologies
Puoi controllare i moduli PHP abilitati.
$ /usr/local/lsws/lsphp74/bin/php7.4 --modules
Configurare PHP per funzionare con OpenLiteSpeed in un secondo momento.
Passaggio 4:installa MariaDB
Installa il server MariaDB.
$ sudo apt install mariadb-server
Avvia e abilita il servizio MariaDB.
$ sudo systemctl start mariadb
$ sudo systemctl enable mariadb
Proteggi la tua installazione di MariaDB. Questo script imposterà la password di root, rimuoverà gli utenti anonimi, non consentirà l'accesso root remoto e rimuoverà le tabelle di test. Scegli una password complessa e rispondi alle domande come descritto di seguito.
$ sudo mysql_secure_installation
[sudo] password for username:

NOTE: RUNNING ALL PARTS OF THIS SCRIPT IS RECOMMENDED FOR ALL MariaDB
SERVERS IN PRODUCTION USE!  PLEASE READ EACH STEP CAREFULLY!

In order to log into MariaDB to secure it, we'll need the current
password for the root user.  If you've just installed MariaDB, and
you haven't set the root password yet, the password will be blank,
so you should just press enter here.

Enter current password for root (enter for none):
OK, successfully used password, moving on...

Setting the root password ensures that nobody can log into the MariaDB
root user without the proper authorisation.

Set root password? [Y/n] y
New password:
Re-enter new password:
Password updated successfully!
Reloading privilege tables..
 ... Success!

By default, a MariaDB installation has an anonymous user, allowing anyone
to log into MariaDB without having to have a user account created for
them.  This is intended only for testing, and to make the installation
go a bit smoother.  You should remove them before moving into a
production environment.

Remove anonymous users? [Y/n] y
 ... Success!

Normally, root should only be allowed to connect from 'localhost'.  This
ensures that someone cannot guess at the root password from the network.

Disallow root login remotely? [Y/n] y
 ... Success!

By default, MariaDB comes with a database named 'test' that anyone can
access.  This is also intended only for testing, and should be removed
before moving into a production environment.

Remove test database and access to it? [Y/n] y
 - Dropping test database...
 ... Success!
 - Removing privileges on test database...
 ... Success!

Reloading the privilege tables will ensure that all changes made so far
will take effect immediately.

Reload privilege tables now? [Y/n] y
 ... Success!

Cleaning up...

All done!  If you've completed all of the above steps, your MariaDB
installation should now be secure.

Thanks for using MariaDB!
Una volta fatto, puoi accedere alla shell MySQL usando il seguente comando.
$ sudo mysql -u root -p
Crea un database di prova e un utente con autorizzazione di accesso. Sostituisci testdb e testuser con i nomi appropriati per la tua configurazione. Sostituisci password con una password complessa.
CREATE DATABASE testdb;
CREATE USER 'testuser' IDENTIFIED BY 'password';
GRANT ALL PRIVILEGES ON testdb.* TO 'testuser';
FLUSH PRIVILEGES;
Esci dalla shell MySQL.
exit
Passaggio 5 - Configura OpenLiteSpeed
Configura il pannello di amministrazione
Imposta le credenziali del pannello amministratore.
$ sudo /usr/local/lsws/admin/misc/admpass.sh
Please specify the user name of administrator.
This is the user name required to login the administration Web interface.

User name [admin]: <username>

Please specify the administrator's password.
This is the password required to login the administration Web interface.

Password:
Retype password:
Administrator's username/password is updated successfully!
Puoi anche utilizzare questo comando nel caso in cui dimentichi i tuoi dati di accesso.
Per accedere al pannello di amministrazione, apri http://<YOURSERVERIP>:7080 .
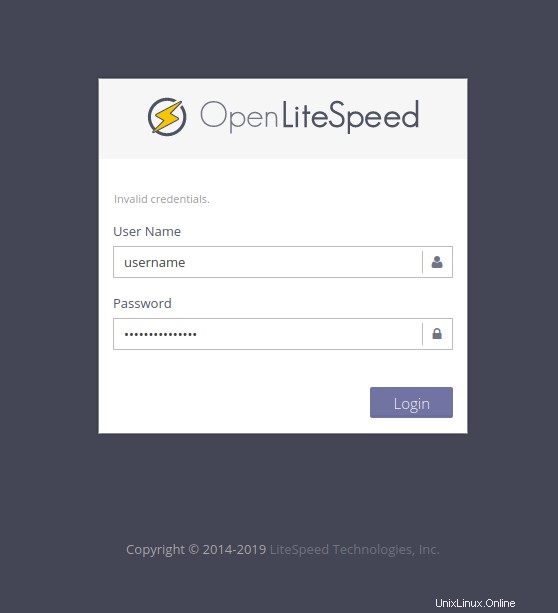
Al tuo primo accesso, il tuo browser avviserà che la tua connessione non è privata. Fai clic su Avanzate e fai clic su "Accetta il rischio e continua" (in caso di Firefox) o "Procedi a <YOURSERVERIP>(unsafe) " (in caso di browser basato su Chromium). Non vedrai più l'avviso.
Verrai accolto dalla seguente schermata.
Riporta la porta HTTP a 80
Cambiamo la porta HTTP predefinita su 80. Accedi al tuo pannello di amministrazione su http://<YOURSERVERIP>:7080 con le credenziali appena create.
Verrai accolto dalla seguente schermata.
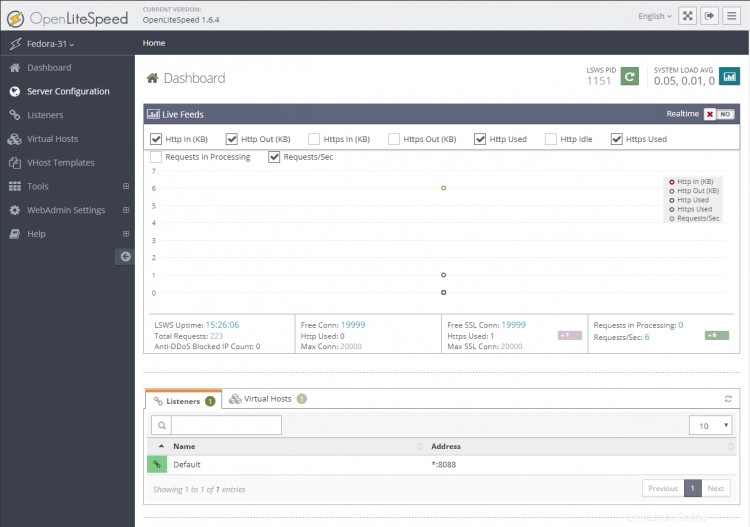
Visita Ascoltatori sezione da sinistra. Vedrai i listener predefiniti con la porta 8080.

Fare clic sul pulsante Visualizza per visualizzare i dettagli della configurazione. Nella pagina successiva in Predefinito Listener> Generale Pagina, fai clic sull'icona Modifica e cambia la porta da 8080 a 80.
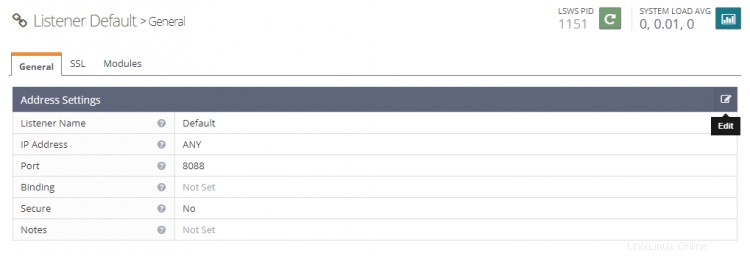
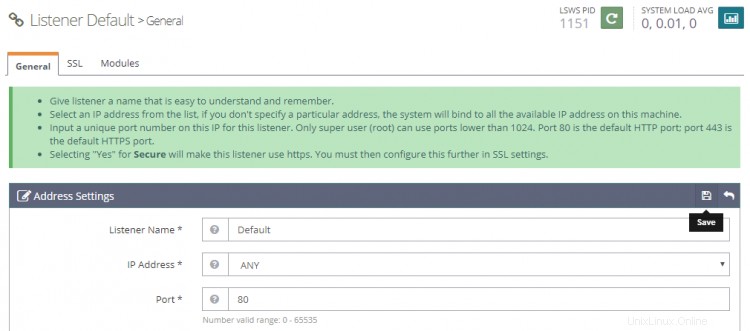
Fare clic su Salva e quindi riavviare il server facendo clic sul pulsante di riavvio grazioso.

Fase 6 - Configura PHP
In questo passaggio, dobbiamo associare la nostra copia di PHP 7.4 al server.
Fare clic su Configurazione server sezione a sinistra e poi nella scheda App esterna . Vedrai un'app LiteSpeed esistente per PHP 7.3. Creeremo la nostra app LiteSpeed per PHP 7.4. Puoi passare facilmente da uno all'altro in seguito, se lo desideri.
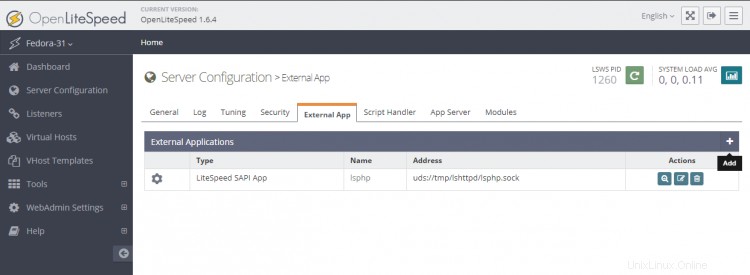
Fare clic sul pulsante Aggiungi per creare una nuova app. Per il tipo, seleziona App LiteSpeed SAPI e fare clic su Avanti.

Quindi, aggiungi la configurazione di seguito. Lascia vuoti tutti gli altri campi.
Name: lsphp74
Address: uds://tmp/lshttpd/lsphp.sock
Max Connections: 35
Environment: PHP_LSAPI_MAX_REQUESTS=500
             PHP_LSAPI_CHILDREN=35
             LSAPI_AVOID_FORK=200M
Initial Request Timeout (secs): 60
Retry Timeout : 0
Persistent Connection: Yes
Response Buffering: no
Start By Server: Yes(Through CGI Daemon)
Command: lsphp74/bin/lsphp
Back Log: 100
Instances: 1
Priority: 0
Memory Soft Limit (bytes): 2047M
Memory Hard Limit (bytes): 2047M
Process Soft Limit: 1400
Process Hard Limit: 1500
Al termine, fai clic su Salva.

Ora che abbiamo creato la nostra app basata su PHP 7.4, dobbiamo dire al server di iniziare a usarla.
Vai al gestore di script scheda e modifica il gestore lsphp. Cambia il nome dell'handle in lsphp74 dal menu a tendina.
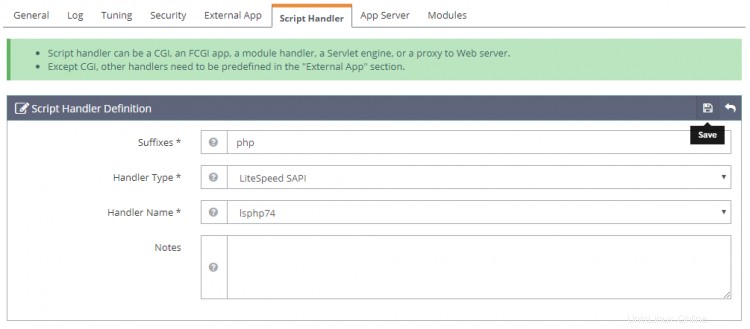
Fare clic su Salva, quindi riavviare il server facendo clic su Riavvio regolare pulsante.
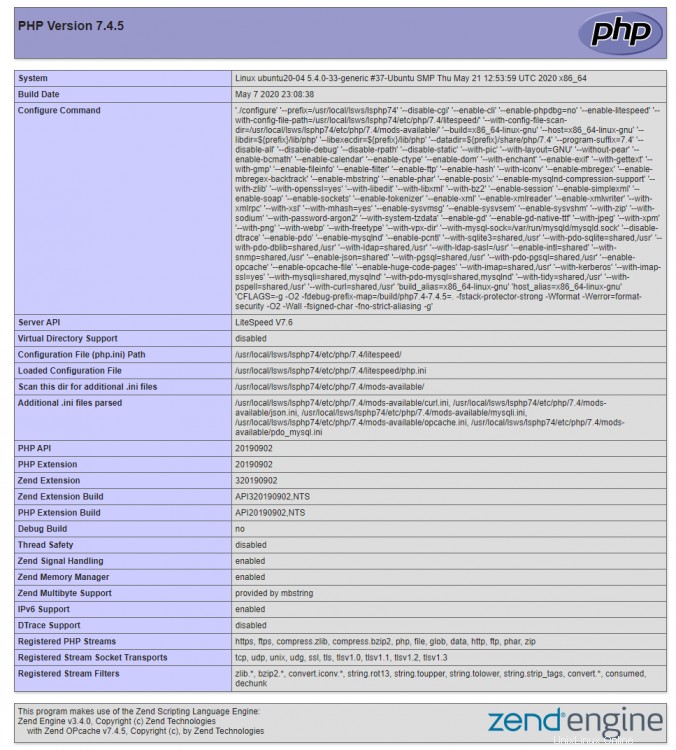
Per verificare se il tuo PHP è stato cambiato correttamente, visita http://<YOURSERVERIP>/phpinfo.php nel tuo browser.
Passaggio 7:configurazione dell'host virtuale
Innanzitutto, dobbiamo creare directory per il nostro host virtuale.
$ sudo mkdir /usr/local/lsws/example.com/{html,logs} -p
Il html directory conterrà i file pubblici ei logs directory conterrà i log del server.
Quindi, apri la Console di amministrazione e accedi agli Host virtuali sezione da sinistra e fare clic sul pulsante Aggiungi.

Compila i valori come specificato
Virtual Host Name: example.com
Virtual Host Root: $SERVER_ROOT/example.com/
Config File: $SERVER_ROOT/conf/vhosts/$VH_NAME/vhconf.conf
Follow Symbolic Link: Yes
Enable Scripts/ExtApps: Yes
Restrained: Yes
External App Set UID Mode: Server UID
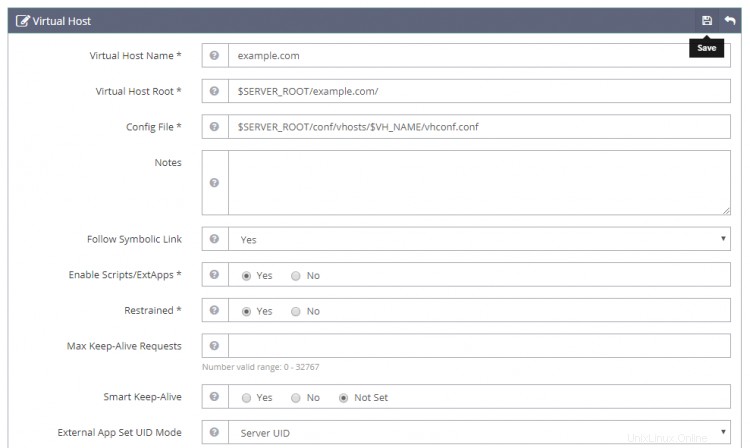
Al termine, fai clic sul pulsante Salva. Riceverai il seguente errore perché il file di configurazione non esiste al momento. Fare clic sul collegamento per creare il file di configurazione.
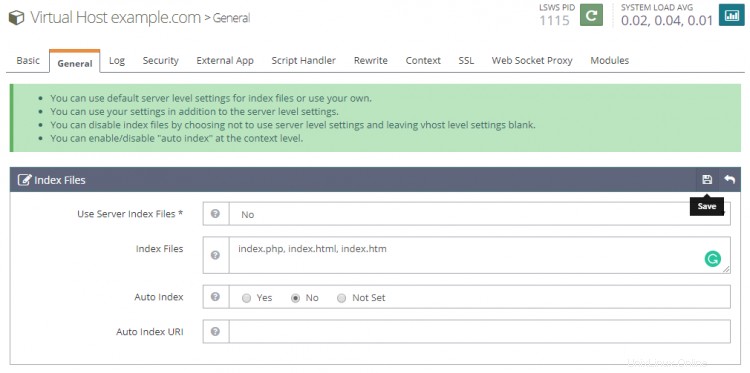
Fare nuovamente clic sul pulsante Salva per completare la creazione dell'host virtuale.
Una volta creato l'host virtuale, vai su Host virtuali -> Scegli host virtuale(example.com) -> Generale e modificare la configurazione come indicato.
Document Root: $VH_ROOT/html/
Domain Name: example.com
Enable Compression: Yes
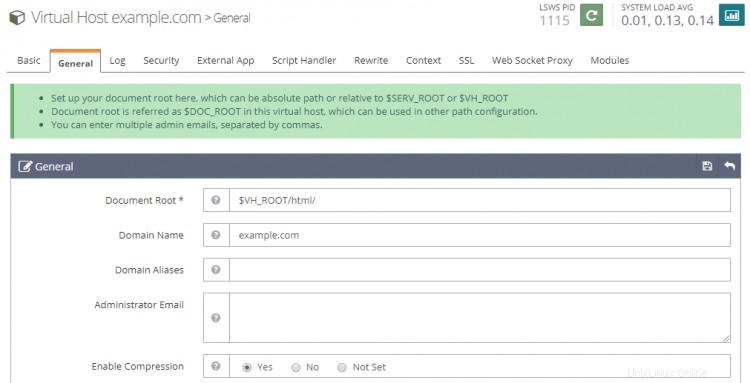
Fare clic sul pulsante Salva al termine. Successivamente, dobbiamo impostare i file di indice. Fai clic sul pulsante di modifica rispetto ai file di indice sotto il Generale Sezione. Imposta le seguenti opzioni.
Use Server Index Files: No
Index files: index.php, index.html, index.htm
Auto Index: No

Al termine, fai clic su Salva. Successivamente, dobbiamo scegliere File di registro. Vai al Registro sezione e fai clic su Modifica su Registro host virtuale e inserisci i seguenti valori.
Use Server’s Log: Yes
File Name: $VH_ROOT/logs/error.log
Log Level: ERROR
Rolling Size (bytes): 10M

Puoi scegliere il Livello registro come DEBUG se sei su una macchina di produzione/sviluppo.
Fai clic su Salva, quindi fai clic sul segno più nel Registro di accesso sezione per aggiungere una nuova voce. Inserisci i seguenti valori.
Log Control: Own Log File
File Name: $VH_ROOT/logs/access.log
Piped Logger: Not Set
Log Format: Not Set
Log Headers: Not Set
Rolling Size (bytes): 10M
Keep Days: 30
Bytes log: Not Set
Compress Archive: Yes
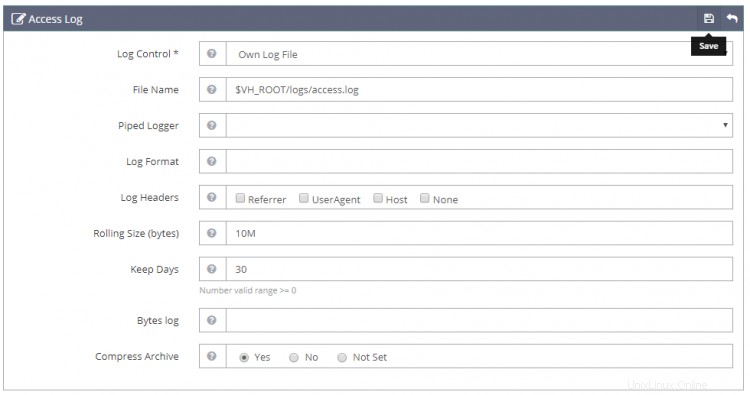
Al termine, fai clic su Salva. Successivamente, dobbiamo configurare Controllo accesso nella sezione Sicurezza sezione. Imposta i seguenti valori.
Allowed List: *
Denied List: Not set

Al termine, fai clic su Salva. Successivamente, dobbiamo impostare la Definizione gestore script . Imposta i seguenti valori.
Suffixes: php
Handler Type: LiteSpeed SAPI
Handler Name: [Server Level]: lsphp74

Successivamente, dobbiamo impostare Controllo riscrittura in Riscrivi sezione. Imposta i seguenti valori.

E alla fine, dobbiamo impostare gli ascoltatori. Vai a Ascoltatori sezione e fai clic sul pulsante Visualizza contro Ascoltatore predefinito . Quindi, fai clic sul pulsante Aggiungi in corrispondenza di Mapping host virtuali per aggiungere una nuova mappatura e impostare i seguenti valori.

Al termine, fai clic su Salva. Ora, fai clic su Riavvio graduale per applicare tutte le modifiche precedenti e riavviare il server.
Passaggio 8 - Imposta SSL
La configurazione di SSL in OpenLiteSpeed richiede la configurazione di due certificati. Un certificato autofirmato per l'intero server e un server specifico per il sito Let's Encrypt.
Creiamo prima il certificato autofirmato.
$ openssl req -x509 -days 365 -newkey rsa:4096 -keyout key.pem -out cert.pem -nodes
Generating a RSA private key
..++++
......................++++
writing new private key to 'key.pem'
-----
You are about to be asked to enter information that will be incorporated
into your certificate request.
What you are about to enter is what is called a Distinguished Name or a DN.
There are quite a few fields but you can leave some blank
For some fields there will be a default value,
If you enter '.', the field will be left blank.
-----
Country Name (2 letter code) [AU]:
State or Province Name (full name) [Some-State]:
Locality Name (eg, city) []:
Organization Name (eg, company) [Internet Widgits Pty Ltd]:
Organizational Unit Name (eg, section) []:
Common Name (e.g. server FQDN or YOUR name) []:
Email Address []:
Puoi premere invio attraverso tutti i campi e lasciarli vuoti.
I certificati sono ora archiviati in /home/user directory. Avremo bisogno di queste informazioni in seguito.
Per utilizzare Let's Encrypt, dobbiamo installare lo strumento Certbot.
$ sudo apt install certbot
Ottieni il certificato SSL.
$ sudo certbot certonly --webroot -w /usr/local/lsws/example.com/html/ -d example.com
Segui il prompt interattivo.
Saving debug log to /var/log/letsencrypt/letsencrypt.log
Plugins selected: Authenticator webroot, Installer None
Enter email address (used for urgent renewal and security notices) (Enter 'c' to
cancel): [email protected]
Starting new HTTPS connection (1): acme-v01.api.letsencrypt.org

-------------------------------------------------------------------------------
Please read the Terms of Service at
https://letsencrypt.org/documents/LE-SA-v1.2-November-15-2017.pdf. You must agree
in order to register with the ACME server at
https://acme-v02.api.letsencrypt.org/directory
-------------------------------------------------------------------------------
(A)gree/(C)ancel: A

-------------------------------------------------------------------------------
Would you be willing to share your email address with the Electronic Frontier
Foundation, a founding partner of the Let's Encrypt project and the non-profit
organization that develops Certbot? We'd like to send you email about our work
encrypting the web, EFF news, campaigns, and ways to support digital freedom.
-------------------------------------------------------------------------------
(Y)es/(N)o: N
Obtaining a new certificate
Performing the following challenges:
http-01 challenge for example.com
Using the webroot path /usr/local/lsws/example.com/html for all unmatched domains.
Waiting for verification...
Cleaning up challenges

IMPORTANT NOTES:
 - Congratulations! Your certificate and chain have been saved at:
   /etc/letsencrypt/live/example/fullchain.pem. Your key file has
   been saved at:
   /etc/letsencrypt/live/linode.nspeaks.com/privkey.pem Your cert will
   expire on 2020-09-04. To obtain a new or tweaked version of this
   certificate in the future, simply run certbot again. To
   non-interactively renew *all* of your certificates, run "certbot
   renew"
 - Your account credentials have been saved in your Certbot
   configuration directory at /etc/letsencrypt. You should make a
   secure backup of this folder now. This configuration directory will
   also contain certificates and private keys obtained by Certbot so
   making regular backups of this folder is ideal.
 - If you like Certbot, please consider supporting our work by:

   Donating to ISRG / Let's Encrypt:   https://letsencrypt.org/donate
   Donating to EFF:                    https://eff.org/donate-le
Ora apri la Console di amministrazione e vai su Ascoltatori>> Aggiungi nuovo ascoltatore e aggiungi i seguenti valori.
Listener Name: SSL
IP Address: ANY
Port: 443
Secure: Yes
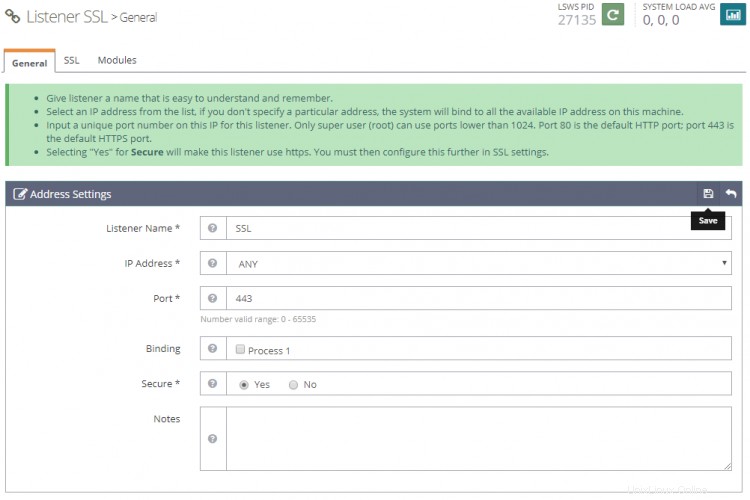
Al termine, fai clic su Salva. Quindi, vai a Mapping host virtuali sezione sotto il Listener SSL facendo clic su SSL, fare clic sul pulsante Aggiungi e compilare i seguenti valori.
Virtual Host: example.com
Domains: example.com

Al termine, fai clic su Salva.
Quindi, vai a Listeners>> Listener SSL>> Scheda SSL>>Chiave privata e certificato SSL (pulsante Modifica) e inserisci i seguenti valori per il certificato autofirmato che abbiamo creato in precedenza.
Private Key File: /home/user/key.pem
Certificate File: /home/user/cert.pem
Chained Certificate: Yes
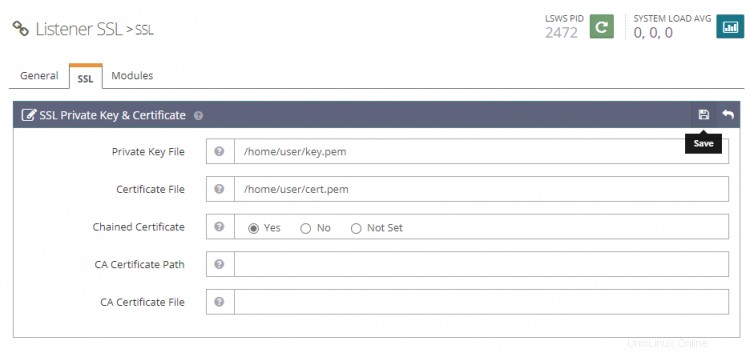
Quindi vai a Host virtuali>> example.com>> Scheda SSL>> Chiave privata e certificato SSL (pulsante Modifica) e compila i seguenti valori con il certificato Let's Encrypt.
Private Key File: /etc/letsencrypt/live/example.com/privkey.pem
Certificate File: /etc/letsencrypt/live/example.com/fullchain.pem
Chained Certificate: Yes
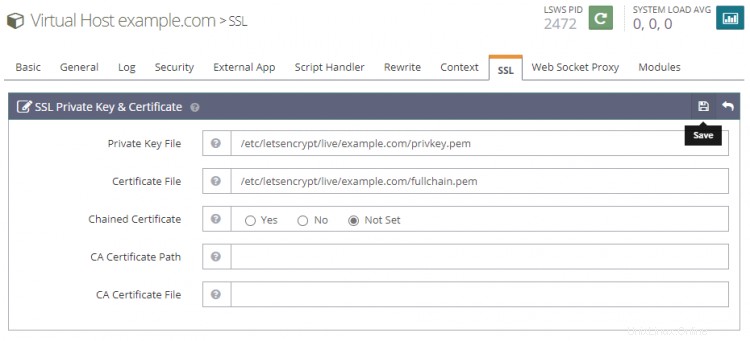
Al termine, fai clic su Salva.
Riavvia il server facendo clic sul pulsante Riavvio grazioso.
Fase 9 - Test del sito
Crea un file di prova nel tuo html directory.
$ sudo nano /usr/local/lsws/example.com/html/index.php
Incolla il codice seguente nell'editor Nano.
<html>
<head>
    <h2>OpenLiteSpeed Server Install Test</h2>
</head>
    <body>
    <?php echo '<p>Hello,</p>';

    // Define PHP variables for the MySQL connection.
    $servername = "localhost";
    $username = "testuser";
    $password = "password";

    // Create a MySQL connection.
    $conn = mysqli_connect($servername, $username, $password);

    // Report if the connection fails or is successful.
    if (!$conn) {
        exit('<p>Your connection has failed.<p>' .  mysqli_connect_error());
    }
    echo '<p>You have connected successfully.</p>';
    ?>
</body>
</html>
Visita il tuo sito su https://example.com in un browser e dovresti vedere la seguente pagina.
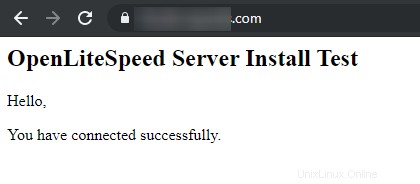
Questo è tutto per questo tutorial. Se hai domande, scatta nei commenti qui sotto.