Introduzione
phoenixNAP Bare Metal Cloud espone un'interfaccia API RESTful che consente agli sviluppatori di automatizzare la creazione di server bare metal.
Per dimostrare le capacità del sistema, questo articolo spiega e fornisce esempi di codice Python su come sfruttare l'API BMC per automatizzare il provisioning di un cluster Spark su Bare Metal Cloud .

Prerequisiti
- account phoenixNAP Bare Metal Cloud
- Un token di accesso OAuth
Come automatizzare la distribuzione di Spark Cluster
Le istruzioni seguenti si applicano all'ambiente Bare Metal Cloud di phoenixNAP. Gli esempi di codice Python trovati in questo articolo potrebbero non funzionare in altri ambienti.
I passaggi necessari per distribuire e accedere al cluster Apache Spark:
1. Genera un token di accesso.
2. Crea server Bare Metal Cloud con sistema operativo Ubuntu.
3. Distribuire un cluster Apache Spark sulle istanze del server create.
4. Accedi al dashboard di Apache Spark seguendo il link generato.
L'articolo evidenzia un sottoinsieme di segmenti di codice Python che sfruttano l'API Bare Metal Cloud e i comandi della shell per completare i passaggi descritti sopra.
Fase 1:ottieni il token di accesso
Prima di inviare richieste all'API BMC, devi ottenere un token di accesso OAuth utilizzando il client_id e client_secret registrati nel Portale BMC.
Per ulteriori informazioni su come registrarsi per client_id e client_secret, fare riferimento alla guida di avvio rapido dell'API Bare Metal Cloud.
Di seguito è riportata la funzione Python che genera il token di accesso per l'API:
def get_access_token(client_id: str, client_secret: str) -> str:
"""Retrieves an access token from BMC auth by using the client ID and the
client Secret."""
    credentials = "%s:%s" % (client_id, client_secret)
    basic_auth = standard_b64encode(credentials.encode("utf-8"))
    response = requests.post(' https://api.phoenixnap.com/bmc/v0/servers',
        headers={
            'Content-Type': 'application/x-www-form-urlencoded',
            'Authorization': 'Basic %s' % basic_auth.decode("utf-8")},
        data={'grant_type': 'client_credentials'})

    if response.status_code != 200:
        raise Exception('Error: {}. {}'.format(response.status_code, response.json()))
    return response.json()['access_token']
Passaggio 2:crea istanze del server Bare Metal
Utilizza le chiamate API REST POST/server per creare istanze del server bare metal. Per ogni richiesta POST/server, specificare i parametri richiesti, come la posizione del data center, il tipo di server, il sistema operativo, ecc.
Di seguito è riportata la funzione Python che effettua una chiamata all'API BMC per creare un server bare metal.
def __do_create_server(session, server):
    response = session.post('https://api.phoenixnap.com/bmc/v0/servers'),
                            data=json.dumps(server))
    if response.status_code != 200:
        print("Error creating server: {}".format(json.dumps(response.json())))
    else:
        print("{}".format(json.dumps(response.json())))
        return response.json()
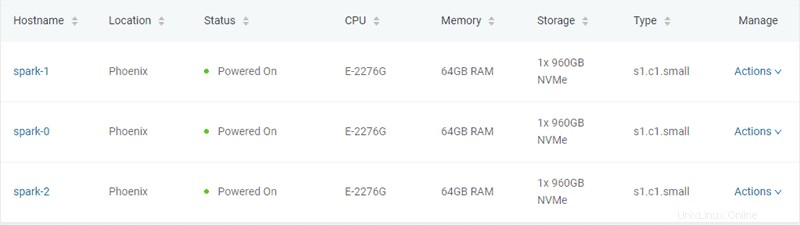
In questo esempio vengono creati tre server bare metal di tipo "s1.c1.small", come specificato nel file server-settings.conf.
{
"ssh-key" : "ssh-rsa xxxxxx== username",
"servers_quantity" : 3,
"type" : "s1.c1.small",
"hostname" : "spark",
"description" : "spark",
"public" : True,
"location" : "PHX",
"os" : "ubuntu/bionic"
}
L'output previsto dallo script Python che genera il token ed effettua il provisioning dei server è il seguente:
Retrieving token

Successfully retrieved API token

Creating servers...

{
  "id": "5ee9c1b84a9ca71ea6b9b766",
  "status": "creating",
  "hostname": "spark-1",
  "description": "spark-1",
  "os": "ubuntu/bionic",
  "type": "s1.c1. small ",
  "location": "PHX",
  "cpu": "E-2276G",
  "ram": "128GB RAM",
  "storage": "2x 960GB NVMe",
  "privateIpAddresses": [
    "10.0.0.11"
  ],

  "publicIpAddresses": [
    "131.153.143.250",
    "131.153.143.251",
    "131.153.143.252",
    "131.153.143.253",
    "131.153.143.254"
  ]

}

Server created, provisioning spark-1...

{
  "id": "5ee9c1b84a9ca71ea6b9b767",
  "status": "creating",
  "hostname": "spark-0",
  "description": "spark-0",
  "os": "ubuntu/bionic",
  "type": "s1.c1.small",
  "location": "PHX",
  "cpu": "E-2276G",
  "ram": "128GB RAM",
  "storage": "2x 960GB NVMe",

  "privateIpAddresses": [
    "10.0.0.12"
  ],

  "publicIpAddresses": [
    "131.153.143.50",
    "131.153.143.51",
    "131.153.143.52",
    "131.153.143.53",
    "131.153.143.54"
  ]
}

Server created, provisioning spark-0...

{
  "id": "5ee9c1b84a9ca71ea6b9b768",
  "status": "creating",
  "hostname": "spark-2",
  "description": "spark-2",
  "os": "ubuntu/bionic",
  "type": "s1.c1. small ",
  "location": "PHX",
  "cpu": "E-2276G",
  "ram": "128GB RAM",
  "storage": "2x 960GB NVMe",

  "privateIpAddresses": [
    "10.0.0.13"
  ],

  "publicIpAddresses": [
    "131.153.142.234",
    "131.153.142.235",
    "131.153.142.236",
    "131.153.142.237",
    "131.153.142.238"
  ]
}

Server created, provisioning spark-2...

Waiting for servers to be provisioned...
Una volta creati i tre server bare metal, lo script comunica con l'API BMC per controllare lo stato del server fino al completamento del provisioning e all'accensione dei server.
Fase 3:Fornitura del cluster Apache Spark
Una volta eseguito il provisioning dei server, lo script Python stabilisce una connessione SSH utilizzando l'indirizzo IP pubblico dei server. Successivamente, lo script installa Spark sui server Ubuntu. Ciò include l'installazione di JDK , Scala , Git e Scintilla su tutti i server.
Per avviare il processo, esegui all_hosts.sh file su tutti i server. Lo script fornisce istruzioni per il download e l'installazione, nonché la configurazione dell'ambiente necessaria per preparare il cluster per l'uso.
Apache Spark include script che configurano i server come nodi master e di lavoro. L'unico vincolo nella configurazione di un nodo di lavoro è che il nodo master sia già configurato. Il primo server di cui eseguire il provisioning viene assegnato come nodo Spark Master.
La seguente funzione Python esegue tale attività:
def wait_server_ready(function_scheduler, server_data):
    json_server = bmc_api.get_server(REQUEST, server_data['id'])
    if json_server['status'] == "creating":
        main_scheduler.enter(2, 1, wait_server_ready, (function_scheduler, server_data))
    elif json_server['status'] == "powered-on" and not data['has_a_master_server']:
        server_data['status'] = json_server['status']
        server_data['master'] = True
        server_data['joined'] = True
        data['has_a_master_server'] = True
        data['master_ip'] = json_server['publicIpAddresses'][0]
        data['master_hostname'] = json_server['hostname']
        print("ASSIGNED MASTER SERVER: {}".format(data['master_hostname']))
Esegui master_host.sh per configurare il primo server come nodo Master. Vedi sotto il contenuto di master_host.sh file:
#!/bin/bash
echo "Setting up master node"
/opt/spark/sbin/start-master.sh
Una volta assegnato e configurato il nodo master, gli altri due nodi vengono aggiunti al cluster Spark.
Vedi sotto il contenuto di worker_host.sh file:
#!/bin/bash
echo "Setting up master node on /etc/hosts"
echo "$1 $2 $2" | sudo tee -a /etc/hosts
echo "Starting worker node"
echo "Joining worker node to the cluster"
/opt/spark/sbin/start-slave.sh spark://$2:7077
Il provisioning di un cluster Apache Spark è stato completato. Di seguito è riportato l'output previsto dallo script Python:
ASSIGNED MASTER SERVER: spark-2
Running all_host.sh script on spark-2 (Public IP: 131.153.142.234)
Setting up /etc/hosts
Installing jdk, scala and git
Downloading spark-2.4.5
Unzipping spark-2.4.5
Setting up environment variables
Running master_host.sh script on spark-2 (Public IP: 131.153.142.234)
Setting up master node
starting org.apache.spark.deploy.master.Master, logging to /opt/spark/logs/spark-ubuntu-org.apache.spark.deploy.master.Master-1-spark-2.out
Master host installed
Running all_host.sh script on spark-0 (Public IP: 131.153.143.170)
Setting up /etc/hosts
Installing jdk, scala and git
Downloading spark-2.4.5
Unzipping spark-2.4.5
Setting up environment variables
Running all_host.sh script on spark-1 (Public IP: 131.153.143.50)
Setting up /etc/hosts
Installing jdk, scala and git
Downloading spark-2.4.5
Unzipping spark-2.4.5
Setting up environment variables
Running slave_host.sh script on spark-0 (Public IP: 131.153.143.170)
Setting up master node on /etc/hosts
10.0.0.12 spark-2 spark-2
Starting worker node
Joining worker node to the cluster
starting org.apache.spark.deploy.worker.Worker, logging to /opt/spark/logs/spark-ubuntu-org.apache.spark.deploy.worker.Worker-1-spark-0.out
Running slave_host.sh script on spark-1 (Public IP: 131.153.143.50)
Setting up master node on /etc/hosts
10.0.0.12 spark-2 spark-2
Starting worker node
Joining worker node to the cluster
starting org.apache.spark.deploy.worker.Worker, logging to /opt/spark/logs/spark-ubuntu-org.apache.spark.deploy.worker.Worker-1-spark-1.out
Setup servers done
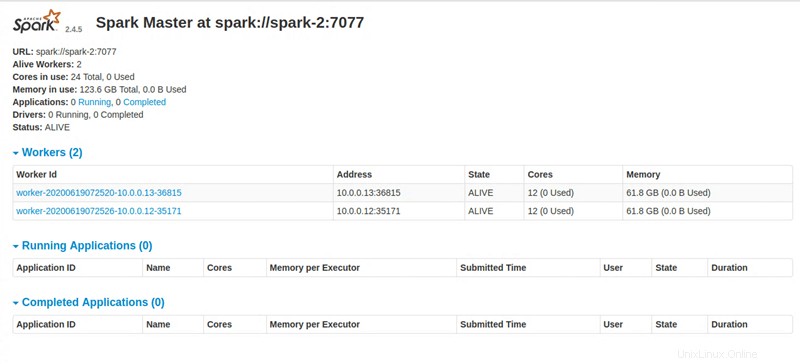
Master node UI: http://131.153.142.234:8080
Fase 4:accedi alla dashboard di Apache Spark
Dopo aver eseguito tutte le istruzioni, lo script Python fornisce un collegamento per accedere alla dashboard di Apache Spark.