Spettacolo è un software proprietario che viene utilizzato per lo streaming di contenuti multimediali su Internet, utilizzato in particolare per lo streaming di musica dal vivo dalle stazioni radio su Internet. È appositamente per la creazione o l'ascolto di trasmissioni audio su Internet. Shoutcast ci consente di trasmettere un flusso musicale al client remoto connesso al server.
Una volta che Shoutcast è nel tuo server, puoi utilizzare lettori multimediali come Winamp o Mixxx per connetterti a un server di streaming e trasmettere playlist audio a Internet.
Questo tutorial copre l'installazione di Shoutcast su CentOS 8.
Innanzitutto, devi aggiungere l'utente Shoutcast. Utilizzerai la directory e i privilegi di questo utente per installare il server Shoutcast. Inoltre, assicurati di disabilitare il firewall.
systemctl stop firewalld.service
systemctl disable firewalld.service
adduser shoutcast
In secondo luogo, sposta nella directory shoutcast.
cd /home/shoutcast
Scarica l'ultimo file tar del server shoutcast dal loro sito Web ufficiale.
wget http://download.nullsoft.com/shoutcast/tools/sc_serv2_linux_x64-latest.tar.gzCrea una directory chiamata sc in cui installerai / estrai il file tar.
mkdir sc
mv sc_serv2_linux_x64-latest.tar.gz /home/shoutcast/sc/
cd sc/
tar -xvzf sc_serv2_linux_x64-latest.tar.gz
Rimuovere il file tar dopo l'installazione del server Shoutcast.
rm sc_serv2_linux_x64-latest.tar.gzPer eseguire e far funzionare il server Shoutcast in base alle tue esigenze, devi creare un file di configurazione.
nano sc_serv_basic.confAggiungi la seguente configurazione nel file di configurazione appena creato.
adminpassword=password
password=password1
requirestreamconfigs=1
streamadminpassword_1=password2

streamid_1=1
streampassword_1=password3
streampath_1=http://192.168.7.38:8000/stream/1/


#################NEW CONFIG##########
shoutcast1clientdebug=0
shoutcast2clientdebug=0
httpclientdebug=0
flvclientdebug=0
shoutcastsourcedebug=0
uvox2sourcedebug=0
httpsourcedebug=0
relayshoutcastdebug=0
relayuvoxdebug=0
relaydebug=0
httpstyledebug=0
webclientdebug=0
admetricsdebug=0
yp2debug=0
streamdatadebug=0
statsdebug=0
microserverdebug=0
threadrunnerdebug=0
buffertype=1
adaptivebuffersize=10
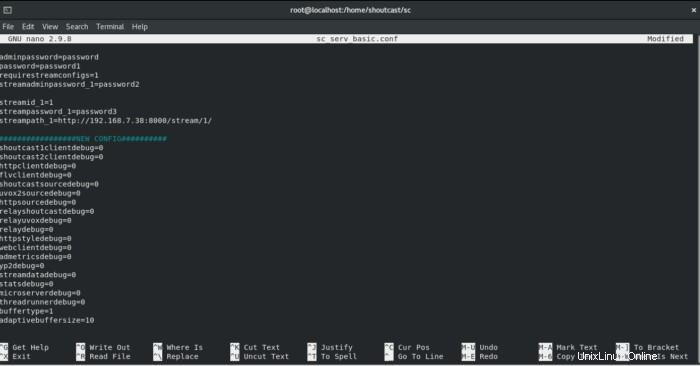
La dichiarazione della password in questa configurazione è importante, che devi modificare di conseguenza:
- password amministratore – Password amministratore richiesta per eseguire l'amministrazione remota tramite l'interfaccia web al server.
- streampassword_1 – Password richiesta dal lettore multimediale remoto per la connessione e lo streaming di contenuti multimediali al server.
Ora, avvia il server Shoutcast in background.
./sc_serv sc_serv_basic.conf &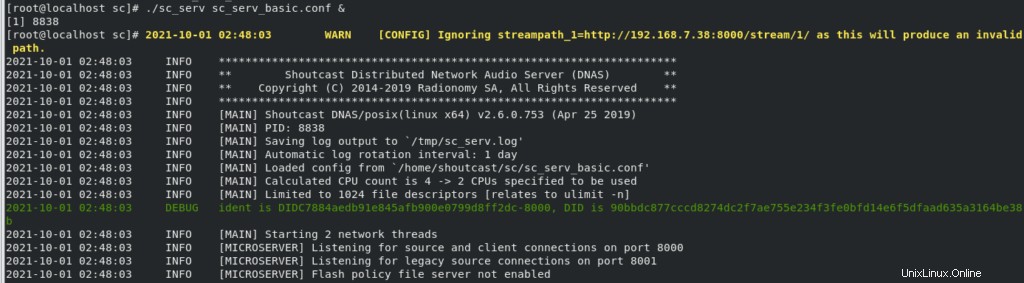
Apri il tuo browser con l'URL configurato per vedere il tuo server Shoutcast. puoi sostituire il tuo IP nel seguente URL.
http://192.168.7.40:8000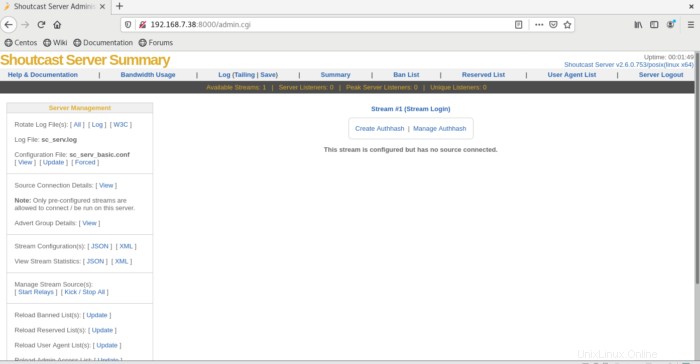
Il server Shoutcast è installato e configurato nella tua macchina CentOS 8. Ora puoi aggiungere stream in base alle tue necessità nel file di configurazione.
Creazione di uno script Daemon per avviare e arrestare Shoutcast Server:
Creeremo uno script demone per avviare e fermare il server shoutcast.
Crea un file "shoutcast_server.sh" nel percorso /usr/local/bin.
touch /usr/local/bin/shout_server.shApri shoutcast_server con nano editor e incolla la seguente configurazione per creare uno script daemon.
nano /usr/local/bin/shout_server.sh

#!/bin/bash
case $1 in
                start)
cd /home/shoutcast/sc/
./sc_serv sc_serv_basic.conf &
              ;;
                stop)
killall sc_serv
                ;;

                *)
echo "Usage radio start|stop"
                ;;
esac
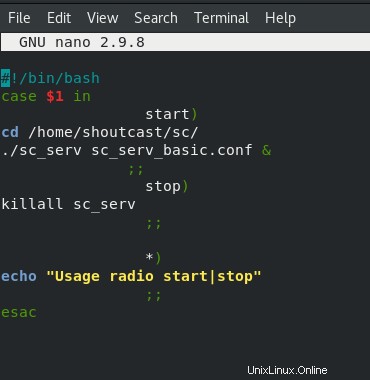
Scrivi ed esci dal file. rendere questo file eseguibile modificando l'autorizzazione come segue:
chmod +x /usr/local/bin/shoutcast_server.shOra avvia e interrompi il server shoutcast usando lo script del demone.
/usr/local/bin/shoutcast_server.sh start
/usr/local/bin/shoutcast_server.sh stop
