Chef è una potente piattaforma per l'automazione, che semplifica il modo in cui l'infrastruttura viene gestita, distribuita o configurata su una rete. Chef opera trasformando l'infrastruttura in codice. Lo sviluppatore può quindi distribuire o gestire le risorse su più server o nodi, ma prima che lo sviluppatore distribuisca il codice su qualsiasi altro ambiente, lo crea e lo testa su una workstation. Nel complesso, Chef è uno dei migliori strumenti per l'amministrazione dell'infrastruttura da una workstation.
Per conformità, visibilità dei nodi e flusso di lavoro, Chef Automate mette a disposizione una suite completa di funzionalità aziendali. Il software si integra con prodotti open source come Habitat, InSpec e Chef.
In questo tutorial, ti mostreremo come installare il server e il client Chef su Ubuntu 20.04.
Prerequisiti
- Due nuovi VPS Ubuntu 20.04 sulla piattaforma Atlantic.Net Cloud.
Un cliente
Un server
- Una password di root configurata sul tuo server
Fase 1:crea un server cloud Atlantic.Net
Per prima cosa, accedi al tuo server Atlantic.Net Cloud. Crea un nuovo server, scegliendo Ubuntu 20.04 come sistema operativo con almeno 4 GB di RAM. Collegati al tuo Cloud Server tramite SSH e accedi utilizzando le credenziali evidenziate in alto nella pagina.
Dopo aver effettuato l'accesso al tuo server Ubuntu 20.04, esegui il comando seguente per aggiornare il tuo sistema di base con gli ultimi pacchetti disponibili.
apt-get update -y
Fase 2:imposta il nome host
Prima di iniziare, dovrai configurare un nome host completo e una risoluzione del nome host sul tuo server Chef.
Innanzitutto, imposta il nome host con il seguente comando:
hostnamectl set-hostname chef.example.com
Quindi, apri il file /etc/hosts e associa l'indirizzo IP del tuo server con il nome host:
nano /etc/hosts
Aggiungi la seguente riga:
chef-server-ip chef.example.com
Salva e chiudi il file quando hai finito.
Fase 3 – Installa Chef Server
Innanzitutto, installa le dipendenze richieste eseguendo il comando seguente sul server Chef:
apt-get install curl wget gnupg2 -y
Quindi, scarica il pacchetto Chef con il seguente comando:
wget https://packages.chef.io/files/stable/chef-server/13.1.13/ubuntu/18.04/chef-server-core_13.1.13-1_amd64.deb
Una volta scaricato il pacchetto, installalo eseguendo il seguente comando:
dpkg -i chef-server-core_13.1.13-1_amd64.deb
Una volta installato il pacchetto, dovrai riconfigurare il server Chef. Puoi riconfigurarlo con il seguente comando:
chef-server-ctl reconfigure
Ti verrà chiesto di accettare il termine della licenza come mostrato di seguito:
+---------------------------------------------+
Chef License Acceptance

Before you can continue, 3 product licenses
must be accepted. View the license at
https://www.chef.io/end-user-license-agreement/

Licenses that need accepting:
* Chef Infra Server
* Chef Infra Client
* Chef InSpec

Do you accept the 3 product licenses (yes/no)?

> yes
Digita yes per accettare la licenza e premi invio per continuare. Una volta completata l'installazione, dovresti ottenere il seguente output:
Running handlers:
Running handlers complete
Chef Infra Client finished, 482/1032 resources updated in 04 minutes 34 seconds
Chef Server Reconfigured!
Nota :L'installazione richiederà più di 5 minuti
Fase 4:crea un account amministratore e un'organizzazione
Innanzitutto, crea una directory in cui memorizzare tutte le chiavi.
mkdir ~/.chef_key
Quindi, esegui il comando seguente per creare un account amministratore:
chef-server-ctl user-create atlanticuser Atlantic User example@unixlinux.online 'mypassword' --filename ~/.chef_key/atlantic.pem
Il comando precedente creerà un account amministratore con il nome atlanticuser, nome completo "Atlantic User", password "mypassword" e genererà il file chiave in ~/.chef_key/atlantic.pem.
Quindi, crea un'organizzazione con il seguente comando:
chef-server-ctl org-create atlantic "atlantic cloud" --association_user atlanticuser --filename ~/.chef_key/atlantic-org.pem
Il comando precedente creerà un'organizzazione con il nome atlantic, il nome completo "atlantic cloud", l'utente associato "atlanticuser" e genererà il file di chiavi in ~/.chef_key/atlantic-org.pem.
Ora puoi verificare le chiavi generate con il seguente comando:
ls ~/.chef_key/
Dovresti vedere il seguente output:
atlantic.pem hitjethva.pem
Passaggio 5:installare Chef Web Management Console
Successivamente, dovrai installare Chef Manage nel tuo server. Chef manage è un componente aggiuntivo che può essere utilizzato per gestire il server Chef dall'interfaccia basata sul Web.
Puoi installare Chef Manage con il seguente comando:
chef-server-ctl install chef-manage
Quindi, riconfigura il server Chef e Chef gestisce con il seguente comando:
chef-server-ctl reconfigure
chef-manage-ctl reconfigure
Ti verrà chiesto di accettare il contratto di licenza come mostrato di seguito:
Press any key to continue.
Type 'yes' to accept the software license agreement or anything else to cancel.
yes
Digita sì e premi Invio per completare l'installazione.
Passaggio 6:installazione del client Chef
Successivamente, dovrai accedere alla macchina client Chef e installare il pacchetto client Chef.
Eseguire il comando seguente per scaricare il pacchetto della workstation Chef:
wget https://packages.chef.io/files/stable/chef-workstation/20.6.62/debian/10/chef-workstation_20.6.62-1_amd64.deb
Una volta scaricato il pacchetto, installalo con il seguente comando:
dpkg -i chef-workstation_20.6.62-1_amd64.deb
Dopo aver installato il client Chef, dovrai creare un repository Chef nel tuo sistema. La directory chef-repo memorizzerà i tuoi libri di cucina Chef e altri file correlati.
Puoi crearlo con il seguente comando:
chef generate repo chef-repo
Ti verrà chiesto di accettare la licenza come mostrato di seguito:
+---------------------------------------------+
Chef License Acceptance

Before you can continue, 3 product licenses
must be accepted. View the license at
https://www.chef.io/end-user-license-agreement/

Licenses that need accepting:
* Chef Workstation
* Chef Infra Client
* Chef InSpec

Do you accept the 3 product licenses (yes/no)?

> yes
Digita sì e premi Invio per accettare la licenza. Dovresti ottenere il seguente output:
Persisting 3 product licenses...
✔ 3 product licenses persisted.

+---------------------------------------------+
Generating Chef Infra repo chef-repo
- Ensuring correct Chef Infra repo file content

Your new Chef Infra repo is ready! Type `cd chef-repo` to enter it.
Puoi elencare tutti i file e le directory generati all'interno del repository Chef con il seguente comando:
ls chef-repo
Dovresti ottenere il seguente output:
chefignore cookbooks data_bags LICENSE policyfiles README.md
Successivamente, dovrai creare una directory .chef per archiviare tutti i file di configurazione di Knife e i file .pem utilizzati per l'autenticazione della coppia di chiavi RSA con il server Chef.
Puoi crearlo con il seguente comando:
mkdir ~/chef-repo/.chef
Quindi, genera una coppia di chiavi SSH con il seguente comando:
ssh-keygen -b 4096
Non fornire alcuna password, basta premere Invio per generare una coppia di chiavi SSH come mostrato di seguito:
Generating public/private rsa key pair.
Enter file in which to save the key (/root/.ssh/id_rsa):
Created directory '/root/.ssh'.
Enter passphrase (empty for no passphrase):
Enter same passphrase again:
Your identification has been saved in /root/.ssh/id_rsa
Your public key has been saved in /root/.ssh/id_rsa.pub
The key fingerprint is:
SHA256:OvOCW9vNnVfs8II8TKJnRxv9vwRu5R4JqRxWPVU1rTY example@unixlinux.online
The key's randomart image is:
+---[RSA 4096]----+
| .B|
| . +|
| . + |
| . E .|
| S o * + |
| . + B B +|
| .= . O * @ |
| ...*.oo.O.= =|
| ....ooo.oo ++|
+----[SHA256]-----+
Quindi, copia la chiave generata sulla macchina del server Chef con il seguente comando:
ssh-copy-id example@unixlinux.online
Successivamente, dovrai copiare tutti i file .pem dal server Chef al computer client. Puoi copiarli con il seguente comando:
scp example@unixlinux.online:~/.chef_key/*.pem ~/chef-repo/.chef/
Dovresti ottenere il seguente output:
atlantic.pem 100% 1674 2.2MB/s
00:00
hitjethva.pem 100% 1678 2.4MB/s
00:00
Passaggio 7:configura il coltello e genera il ricettario
Successivamente, dovrai configurare Knife e generare il ricettario sulla macchina client.
Per prima cosa, cambia nel repository con il comando:
cd ~/chef-repo
Quindi, genera il tuo primo ricettario con il seguente comando:
chef generate cookbook my_cookbook
Una volta generato il ricettario, crea un nuovo file di configurazione Knife:
nano ~/chef-repo/.chef/config.rb
Aggiungi le seguenti righe:
current_dir = File.dirname(__FILE__)
log_level :info
log_location STDOUT
node_name 'hitjethva'
client_key "hitjethva.pem"
validation_client_name 'atlantic-validator'
validation_key "atlantic-validator.pem"
chef_server_url 'https://chef.example.com/organizations/atlantic'
cache_type 'BasicFile'
cache_options( :path => "#{ENV['HOME']}/.chef/checksums" )
cookbook_path ["#{current_dir}/../cookbooks"]
Salva e chiudi il file.
Assicurati che tutti i nomi corrispondano al nome della tua organizzazione e al nome utente amministratore.
Quindi, modifica il file /etc/hosts e aggiungi il nome completo del tuo server Chef.
nano /etc/hosts
Aggiungi la seguente riga:
chef-server-ip chef.example.com
Salva e chiudi il file quando hai finito.
Quindi, recupera il certificato SSL dal server Chef con il seguente comando:
cd ~/chef-repo
knife ssl fetch
Dovresti ottenere il seguente output:
WARNING: Certificates from chef.example.com will be fetched and placed in your trusted_cert
directory (/root/chef-repo/.chef/trusted_certs).
Knife has no means to verify these are the correct certificates. You should
verify the authenticity of these certificates after downloading.
Adding certificate for chef_example_com in /root/chef-repo/.chef/trusted_certs/chef_example_com.crt
Puoi anche verificare l'SSL con il seguente comando:
knife ssl check
Dovresti ottenere il seguente output:
Connecting to host chef.example.com:443
Successfully verified certificates from `chef.example.com'
Fase 8:bootstrap di un nodo client
Successivamente, dovrai installare il client Chef sul nodo e convalidare il nodo. Ciò consente al nodo di leggere dal server Chef, estrarre e applicare eventuali aggiornamenti di configurazione necessari rilevati dal client chef dalla workstation.
Sulla macchina client Chef, cambia la directory in .chef con il comando seguente:
cd ~/chef-repo/.chef
Successivamente, avvia il client con il seguente comando:
knife bootstrap chef.example.com -x root -P rootpassword --node-name clientnode
Una volta completata l'installazione, dovresti ottenere il seguente output:
Patents: https://www.chef.io/patents
[chef.example.com] resolving cookbooks for run list: []
[chef.example.com] Synchronizing Cookbooks:
[chef.example.com] Installing Cookbook Gems:
[chef.example.com]
[chef.example.com] Compiling Cookbooks...
[chef.example.com] [2020-10-02T07:56:21+00:00] WARN: Node clientnode has an empty run list.
[chef.example.com] Converging 0 resources
[chef.example.com]
[chef.example.com] Running handlers:
Running handlers complete
Chef Infra Client finished, 0/0 resources updated in 02 seconds
Ora puoi elencare tutti i nodi con il seguente comando:
knife client list
Dovresti ottenere il seguente output:
atlantic-validator
clientnode
Fase 9:accedi alla console di gestione di Chef
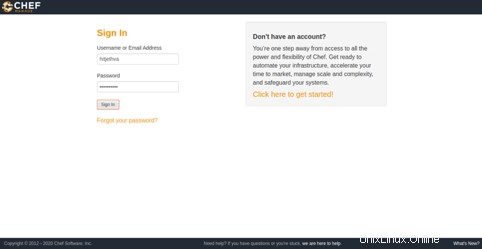
Ora apri il tuo browser web e accedi alla console di gestione di Chef utilizzando l'URL http://chef.server-ip/login. Dovresti vedere la pagina di accesso di Chef:
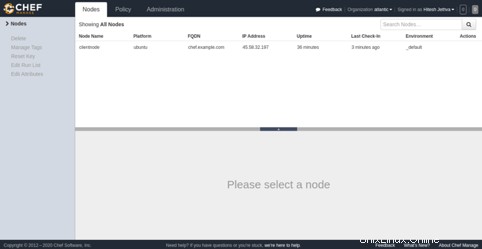
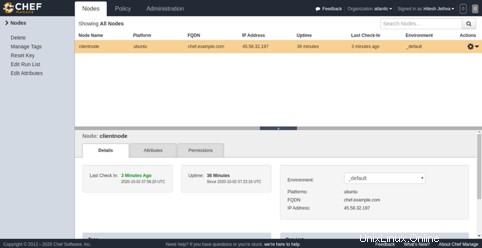
Fornisci il nome utente e la password dell'amministratore e fai clic su Firma dentro pulsante. Dovresti vedere la dashboard di Chef nella pagina seguente:
Conclusione
Nella guida sopra, hai imparato come installare il server e il client Chef sul server Ubuntu 20.04. Hai anche imparato i suoi componenti con le impostazioni di installazione e configurazione. Per ulteriori informazioni, puoi visitare la documentazione di Chef. Prova Chef sul tuo server privato virtuale di Atlantic.Net!