Naemon è la nuova suite di monitoraggio che mira a essere veloce, stabile e innovativa offrendo al contempo una visione chiara dello stato della rete e delle applicazioni. Questo è un sostituto del server nagios ed è molto stabile e utilizza un fantastico dashboard chiamato thruk. Configurare naemon è molto semplice e ha lo stato live inbuild. In questo tutorial, ti mostrerò come installare e configurare naemon in un ambiente di produzione insieme a pnp4nagios per i grafici. Naemon è molto stabile, ti mostrerò come mantenere le configurazioni in un ambiente su larga scala.
In questo tutorial utilizzerò quattro server
- 192.168.1.170 - Naemon Server - centos 7
- 192.168.1.21 - client nrpe - centos 6
- 192.168.1.182 - client nrpe - ubuntu
- 192.168.1.75 - client nscp - Windows Server 2012R2
Installazione di Naemon Server
Sto utilizzando un host CentOS 7 con un'installazione minima, SELinux disabilitato e firewalld abilitato.
[[email protected] ~]# sestatus
SELinux status:                 disabled
[[email protected] ~]#
Installazione del repository:
[[email protected] ~]# yum -y install https://labs.consol.de/repo/stable/rhel7/x86_64/labs-consol-stable.rhel7.noarch.rpm
abilitazione del repository epel:
yum -y install epel-release
Installazione del pacchetto Naemon:
[[email protected] ~]# yum install naemon*
Naemon utilizza lo stesso plugin Nagios e nrpe per monitorare gli host. Ora li installeremo:
[[email protected] ~]# yum install nagios-plugins nagios-plugins-all nagios-plugins-nrpe nrpe -y
Aggiungeremo le regole del firewall:
[[email protected] ~]# firewall-cmd --add-service=http --permanent
success
[[email protected] ~]# firewall-cmd --add-service=https --permanent
success
[[email protected] ~]# firewall-cmd --reload
success
[[email protected] ~]# firewall-cmd --list-all
public (active)
  target: default
  icmp-block-inversion: no
  interfaces: eno16777736
  sources:
  services: dhcpv6-client http https ssh
  ports:
  protocols:
  masquerade: no
  forward-ports:
  sourceports:
  icmp-blocks:
  rich rules:

[[email protected] ~]#
Installazione di pnp4nagios.
yum install gcc-c++ rrdtool perl-Time-HiRes perl-rrdtool php-gd php php-cli wget
Download di pnp4nagios.
[[email protected] ~]# wget https://svwh.dl.sourceforge.net/project/pnp4nagios/PNP-0.6/pnp4nagios-0.6.25.tar.gz
    [[email protected] ~]# tar -zxvf pnp4nagios-0.6.25.tar.gz
    [[email protected] ~]# cd pnp4nagios-0.6.25/
[[email protected] pnp4nagios-0.6.25]# ./configure --with-nagios-user=naemon --with-nagios-group=naemon
[[email protected] pnp4nagios-0.6.25]# make all
[[email protected] pnp4nagios-0.6.25]# make fullinstall
[[email protected] pnp4nagios-0.6.25]# make install-webconf
[[email protected] pnp4nagios-0.6.25]# make install-config
[[email protected] pnp4nagios-0.6.25]# make install-init
Riavvio e abilitazione del servizio.
    [[email protected] ~]# systemctl enable httpd && systemctl restart httpd
[[email protected] ~]# systemctl enable naemon && systemctl restart naemon
[[email protected] ~]# systemctl enable thruk && systemctl restart thruk
[[email protected] ~]# systemctl enable npcd && systemctl restart npcd
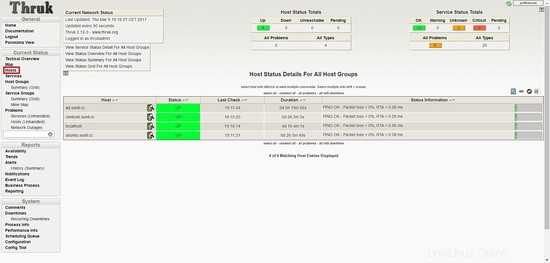
dovresti essere in grado di accedere all'URL da http://192.168.1.170/thruk

Il nome utente predefinito è thrukadmin, la password è thrukadmin.
Nel caso in cui desideri modificare la password di thrukadmin, esegui:
[[email protected] ~]# htpasswd /etc/thruk/htpasswd thrukadmin
Installazione di Monitoring Client per monitorare i nodi
Installazione di client nrpe per il monitoraggio di host Linux
192.168.1.21 - client nrpe - centos 6
Installazione del plugin Nagios e del client nrpe:
[[email protected] ~]# yum install nagios-plugins nagios-plugins-all nagios-plugins-nrpe nrpe -y
Fai un backup di nrpe.cfg:
[[email protected] ~]# cp /etc/nagios/nrpe.cfg /etc/nagios/nrpe.cfg.bkp
Sostituisci il contenuto del file nrpe.conf con il contenuto seguente:
[[email protected] ~]# cat /etc/nagios/nrpe.cfg
log_facility=daemon
pid_file=/var/run/nrpe/nrpe.pid
nrpe_user=nrpe
nrpe_group=nrpe
allowed_hosts=127.0.0.1,192.168.1.170
dont_blame_nrpe=1
debug=0
command_timeout=60
connection_timeout=300
include_dir=/etc/nrpe.d/

[[email protected] ~]#
Sotto allowed_host aggiungi l'indirizzo IP del server naemon qui è 192.168.1.170.
Ora dobbiamo riavviare il servizio nrpe:
	[[email protected] ~]# service nrpe restart
	[[email protected] ~]# chkconfig nrpe on
192.168.1.182 - client nrpe - ubuntu
[email protected]:~# apt-get install nagios-nrpe-server nagios-plugins -y
Fai un backup di nrpe.cfg:
[[email protected] ~]# cp /etc/nagios/nrpe.cfg /etc/nagios/nrpe.cfg.bkp
Sostituisci il contenuto del file nrpe.conf con il contenuto seguente:
[email protected]:~# cat /etc/nagios/nrpe.cfg
log_facility=daemon
pid_file=/var/run/nagios/nrpe.pid
nrpe_user=nagios
nrpe_group=nagios
allowed_hosts=127.0.0.1,192.168.1.170
dont_blame_nrpe=1
debug=0
command_timeout=60
connection_timeout=300
include_dir=/etc/nagios/nrpe.d/
[email protected]:~#
Ora dobbiamo riavviare il servizio nrpe:
	[email protected]:~# systemctl restart nagios-nrpe-server.service
	[email protected]:~# systemctl enable nagios-nrpe-server.service
Installazione di Nscp su Windows
192.168.1.75 - client nscp - server Windows 2012R2
Scarica nscp da questo sito Web:
https://www.nsclient.org/download/
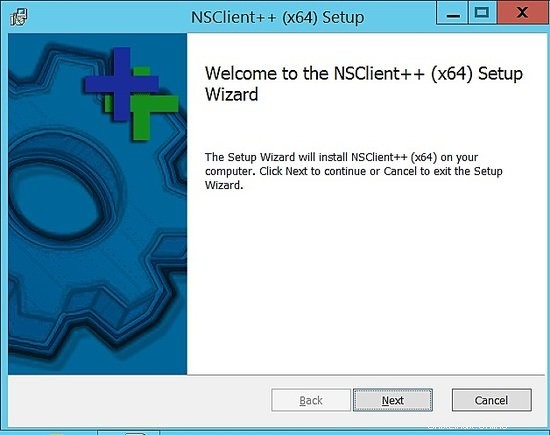
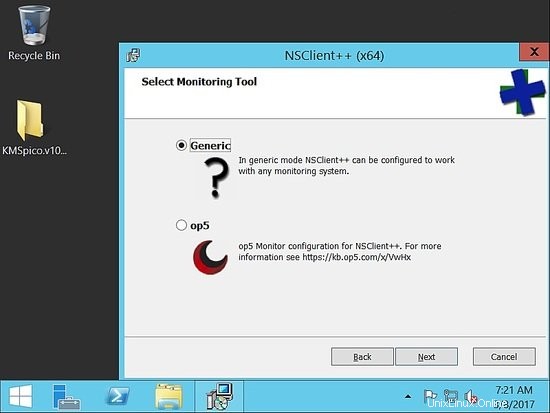
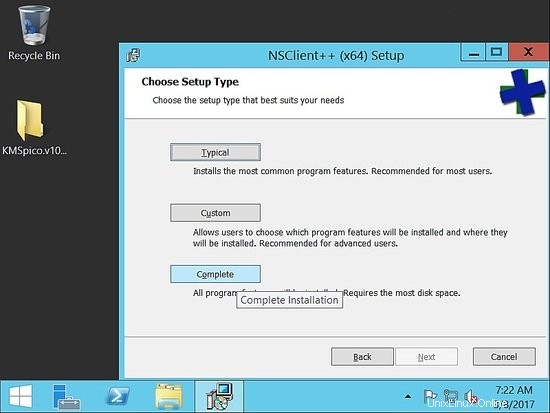
Una volta scaricato, segui gli screenshot di installazione
Scegli generico.
Scegli completo:
Scegli il percorso predefinito:
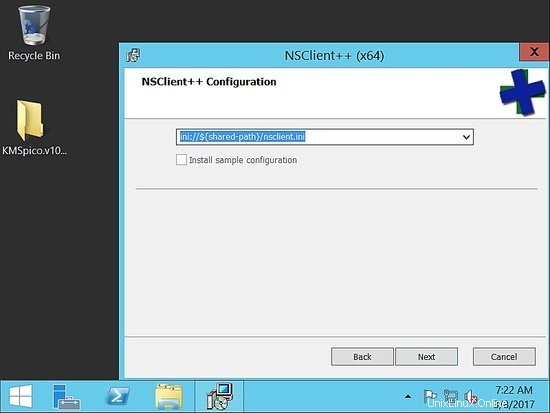
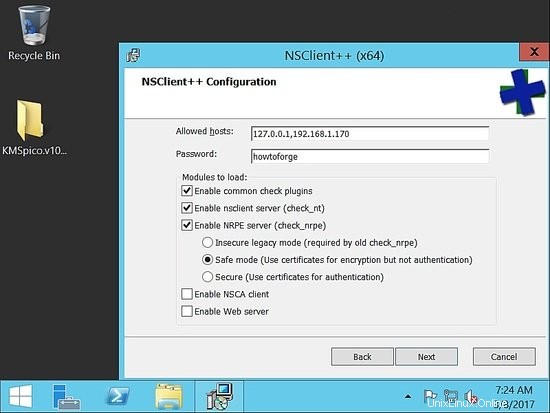
Ora, sotto gli host consentiti, aggiungi l'host naemon. Qui nella nostra configurazione è 192.168.1.170.
Assicurati di fornire una password complessa. Per questo esempio, ho usato la password come "howtoforge". Quindi controlla abilita nsclient e nrpe.
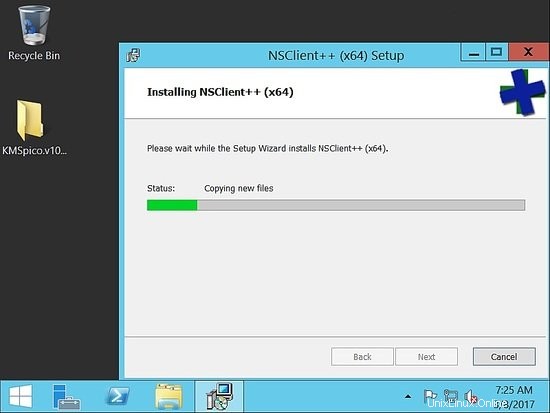
Una volta completata l'installazione, assicurati che il servizio sia attivo e funzionante.
Ora convalideremo da naemon host, per assicurarci di essere in grado di raggiungerlo.
Convalida nrpe e nscp da Naemon Server per verificare la connettività
[[email protected] ~]# /usr/lib64/nagios/plugins/check_nrpe -H 192.168.1.182
NRPE v2.15
[[email protected] ~]# /usr/lib64/nagios/plugins/check_nrpe -H 192.168.1.21
NRPE v2.15
[[email protected] ~]#
[[email protected] ~]# /usr/lib64/nagios/plugins/check_nt -H 192.168.1.75 -p 12489 -v CLIENTVERSION -s 'howtoforge'
NSClient++ 0.5.0.62 2016-09-14
[[email protected] ~]#
Monitoraggio dei server
Monitoreremo le prestazioni del server in questo tutorial.
In un ambiente di produzione, dovremo monitorare l'utilizzo della CPU, della memoria e del disco rigido, oltre al controllo dell'host attivo.
Aggiunta delle seguenti righe in nrpe conf /etc/nrpe.d/base.cfg
192.168.1.21 - client nrpe - centos 6
  [[email protected] ~]# cat /etc/nrpe.d/base.cfg
command[check_disks]=/usr/lib64/nagios/plugins/check_disk -w $ARG1$ -c $ARG2$ -p $ARG3$
command[check_disk]=/usr/lib64/nagios/plugins/check_disk -X nfs -X cifs -X none -X tmpfs -w $ARG1$ -c $ARG2$
command[memory]=/usr/lib64/nagios/plugins/check_memory -w $ARG1$ -c $ARG2$
command[load]=/usr/lib64/nagios/plugins/check_load -w $ARG1$ -c $ARG2$
command[check_total_procs]=/usr/lib64/nagios/plugins/check_procs -w $ARG1$ -c $ARG2$
command[check_procs_c]=/usr/lib64/nagios/plugins/check_procs -c $ARG1$ -C $ARG2$
command[check_procs_a]=/usr/lib64/nagios/plugins/check_procs -c $ARG1$ -a $ARG2$
Salva e riavvia il file, quindi riavvia nrpe.
[[email protected] ~]# /etc/init.d/nrpe restart
Shutting down nrpe:                                        [FAILED]
Starting nrpe:                                             [  OK  ]
[[email protected] ~]#
Il plug-in di memoria non sarà disponibile come plug-in predefinito. Utilizzeremo il plug-in di seguito.
 [[email protected] ~]# cd  /usr/lib64/nagios/plugins/
 [[email protected] plugins]# vim check_memory
Aggiungi il contenuto di seguito.
#! /usr/bin/perl -w
##Included Perf data
#The nagios plugins come with ABSOLUTELY NO WARRANTY. You may redistribute
#copies of the plugins under the terms of the GNU General Public License.
#
use strict;
use Getopt::Long;

my ($opt_f, $opt_h, $opt_c, $opt_w);
my ($result, $message, $ram_percent);

my $PROGNAME="check_memory";

$opt_f = "";

Getopt::Long::Configure('bundling');
GetOptions(
        "h"   => \$opt_h, "help"        => \$opt_h,
        "c=s" => \$opt_c, "Warning_Percentage"  => \$opt_c,
        "w=s" => \$opt_w, "Critical_Percentage" => \$opt_w,
);

if ($opt_h) {
        &print_help();
        exit 0;
}

$opt_w = shift unless ($opt_w);
$opt_c = shift unless ($opt_c);

if (! $opt_c && ! $opt_w) {
        print "Warning and Critical must be specified\n";
        exit 3;
}
if ($opt_c <= $opt_w){
        print "Critical must be greater than Warning CRITICAL: $opt_c WARNING: $opt_w\n";
        exit 3;
}


$result = 'OK';
open(FREE_M, "free -m|");
while (my $line = ){
        if ($line =~ /^Mem/){
                my ($junk,$total_mem,$used_mem,$free_mem,$shared_mem,$buffered_mem,$cached_mem)=split(/\s+/,$line);
                $ram_percent=int(($total_mem-($free_mem+$cached_mem+$buffered_mem))/$total_mem*100*100)/100;

        }
}
close(FREE_M);

if ($ram_percent > $opt_c){
print "Memory usage is: CRITICAL: ${ram_percent}% used | used=$ram_percent;$opt_w;$opt_c\n";
exit 2;
}elsif ($ram_percent > $opt_w) {
print "Memory usage is: WARNING: ${ram_percent}% used | used=$ram_percent;$opt_w;$opt_c\n";
exit 1;
}
else{
print "Memory usage is: $result: ${ram_percent}% used | used=$ram_percent;$opt_w;$opt_c\n";
exit 0;
}

sub print_usage () {
        print "Usage:\n";
        print "  $PROGNAME -f \n";
        print "  $PROGNAME -c \n";
        print "  $PROGNAME -w \n";
        print "  $PROGNAME [-h | --help]\n";
        print "  $PROGNAME [-V | --version]\n";
}

sub print_help () {
        print << EOF;
$PROGNAME v1.0.01
The nagios plugins come with ABSOLUTELY NO WARRANTY. You may redistribute
copies of the plugins under the terms of the GNU General Public License.
EOF
        &print_usage();
        print "\n";
        exit 3;
}
Scarica il link check_memory plug-in
Devi dare i permessi di esecuzione al file:
[[email protected] plugins]# chmod 755 check_memory
Aggiunta delle seguenti righe in nrpe conf /etc/nagios/nrpe.d/base.cfg
192.168.1.182 - client nrpe - ubuntu
Qui il percorso del file è diverso:
La cartella del plugin è lib e non lib64.
  [email protected]:~# cat /etc/nagios/nrpe.d/base.cfg
command[check_disks]=/usr/lib/nagios/plugins/check_disk -w $ARG1$ -c $ARG2$ -p $ARG3$
command[check_disk]=/usr/lib/nagios/plugins/check_disk -X nfs -X cifs -X none -X tmpfs -w $ARG1$ -c $ARG2$
command[memory]=/usr/lib/nagios/plugins/check_memory -w $ARG1$ -c $ARG2$
command[load]=/usr/lib/nagios/plugins/check_load -w $ARG1$ -c $ARG2$
command[check_total_procs]=/usr/lib/nagios/plugins/check_procs -w $ARG1$ -c $ARG2$
command[check_procs_c]=/usr/lib/nagios/plugins/check_procs -c $ARG1$ -C $ARG2$
command[check_procs_a]=/usr/lib/nagios/plugins/check_procs -c $ARG1$ -a $ARG2$
Aggiungi lo stesso script check_memory in /usr/lib/nagios/plugins.
  [email protected]:~# vim /usr/lib/nagios/plugins/check_memory
[email protected]:~# chmod 755 /usr/lib/nagios/plugins/check_memory
[email protected]:~# systemctl restart nagios-nrpe-server.service
[email protected]:~#
Configurazione su Naemon Server
Accedi come utente naemon:
[[email protected] ~]# su - naemon
Last login: Thu Mar  9 17:11:39 CET 2017 on pts/0
-sh-4.2$
Modifica la posta dell'amministratore in /etc/naemon/naemon.cfg
........
........
[email protected]
[email protected]
........
........
Ora configureremo i comandi personalizzati per fare il check in /etc/naemon/conf.d
Crea un comando personalizzato chiamato custom_commands.cfg con il contenuto sottostante.
$ vim /etc/naemon/conf.d/custom_commands.cfg
## Host Alive check ##
# command 'check_icmp Host Alive'
define command{
    command_name                   host_alive
    command_line                   $USER1$/check_icmp -H $HOSTADDRESS$ -n 1 -w 3000.00,80% -c 5000.00,100%
    }
### Service Command ##
# command 'check_nrpe_disks'
define command{
    command_name                   check_nrpe_disks
    command_line                   $USER1$/check_nrpe -t 55 -u -H $HOSTADDRESS$ -c check_disks -a $ARG1$ $ARG2$ $ARG3$
    }

# command 'nrpe'
define command{
    command_name                   nrpe
    command_line                   $USER1$/check_nrpe -t 55 -u -H $HOSTADDRESS$ -c $ARG1$
    }

# NRPE With Arguements
define command{
    command_name                   check_nrpe_a
    command_line                   $USER1$/check_nrpe -t 55 -u -H $HOSTADDRESS$ -c $ARG1$ -a $ARG2$ $ARG3$ $ARG4$
    }
#####################################
# Windows NSClient++ Checks
# command 'check_nt'
define command{
    command_name                   nt
    command_line                   $USER1$/check_nt -H $HOSTADDRESS$ -p 12489 -v $ARG1$ $ARG2$ -s $USER4$
    }
Per motivi di sicurezza, salva la password dei client nscp in /etc/naemon/resource.cfg
...........
...........
$USER4$=howtoforge
...........
............
Ora dobbiamo definire la configurazione dell'host.
Creiamo un file chiamato linux.cfg.
$ vim /etc/naemon/conf.d/linux.cfg
define host {
  host_name                      centos6.sunil.cc
  alias                          Centos
  address                        192.168.1.21
  use                            linux-server
  hostgroups                     linux-servers
}
define host {
  host_name                      ubuntu.sunil.cc
  alias                          Ubuntu
  address                        192.168.1.182
  use                            linux-server
  hostgroups                     linux-servers
}
Facciamo lo stesso per l'host Windows.
$ vim /etc/naemon/conf.d/windows.cfg
define host {
  host_name                      ad.sunil.cc
  alias                          My Windows Server
  address                        192.168.1.75
  use                            windows-server
}

define hostgroup {
  hostgroup_name                 windows-servers
  alias                          Windows Servers
}
Ora dobbiamo definire la configurazione del servizio.
$ vim linux_services.cfg
define service {
  service_description            Disks Status
  hostgroup_name                  linux-servers
  use                            generic-service
  check_command                  check_nrpe_a!check_disk!15%!5%
}
define service{
    use                            generic-service
    hostgroup_name                 linux-servers
    service_description            Load Average
    check_command                  check_nrpe_a!load!30,25,20!45,40,35
    }
define service{
    use                            generic-service
    hostgroup_name                 linux-servers
    service_description            Memory Usage
    check_command                  check_nrpe_a!memory!80!90
    }
Per Windows, creiamo una configurazione simile.
$ vim window_services.cfg
define service{
    use                            generic-service
    hostgroup_name                 windows-servers
    service_description            Disk - C:
    check_command                  nt!USEDDISKSPACE!-l c -w 80 -c 90
     }
define service{
    use                            generic-service
    hostgroup_name                 windows-servers
    service_description            Load Average
    check_command                  nt!CPULOAD!-l 60,90,95
    }
define service{
    use                            generic-service
    hostgroup_name                 windows-servers
    service_description            Memory Usage
    check_command                  nt!MEMUSE!-w 90 -c 95
    }
Ora cambieremo l'indirizzo email di contatto.
$ vim contacts.cfg
define contact {
  contact_name                   naemonadmin                         ; Short name of user
  alias                          Naemon Admin                        ; Full name of user
  use                            generic-contact                     ; Inherit default values from generic-contact template (defined above)
  email                          [email protected]             ; <<***** CHANGE THIS TO YOUR EMAIL ADDRESS ******
}
Ora rimuoviamo le configurazioni non necessarie che non sono richieste.
$ mv switch.cfg switch.cfg.bkp
$ mv printer.cfg printer.cfg.bkp
Per convalidare le configurazioni.
$ naemon -v /etc/naemon/naemon.cfg

Naemon Core 1.0.6-pkg
Copyright (c) 2013-present Naemon Core Development Team and Community Contributors
Copyright (c) 2009-2013 Nagios Core Development Team and Community Contributors
Copyright (c) 1999-2009 Ethan Galstad
License: GPL

Website: http://www.naemon.org
Reading configuration data...
   Read main config file okay...
   Read object config files okay...

Running pre-flight check on configuration data...

Checking objects...
        Checked 20 services.
        Checked 4 hosts.
        Checked 1 contacts.
        Checked 2 host groups.
        Checked 0 service groups.
        Checked 1 contact groups.
        Checked 29 commands.
        Checked 5 time periods.
        Checked 0 host escalations.
        Checked 0 service escalations.
Checking for circular paths...
        Checked 4 hosts
        Checked 0 service dependencies
        Checked 0 host dependencies
        Checked 5 timeperiods
Checking global event handlers...
Checking obsessive compulsive processor commands...
Checking misc settings...

Total Warnings: 0
Total Errors:   0

Things look okay - No serious problems were detected during the pre-flight check
-sh-4.2$
Accedi come root e riavvia il servizio naemon.
[[email protected] conf.d]# systemctl restart naemon
[[email protected] conf.d]# systemctl status naemon
? naemon.service - Naemon Monitoring Daemon
   Loaded: loaded (/usr/lib/systemd/system/naemon.service; enabled; vendor preset: disabled)
   Active: active (running) since Thu 2017-03-09 19:14:36 CET; 7s ago
     Docs: http://naemon.org/documentation
  Process: 5112 ExecStart=/usr/bin/naemon --daemon /etc/naemon/naemon.cfg (code=exited, status=0/SUCCESS)
  Process: 5110 ExecStartPre=/usr/bin/chown -R naemon:naemon /var/run/naemon/ (code=exited, status=0/SUCCESS)
  Process: 5108 ExecStartPre=/usr/bin/mkdir /var/run/naemon (code=exited, status=1/FAILURE)
 Main PID: 5114 (naemon)
   CGroup: /system.slice/naemon.service
           ??5114 /usr/bin/naemon --daemon /etc/naemon/naemon.cfg
           ??5115 /usr/bin/naemon --worker /var/lib/naemon/naemon.qh
           ??5116 /usr/bin/naemon --worker /var/lib/naemon/naemon.qh
           ??5117 /usr/bin/naemon --worker /var/lib/naemon/naemon.qh
           ??5118 /usr/bin/naemon --worker /var/lib/naemon/naemon.qh
           ??5119 /usr/bin/naemon --daemon /etc/naemon/naemon.cfg

Mar 09 19:14:36 naemon.sunil.cc systemd[1]: Starting Naemon Monitoring Daemon...
Mar 09 19:14:36 naemon.sunil.cc systemd[1]: Failed to read PID from file /var/run/naemon/naemon.pid: Invalid argument
Mar 09 19:14:36 naemon.sunil.cc systemd[1]: Started Naemon Monitoring Daemon.
[[email protected] conf.d]#
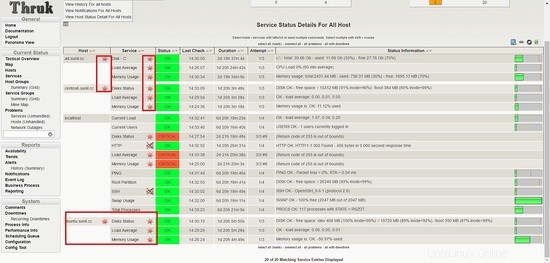
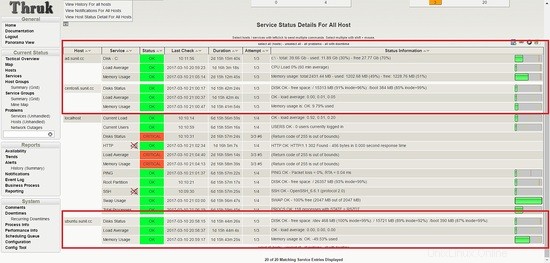
Accedi alla dashboard e dovresti vedere i servizi attivi e funzionanti.
Vediamo che i servizi falliscono per l'host Ubuntu.
It is seen that nrpe package compiled for ubuntu had enable arguments disabled for security vulnerabily and that is the reason it is failing
Dovremo ricompilare il pacchetto per abilitare gli argomenti, per gestire il tuning da naemon.
Il link sottostante mostra come può essere ricompilato. Trovi anche il pacchetto già compilato con gli argomenti di abilitazione in questo sito. Userò questo pacchetto precompilato per questo tutorial.
https://www.claudiokuenzler.com/blog/626/nrpe-debian-jessie-command-ags-arguments-not-working-error
[email protected]:~# wget https://www.claudiokuenzler.com/downloads/nrpe/nagios-nrpe-server_2.15-1ubuntu2_amd64.xenial.deb
Installa il pacchetto.
[email protected]:~# dpkg -i nagios-nrpe-server_2.15-1ubuntu2_amd64.xenial.deb
(Reading database ... 79576 files and directories currently installed.)
Preparing to unpack nagios-nrpe-server_2.15-1ubuntu2_amd64.xenial.deb ...
Unpacking nagios-nrpe-server (2.15-1ubuntu2) over (2.15-1ubuntu1) ...
Setting up nagios-nrpe-server (2.15-1ubuntu2) ...
Processing triggers for systemd (229-4ubuntu16) ...
Processing triggers for ureadahead (0.100.0-19) ...
Processing triggers for man-db (2.7.5-1) ...
[email protected]:~#
Riavvia NRPE.
[email protected]:~# systemctl restart nagios-nrpe-server.service
Ora stiamo monitorando tutti gli host usando naemon.
Configurazione di pnp4nagios
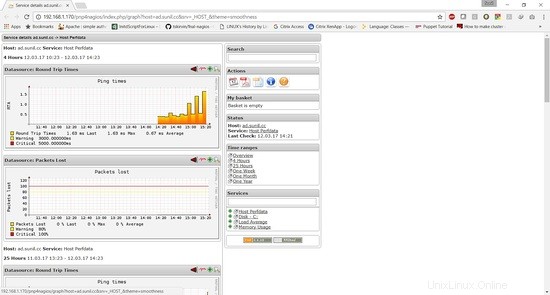
Dovremo configurare pnp4nagios per il grafico delle prestazioni.
Ora utilizzeremo lo stesso metodo di autenticazione della dashboard di thruk, faremo prima un backup del file e modificheremo le seguenti righe.
[[email protected] conf.d]# cd /etc/httpd/conf.d/
[[email protected] conf.d]# cp pnp4nagios.conf pnp4nagios.conf.bkp
[[email protected] share]# cat /etc/httpd/conf.d/pnp4nagios.conf
# SAMPLE CONFIG SNIPPETS FOR APACHE WEB SERVER

Alias /pnp4nagios "/usr/local/pnp4nagios/share"

<Directory "/usr/local/pnp4nagios/share">
        AllowOverride None
        Order allow,deny
        Allow from all
        #
        # Use the same value as defined in nagios.conf
        #
        AuthName "Thruk Access"
        AuthType Basic
        AuthUserFile /etc/thruk/htpasswd
        Require valid-user

                # Turn on URL rewriting
                RewriteEngine On
                Options symLinksIfOwnerMatch
                # Installation directory
                RewriteBase /pnp4nagios/
                # Protect application and system files from being viewed
                RewriteRule "^(?:application|modules|system)/" - [F]
                # Allow any files or directories that exist to be displayed directly
                RewriteCond "%{REQUEST_FILENAME}" !-f
                RewriteCond "%{REQUEST_FILENAME}" !-d
                # Rewrite all other URLs to index.php/URL
                RewriteRule "^.*$" "index.php/$0" [PT]


[[email protected] share]#
[[email protected] conf.d]# systemctl restart httpd.service
Ora dovremo cambiare la pagina di configurazione.
[[email protected] share]# cd /usr/local/pnp4nagios/share/
[[email protected] share]# mv install.php install.php.txt
Ora dovremo cambiare il file di configurazione per pnp4nagios.
Cambia nagios in naemon nel file di configurazione.
[[email protected] conf.d]# vi /usr/local/pnp4nagios/etc/config_local.php
............................
................................
$conf['nagios_base'] = "/naemon/cgi-bin";
..................................
............................
Abilita i dati sulle prestazioni da 0 a 1.
[[email protected] conf.d]# vi /etc/naemon/naemon.cfg
.....................
.....................
process_performance_data=1
......................
......................
Aggiungi le righe sottostanti in fondo a naemon.conf.
[[email protected] conf.d]# vi /etc/naemon/naemon.cfg
#
# service performance data
#
service_perfdata_file=/usr/local/pnp4nagios/var/service-perfdata
service_perfdata_file_template=DATATYPE::SERVICEPERFDATA\tTIMET::$TIMET$\tHOSTNAME::$HOSTNAME$\tSERVICEDESC::$SERVICEDESC$\tSERVICEPERFDATA::$SERVICEPERFDATA$\tSERVICECHECKCOMMAND::$SERVICECHECKCOMMAND$\tHOSTSTATE::$HOSTSTATE$\tHOSTSTATETYPE::$HOSTSTATETYPE$\tSERVICESTATE::$SERVICESTATE$\tSERVICESTATETYPE::$SERVICESTATETYPE$
service_perfdata_file_mode=a
service_perfdata_file_processing_interval=15
service_perfdata_file_processing_command=process-service-perfdata-file

#
#
#
host_perfdata_file=/usr/local/pnp4nagios/var/host-perfdata
host_perfdata_file_template=DATATYPE::HOSTPERFDATA\tTIMET::$TIMET$\tHOSTNAME::$HOSTNAME$\tHOSTPERFDATA::$HOSTPERFDATA$\tHOSTCHECKCOMMAND::$HOSTCHECKCOMMAND$\tHOSTSTATE::$HOSTSTATE$\tHOSTSTATETYPE::$HOSTSTATETYPE$
host_perfdata_file_mode=a
host_perfdata_file_processing_interval=15
host_perfdata_file_processing_command=process-host-perfdata-file
Ora dobbiamo aggiungere le righe seguenti in custom_commands.conf.
[[email protected] conf.d]# vim /etc/naemon/conf.d/custom_commands.cfg
define command{
       command_name    process-service-perfdata-file
       command_line    /bin/mv /usr/local/pnp4nagios/var/service-perfdata /usr/local/pnp4nagios/var/spool/service-perfdata.$TIMET$
}

define command{
       command_name    process-host-perfdata-file
       command_line    /bin/mv /usr/local/pnp4nagios/var/host-perfdata /usr/local/pnp4nagios/var/spool/host-perfdata.$TIMET$
}
Ora creiamo un modello per le prestazioni dell'host e il grafico delle prestazioni dei servizi.
$ cd /etc/naemon/conf.d/templates/
$ cat pnp.cfg
define host {
   name host-pnp
   process_perf_data 1
   action_url /pnp4nagios/index.php/graph?host=$HOSTNAME$&srv=_HOST_' class='tips' rel='/pnp4nagios/index.php/popup?host=$HOSTNAME$&srv=_HOST_
   register 0
}

define service {
   name service-pnp
   process_perf_data 1
   action_url /pnp4nagios/index.php/graph?host=$HOSTNAME$&srv=$SERVICEDESC$' class='tips' rel='/pnp4nagios/index.php/popup?host=$HOSTNAME$&srv=$SERVICEDESC$
   register 0
}
Ora per accedere al grafico delle prestazioni per i servizi di cui hai bisogno, dobbiamo aggiornare il file service.cfg.
$ cat linux_services.cfg
define service {
  service_description            Disks Status
  hostgroup_name                  linux-servers
  use                            generic-service,service-pnp                       ; Name of service template to use
  check_command                  check_nrpe_a!check_disk!15%!5%
}
define service{
    use                            generic-service,service-pnp
    hostgroup_name                 linux-servers
    service_description            Load Average
    check_command                  check_nrpe_a!load!30,25,20!45,40,35
    }
define service{
    use                            generic-service,service-pnp
    hostgroup_name                 linux-servers
    service_description            Memory Usage
    check_command                  check_nrpe_a!memory!80!90
    }
$ cat window_services.cfg
define service{
    use                            generic-service,service-pnp
    hostgroup_name                 windows-servers
    service_description            Disk - C:
    check_command                  nt!USEDDISKSPACE!-l c -w 80 -c 90
     }
define service{
    use                            generic-service,service-pnp
    hostgroup_name                 windows-servers
    service_description            Load Average
    check_command                  nt!CPULOAD!-l 60,90,95
    }
define service{
    use                            generic-service,service-pnp
    hostgroup_name                 windows-servers
    service_description            Memory Usage
    check_command                  nt!MEMUSE!-w 90 -c 95
    }
Per controllare il grafico host, dobbiamo includerlo nel file sottostante.
$ cat linux.cfg
define host {
  host_name                      centos6.sunil.cc
  alias                          Centos
  address                        192.168.1.21
  use                            linux-server,host-pnp
  hostgroups                     linux-servers
}
define host {
  host_name                      ubuntu.sunil.cc
  alias                          Ubuntu
  address                        192.168.1.182
  use                            linux-server,host-pnp
  hostgroups                     linux-servers
}
$ cat windows.cfg
define host {
  host_name                      ad.sunil.cc
  alias                          My Windows Server
  address                        192.168.1.75
  use                            windows-server,host-pnp
}

define hostgroup {
  hostgroup_name                 windows-servers
  alias                          Windows Servers
}
Convalida la configurazione
$ naemon -v /etc/naemon/naemon.cfg

Naemon Core 1.0.6-pkg
Copyright (c) 2013-present Naemon Core Development Team and Community Contributors
Copyright (c) 2009-2013 Nagios Core Development Team and Community Contributors
Copyright (c) 1999-2009 Ethan Galstad
License: GPL

Website: http://www.naemon.org
Reading configuration data...
   Read main config file okay...
   Read object config files okay...

Running pre-flight check on configuration data...

Checking objects...
        Checked 20 services.
        Checked 4 hosts.
        Checked 1 contacts.
        Checked 2 host groups.
        Checked 0 service groups.
        Checked 1 contact groups.
        Checked 31 commands.
        Checked 5 time periods.
        Checked 0 host escalations.
        Checked 0 service escalations.
Checking for circular paths...
        Checked 4 hosts
        Checked 0 service dependencies
        Checked 0 host dependencies
        Checked 5 timeperiods
Checking global event handlers...
Checking obsessive compulsive processor commands...
Checking misc settings...

Total Warnings: 0
Total Errors:   0

Things look okay - No serious problems were detected during the pre-flight check
Riavvia i servizi.
[[email protected] ~]# systemctl enable npcd
npcd.service is not a native service, redirecting to /sbin/chkconfig.
Executing /sbin/chkconfig npcd on
[[email protected] ~]# systemctl restart npcd
[[email protected] ~]# systemctl restart naemon
