In questa pagina il protocollo DNS e il server BIND DNS vengono spiegati, così come il modulo Webmin per la creazione e la gestione dei domini DNS.
- Vedi Introduzione al Domain Name System
Contenuti
Il modulo BIND DNS Server
BIND (Berkeley Internet Name Domain) è il server DNS più comune per i sistemi Unix. Diverse versioni sono state rilasciate nel corso degli anni, la più recente è la versione 9. Il modulo BIND DNS Server (che si trova nella categoria Server) supporta la configurazione delle versioni 8 e 9. La versione precedente 4 ha un formato di file di configurazione diverso e può essere configurato utilizzando il modulo BIND 4 DNS Server, documentato in una sezione successiva di questo capitolo.
Poiché BIND è disponibile per quasi tutti i sistemi Unix e funziona in modo identico indipendentemente dal sistema operativo, le istruzioni in questo capitolo si applicano non solo a Linux ma anche ad altre versioni di Unix. La maggior parte delle versioni di Unix e Linux include BIND 8 o 9 come pacchetto standard, quindi è raramente necessario installarlo. Se il modulo non riesce a trovare il server DNS, verrà visualizzato un messaggio di errore nella pagina principale:in tal caso, controlla il CD del sistema operativo o il sito Web per un pacchetto BIND, oppure scarica e compila il sorgente da http://www.isc .org/.
Il file di configurazione principale di BIND è /etc/named.conf, che contiene tutte le zone ospitate dal server e le impostazioni di configurazione globali che si applicano a tutte le zone. I record in ciascuna zona sono archiviati in file separati, generalmente presenti nella directory /var/named. Questo modulo Webmin aggiorna sempre tutti questi file direttamente, invece di comunicare con il processo BIND in esecuzione. Ciò significa che se si esegue un altro programma che aggiorna dinamicamente le zone comunicando con BIND (come un server DHCP), questo modulo non deve essere utilizzato poiché potrebbe interferire con queste modifiche. Tuttavia, pochissimi sistemi hanno attivato questo tipo di aggiornamento dinamico.
Le versioni 9 di BIND hanno alcune funzionalità che la versione 8 non ha. Il più importante supportato da questo modulo Webmin sono le visualizzazioni. Una vista è un insieme di zone visibili solo ad alcuni client DNS. Normalmente tutti i client vedono le stesse zone, ma con BIND 9 puoi limitare la visibilità di alcuni domini solo a particolari client, identificati dai loro indirizzi IP. Questo può essere utile per creare zone visibili solo ai sistemi su una rete interna, anche se il tuo server DNS è connesso a Internet.
Se non hai mai impostato BIND sul tuo sistema, quando entri nel modulo per la prima volta la pagina principale visualizzerà un modulo per la configurazione del server DNS, come mostrato di seguito. Questo modulo viene visualizzato solo se Webmin rileva che il file di configurazione denominato.conf non esiste o se la directory dei file di zona specificata è inesistente. Se sei certo che la tua configurazione BIND sia valida e che il server DNS sia già in esecuzione, non fare clic su Crea pulsante, poiché il file named.conf verrà sovrascritto. Invece, fai clic su Configurazione modulo collega e controlla che tutti i percorsi siano corretti per il tuo sistema.
-
 Bind Install
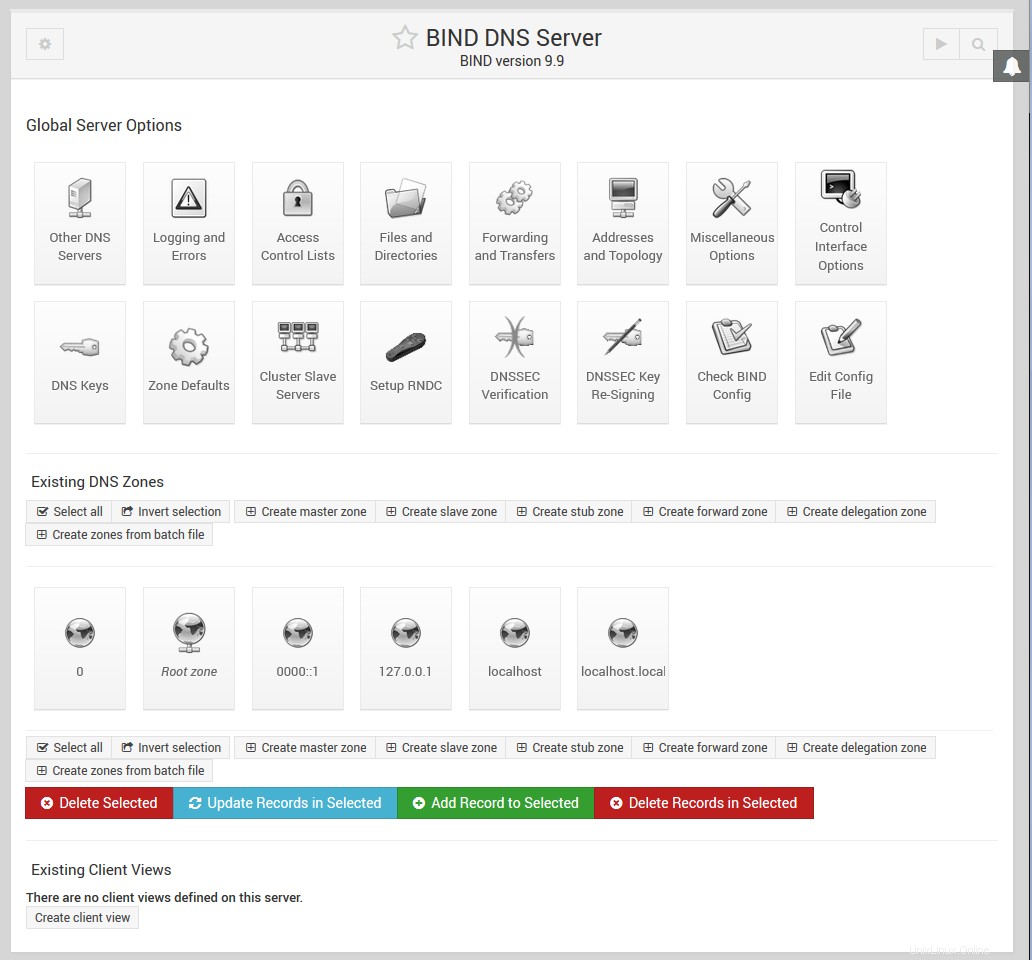
Quando BIND è stato impostato sul tuo sistema, la pagina principale apparirà come mostrato nello screenshot qui sotto. Nella parte superiore c'è una tabella di icone per l'impostazione delle opzioni globali che si applicano all'intero server DNS. Sotto di esse ci sono le icone per ciascuna delle zone ospitate dal tuo server, seguite dalle icone per le visualizzazioni se stai eseguendo BIND versione 9. In fondo ci sono i pulsanti per applicare la configurazione DNS corrente o avviare il server BIND.
Se hai appena impostato BIND per la prima volta, probabilmente ci sarà solo un'icona di zona:la zona principale. Alcune distribuzioni Linux che includono un pacchetto BIND vengono fornite con un file di configurazione di base che definisce zone come localdomain e 127.0.0, che vengono utilizzate per risolvere localhost e 127.0.0.l loopback hostname e indirizzo IP.
-
 Associa la pagina principale del server DNS
Creazione di una nuova zona principale
Una zona master è quella per la quale il tuo server DNS è la fonte autorevole di informazioni. Una singola zona può essere ospitata da più server, ma solo uno è il master, tutti gli altri sono slave. Se vuoi aggiungere una nuova zona master alla configurazione del tuo server, i passaggi da seguire sono:
- Decidi un nome per la nuova zona, ad esempio example.com o internal. Se questo sarà un dominio Internet visibile a tutti gli altri nel mondo, il nome di dominio non deve essere stato ancora registrato da nessun altro. Tuttavia, normalmente non puoi registrarlo tu stesso fino a quando il tuo server DNS non è stato impostato per ospitarlo.
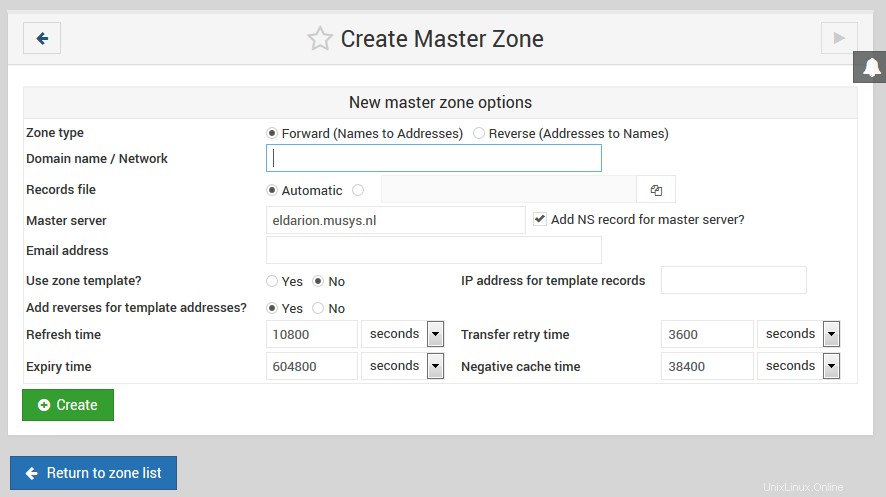
- Nella pagina principale del modulo, fare clic su Crea una nuova zona master link sotto la tabella delle zone esistenti. Questo ti porterà alla pagina mostrata nell'immagine qui sotto per inserire i dettagli della nuova zona.
- Se questa deve essere una zona diretta come esempio.com o foo.com.au, lascia il Tipo di zona campo impostato su Inoltra . Tuttavia, se si tratta di una zona inversa per la ricerca di nomi host dagli indirizzi IP, impostare il campo su Inverti .
- Nel Nome di dominio/Rete campo, inserire il nome della zona senza alcun punto finale. Per una zona inversa, inserisci semplicemente l'indirizzo di rete come 192.168.1. Webmin lo convertirà automaticamente nel formato in-addr.arpa per te quando viene creato il dominio.
- Il file dei record controlla il campo in cui è archiviato il file di configurazione contenente i record della zona. Se lo lasci impostato su Automatico , il nome del file verrà determinato automaticamente in base alla configurazione del modulo e all'impostazione della directory nel file named.conf. Questa è solitamente l'opzione migliore, in quanto risulterà nella creazione del file dei record nella stessa directory di qualsiasi zona esistente, come /var/named. Tuttavia, se deselezioni Automatico opzione e inserisci invece un nome file, tutti i record per la zona verranno scritti in quel file. Se inserisci il nome di un file esistente, verrà sovrascritto alla creazione del dominio.
- Nel server principale campo, immettere il nome di dominio completo del server DNS principale per questa zona. Questo deve essere il nome canonico del tuo sistema, come server.example.com, non un nome breve come server. Questo server (e i valori del prossimo
- campi) vengono utilizzati per creare il record SOA della nuova zona.
- Nell'Indirizzo email campo, inserire l'indirizzo della persona responsabile di questa zona. È possibile utilizzare il simbolo @ nell'indirizzo, che Webmin convertirà automaticamente in un punto per l'inclusione nel record SOA.
- Il Tempo di aggiornamento campo determina la frequenza con cui i server secondari devono verificare con questo server master gli aggiornamenti alla zona. L'impostazione predefinita è ragionevole, ma potresti volerla aumentare per le zone che cambiano raramente o diminuirla per quelle che vengono aggiornate di frequente.
- Il tempo di ripetizione del trasferimento campo determina per quanto tempo un server secondario deve attendere dopo un trasferimento di zona non riuscito prima di riprovare.
- Il Tempo di scadenza campo controlla la quantità di tempo massima per cui un server DNS secondario per la zona deve memorizzare nella cache i record prima di ritrasferirli dal master.
- Il tempo di vita predefinito campo determina il TTL dei record nella zona che non ne hanno uno impostato in modo esplicito.
- Fai clic su Crea pulsante in fondo alla pagina. Finché il modulo è stato compilato correttamente e la zona non esiste già sul tuo server, verrai indirizzato a una pagina per l'aggiunta di nuovi record alla zona.
- Torna alla pagina principale del modulo che ora includerà un'icona per la tua nuova zona e fai clic su Applica modifiche pulsante in basso per attivarlo.
- Crea Master Zone.png
Una zona appena creata conterrà un solo record (a meno che tu non abbia impostato un modello). Per aggiungerne altri, segui le istruzioni nella sezione successiva. Dopo aver impostato i record di base nel tuo dominio, puoi registrarlo presso l'autorità che gestisce il dominio principale, come .com o .com.au. Alcune autorità di dominio non ti consentiranno di registrare zone che non hanno almeno due server (un master e uno slave) e record di server dei nomi nella zona per quei server.
Aggiunta e modifica di record
-
 Lega - Modifica zona principale
La caratteristica più utile del modulo BIND DNS Server è la possibilità di aggiungere, modificare ed eliminare record nelle zone master ospitate dal tuo server. Ad esempio, se desideri configurare un server web nel tuo dominio example.com, devi aggiungere un record di indirizzo per www.example.com con l'indirizzo IP del server. Per aggiungere un nuovo record come questo, i passaggi da seguire sono:
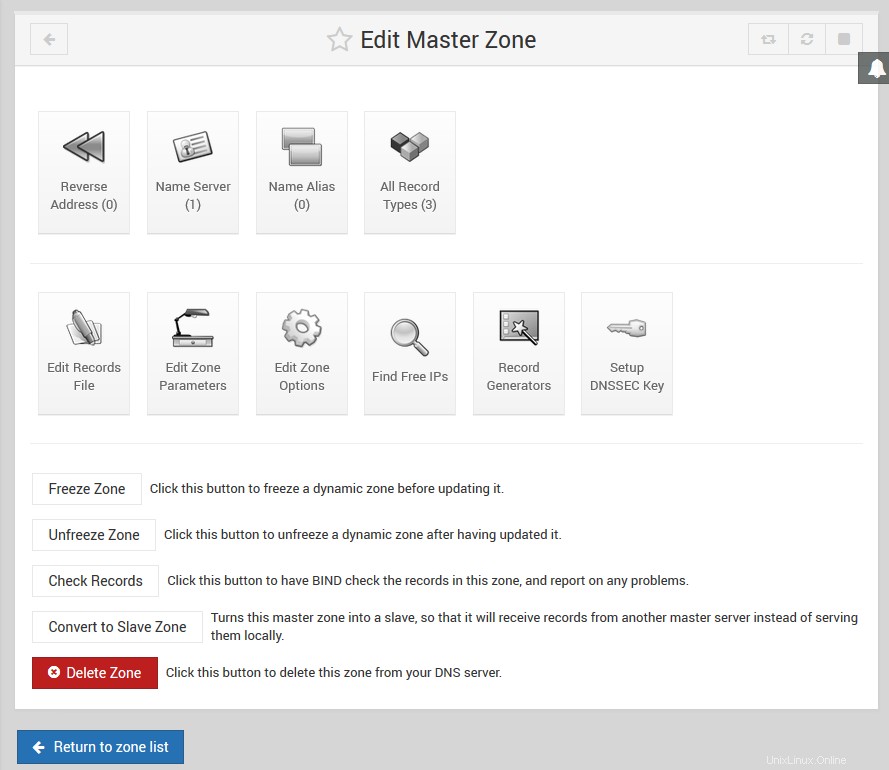
- Nella pagina principale del modulo, fare clic sull'icona della zona a cui si desidera aggiungere. Verrà visualizzata la pagina mostrata di seguito, nella parte superiore della quale è presente una tabella di icone, una per ogni tipo di record.
- Fare clic sull'icona del tipo di record che si desidera aggiungere. Il tipo più comune è Indirizzo , che associa un indirizzo IP a un nome host. Vedi i Tipi di #record sezione seguente per un elenco completo di tutti i tipi di record supportati.
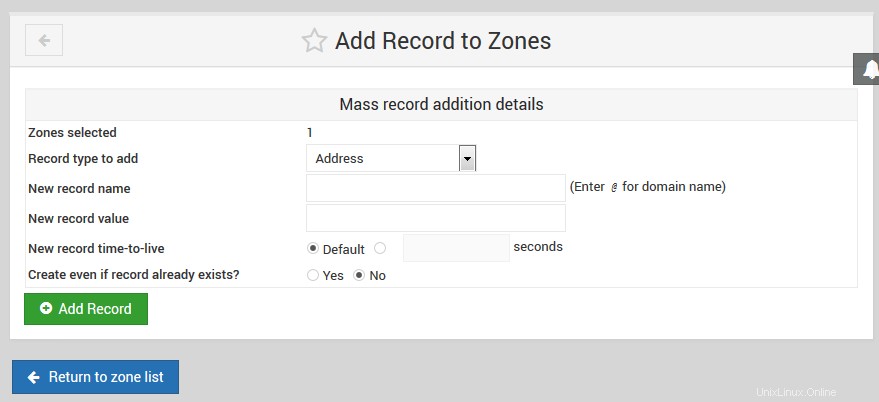
- Facendo clic sull'icona si accede a una pagina che elenca tutti i record esistenti di quel tipo. Sopra l'elenco c'è un modulo per inserire un nuovo record.
- Nel Nome campo, inserire il nome del nuovo record relativo al nome della zona. Ad esempio, se desideri aggiungere il record www.example.com, devi semplicemente inserire www . È anche possibile inserire il nome completo del record, purché abbia un punto alla fine per indicare che non è relativo alla zona. Non inserire solo www.example.com , poiché verrà convertito in www.example.com.example.com, che probabilmente non è quello che desideri.
- Se questo record cambierà più frequentemente rispetto al resto della zona, cambia il Time-To-Live campo da Predefinito al tempo stimato tra le modifiche. Ciò determina per quanto tempo i client DNS e altri server inseriranno nella cache il record.
- Se stai aggiungendo un record Indirizzo, inserisci l'indirizzo IP completo dell'host in Indirizzo campo. Vedere la tabella seguente per una descrizione dei campi che appaiono quando si aggiungono altri tipi di record e il loro significato.
- Il campo Aggiornare inverso? viene visualizzato solo quando si aggiunge un record di indirizzo. Controlla la creazione automatica di un record corrispondente in una zona inversa che associa il nome host all'indirizzo IP. Naturalmente, questo può essere fatto solo se l'IP che inserisci si trova in una rete per la quale il tuo sistema è il server DNS inverso primario. Ciò mantiene sincronizzate le zone avanti e indietro, il che può essere molto utile. Se Sì è selezionato, verrà aggiunto un record di indirizzo inverso purché non ne esista già uno nella zona inversa per lo stesso indirizzo IP. Spesso molti nomi host avranno lo stesso IP, come quelli utilizzati per l'hosting virtuale basato sui nomi. In casi come questi, non si desidera modificare la mappatura inversa se ne esiste già una. L'opzione *Sì (e sostituisci esistente)* funziona come Sì , ma se esiste già un record inverso per l'indirizzo IP, verrà aggiornato con il nuovo nome host. Questo può essere utile se sai che esiste un record esistente che desideri sostituire. Se No è selezionato, non verrà creato alcun indirizzo inverso anche se possibile.
- Quando hai finito di compilare il modulo, fai clic su Crea pulsante in basso. Se compilato correttamente, il record verrà aggiunto all'elenco sotto il modulo. Quando si scrive nel file dei record della zona, Webmin utilizzerà il formato canonico completo per il nome del record, ad esempio www.example.com., anche se si immette semplicemente www.
- Per attivare il nuovo record in modo che possa essere ricercato da client DNS e altri server, dovrai fare clic su Applica modifiche pulsante nella pagina principale del modulo. Se hai intenzione di aggiungere o modificare diversi record, di solito è meglio attendere il completamento di tutte le modifiche prima di premere il pulsante Applica. Se è disponibile, puoi invece utilizzare Applica modifiche pulsante nella parte inferiore della pagina della zona principale mostrata di seguito. Questo utilizza il comando ndc per dire a BIND di rileggere solo il file per questa zona, che può essere molto più veloce su un sistema che ospita un numero elevato di domini.
-
 Associa - Aggiungi record alle zone
Sebbene le istruzioni precedenti siano incentrate sull'aggiunta di un record di indirizzo, il processo di aggiunta di altri tipi di record a una zona diretta è quasi identico. Il aggiornamento inverso? il campo non esiste e l'Indirizzo campo viene sostituito con uno o più campi diversi. I Tipi di record la sezione seguente spiega in dettaglio quali campi sono disponibili per ogni tipo di record noto a Webmin.
Quando si aggiunge un record di indirizzo inverso a una zona inversa, il modulo è molto diverso. L'indirizzo il campo viene visualizzato prima del Nome host e il nome host deve essere sempre inserito in forma canonica con un punto alla fine, come www.example.com. . Il aggiornamento inverso? il campo viene sostituito con Aggiornare in avanti? , che controlla la creazione automatica di un record nella zona di inoltro corrispondente. Tuttavia, non è possibile sovrascrivere un record forward esistente:se ne esiste già uno con lo stesso nome, non verrà toccato anche se Sì è selezionato.
Ogni volta che un record viene aggiunto o aggiornato in una zona utilizzando Webmin, il suo numero di serie verrà incrementato automaticamente. Ciò vale anche per le zone inverse che vengono aggiornate automaticamente quando si aggiunge un record di indirizzo e viceversa. Ciò significa che quando applichi le modifiche, altri server DNS saranno in grado di rilevare che la zona è cambiata confrontando il nuovo numero di serie con quello vecchio che hanno memorizzato nella cache.
Per modificare un record esistente in una zona, i passaggi da seguire sono:
- Nella pagina principale del modulo, fai clic sull'icona della zona che desideri modificare, che ti porterà alla pagina mostrata sopra.
- Fare clic sull'icona del tipo di record che si desidera modificare, che visualizzerà una pagina che elenca tutti i record di quel tipo nella zona. In alternativa, puoi fare clic su Tutti i tipi di record icona che farà apparire un elenco di ogni singolo record nella zona indipendentemente dal tipo.
- Fare clic sul nome del record che si desidera modificare. Il tuo browser visualizzerà un modulo simile a quello utilizzato per aggiungere un record, ma con i campi già compilati con i dettagli dell'indirizzo esistente.
- Per rinominare il record, modifica il contenuto del Nome campo. Inizialmente verrà mostrato in forma canonica con un punto alla fine, ma se lo desideri puoi cambiarlo con un nome relativo al dominio.
- Regola il Time-To-Live nel campo in cui desideri che questo record abbia un TTL diverso o impostalo su Predefinito per renderlo uguale al resto della zona.
- Se si tratta di un record di indirizzo, modificare l'IP in Indirizzo campo. Per altri tipi di record, i campi sono gli stessi del modulo di creazione del record e hanno lo stesso significato.
- Per i record di indirizzo, il campo Aggiornare inverso? È visualizzato. Selezionando Sì farà sì che il nome e l'indirizzo del record corrispondente nella zona inversa vengano modificati in modo che corrispondano a questo record in avanti. Se modifichi l'IP in modo che l'indirizzo inverso non sia più nella stessa rete, verrà rimosso dalla vecchia zona inversa e aggiunto alla nuova zona inversa (se è ospitata dal tuo server).
- Per i record di indirizzo inverso, il campo Aggiornare in avanti? viene invece mostrato. Se Sì è selezionato, il record di indirizzo corrispondente nella sua zona di inoltro verrà modificato in modo che corrisponda a tutte le modifiche apportate in questo modulo.
- Fai clic su Salva per aggiornare il record nel file di zona e tornare all'elenco dei tipi di record.
- Per attivare le modifiche, fai clic su Applica modifiche pulsante indietro nella pagina principale del modulo.
Per eliminare un record da una zona, fai clic su Elimina pulsante sul modulo di modifica invece di Salva . Per i record di indirizzi, se l'Aggiornamento inverso? il campo è impostato su Sì , verrà eliminato anche il record di indirizzo inverso corrispondente. A parte questo, il processo di eliminazione di un record è identico, indipendentemente dal tipo. La stessa cosa accade quando si elimina un record di indirizzo inverso:anche il record di indirizzo corrispondente viene eliminato, purché Aggiornare in avanti? il campo è impostato su Sì .
L'elenco dei record in una zona viene inizialmente ordinato in base alla configurazione del modulo, il che in genere significa che i record verranno visualizzati nell'ordine in cui sono stati aggiunti. Per cambiarlo, puoi fare clic sull'intestazione di una colonna come Nome , Indirizzo o Nome reale per ordinarli invece in base a quella colonna. Tuttavia, l'ordinamento è solo temporaneo e andrà perso se torni alla pagina principale e riapri la zona. Per modificarlo in modo permanente, consulta l'Ordine di visualizzazione dei record in campo nella sezione su Configurazione del modulo BIND DNS Server .
Tipi di record
Webmin non supporta tutti i tipi di record conosciuti da BIND, solo quelli più comunemente usati. L'elenco seguente copre tutti i tipi supportati e spiega a cosa servono e quali campi sono disponibili quando si aggiunge o si modifica un record di quel tipo in Webmin. Accanto al nome di ogni tipo c'è il codice breve utilizzato da BIND stesso per identificare il tipo nel file dei record.
- Indirizzo (A)
- Un record di indirizzo associa un indirizzo IPv4 a un nome host. Qualsiasi sistema a cui vuoi essere in grado di connetterti tramite HTTP, telnet o qualche altro protocollo usando il suo nome host deve avere un record di indirizzo in modo che i client possano cercare il suo IP. Un singolo nome host può avere più di un record di indirizzi, operazione che spesso viene eseguita per distribuire il carico di un sito Web su più server. È anche valido creare più record di questo tipo con nomi diversi ma con lo stesso IP, ad esempio quando si configurano server virtuali Apache basati su nomi. Quando si crea o si modifica un record Indirizzo, il campo Indirizzo viene visualizzato per inserire l'IP associato al nome host. Un campo con l'etichetta Aggiornare inverso? viene visualizzato anche, che controlla la creazione e la modifica automatiche di un record di indirizzo inverso nella zona inversa appropriata. Consulta Aggiunta e modifica di record sezione sopra per maggiori dettagli.
- Indirizzo IPv6 (AAAA)
- Un record di indirizzo IPv6 associa un indirizzo IPv6 a un nome host simile a un record A.
- Server dei nomi (NS)
- I record di questo tipo definiscono un server dei nomi responsabile di una zona. Ogni zona deve avere almeno un record del server dei nomi per sé e può avere record aggiuntivi che specificano i server DNS responsabili dei sottodomini. Se configuri un server DNS secondario per una zona, assicurati di aggiungere un record del server dei nomi per la zona sul server master. In questo caso, il nome del record sarà il nome canonico della zona, ad esempio example.com. . Quando si crea o si modifica un record di questo tipo, un campo denominato Server dei nomi sarà mostrato. Questo deve essere compilato con l'indirizzo IP o il nome host del server DNS responsabile della zona. Se inserisci un nome host, deve avere un indirizzo IP impostato da un record di indirizzo in una zona del tuo server.
- Nome alias (CNAME)
- Questo tipo di record crea un nome aggiuntivo per un record Indirizzo o Indirizzo inverso esistente. Quando un client DNS richiede l'indirizzo IP di un record di questo tipo, riceverà l'IP del record a cui punta invece il Name Alias. Questo tipo di record può essere utile se si dispone di un singolo host che deve essere accessibile con diversi nomi, ad esempio un server Web che esegue un hosting virtuale basato sul nome. Anche se ciò può essere fatto anche creando più record di indirizzi, la creazione di un solo indirizzo e più alias di nome è più flessibile in quanto consente un aggiornamento più semplice se l'indirizzo IP dell'host cambia. I moduli per la modifica e la creazione di record Name Alias contengono un campo denominato Real Name . Questo deve essere compilato con il nome canonico del record a cui punta l'alias (come webserver.example.com. ), o con un nome breve relativo alla zona in cui si trova il record Name Alias.
- Server di posta (MX)
- I record del server di posta indicano ai programmi di consegna della posta come Sendmail e Qmail quale sistema contattare quando si consegna la posta a un dominio o host. Senza un record di questo tipo, la posta per un dominio verrà recapitata al sistema il cui IP è specificato nel record Indirizzo per la zona stessa. Questo non è sempre auspicabile, poiché potresti volere che l'IP sia l'indirizzo di un server web, in modo che i browser web possano connettersi a http://example.com/ così come a http://www.example.com/. Un record del server di posta può risolvere questo problema inviando solo e-mail ad esempio.com a un altro host e tutto il resto del traffico al server web. Ciascun record del server di posta ha una priorità, che indica ai programmi di recapito della posta quale server di posta deve essere provato per primo. Il record con la priorità più bassa dovrebbe puntare al sistema che effettivamente riceve e archivia la posta elettronica per il dominio, mentre quelli con priorità più alta generalmente puntano a sistemi che semplicemente trasmetteranno la posta. I programmi di consegna proveranno a turno a partire dal più basso, in modo che se il server di posta principale è inattivo, l'e-mail verrà comunque inviata a un inoltro in grado di trattenerla fino a quando il server principale non viene ripristinato.
- Quando si aggiunge o si modifica un record del server di posta, vengono visualizzati due campi aggiuntivi. Il primo è denominato Server di posta , e deve essere compilato con il nome host canonico o relativo di un sistema che può accettare la posta per il dominio o il nome host inserito nel Nome campo. Il secondo è etichettato come Priorità e deve essere utilizzato per specificare una priorità numerica per questo particolare server di posta. Normalmente viene utilizzata una priorità di 5 per il server di posta principale e 10 per gli inoltri di backup. Se hai un solo server di posta per il tuo dominio, non importa quale numero sia inserito in questo campo. È possibile che due server abbiano la stessa priorità, nel qual caso uno verrà scelto casualmente a cui consegnare. Un record del server di posta può utilizzare il carattere jolly * nel suo nome, che indica ai programmi di posta che un particolare server di posta è responsabile di tutti gli host in un dominio. Ad esempio, un record denominato come *.example.com corrisponderebbe al nome host pc1.example.com e a qualsiasi altro host nella zona. Questo può essere utile se vuoi forzare la posta che altrimenti verrebbe consegnata direttamente alle workstation nel tuo dominio per passare invece attraverso un server di posta centrale. Webmin non ti consentirà di utilizzare caratteri jolly a meno che non sia Consenti caratteri jolly l'opzione di configurazione del modulo è impostata su Sì tuttavia, come spiegato nella sezione *Configurazione del modulo BIND DNS Server*.
- Informazioni sull'host (HINFO)
- I record di questo tipo vengono utilizzati per registrare informazioni sull'hardware e sul sistema operativo di un particolare host. Ad esempio, potresti crearne uno che indichi server1.example.com è un PC x86 con Linux. Tuttavia, vengono utilizzati molto raramente e di fatto sono considerati un rischio per la sicurezza, poiché forniscono informazioni a potenziali aggressori che potrebbero essere utilizzate per impossessarsi di un server. Quando si crea o si modifica un record di informazioni sull'host, i campi Hardware e Sistema operativo vengono visualizzati per immettere l'architettura e il tipo di sistema operativo di un host. I valori immessi non devono contenere spazi, in genere vengono sostituiti nel tipo di hardware e nelle stringhe del sistema operativo con caratteri _.
- Testo (TXT)
- Un record di testo associa un messaggio arbitrario di qualche tipo a un nome. I record TXT possono essere utilizzati per fornire informazioni sulla proprietà alle strutture di posta come SPF e DKIM. Tieni presente, tuttavia, che qualsiasi commento di questo tipo sarà disponibile per chiunque su Internet possa cercare record nel tuo dominio e quindi non dovrebbe contenere informazioni riservate. Il campo Messaggio viene visualizzato quando si immette o si modifica un record di testo. Puoi inserire qualsiasi testo che ti piace, inclusi gli spazi.
- Servizio ben noto (WKS)
- Un record di questo tipo associa un nome host, una porta e un protocollo a un nome. Può essere considerato come una variante generalizzata del record del server di posta, che indica ai client quale host fornisce un servizio particolare per un dominio o un nome host. Tuttavia, quasi nessun programma cerca effettivamente i record WKS, quindi in pratica sono praticamente inutili. Quando aggiungi o modifichi uno di questi record, i campi Indirizzo , Protocollo e Servizi sono disponibili. Il primo serve per inserire l'indirizzo IP di un host che fornisce i servizi per l'host o il dominio inserito nel Nome campo. Il secondo serve per selezionare il protocollo di rete utilizzato dai servizi, TCP o UDP. L'ultimo serve per inserire un elenco di numeri di porta o nomi (dal file /etc/services) per i servizi forniti dall'host.
- Persona Responsabile (PR)
- Questo tipo di record viene utilizzato per specificare la persona o il gruppo responsabile di un particolare host. Ciascuno di questi record ha due valori associati:un indirizzo e-mail e il nome del record di testo contenente il nome della persona. I record Persona responsabile vengono visualizzati raramente e non vengono utilizzati da alcun programma di recapito della posta o client Internet. L'Indirizzo email il campo mostrato durante la modifica o l'aggiunta di uno di questi record serve per inserire l'indirizzo completo (come jcameron@example.com ) del responsabile dell'host il cui nome è inserito nel Nome campo. Il Nome del record di testo campo serve per inserire il nome relativo o canonico di un record di testo che contiene il vero nome della persona.
- Posizione (LOC)
- I record di posizione vengono utilizzati per specificare la posizione fisica in latitudine e longitudine di un host. Non si vedono quasi mai e quindi non vengono utilizzati da molti programmi. Tuttavia, possono essere utili in grandi organizzazioni che hanno host in molti paesi. Quando si aggiunge o si modifica un record Posizione, viene visualizzato il campo *Latitudine e Longitudine* per inserire la posizione dell'host nel Nome campo. Deve essere formattato come _42 21 43.528 N 71 05 06.284 W 12.00m 30.00m 10000.00m 10.00m_.
- Indirizzo di servizio (SRV)
- I record di questo tipo vengono utilizzati per associare un nome di dominio, un nome di servizio e un protocollo a un determinato host. Consentono di specificare quale server deve contattare un client per un particolare servizio e nome host, invece di connettersi semplicemente all'host. In un certo senso, sono come i record del server di posta ma molto più flessibili. Ad esempio, puoi specificare che il server POP3 per esempio.com sia mail.esempio.com , ma il server web è www.example.com . Al momento della scrittura, i record SRV sono utilizzati principalmente dai sistemi client Windows. Quando si aggiunge o si modifica un record di indirizzo di servizio, i campi Protocollo e Nome del servizio vengono visualizzati accanto al Nome casella di testo. Per il protocollo, è necessario selezionare TCP o UDP dal menu. Per il nome del servizio, devi inserire un nome noto dal file /etc/services, come pop3 o telnet . Per cercare un record SRV, un client combina il nome del servizio, il protocollo e il nome per ottenere un nome del record come ___telnet.___tcp.example.com . Webmin esegue questa operazione automaticamente durante la modifica o l'aggiunta di un record di indirizzo di servizio, ma puoi vedere il nome combinato sulla pagina che elenca i record di questo tipo. Webmin ha anche aggiunto automaticamente le _s prima del servizio e del protocollo, ma le nasconde quando viene visualizzato o modificato un record SRV. Ciò significa che non è necessario inserirlo manualmente durante la creazione o la modifica di un record di questo tipo. La Priorità campo deve essere utilizzato per inserire una priorità numerica per questo server, che ha lo stesso significato della priorità in un record del server di posta. Il peso il campo deve contenere una pesatura per questo particolare server, oppure zero se esiste un solo record con lo stesso nome, protocollo e nome del servizio. Un peso maggiore indica ai client di provare questo server più spesso di uno con un peso inferiore. Il Porto il campo deve contenere un numero di porta a cui i client possono connettersi sul server, che non deve necessariamente essere la porta standard per il servizio. Nel server campo, è necessario inserire il nome host o l'indirizzo IP del sistema che fornisce effettivamente il servizio ea cui i client si connettono effettivamente.
I tipi di record supportati da Webmin nelle zone inverse sono:
- Indirizzo inverso (PTR)
- Un record di indirizzo inverso associa un nome host a un indirizzo IP in una zona inversa. Affinché i client DNS siano in grado di cercare i nomi host dagli indirizzi IP nella rete, dovrai creare un record di questo tipo per ogni host. Tuttavia, la maggior parte delle volte ciò viene eseguito automaticamente da Webmin durante l'aggiunta e la modifica dei record di indirizzi. Se crei i tuoi record di indirizzo inverso, assicurati che siano sincronizzati con i record di indirizzo corrispondenti. Quando si aggiunge o si modifica un record di questo tipo, i campi Indirizzo e Nome host vengono visualizzati. Il primo serve per inserire un indirizzo IP completo, come 192.168.1.10 . Questo verrà automaticamente convertito da Webmin nel formato in-addr.arpa utilizzato internamente dal sistema DNS per gli indirizzi inversi. Il secondo campo serve per inserire un nome host in forma canonica, come pc1.example.com. , assicurati di mettere sempre un punto alla fine, altrimenti il nome host sarà relativo alla zona inversa, che sicuramente non è quello che vuoi.
- Server dei nomi (NS)
- I record del server dei nomi in una zona inversa hanno uno scopo identico a quelli in un dominio forward:comunicano ad altri server DNS l'indirizzo IP o il nome host di un server responsabile della zona o di un sottodominio. Ciò significa che è necessario aggiungerne uno per ogni server DNS primario o secondario per la zona. Il campo *Zone Name* che appare quando si aggiunge o si modifica un record di questo tipo serve per inserire il nome della zona di cui è responsabile il server, che sarà in genere la zona che contiene il record. Tuttavia, a differenza dei record di indirizzo inverso, questo campo non viene convertito automaticamente nel formato in-addr.arpa. Invece, devi inserirlo in un formato completo come 1.168.192.in-addr.arpa. se si definisce un server dei nomi per 192.168.1 Rete. Nel campo *Name Server*, devi inserire un indirizzo IP o un nome host in formato canonico per il server DNS, come ns1.example.com. .
- Nome alias (CNAME)
- I record di questo tipo si comportano esattamente allo stesso modo nelle zone inverse come nei domini diretti. Tuttavia, devi inserire il Nome e Nome reale campi con nomi inversi nel formato in-addr.arpa, poiché Webmin non li convertirà per te. I campi Nome Alias sono più utili nelle zone inverse per eseguire una delega parziale di sottorete, come illustrato nella sezione *Delega inversa parziale* di seguito.
Modifica di una zona principale
You can use Webmin to edit many of the settings that apply to an entire master zone, such as the expiry and retry times, and the clients that are allowed to query it. These settings effectively apply to all records in the zone, although some (such as the TTL) can be overridden on a per-record basis.
Webmin uses the term zone parameters to refer to all information stored in the domain's SOA record, including the primary nameserver, administrator email address and retry and expiry times. All of these are set when the zone is created, but you can edit them at any time by following these steps:
- On the module's main page, click on the icon for the zone that you want to edit.
- Click on the Zone Parameters icon, which will bring up a form for editing the parameters.
- The Master server field only needs to be edited if the Internet hostname of the DNS server has changed. Enter a fully-qualified hostname, with a dot at the end.
- To change the address of the person responsible for the zone, edit the Email address campo. Any @ symbols that it contains will be automatically converted to dots for use in the SOA record, as BIND requires.
- The Refresh time , Transfer retry time , Expiry time and Default time-to-live fields all have the same meanings as explained in the section on Creating a new master zone . If records in your zone are going to be changing frequently in future, you may want to reduce some of these times. However, any changes, may not be detected by secondary servers and DNS clients until the old refresh or expiry time has elapsed, even if the new times are much lower. This is because they will wait for the old times to elapse before checking with the master server again to discovered the new ones.
- Fai clic su Salva button at the bottom of the page when you are done, and then the Apply Changes button back on the module's main page. The serial number in the SOA record will be automatically incremented when the form is saved, so that secondaries now that the zone has changed.
There is another set of options that you can edit for a master zone, stored in the named.conf file in the zone's section. These control which servers and clients are allowed to query records in the zone, do zone transfers and update records over the network. The most useful of these options specifies a list of slave DNS servers for the zone that should be notified when a change occurs, so that they can perform immediate zone transfers and thus remain synchronized.
To edit these master zone options, the process to follow is:
- On the module's main page, click on the icon for the zone that you want to edit. This will take you to the form shown in Figure 30-4.
- Click on the Edit Zone Options icon, which will bring up a form showing the existing settings.
- The Check names? field determines the level of checking that BIND performs on records in this zone when it reads the records file. The available options are :
- Warn
- If an invalid record is found, an error will be written to the system log file but processing of other records continues normally.
- Fail
- Invalid records cause the entire zone to be rejected, but other zones will still be processed normally.
- Ignore
- No checking is done at all.
- Default
- The global default from the Zone Defaults page is used. If it is not set, then the default complied into BIND will be used instead, which is to fail when invalid records are encounterd.
- To have secondary servers notified when records in the zone change, set the Notify slaves of changes? field to Yes . BIND works out which slaves will be notified by looking at the Name Server records for the zone, and the list of IP addresses in the Also notify slaves campo. If your zone has an secondary servers, then you should definitely turn this option on.
- To allow some systems to update records in the zone dynamically, fill in the Allow updates from field with a list of IP addresses, IP networks (like 192.168.1.0/24) and BIND ACL names. Only those hosts that match will be able to modify records using commands like nsupdate, and if the list is left empty updates will not be allowed at all. You should be careful allowing the dynamic update of zones in which Webmin is also being used to edit records, as it is very likely that updates made dynamically will be overwritten by changes made in this module, or vice-versa.
- By default, all DNS clients and servers will be able to lookup records in the zone. This may not be what you want for a zone that is used only on an internal network, as it may give away sensitive information to potential attackers. To restrict queries, fill in the Allow queries from field with a list of IP addresses, IP networks and BIND ACL names. If the field is left empty, the field with the same name on the global Zone Defaults page determines which clients are allowed.
- To restrict the clients and servers that are allowed to perform zone transfers of all the records in this domain, fill in the Allow transfers from campo. Often you will only want to allow secondary servers to perform transfers, especially if your zone is very large or contains records that you want to hide from attackers. Enter a list of IP addresses, IP networks and ACL names into the field to limit transfers to only matching clients. If it is left empty, the Allow transfers from field on the Zone Defaults page applies instead.
- To specify additional slave servers to be notified when the zone changes, fill in the Also notify slaves field with a list of IP addresses. BIND normally works out with addresses of all secondary servers for the zone from its Name Server records, but this may not always be complete.
- When you are done, click the Save button at the bottom of the page to update the BIND configuration file with your changes. You will need to use the Apply Changes button on the module's main page to make them active.
If a master zone is no longer needed, you can use this Webmin module to totally delete it along with all the records that it contains. To do this, the steps to follow are:
- On the module's main page, click on the icon for the zone that you want to edit.
- Click on the Delete Zone button at the bottom of the page.
- When deleting a forward zone, the field *Delete reverse records in other zones?* controls whether matching Reverse Address records in hosted reverse zones for all of the Address records in this one should be removed as well. This is generally safe to set to Yes , as only records with the exact same IP address and hostname will be deleted.
- Similarly, when deleting a reverse zone the field *Delete forward records in other zones?* determines whether matching forward records should be deleted too.
- Once you have made your selection and are sure you want to go ahead with the deletion, click the Delete pulsante. The zone's entry in the named.conf file will be removed, and its records file deleted.
You can convert a master zone to a slave zone of the same name without needing to delete and re-create it. This can be useful if the new server is taking over as the master for some domain, or if the master and secondary servers are switching roles. The section on Editing a slave zone explains how to carry out the reverse action of converting a slave zone to a master, which may be useful in this situation.
To convert a zone, the steps to follow are:
- On the module's main page, click on the icon for the zone that you want to edit, then on the Edit Zone Options icon.
- When you click on the Convert to slave zone button , zone's entry in named.conf will be immediately updated to convert it to a slave zone. The browser will then return to the module's main page.
- Normally, every slave zone has a list of master server IP addresses that it can use to perform zone transfers from. In the case of converted zones, this list will be initially empty unless the Default master server(s) for slave zones module configuration option is set. Follow the instructions in the *Edit a slave zone* section to set the master servers addresses correctly.
- To activate the change, click on the Apply Changes button the module's main page.
Creating a new slave zone
A slave or secondary zone is one for which your DNS server gets the list of records from a master server for the zone. Generally, slave servers are used to reduce the load on the primary server, or act as a backup in case it goes down. For important zones (such as a company's Internet domain), you should always have at least one slave server so that your website is still accessible and email can still be delivered even if the primary goes down.
The secondary DNS server for a domain should not usually be located on the same network as the master, so that the failure of that network cannot take them both down. Many ISPs and hosting companies will host secondary zones for their customer's domains for free, on their own DNS servers. If your ISP provides this service and you want to set up a secondary server for an Internet domain, you should take advantage of it. If so, most of this section can be skipped. However, if you want to add a slave server for an internal domain or have a large company network with many connections to the Internet, then the instructions below explain how to set it up:
- On the main page of the BIND DNS Server module, click on the Create a new slave zone link above or below the list of existing zones. This will bring up the form shown below, for entering the details of the new domain.
- For a forward zone like example.com , set the Zone type field to Forward and enter the zone name into the *Domain name / Network* field. For a reverse zone that maps IP addresses to hostnames for a network, choose the Reverse option and enter the network address (like 192.168.1 ) into the *Domain name / Network* text field.
- The Records file field determines if BIND keeps a cache of the records in this zone in a file, and if so where that file is located. If the option None is chosen, records that the DNS server transfers from the master will be kept in memory only, and lost when the server is re-started. This should only be chosen if there is a good network connect between the master and slave servers, as it will increase the number of zone transfers that your server must perform. If you choose Automatic , Webmin will generate a filename in the zone files directory specified in the named.conf file (usually /var/named). Whenever your server does a zone transfer, all records will be written to this file in the standard format. If the final option is selected, you can enter the full path to a file in which records should be stored into the field next to. This can be useful if you want to separate the records files for master and slave zones.
- In the Master servers field, enter the IP addresses of the master DNS server and any other secondary servers for the zone. BIND will try these servers in order when doing a zone transfer, so the master should be first on the list. You must enter at least one address, so that your server knows where to get records from.
- Click the Create button to have the new slave zone added to your server's configuration. Your browser will be re-directed to a page for editing options for the zone.
- Return to the module's main page, and click the Apply Changes button on the main page to make the addition active.
- On the master server, add a new Name Server (NS) record for the zone with the IP address of the secondary server. This can be easily done in Webmin by following the instructions in the Adding and editing records sezione.
- Configure the master DNS server to notify this slave of any changes to records in the zone. The steps in the section on Editing a master zone explain how.
- If this is an Internet domain, notify the registrar for the parent zone of the new secondary server. Most provide online forms for editing the list of nameservers for a domain, to which you can add the secondary's IP. This is necessary so that other hosts on the Internet know to use the slave server is the master is down.

The slave zone creation form
Another type of zone that is closely related to the slave zone is the stub. They are like slave zones, but only contain Name Server records that have been transferred from a master server, instead of all the records. Stub zones are rarely used, but can be useful for ensuring that the Name Server records in a zone for its sub-domains are the same as those use in the sub-domain itself. The steps for creating one are almost identical to those above, but in step 1 you must use the Create a new stub zone link on the main page instead.
Editing a slave zone
After a slave zone has been created, it is still possible to edit several options that apply to it. Naturally there is no way to add or edit the actual records within the zone, but you can still change the list of master servers, the records file and the clients that allowed to query it. To change these setting, the steps to follow are:
- On the module's main page, click on the icon for the slave zone that you want to edit. Your browser will display the form shown in the screenshot below.
- Scroll down to the Zone Options form at the bottom of the page.
- To edit the list of other master and slave servers for this zone, change the IP addresses in the *Master servers *field. If a new secondary server has been added, it should be added to this list on all other secondaries so that they can do zone transfers from it. If the IP address of the master has changed, the list must be updated with the new address.
- To change the amount of time that the server will wait before giving up on a zone transfer, de-select Default for the Maximum transfer time field and enter a number of minutes into the text box next to it.
- If the Records file field is set to None , records transferred from the master server for this zone will be kept in memory only. However if a filename is entered, records will be written to that file instead in the standard format. This is the best option, as it minimizes zone transfers and allows you to view the records on the secondary server, as explained below.
- To have this DNS server notify others when the zone changes, change the Notify slaves of changes? field to Yes . This is only really useful if there are other secondary servers that perform zone transfers from this one, and may not be able to receive update notifications from the master server. The DNS servers to notify are determined from the Name Server records for the zone, and the contents of the *Also notify slaves* field.
- By default, all DNS clients and servers will be able to lookup records in the zone. To change this, fill in the *Allow queries from* field with a list of IP addresses, IP networks and BIND ACL names. If the field is left empty, the field with the same name on the global Zone Defaults page determines which clients are allowed.
- To restrict the clients and servers that are allowed to perform zone transfers of all the records in this domain, fill in the Allow transfers from field with a list of IP addresses, IP networks and ACL names. If it is left empty, the *Allow transfers from* field on the Zone Defaults page applies instead.
- The other fields on the form such as Check names? and *Allow updates from?* are not really used for slave zones, and so can be left unchanged.
- When you are done making changes, click the Save button. As long as there were no syntax errors in your input, you will be returned to the module's main page. Click the Apply Changes button there to make the modifications active. Note that this will not always force a re-transfer of the zone, even if the master servers have changed. For slave zones that use records files, BIND will only do a transfer when it the zone expires or the server receives notification of a change.

The slave zone editing form
When editing a slave zones that uses a records file, it is possible to browse the records in Webmin. At the top of the page that appears when you click on the slave zone's icon is a table of record types, just like the one that appears on the master zone form. Each can be clicked on to list the names and values of records of that type in the zone, as known to the secondary server. Editing or adding to them is impossible of course, as any changes must be made on the master server which is the authoritative source of records for the domain.
To stop your system acting as a slave server for a zone, you will need to delete it from the BIND configuration. This is generally a safe procedure, as the all the records in the zone have been copied from a master server and can be easily replaced. However, you should update the Name Server records in the zone and notify the parent domain's registrar that you system is no longer a secondary for the zone, so that other DNS servers do not waste time querying it.
To delete a slave zone, the steps to follow are:
- On the module's main page, click on the icon for the slave zone that you want to edit. This will take you to the form shown in the screenshot above.
- Click on the Delete button in the bottom right-hand corner of the page, which will display a confirmation form.
- Hit the Delete button if you are sure you want to delete the zone.
- After your browser returns to the module's main page, click on Apply Changes to make the deletion active.
- On the master server, remove the Name Server (NS) record for this secondary server from the zone.
- If this is an Internet domain, notify the parent zone registrar of the removal of this secondary server. Failure to do so could cause problems if other DNS servers attempt to query this one for records in the domain when it cannot provide answers.
The final thing that you can do to a slave zone is convert it to a master. This is only possible for zones that use a records file, so that Webmin can view and edit that file in future. If you do such a conversion, make sure that the original master server is changed to become a slave or stops hosting the zone altogether - the same domain cannot be served by two masters.
The steps to convert a zone are:
- Click on its icon on the module's main page.
- Scroll down to the bottom of the slave zone page, and hit the Convert to master zone pulsante. This will immediately update the named.conf file to change the zone's type, but will not make any other changes.
- To make the conversion active, click on the Apply Changes button on the module's main page.
- You can now edit records in the domain just as you would with any normal master zone, by following the instructions in the section on Adding and editing records .
Creating and editing a forward zone
A forward zone is one for which your DNS server simply forwards queries to another server on behalf of whoever is making the request. They can be useful if the zone is actually hosted by another server that cannot be reached by clients of this server. It is possible to set up BIND to forward all requests for any non-hosted zones to another server, as explained in the *Configuring forwarding and transfers* section below. A forward zone entry does the same thing, but for just a single domain.
To set one up, the steps to follow are:
- On the module's main page, click on the *Create a new forward zone* link above or below the list of existing domain icons. This will take you to the zone creation form.
- Set the Zone type field to either Forward or Reverse , as when creating master and slave zones.
- For a forward zone, enter its full name (without a dot at the end) into the Domain name / Network campo. For a reverse zone, enter its network (like 192.168.1 ) into the field instead - Webmin will automatically convert it to in-addr.arpa format when the zone is added.
- In the Master servers field, enter a list of IP addresses for the DNS servers that can be queried to lookup records in the zone. These must all be master, slave or forward hosts for the domain. If no addresses are entered at all, BIND will always perform normal lookups of records in the zone instead of forwarding requests to another server. This can be used to override the global forwarding settings on the Forwarding and Transfers page for a single zone.
- Click the Create button to have the zone added to BIND's configuration file. Your browser will be taken to a page for editing options in the new domain.
- Return to the module's main page, and hit the Apply Changes button to make it active.
After a forward zone has been created, you can delete it or edit the few settings that it has by following these steps :
- Click on the icon for the zone on the module's main page, which will bring your browser to a small form for editing its options.
- To change the list of DNS servers that requests are forwarded to, edit the IP addresses in the Master servers campo. If none are entered, requests for records in this domain will be looked up directly.
- If the Try other servers? field is set to Yes , BIND will try a normal direct lookup for requests in this zone if it cannot contact any of the listed servers.
- Fai clic su Salva button to store your changes, and then Apply Changes back on the main page to activate them. Or to delete the forward zone, click on Delete and then Delete again on the confirmation page.
Creating a root zone
As the introduction explains, a root zone is one that contains the information that your DNS server needs to contain the Internet root servers. Without one, it is impossible to resolve records in domains other than those hosted by your server. Fortunately, one will almost always exist already in your BIND configuration, created either by Webmin or included as part of the default setup.
You may need to create a root zone if one does not exist yet because you selected the internal non-internet use only option when setting up the module for the first time, but have now connected your system to the Internet. Adding a second root zone can also be useful when views have been configured, as explained in the Using BIND views sezione.
Webmin will only allow you to create a root zone if none exists yet, or if a view exists that does not contain one, because there is no point having two such zones. To add one, the steps to follow are:
- On the module's main page, click on the Create a new root zone icon.
- Fill in the Store root servers in file field with a filename to use for the root zone file. If one already exists, then this field will already contain its path - otherwise, you should enter something like /var/named/db.cache.
- The Get root servers from field controls where Webmin copies the root file from. The choices are :*Download from root FTP server *This is the best option, as it tells the module to make an FTP connection to rs.internic.net and download the latest version of the file. However, this may not work if your system cannot make perform FTP downloads due to a firewall. *Use Webmin's older root server information *This option should be used if the first will not work. If selected, the module will use a copy of the root zone file that comes with Webmin, which will work but may not be up to date. *Existing root servers in file *If the file entered in step 2 already exists, then this option should be chosen. If you are adding a root zone to a view and one already exists in another view, it will be selected by default so that the file can be shared between both zones.
- Click the Create button to add the zone and return to the module's main page. Then hit Apply Changes to make it active.
Once a root zone has been added, an icon representing it will appear on the main page. You can delete it by clicking on the icon and hitting the Delete button - however, this may prevent the lookup of records in non-hosted Internet domains from working as explained above.
Editing zone defaults
Defaults for new master zones
If you add lots of zones that contain similar records, then it can be a lot of work to add them manually after creating each one. For example, in a web hosting company all of your domains might contain a www Address record for the IP address of your webserver, and an Mail Server record that directs mail to a central server. Fortunately, Webmin allows you to create a list of records that get added to all new domains, called a zone template.
A template consists of one or more records, each of which has a name, type and value. For Address records, the value can be option which indicates that it can be entered by the user at zone creation time. This is useful if one of the records (such as www) in the new domains does not have a fixed address, and you want to be able to easily set it when the zone is added. Templates can only be used when creating forward zones, as they do not make much sense for reverse zones.
It is also possible to edit the default expiry, refresh, TTL and retry times for new zones. Webmin's initial defaults are reasonable, but may not be appropriate for your network. To change these defaults and set up template records, the steps to follow are:
- On the module's main page, click on the Zone Defaults icon. The form at the top of the page labeled Defaults for new master zones contains all the fields that need to be edited.
- Edit the Refresh time , Transfer retry time , Expiry time and Default time-to-live fields if you want to change the defaults times for new zones. Existing master zones will not be effected by any changes you make here though.
- If all your new domains are managed by the same person, enter his address into the Default email address campo. This will save you from having to type it in on the master zone creation page every time.
- In the Template records table, two blanks rows appear for entering new records. To add more than two, you will need to save this page and re-edit it. The records in existing rows can be edited by just changing their fields, or deleted by clearing out the record name. Under the Record name column you must enter the name of the record relative to the zone, such as www or ftp. To create a record for the zone itself (such as a Mail Server record for the domain), just enter a single dot. Under the Type column, select a type for the record from the list. See the #Record types section for more information on what each is used for. As its name suggests, the field under the Value column is for entering a value for the new record. For the Address type, you can select From form in which case you will be able to enter an address when creating a new domain, which will be used by all template records that have this option selected. For Mail Server records, both the priority and server name must be entered separated by a space, such as _5 mail.example.com._. Values for records of all other types should be entered in the same format as is used when adding a record to a zone.
- If you are familiar with the records file format used by BIND, you can create your own file of records to be included in new zones. If a filename is entered into the Additional template file field, its contents will be added to the zone file created by Webmin for new master domains.
- When you are done adding template records, click the Save button at the bottom of the page. The changes will apply to any new master zones created from now on.
Now that you have created a template, you can choose whether or not to use it for each new master zone that you create. On the creation form (explained in the Creating a new master zone section) is a field labeled Use zone template? , which is set to Yes by default if there are any template records. Next to it is a field named IP address for template records , which used for entering the IP for records for which the From form option is selected. If you chose to use a template and if there are any records that do not have an IP address specified, then this field must be filled in.
Default zone settings
At the bottom of the Zone Defaults page you will find several options that apply to all existing domains, but can all be set or overridden on a per-zone basis as explained in the Editing a master zone sezione. You can control which clients are allowed to query the server, and what kind of checking is done for the records of various domain types. Being able to limit the allowed client hosts is particularly useful, so that you can stop non-internal clients using your DNS server. However, you should make sure that master Internet zones hosted by your server are accessible to everyone, so that other DNS servers on the Internet can look them up.
To change these global options, the steps to follow are:
- On the module's main page, click on the Zone Defaults icon and scroll down to the Default zone settings sezione.
- To control which hosts are allowed to query your DNS server, change the Allow queries from field to Listed and enter a list of IP addresses, IP networks (like 192.168.1.0/24) and ACL names into the text box below. Clients that do not match any entry on the list will be denied, unless they are requesting a record in a zone which has its own separate settings allowing them.
- To control which hosts are allowed to perform zone transfers from your server, change the Allow transfers from field to Listed and fill in the text box below with a list of IP addresses, IP networks and ACL names. Only servers that are acting as secondaries for zones that this server hosts really need to be able to do transfers, so it is usually a good idea to enter just their IP addresses. If you are restricting queries, this field must be filled in so that hosts that cannot lookup records are not allowed to perform transfers either.
- The fields Check names in master zones? and Check names in slave zones? control the checking of records in all zone files for master and slave zones respectively. The available options for each are:
- Warn
- If an invalid record is found, an error will be written to the system log file but processing of other records continues normally.
- Fail
- Invalid records cause the entire zone to be rejected, but other zones will still be processed normally.
- Ignore
- No checking is done at all.
- Default
- The default checking level is used, which is Fail .
- To have BIND check responses that it receives from other DNS servers, set the Check names in responses? field to Warn or Fail . The default is simply to pass potentially erroneous responses on to clients.
- The Notify slaves of changes? field determines whether BIND sends a notification to all slaves of master zones hosted by this server when they change. To turn this on, select Yes - otherwise, select No or Default . Enabling notification is a good idea, as it ensures that secondary servers are kept in sync with the master.
- When done, click the Save button at the bottom of the page to update the BIND configuration file, and then the Apply Changes button on the module's main page to make the changes active. The new settings will apply to all zones that do not explicitly override them on their own options pages.
Configuring forwarding and transfers
BIND can be configured to forward all requests for zones that it is not the master or slave for to another DNS server. When doing this, it acts like a DNS client itself, accepting requests from real clients and then sending them off to another server or servers for resolution instead of carrying out the normal process of contacting the root zone servers and finding the correct server for the domain. This can be useful if your DNS server is unable to contact the rest of the Internet, but can still communicate with a DNS server that does have full network access. For example, it may be on an internal network behind a firewall that only allows connections to a limited set of destinations.
To set up forwarding, the steps to follow are:
- On the module's main page, click on the Forwarding and Transfers icon.
- In the form that appears, fill in the Servers to forward queries to field the IP addresses of DNS servers that requests should be sent to. BIND will try them in order until one returns a positive or negative a response. If the list is empty, the server will revert to the normal method of looking up records by contacting the root servers and so on.
- If you want your server to attempt to resolve a client's query directly when it cannot contact any of the forwarding servers, set the Lookup directly if no response from forwarder field to Yes . This is only useful if your server is actually capable of doing lookups.
- Fai clic su Salva button at the bottom of the page, and then hit Apply Changes back on the main page to make the new setting active. Assuming the forwarding list was filled in, your server will now send all client queries to the listed servers.
The same form also contains fields for configuring BIND's behavior when doing zone transfers. You can control how long it will wait for a transfer to complete, the protocol used for transfers and the number that can be active at the same time. To edit these settings, follow these steps:
- On the module's main page, click on the Forwarding and Transfers icon.
- By default, BIND will wait 120 minutes (2 hours) for a zone transfer from a master to complete. To change this, enter a different number of minutes into the *Maximum zone transfer time* field. This can also be set or overridden on a per-slave zone basis.
- BIND versions before 8.1 only support the transfer of a single zone at a time. Because this can be slow when transferring many zones from the same master server, the *Zone transfer format* field can be set to Many to use a new format that combines multiple domains into the same transfer. If One at a time or Default is chosen, then each zone will be transferred separately. This is the best choice unless you are sure that all slave servers are running BIND 8.1 or above.
- By default, your nameserver will not carry out more than 2 concurrent zone transfers from the same master server. To increase this limit, change the *Maximum concurrent zone transfers* field to something higher. This can speed up the process of transferring a large number of domains, but at the expense of putting a higher load on the master server.
- Fai clic su Salva button when you are done making changes, and then Apply Changes on the main page to activate them. The new settings will apply to all subsequent zone transfers.
Editing access control lists
An access control list (or ACL) is list of IP addresses, IP networks or other ACLs that are grouped together under a single name. The ACL name can then be used when specifying the list of clients allowed to query, update or perform zone transfers from a zone. This can make be used to reduce the amount of duplication in your BIND configuration, and to make it clearer. For example, the ACL corpnet might match the IP networks 192.168.1.0/24 , 192.168.2.0/24 and 1.2.3.0/24 , which are all part of your company's network. When configuring who can query a zone, you could just enter corpnet instead of that list of network addresses. To view and edit ACLs in Webmin, the steps to follow are :
- On the module's main page, click on the Access Control Lists icon. This will take you to a page listing existing ACLs and allowing the addition of one more. If you want to add more than one ACL, you will need to save the form and re-edit it to force the display of a new blank row.
- To add a new ACL, find the blank row at the bottom of the table and enter a short name consisting of only letters and numbers in the ACL Name colonna. Then in the field under *Matching addresses, networks and ACLs*, enter a list of IP addresses, IP networks and other ACL names that this new ACL will contain. IP addresses must be entered in their standard format like 192.168.1.1 , but hostnames are not allowed. IP networks must be entered in network/prefix format like 192.168.1.0/24 or 192.168.1/24 . You can also precede any address, network or ACL name with a ! to negate it, so for example the entry !192.168.1.0/24 would match all hosts outside the_ 192.168.1 _network.
- Existing entries in the list can be edited by changing their fields in the table, and ACLs can be deleted by clearing out the field containing their names.
- When you are done adding and editing ACLs, click the Save pulsante. To activate the changes, hit Apply Changes back on the main page. As soon as an ACL is created, it can be used in other query, transfer and update restrictions of other zones.
BIND has four built-in ACLs that can be used in all the same places that user-defined ACLs can. They are:
- any
- Matches any client address.
- none
- Matches nothing.
- localhost
- Matches the IP addresses of all network interfaces on your system. Even though it is called localhost, it doesn't just match 127.0.0.1.
- localnets
- Matches all clients on all networks that your system is directly connected to. BIND works this out by looking at the IP addresses and netmasks of all network interfaces.
Setting up partial reverse delegation
Partial reverse zone delegation is method for transferring the management of a small set of reverse IP addresses to another DNS server. Normally, reverse zones cover an entire class C network containing 256 addresses. However, many organizations have networks much smaller than this, containing maybe 16 or 32 addresses. Normally, this would make it impossible for the organization to manage its own reverse address mappings, as the addresses come from a network that is owned by an ISP or hosting company.
Fortunately, there is a solution - the ISP can set up Name Alias (CNAME) records in the reverse zone for the parent network that point to Reverse Address records in a special zone on the organization's DNS server. The parent zone must also contain a Name Server (NS) record for the special sub-zone that points to the customer's server, so that other DNS clients know where to look when resolving the Name Alias records.
An example may make this clearer - imagine for example than an ISP had granted addresses in the range 192.168.1.100 to 192.168.1.110 to Example Corporation, which owns the example.com domain. The company already runs its own DNS server to host the example.com zone, but wants to control reverse address resolution for its IP range as well. The ISP would create Name Alias records in the 192.168.1 zone pointing to the special sub-zone 192.168.1.100-110, which will contain the actual Reverse Address records named like 192.168.1.100-100.101. The ISP also needs to create a Name Server record for 192.168.1.100-110 which tells other servers that Example Corporation's DNS server should be used to find records under that zone.
Webmin handles reverse address delegation well, and automatically converts special network zones like 192.168.1.100-110 to and from the real zone names used by BIND such as 100-110.1.168.192.in-addr.arpa. The exact steps to follow on both the server that hosts the actual class C network zone and the server that a subset of it is being delegated to are :
- Decide on the range of addresses that are being delegated, such as 192.168.1.100 to 192.168.1.110 . Typically, the sub-zone name is based on the range of addresses being delegated, but this does not have to be the case as long as it is under the parent network domain.
- On the server that hosts the class C network zone, add a Name Server record for 192.168.1.100-110 with the server set to the IP address or name of the sub-zone's DNS server.
- For each address in the range, add a Name Alias record to the reverse zone named like 101.1.168.192.in-addr.arpa. with the Real Name set like 101.100-110.1.168.192.in-addr.arpa . As you can see, the alias points to a record inside the zone for the sub-network.
- When all of the Name Alias records have been created, everything that needs to be done on this server is finished and you can hit Apply Changes .
- On the DNS server for the sub-network, create a new master zone for the reverse network 192.168.1.100-110 . Webmin will automatically convert this to the correct in-addr.arpa format for you.
- Add Reverse Address records to the new zone as normal for IP addresses like 192.168.1.100-110.101 . Adding a record for the IP 192.168.1.101 will not work.
- When you are done creating reverse records, click the *Apply Changes* button to make them active. You should now be able to look them up using a command like nslookup on the server for the parent network zone.
The instructions above can be used to delegate multiple ranges from a single class C network to several different DNS servers. There is no limit on the size of ranges, nor any requirement that they follow normal network block boundaries - however, for routing reasons most IP allocation is done in power-of-two sized blocks (like 4, 8, 16 and so on), which means that any sub-zone ranges will be the same size.
The only problem with reverse address delegation when using Webmin is that Reverse Address are not automatically created and updated when Address records are. This means that you will have to create all such records manually on the sub-zone server, as in the steps above.
One inconvenience in setting up partial reverse delegation is the number of similar Name Alias records that must be created on the parent network zone server. Fortunately, there is a simpler alternative - record generators. A generator is a special BIND configuration entry that creates multiple similar records using an incrementing counter. This module allows you to created and edit generators, by following these steps :
- On the module's main page, click on the icon for the reverse zone that you want to create records in. This will typically be a class C network domain that is going to have a range of addresses delegated to some other Server.
- Click on the Record Generators icon. This takes you to a page containing a table of existing generators, with a blank row for adding a new one.
- In the empty row, select CNAME from the menu under the Type colonna.
- Under the Range column, enter numbers for the start and end of the address range into the first two fields, such as 100 and 110 . The third field is for entering the gap between each step, and should be left blank. If you were to enter 2, then the range would go 100 , 102 , 104 and so on.
- In the Address pattern field, enter _$_ (a single dollar sign). When the records are created, the $ will be replaced with the number of each record, which will in turn resolve to an IP address in the range. You could also enter $.1.168.192.in-addr.arpa. , which makes things more obvious but is longer to type.
- In the Hostname pattern field, enter $.100-110 . Similarly, the $ will be replace with the number of each record, which will resolve to something like 101.100-110. 1.168.192.in-addr.arpa. .
- If you like, enter a comment that describes what this generator is for into the Comment campo.
- Fai clic su Salva button, return to the module's main page and click on Apply Changes .
A generator can replace the Name Alias records that the first set of instructions in this section tell you to create, so there is no need for them anymore. Note that the automatically generated replacements will not be visible or editable in the normal way, only through the Record Generators page.
Using BIND views
BIND version 9 introduced the concept of views, which are groups of zones that are visible only to certain DNS clients. Views can be used to hide internal zones from the Internet, to present the same zone in two different ways, or to stop non-local clients resolving non-hosted domains through your server. Every view has a unique name, and a list of matching IPs addresses and IP networks that determines which clients and servers it is visible to.
When it detects that you are running BIND 9, several additional features are available in the module. You can create views, move zones from one view to another, and choose which view zones are created in. On the main page, each current view is represented by an icon under Existing Client Views heading, and each zone icon has a label that indicates which view it is in.
If any views exist, then every zone must be in a view. Only if none are defined will Webmin allow the creation of zones outside views, as this is not supported by BIND. This includes the root zone, which must be available to a client for DNS requests for records in domains not hosted by this server to succeed. For this reason, it often makes sense to put the root zone in a view that is available to all clients.
To add a new view to your BIND configuration, the steps to follow are:
- On the module's main page, click on the Create a new view link in the Existing Client Views sezione. This will take you to a form for entering its details.
- Enter a short alphanumeric name for the view (such as internal or everyone ) into the View name campo. Each view must have a unique name.
- Leave the DNS records class field set to Default .
- If this zones in this view are to be visible to everyone, set the Apply this view to clients field to All clients . Otherwise, choose Selected addresses, networks and ACLs and enter a list of IP addresses, IP networks and BIND ACL names into the text box below. Only clients that match one of the entries in this list will have access to the view.
- Click the Create button at the bottom of the form. You will be returned to the main page, which will include an icon for your new view.
- Move any existing zones that you want to be in this view into it. A zone can be moved by clicking on its icon, then on *Edit Zone Options*, and then selecting the new view from the menu next to the Move to view button before clicking it. If this is your first view, all existing zones must be moved into it (or another view) before the new configuration will be accepted by BIND.
- When you are done moving zones, click the Apply Changes button on the main page.
Once a view has been created, you can change the list of addresses and networks that it matches by clicking on its icon on the main page and updating the Apply this view to clients campo. Then hit the Save button followed by Apply Changes to make the new client list active.
A view can be deleted by clicking the Delete button on the same form. This will bring up a confirmation page that allows you to choose what should happen to the zones that it contains, if any. The available options are:
- Delete totally
- All zones in the view are deleted, along with their records files.
- Move out of views
- Zones in the view are moved out to the top level. This option should only be used when deleting the last view, for the reasons explained above.
- Move to view
- Zones are moved to a different existing view.
When one or more views have been defined on your system, you can choose which one to use when adding new zones. This is done using the Create in view field on the master, slave, forward and root zone creation forms, which allows you to select a view from its menu. Naturally, there is no option for creating a zone outside of any views as this is not allowed by BIND.
One common use of views is hiding internal zones from clients outside your internal network. This is a good way of hiding the structure of your network and the hosts on it from potential attackers. To set it up, the steps to follow are:
- Create a new view called internal that matches clients on your internal LAN.
- Create a second view called everyone that matches all clients.
- Move any zones that are for internal use only into the internal view. Zones for Internet domains such as example.com must not be put in this view, as that would make them inaccessible to the rest of the world.
- Move all other zones (including the root zone) to the everyone view.
Views can also be used to prevent clients outside your network looking up non-hosted domains on your server, as follows:
- Create a new view called internal that matches clients on your internal LAN.
- Create a second view called everyone that matches all clients.
- Move the root zone to the internal view, which will prevent the server from looking up records for non-local clients that require contact with the root servers.
- Move all other zones to the everyone view.
Module access control
Like others, the BIND DNS Server module allows you to control which of its features are available to a particular Webmin user or group. This can be useful for giving people the rights to manage only records in their own zones and nobody else's. Even though this would normally require root access to the records files, with Webmin it can be granted to people without giving them level of power that a root login would allow.
Once you have created a user with access to the module as explained on WebminUsers, the steps to limit his access to only certain zones are:
- Click on the BIND DNS Server next to the name of the user in the Webmin Users module. This will being up a page of access control options.
- Change the Can edit module configuration? field to No , so that the user is not allowed to change the paths that the module uses to named.conf and other files.
- For the *Domains this user can edit *field, choose *Selected zones* and select the ones that you want him to have access to from the list to its right. If you want him to be able to edit almost all zones, it may be better to choose All except selected and select only those that he should not be allowed to manage records in. If your DNS server uses views, you can use the *Zones in view* options to allow or deny access to all zones in a view as well.
- Change the fields Can create master zones? , *Can create slave/stub zones?*, Can create forward zones? and *Can edit global options?* to No .
- If you want Reverse Address records in zones that the user does not have access to to be updated by changes to Address records in zones that he does, set the *Can update reverse addresses in any domain?* field to Yes . This may not be a good idea from a security point of view though, as he would be able to change almost any existing Reverse Address record on your system. For that reason, I suggest that this field be set to No .
- To stop the user creating more than one Address record with the same IP, set the *Can multiple addresses have the same IP? field to *No . Even though creating multiple records is harmless, you may want to set this to No to prevent the user allocating the same IP twice.
- Leave the Read-only access mode? field set to No . If it is changed to Yes , the user will only be able to view zones and records using the module, and not change anything. This might be useful for creating a different kind of restricted user though - one who can see all settings, but not edit them.
- Leave the Can apply changes? field set to Yes , so that he can use the Apply Changes button to make his additions and modifications active.
- Unless you want the user to be able to edit his records file manually, change the Can edit records file? field to No . Most un-trusted users are not smart enough to perform manual editing.
- The Can edit zone parameters? field determines if the user can see and use the Edit Zone Parameters icon for his domains. Setting this to Yes is quite safe, as the user can only harm his own zones by setting the parameters to silly values.
- Similarly, the Can edit zone options? field determines if the Edit Zone Options icon is visible or not. You should set this to No , as it is possible for a user to create a syntax error in named.conf by improper use of the zone options form.
- Unless you want the user to be able to delete his own domains, change the Can delete zones? field to No . Users should contact the master administrator instead if they can to delete zones.
- The Can edit record generators? field can be left set to Yes , as it simply allows the creation of multiple records at once. However, some users may get confused by this feature so it might be a good idea to change the field to No .
- The Can lookup WHOIS information? And *Can search for free IP numbers?* fields can also be left on Yes , as those features mere display information to the user.
- Change the Can create and edit views? field to No , so that the user cannot manage BIND 9 views. If the user is allowed to create zones, you can use the *Views this user can edit and add zones to* field to limit those that he can create zones in.
- Can create slave zones on remote servers? should be set to No , but this doesn't really matter as the user is not going to be allowed to create master or slave zones anyway.
- Finally, click the Save button to make the new restrictions for the user active.
See also:
- Resolution for Virtual Hosts