La Configurazione Webmin esiste per consentire la configurazione di Webmin stesso, a differenza della maggior parte degli altri moduli progettati per configurare qualche altro server o servizio. Ti consente di fare cose come cambiare la porta e utilizza Webmin, limitare gli indirizzi dei client che possono connettersi, cambiare il tema e la lingua utilizzati dall'interfaccia utente e installare nuovi moduli. Questo capitolo spiega come utilizzare il modulo per eseguire queste attività.
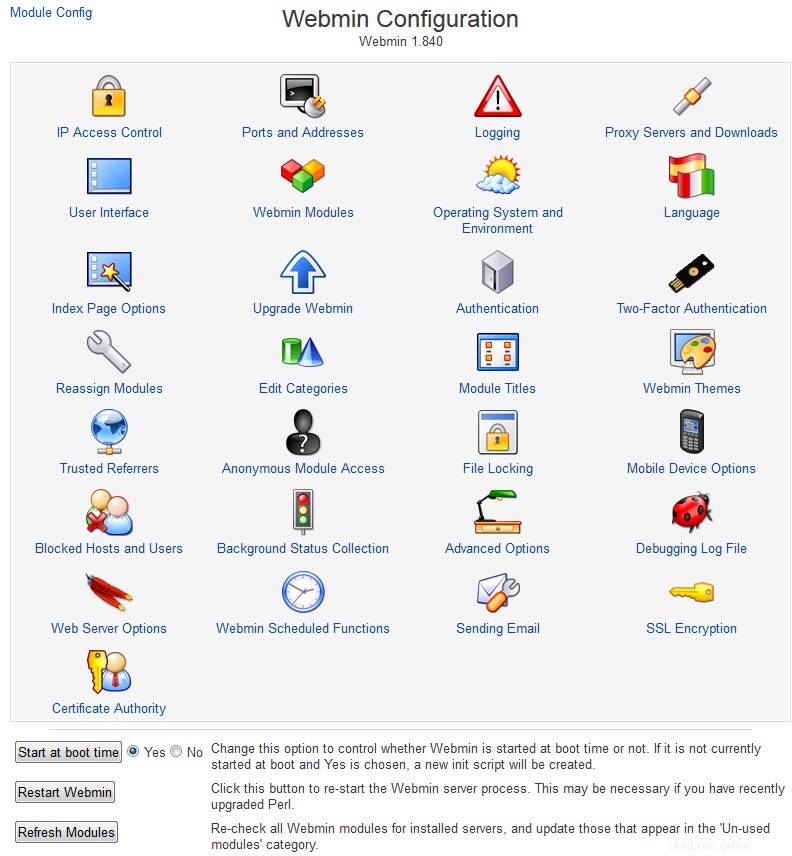
Quando si fa clic sull'icona del modulo nella categoria Webmin, verrà visualizzato il menu di icone mostrato nell'immagine sottostante. È possibile fare clic su ciascuna delle icone per visualizzare una pagina di configurazione o un modulo in cui è possibile modificare alcune impostazioni di Webmin.

Contenuti
 Controllo accessi IP
 Controllo dell'accesso IP
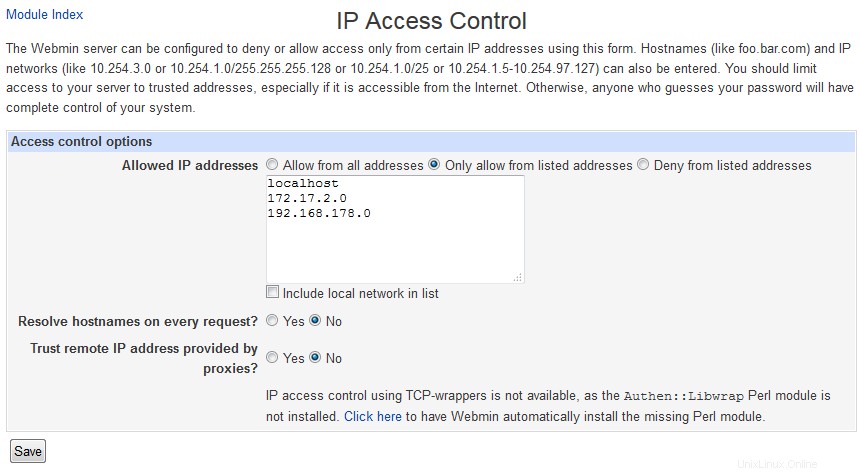
 Per impostazione predefinita Webmin accetterà connessioni da qualsiasi indirizzo IP. Anche se è protetto da password, dovresti limitare l'accesso solo ai sistemi client legittimi, se possibile, in modo che un utente malintenzionato dall'esterno della tua rete non possa nemmeno tentare di accedere. I passaggi da seguire per farlo sono:
- Fare clic su Controllo accesso IP nella pagina principale del modulo per visualizzare il modulo di controllo accessi.
- Seleziona Consenti solo dagli indirizzi elencati e inserisci un elenco di nomi host, indirizzi IP e reti nella casella di testo adiacente. Le reti devono essere inserite con una maschera di rete come 192.168.1.0/255.255.255.0 . Puoi consentire l'accesso da un intero dominio DNS inserendo qualcosa come *.example.com , ma tieni presente che non è del tutto sicuro in quanto un utente malintenzionato può falsificare i risultati DNS inversi.
- Normalmente Webmin risolverà tutti i nomi host inseriti solo una volta, al primo avvio. Per modificare questo, seleziona la casella *Risolvi nomi host su ogni richiesta*t e convertirà i nomi host in indirizzi IP per il confronto per ogni richiesta. Questo può essere utile se il sistema su cui stai eseguendo un browser cambia frequentemente l'indirizzo IP, ma è in grado di aggiornare un record DNS in modo che corrisponda. Questo può accadere su una rete che utilizza DHCP o se sei connesso a un ISP che assegna gli indirizzi in modo dinamico.
- Per fare in modo che Webmin controlli anche i file di configurazione dei TCP-wrappers /etc/hosts.allow e /etc/hosts.deny quando si decide se consentire un client, attivare *Controlla anche TCP-wrappers hosts.allow e hosts Opzione .nega file*. Il nome del servizio da utilizzare durante la modifica di tali file è webmin.
- Premi Salva pulsante per attivare le nuove restrizioni sull'indirizzo del cliente.
 Porte e indirizzi
 Porte e indirizzi
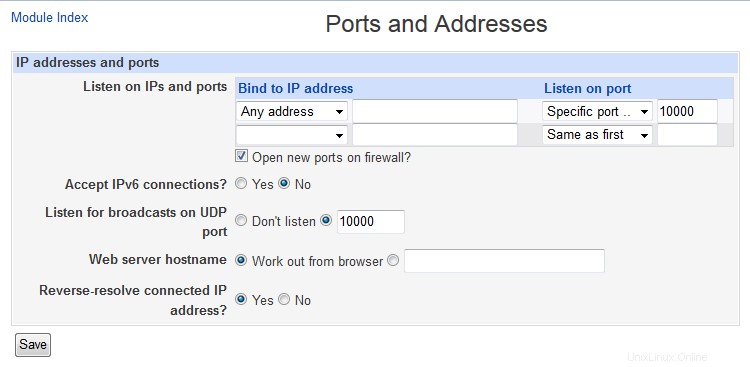
 Webmin di solito ascolta le connessioni sulla porta 10000 su tutti gli indirizzi IP del tuo sistema. Potrebbe essere necessario modificare la porta, forse perché un firewall sulla rete consente connessioni a server Web solo sulle porte standard di 80 e 443. Poiché la porta 10000 può essere utilizzata da server gestiti da qualsiasi utente, potrebbe essere possibile un utente malintenzionato sul tuo sistema per attendere la chiusura di Webmin e quindi avviare il proprio server Webmin falso su quella parte, che potrebbe acquisire la password di amministratore o root. Per questo motivo potresti voler utilizzare invece una porta inferiore a 1024 (su cui solo i programmi eseguiti come root possono ascoltare). La modifica dell'indirizzo IP di ascolto può essere utile anche se il sistema dispone di più interfacce di rete e si desidera consentire solo le connessioni sull'interfaccia collegata alla LAN interna.
Per modificare la porta o l'indirizzo, procedi come segue :
- Fai clic su Porta e indirizzo icona nella pagina principale del modulo.
- Per ascoltare solo su un indirizzo di interfaccia specifico, seleziona la seconda opzione in Ascolta su indirizzo IP campo e inserisci un IP nella casella di testo accanto ad esso. Questo deve essere l'indirizzo di una delle interfacce reali o virtuali del tuo host.
- Per modificare la porta, inserisci un numero in Ascolta sulla porta campo.
- Premi Salva pulsante per utilizzare le nuove impostazioni. Il tuo browser verrà reindirizzato alla nuova porta e indirizzo e potrebbe essere necessario effettuare nuovamente il login.
 Registrazione
 Registrazione
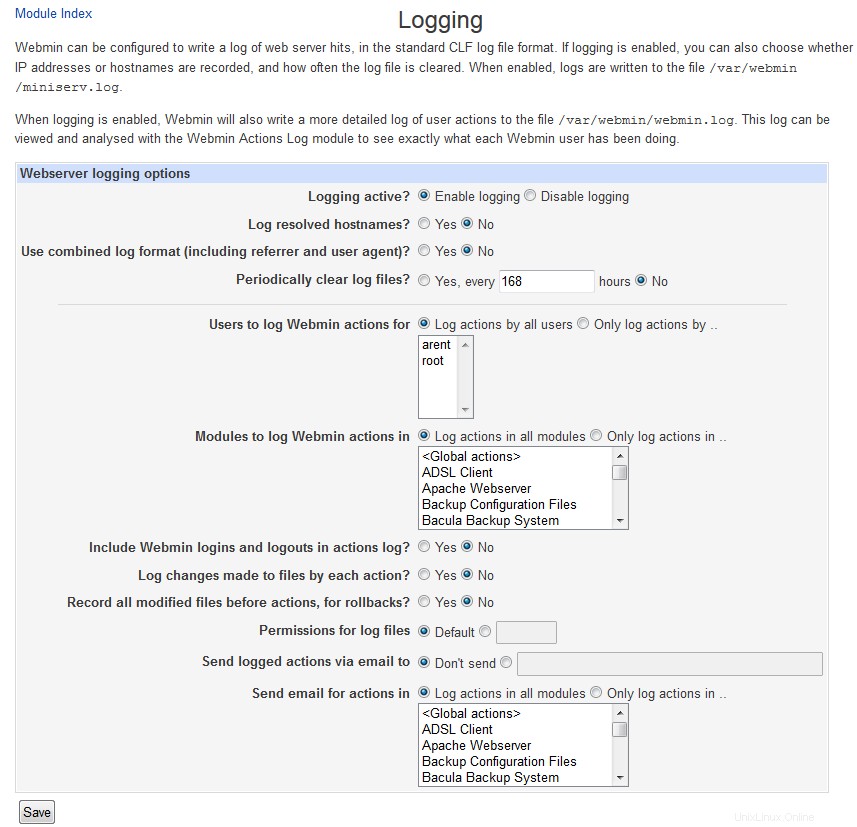
 Come la maggior parte dei server Web, Webmin può essere configurato per creare un file di registro nel formato CLF standard che registra ogni richiesta che riceve. Inoltre, crea anche un registro delle azioni eseguite dagli utenti, come la creazione di una zona DNS o l'eliminazione di un gruppo Unix. Questo registro delle azioni può anche includere i dettagli di ogni file modificato e comando eseguito da ciascuna azione, in modo che tu possa vedere cosa sta facendo Webmin sotto il cofano.
La registrazione di base è abilitata per impostazione predefinita, ma puoi configurarla ulteriormente seguendo questi passaggi:
- Fai clic su Registrazione icona nella pagina principale.
- Se Disabilita la registrazione è selezionato, Webmin non scriverà alcun registro. Tuttavia, dovresti scegliere Abilita registrazione per attivarlo.
- Se il log ha risolto i nomi host la casella è selezionata il file di registro conterrà i nomi host dei client effettivi anziché gli indirizzi IP. Ciò può causare problemi se le ricerche DNS inverse richiedono molto tempo sulla rete, poiché sarà necessario eseguirne una per ogni richiesta.
- Per evitare che i file di registro diventino troppo grandi, Webmin può essere configurato per troncarli periodicamente. Per abilitare questa funzione, seleziona Cancella file di registro ogni e inserisci un numero di ore nel campo di testo adiacente.
- Per limitare la registrazione delle azioni solo a utenti specifici, seleziona Registra solo le azioni per opzione e scegli alcuni utenti dall'elenco accanto ad essa. Questo può essere utile se la maggior parte dei tuoi utenti può eseguire solo attività che non ti interessano molto e vuoi invece registrare solo le azioni intraprese dagli amministratori più potenti.
- Per limitare la registrazione delle azioni solo a moduli specifici, seleziona Accedi solo alle azioni opzione e scegli uno o più moduli dalla sua lista.
- Per abilitare la registrazione delle modifiche ai file e dei comandi eseguiti per ciascuna azione, selezionare la casella *Registra modifiche apportate ai file da ciascuna azione *. Ciò occuperà più spazio su disco, ma fornisce alcune informazioni molto utili e interessanti.
- Premi Salva pulsante per attivare le modifiche.
Il modulo Webmin Actions Log spiega come cercare e visualizzare le azioni dopo aver abilitato la loro registrazione qui. Questo può essere utile per scoprire chi ha fatto cosa sul tuo sistema se hai più amministratori con accesso al server.
 Server proxy e download
 Server proxy
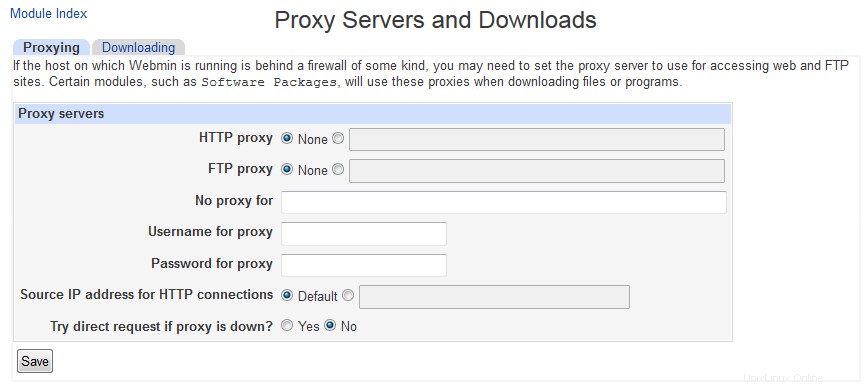
 Molti moduli Webmin sono in grado di scaricare file da altri server FTP, HTTP e HTTPS. Ad esempio, il modulo Pacchetti software consente di inserire un URL da cui recuperare e installare un nuovo pacchetto. Normalmente Webmin si connetterà direttamente all'host specificato nell'URL, ma può essere configurato per utilizzare invece un server proxy. Ciò potrebbe essere necessario se la tua rete non consente l'accesso diretto a siti Web e FTP, ma costringe invece i client a connettersi tramite un proxy.
Il meccanismo RPC di Webmin (coperto in Webmin Servers Index) utilizza anche le richieste HTTP ad altri server Webmin. Qualsiasi configurazione proxy si applicherà anche alle chiamate RPC, sebbene non alle connessioni TCP dirette utilizzate dal protocollo RPC in modalità rapida o durante il trasferimento di file di grandi dimensioni. Poiché è probabile che qualsiasi altro server Webmin si trovi sulla stessa rete, probabilmente vorrai disabilitare l'utente di un proxy per quegli host.
Per specificare i server proxy HTTP e FTP e gli host per i quali verranno utilizzati, attenersi alla seguente procedura:
- Nella pagina principale del modulo Configurazione Webmin, fare clic su Server proxy icona.
- Se desideri utilizzare un proxy per le richieste HTTP, seleziona il secondo pulsante di opzione nel Proxy HTTP campo e inserisci un URL completo come http://proxy.example.com:8080/ nella casella di testo accanto. Se Nessuno viene scelto, non verrà utilizzato alcun proxy. Questo server specificato verrà utilizzato anche per le connessioni HTTPS effettuando richieste proxy CONNECT, quindi assicurati che le supporti e le consenta.
- Allo stesso modo, puoi inserire un proxy da utilizzare per i download FTP nel Proxy FTP campo. Di solito questo sarà lo stesso del proxy HTTP.
- Per disabilitare l'uso di un proxy per determinati host, compila il campo Nessun proxy per campo con un elenco separato da spazi di nomi host, nomi di dominio e indirizzi IP completi o parziali. Ad esempio, puoi inserire .example.com 192.168.1. per fare in modo che Webmin si connetta direttamente agli host in quel dominio e rete.
- Se il tuo proxy richiede ai client di autenticarsi, inserisci il Nome utente per proxy e Password per proxy campi.
- Premi Salva pulsante per fare in modo che Webmin inizi a utilizzare le nuove impostazioni.
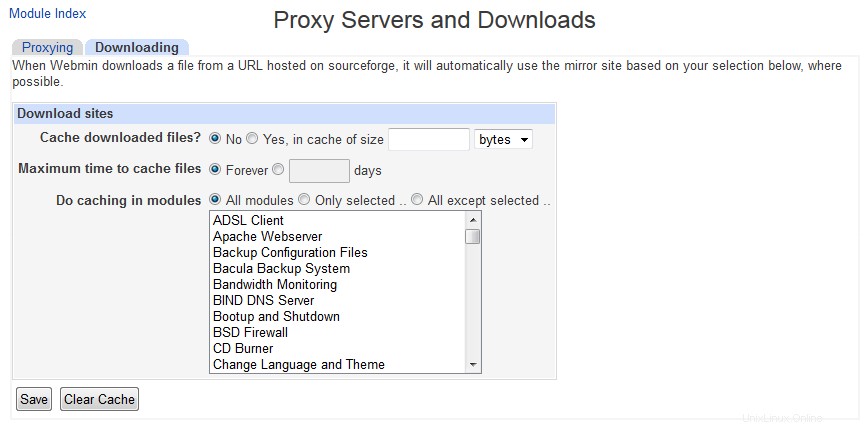 Download
  Interfaccia utente
Webmin ha diverse impostazioni che controllano la combinazione di colori dell'interfaccia utente (quando si utilizza il Tema Webmin vecchio ), quali informazioni sull'host del server vengono visualizzate in ciascuna pagina e se è consentito l'invio di feedback. Puoi modificarli seguendo questi passaggi :
- Nella pagina principale del modulo, fai clic su Interfaccia utente icona per visualizzare il modulo delle opzioni dell'interfaccia.
- I primi cinque campi consentono di scegliere i colori da utilizzare per le varie parti dell'interfaccia quando si utilizza il tema vecchio stile. Per ciascuno puoi selezionare Predefinito oppure inserisci tre numeri esadecimali per i componenti rosso, verde e blu di un colore. Ad esempio, FF 88 00 sarebbe una sfumatura di arancione. Tuttavia, queste opzioni non hanno alcun effetto sul nuovo tema predefinito.
- In alcuni temi, il titolo nella parte superiore di ogni pagina viene visualizzato come un'immagine. Poiché ciò può rallentare il download della pagina, puoi invece forzare l'uso di titoli di testo HTML semplici modificando Visualizzare i titoli come testo? campo su Sì .
- Per impostazione predefinita, ogni pagina di Webmin mostra il nome host e il sistema operativo del tuo sistema nella barra di stato del browser. Per visualizzarlo altrove o disattivarlo del tutto, seleziona una delle seguenti opzioni da Mostra login e nome host menu :*Nella parte inferiore del browser *Le informazioni vengono visualizzate nell'area di stato del browser, che di solito si trova nella parte inferiore della finestra. *Nel titolo del browser *Le informazioni vengono aggiunte al titolo di ogni pagina, che di solito appare nel titolo della finestra del browser. *Sopra l'intestazione della pagina *Le informazioni sono mostrate sopra il titolo di ogni pagina. *Nowhere *Le informazioni sul nome host e sul sistema operativo non vengono visualizzate da nessuna parte. Se sei preoccupato che utenti non attendibili imparino troppo sul tuo sistema, questa è l'opzione da scegliere.
- Quando si utilizza il tema predefinito, ogni pagina in Webmin ha un collegamento nell'angolo in alto a destra per inviare feedback allo sviluppatore. Tuttavia, potresti volerlo configurare in modo che il feedback venga invece inviato all'amministratore di sistema principale, in modo che altri utenti possano contattarti. A tale scopo, inserisci il tuo indirizzo email in Invia feedback a campo e cambia il campo *Consenti l'invio di feedback?* in Solo all'indirizzo sopra . L'invio di feedback può essere completamente impedito selezionando No in quest'ultimo campo invece.
- Fai clic su Salva pulsante per attivare le nuove impostazioni dell'interfaccia utente.
 Moduli Webmin
 Moduli Webmin Install/Clone/Delete/Export
 Come spiega il primo capitolo di questo libro, Webmin è essenzialmente una raccolta di moduli, ognuno dei quali esegue alcune attività come la configurazione di Apache o la gestione degli utenti Unix. Un modulo può essere aggiunto o rimosso senza influenzare il funzionamento di altri, supponendo che non dipendano da esso. Anche se la distribuzione principale di Webmin include 76 moduli al momento della scrittura, oltre 100 altri scritti da altre persone sono disponibili per il download dal sito web webmin.thirdpartymodules.com. Questo è un database ricercabile di moduli e temi che eseguono attività che i moduli principali non svolgono, come la gestione del firewall di FreeBSD, la visualizzazione delle informazioni di sistema e la connessione a un server VNC.
- Installazione in corso
Una volta trovato un modulo che ti piace, puoi installarlo seguendo questi passaggi:
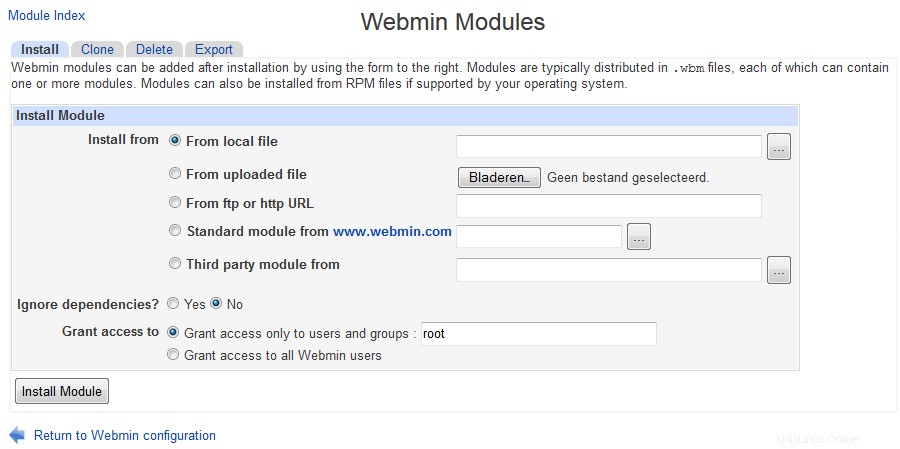
- Nella pagina principale, fai clic su Moduli Webmin icona. Questo ti porterà a una pagina con i moduli per l'installazione, la clonazione e l'eliminazione dei moduli.
- Se hai già scaricato il file .wbm del modulo sul sistema su cui è in esecuzione Webmin, seleziona Da file locale e inserisci il percorso completo del file nel campo di testo accanto ad esso.
- In alternativa, se il file del modulo si trova sul PC su cui è in esecuzione il tuo browser web, seleziona Da file di caricamento e usa il pulsante Sfoglia per trovare il file sul tuo computer.
- Se invece il modulo è su un sito web da qualche parte, seleziona *Da ftp o http URL* e inserisci l'URL completo nella casella di testo accanto a questa opzione.
- Webmin normalmente interromperà l'installazione di un modulo se non sono disponibili altri moduli da cui dipende o se è stato scritto per una versione successiva di Webmin. Per evitare ciò, controlla Ignora le dipendenze del modulo durante l'installazione scatola. Tuttavia, ciò potrebbe consentire l'installazione di un modulo che non funzionerà. Tuttavia, non ti consentirà di aggiungere moduli che non supportano il sistema operativo del server.
- Per controllare a chi verrà concesso questo nuovo modulo, seleziona Concedi accesso solo a utenti e gruppi opzione e inserisci un elenco di utenti Webmin e nomi di gruppi nella casella di testo adiacente. Per impostazione predefinita, viene elencato solo l'utente a cui sei attualmente connesso. In alternativa puoi fornirlo a tutti gli utenti e gruppi scegliendo Concedi accesso a tutti gli utenti Webmin .
- Premi Installa modulo da file pulsante per scaricare (se necessario) e installare il nuovo modulo. Se tutto va bene verrà visualizzata una pagina che elenca i moduli installati e le dimensioni delle loro directory.
Webmin viene fornito con uno script chiamato install-module.pl che può essere trovato nella directory principale di installazione. Se hai installato la versione RPM, questa sarà /usr/libexec/webmin, altrimenti sarà dove è stato estratto il file tar.gz. Questo script può essere utilizzato per installare un modulo dalla riga di comando, passandogli il file .wbt come parametro. Verrà concesso solo all'utente root o amministratore, se esistente, o al primo account elencato nel modulo Utenti Webmin in caso contrario.
Tutti i moduli attualmente installati, inclusi quelli forniti con Webmin per impostazione predefinita, possono essere eliminati anche sulla stessa pagina. Tuttavia, l'eliminazione dei moduli predefiniti non è una buona idea, poiché verranno automaticamente reinstallati al prossimo aggiornamento. Invece è meglio togliere l'accesso che non vuoi usare con il modulo Utenti Webmin. Non tutti i moduli possono essere eliminati, poiché alcuni dipendono da altri moduli (come Processi in esecuzione). Né è possibile eliminare questo modulo.
- Eliminazione
Per rimuovere uno o più moduli, i passaggi da seguire sono:
- Fai clic su Moduli Webmin icona nella pagina principale.
- Scorri verso il basso fino all'ultimo modulo della pagina e seleziona tutti i moduli che desideri rimuovere da Elimina moduli elenco. Anche i cloni (spiegati più avanti) possono essere eliminati se non sono più necessari. L'eliminazione di un modulo che ha cloni rimuoverà automaticamente anche loro.
- Quando premi Elimina moduli selezionati verrà visualizzata una pagina di conferma che mostra esattamente cosa verrà rimosso. Oppure, se ci sono alcuni problemi di dipendenza che impediscono l'eliminazione di uno o più, verrà invece visualizzato un messaggio di errore che spiega il problema.
- Per rimuovere l'accesso al modulo da tutti gli utenti e ripristinare tutte le impostazioni di controllo accessi ai valori predefiniti, seleziona Rimuovere dagli utenti e ripristinare le impostazioni di controllo accessi? scatola. Questo può essere utile se prevedi di reinstallare il modulo in futuro e non vuoi che sia disponibile per le stesse persone che potrebbero usarlo prima.
- Fai clic su Elimina per procedere con la rimozione del modulo. Verrà visualizzata una pagina che mostra esattamente quali moduli sono stati eliminati, insieme al numero di byte eliminati per ciascuno.
- Clonazione di un modulo Webmin
In alcune situazioni potresti desiderare di avere lo stesso modulo Webmin installato due volte, in modo che ciascuno possa essere configurato individualmente. Questo può essere utile se ad esempio hai due versioni di Apache installate, forse una per il test e una per la produzione. Il modulo Apache standard può essere configurato per gestirne solo uno alla volta, quindi potrebbe sembrare che l'unico desiderio di configurare entrambi i server sia installare Webmin due volte.
Tuttavia, esiste una soluzione:la clonazione del modulo. Un clone è una copia di un modulo esistente che condivide tutto lo stesso codice, ma può essere configurato separatamente, assegnato a utenti diversi e avere il controllo dell'accesso utente impostato in modo indipendente. Per creare un clone, segui questi passaggi :
- Fai clic su Moduli Webmin icona nella pagina principale.
- Vai al secondo modulo, intitolato Modulo clone e seleziona il modulo originale da Modulo da clonare menu.
- Nel nome del modulo clonato immettere un nuovo nome da visualizzare sotto l'icona del clone, ad esempio Test del server Apache .
- Se vuoi che questo modulo appaia in una categoria diversa dall'originale, selezionalo da Assegna a categoria menu.
- Premi il Modulo Clona pulsante. La copia verrà creata e concessa all'utente con cui sei attualmente connesso e il tuo browser tornerà alla pagina principale di Configurazione Webmin.
- Ora puoi passare al nuovo modulo, che per impostazione predefinita sarà configurato in modo identico all'originale. La Configurazione del modulo link può quindi essere utilizzato per configurarlo in modo da utilizzare file di configurazione e percorsi di programma diversi, se necessario. Se cloni un modulo come Comandi personalizzati o Stato del sistema e del server, anche tutti i comandi o i monitor esistenti verranno copiati nel clone. Puoi eliminarli se lo desideri, senza modificare le impostazioni nel modulo originale.
Ci sono alcuni trucchi intelligenti che possono essere eseguiti con la clonazione, come fare una nuova copia del modulo Stato del sistema e del server che viene eseguito su una pianificazione diversa, fare una copia del modulo Utenti e gruppi per gestire gli utenti NIS o avere più del modulo Fetchmail per diversi file di configurazione.
- Moduli aggiunti dopo l'aggiornamento
Ogni volta che un nuovo modulo è stato aggiunto durante l'aggiornamento (automatizzato), dovrai aggiungere quel modulo agli utenti che possono accedere al nuovo modulo.
 Sistema operativo e ambiente
Webmin si comporta in modo diverso a seconda del sistema operativo o della distribuzione Linux che hai installato e della versione particolare che stai eseguendo. Il sistema operativo corretto viene sempre rilevato automaticamente al momento dell'installazione o fornito dall'installatore, ma è del tutto possibile che il sistema venga aggiornato durante il ciclo di vita del sistema. Se ciò accade, Webmin non rileverà automaticamente l'aggiornamento:devi comunicarlo seguendo questi passaggi:
- Fare clic su Sistema operativo e ambiente icona nella pagina principale del modulo.
- Seleziona il fornitore e la versione di Unix dall'elenco *Nuovo sistema operativo*.
- Premi Salva pulsante per fare in modo che Webmin inizi a usarlo.
Il sistema operativo e la versione rilevati al momento dell'installazione determinano i valori predefiniti per le configurazioni dei moduli, poiché ogni versione di Unix utilizza posizioni e formati diversi per i vari file di configurazione gestiti da Webmin. Tuttavia, la modifica del sistema operativo seguendo i passaggi precedenti non modificherà nessuna di queste impostazioni di configurazione. Invece, determinerà solo quali verranno utilizzati per i moduli installati in futuro. Di solito questo non è un problema, poiché la maggior parte degli aggiornamenti del sistema operativo non modificherà le posizioni di file e programmi. Tuttavia, alcuni moduli potrebbero dover essere configurati manualmente dopo un aggiornamento, ad esempio, potrebbe essere necessario modificare il sistema di stampa utilizzato dal modulo di amministrazione della stampante se la versione precedente del sistema operativo utilizzava LPRng e la nuova versione utilizza CUPS.
- Modifica del percorso del programma e delle variabili di ambiente
Quando esegui un comando come ls dalla shell Unix, la variabile di ambiente PATH determina le directory che la tua shell cercherà per trovare l'eseguibile effettivo, come /bin/ls. Webmin utilizza anche la variabile PATH per individuare i comandi che esegue quando non viene specificato un percorso completo, come webalizer o mysql. Per impostazione predefinita, questo elenco di directory è impostato per includere tutte le posizioni comuni per i programmi sul tuo sistema operativo, ma potrebbe non essere corretto se hai installato eseguibili in una directory non standard come /usr/local/samba/bin.
Allo stesso modo, la variabile di ambiente LD_LIBRARY_PATH determina dove i programmi cercano le librerie condivise che devono caricare durante l'esecuzione. Anche in questo caso, Webmin per impostazione predefinita imposta questa variabile in modo da includere tutte le directory delle librerie comuni sul tuo sistema operativo, ma potrebbe perderne alcune se hai compilato e installato i programmi manualmente. Un sintomo di ciò sono i programmi eseguiti da Webmin che falliscono con un messaggio di errore come libmysqlclient.so.6:open failed. Una libreria come questa potrebbe essere trovata in /usr/local/mysql/lib, che non è nel percorso di ricerca predefinito.
Puoi modificare questi percorsi e definire le tue variabili di ambiente che verranno passate a tutti i programmi eseguiti da Webmin seguendo questi passaggi:
- Fare clic su Sistema operativo e ambiente icona.
- Aggiungere eventuali directory di programma aggiuntive al campo *Percorso di ricerca del programma*. Ogni directory deve essere separata da un :(due punti), proprio come nella variabile di ambiente PATH. Tuttavia, le directory esistenti non devono essere rimosse o modificate, poiché potrebbero impedire il funzionamento di parti di Webmin.
- Aggiungi eventuali directory di librerie condivise aggiuntive al campo *Percorso di ricerca libreria*, sempre separate da due punti.
- A volte è utile fare in modo che Webmin passi altre variabili di ambiente ai programmi che esegue. Ad esempio, se avevi diversi comandi personalizzati collegati a Oracle, potresti voler impostare ORACLE_HOME in modo appropriato prima che vengano eseguiti. Le Variabili di ambiente aggiuntive la tabella consente di definirne alcuni. Basta inserire un nome nel primo campo vuoto sotto Nome variabile e un valore nel campo accanto sotto Valore . Come con la maggior parte delle tabelle in Webmin, questa mostra solo una riga vuota alla volta, quindi se vuoi aggiungere più di una variabile dovrai salvare e riaprire questa pagina.
- Quando hai finito di impostare percorsi e variabili, clicca su Salva pulsante per attivarli.
Qualsiasi programma eseguito da Webmin ha anche accesso a diverse variabili impostate dal web server stesso e passate ai programmi CGI che compongono Webmin. Ad esempio, REMOTE_USER contiene il nome dell'utente connesso e REMOTE_HOST l'indirizzo IP del client. Tutte le intestazioni HTTP sono memorizzate in variabili maiuscole che iniziano con HTTP_, quindi un programma può trovare informazioni sul browser dell'utente nella variabile HTTP_USER_AGENT, ad esempio.
 Lingua
Molti moduli Webmin sono stati tradotti in diverse lingue, come tedesco e giapponese. Puoi modificare la lingua predefinita per tutti gli utenti seguendo i passaggi seguenti, o per un solo utente nel modulo Utenti Webmin. Non tutte le traduzioni sono complete, quindi alcuni messaggi ed etichette appariranno comunque in inglese.
- Fai clic su Lingua icona nella pagina principale del modulo.
- Nel modulo visualizzato, seleziona la lingua preferita dai tuoi utenti da Visualizza in lingua menù.
- Alcuni browser (come Opera) possono richiedere che il server visualizzi le pagine in una lingua scelta dall'utente. Per fare in modo che Webmin rispetti tali richieste, se possibile, cambia il campo *Usa la lingua specificata dal browser?* su Sì . Se viene inviata una lingua, sovrascriverà le impostazioni degli utenti sia globali che individuali.
- Premi Salva pulsante per fare in modo che Webmin passi immediatamente alla nuova lingua.
Molte lingue (come cinese, giapponese e russo) utilizzano simboli che non si trovano nell'alfabeto europeo standard. Per visualizzarli spesso è necessario installare un font speciale sul sistema che esegue il browser utilizzato per accedere a Webmin. Alcune distribuzioni Linux includono questi caratteri per impostazione predefinita, ma altre no e l'installazione può essere piuttosto complessa.
 Opzioni della pagina indice
Oltre alle impostazioni generali dell'interfaccia utente che si applicano a tutte le pagine, ce ne sono alcune che controllano il layout del solo menu principale su cui vengono visualizzate le icone dei moduli. Possono essere utilizzati per disattivare la categorizzazione, controllare la visualizzazione del nome host e del sistema operativo del sistema e inviare gli utenti direttamente a un modulo per impostazione predefinita, tra le altre cose. Questi passaggi spiegano come modificare le impostazioni del menu principale :
- Fai clic su Opzioni pagina indice icona nella pagina principale del modulo Configurazione Webmin.
- Per impostazione predefinita, le icone dei moduli sono elencate quattro per riga. Se preferisci utilizzare un'ampia finestra del browser, questa potrebbe essere troppo piccola per utilizzare correttamente lo spazio disponibile. Modifica il Numero di colonne campo per modificare il numero di icone in ogni riga.
- Quando i Categorizzare i moduli? l'opzione è impostata su Sì , le icone vengono visualizzate sotto le categorie per ridurre il numero che appare in una qualsiasi pagina del menu principale. Selezionando No invece li metterà tutti su una grande pagina e rimuoverà l'elenco delle categorie dalla parte superiore di tutte le pagine quando si utilizza il tema predefinito.
- Quando un utente accede a Webmin, vedrà i moduli in Webmin categoria per impostazione predefinita. Se di solito utilizzi moduli in un'altra categoria, selezionala dalla Categoria predefinita menù.
- Quando Mostra versione, nome host e sistema operativo? il campo è impostato su Sì come è per impostazione predefinita, il menu principale mostra la versione Webmin, il nome host e il sistema operativo del tuo sistema. Se non desideri che queste informazioni siano messe a disposizione degli utenti per motivi di sicurezza, seleziona No invece.
- Se un utente Webmin ha accesso a un solo modulo, non ha alcun senso per lui vedere il menu principale, poiché conterrà solo un'icona. Per fare in modo che tali utenti vengano indirizzati immediatamente al loro unico modulo dopo l'accesso, modificare il campo Vai *diretto al modulo se l'utente ne ha solo uno?* su Sì .
- Fai clic su Salva per attivare queste nuove impostazioni del menu principale.
Alcuni temi non standard potrebbero non implementare tutte queste funzionalità, in particolare quelli che hanno i propri menu principali.
 Aggiorna Webmin
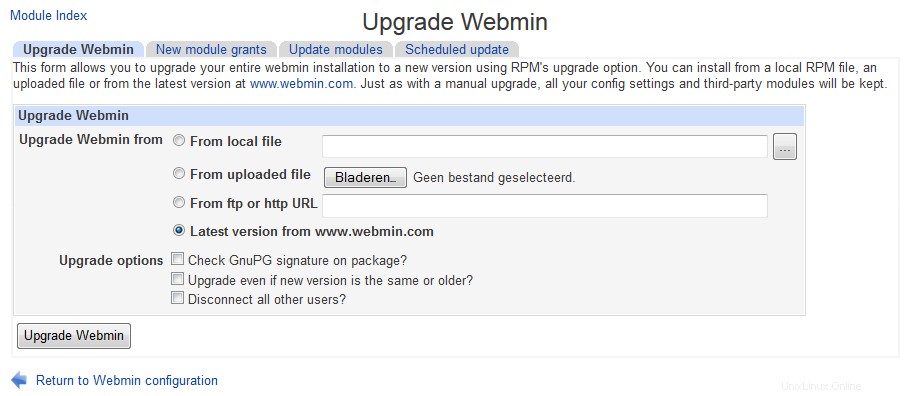
Aggiorna la schermata principale di Webmin Webmin ha la possibilità di aggiornarsi quando esce una nuova versione, da un file che hai già scaricato o da un pacchetto che recupera da www.webmin.com per te. Anche se è possibile eseguire l'aggiornamento dalla riga di comando installando l'ultimo pacchetto RPM o tar.gz, farlo dall'interno di questo modulo è ancora più semplice e meno soggetto a errori.
Webmin può essere aggiornato solo utilizzando lo stesso tipo di pacchetto da cui è stato originariamente installato. Ciò significa che se hai utilizzato originariamente il formato tar.gz, un aggiornamento può essere eseguito solo da un altro file tar.gz. Allo stesso modo, un'installazione RPM può essere aggiornata solo da un pacchetto RPM più recente. Ovviamente, quando Webmin scarica per te la versione più recente, sceglierà sempre il formato di pacchetto giusto.
Le versioni recenti hanno la capacità di controllare la firma digitale GnuPG sui pacchetti RPM e tar.gz per assicurarsi che siano autentici. Questo può essere fatto solo se hai il comando gpg installato sul tuo sistema e quando usi il pacchetto tar.gz solo quando esegui l'aggiornamento direttamente dal sito Webmin. Il controllo della firma ti protegge dall'installazione di versioni false di Webmin che in realtà è un cavallo di Troia o qualche altro tipo di programma dannoso.
Per aggiornare Webmin, segui questi passaggi:
- Fai clic su Aggiorna Webmin icona nella pagina principale del modulo. Questo ti porterà a una pagina con i moduli per l'aggiornamento, l'installazione dei moduli aggiornati e la configurazione dell'installazione automatica degli aggiornamenti.
- Il Aggiorna Webmin il modulo è molto simile al modulo per l'installazione dei moduli, spiegato nella sezione *Installazione ed eliminazione dei moduli Webmin*. Seleziona Da file locale se il nuovo pacchetto è già sul tuo sistema server, *Da file caricato* se è sul PC su cui è in esecuzione il tuo browser web, o *Da URL ftp o http* per scaricare il pacchetto da qualche URL. L'opzione più semplice è scegliere Ultima versione da www.webmin.com per scaricare automaticamente il pacchetto appropriato.
- Se Webmin sul tuo sistema è stato installato dal file tar.gz, Eliminare la directory della vecchia versione dopo l'aggiornamento? è possibile selezionare la casella per rimuovere la vecchia versione dopo l'installazione di quella nuova. A meno che tu non voglia essere in grado di ripristinare la versione precedente, questa opzione dovrebbe essere abilitata per risparmiare spazio su disco. Non appare affatto per le installazioni RPM, poiché il pacchetto RPM viene sempre installato nella stessa directory.
- Per far verificare la firma GnuPG sul pacchetto, se possibile, attivare Controllare la firma GnuPG sul pacchetto? opzione. È abilitato per impostazione predefinita se il programma gpg è installato sul tuo sistema.
- Premi Aggiorna Webmin pulsante per iniziare l'aggiornamento. Verrà visualizzata una pagina che mostra l'avanzamento del download (se necessario) e l'output dello script setup.sh della nuova versione. Se stai già eseguendo una versione successiva a quella selezionata per l'installazione o su www.webmin.com, verrà invece visualizzato un messaggio di errore.
Il processo di aggiornamento conserverà tutti gli utenti e le impostazioni di configurazione del modulo e non dovrebbe nemmeno essere notato dalle persone che attualmente accedono al tuo server Webmin. Se hai originariamente installato il programma dal pacchetto tar.gz e non hai specificato una directory di destinazione come /usr/local/webmin, la nuova versione verrà installata nella directory "accanto" a quella precedente. For example, if Webmin 1.060 was in /usr/local/webmin-1.060 and you upgraded to version 1.070, it would be installed in /usr/local/webmin-1.070, and the old directory deleted if the *Delete old version's directory after upgrade?* option was checked.
Any modules that the new version includes but the old one does not will be granted to the first user listed in the Webmin Users module, which will typically be root or admin. You should check after the upgrade is complete to ensure that they have not been given to an un-trusted user instead though, as most modules by default can be used to subvert security on your system.
- Installing updates to Webmin
Updated versions of Webmin modules in the latest release are often made available to fix bugs or security problems. Installing these updated modules is always a good idea, as they may fix problems that you have been having or patch security holes that could allow un-trusted users to gain root access on your system. Updates are always designed to solve problems rather than adding new features which may potentially have problems of their own.
Of course, if you are not having any trouble then you can just wait until the next full release and install it instead. Each version will always include any updates that were made available for previous versions of Webmin. Updates are only created to solve problems in the latest version, so if you are running an older version do not expect any more to be released for it.
The page http://www.webmin.com/updates.html lists the downloadable updates for each version of Webmin. You can retrieve any that you need from there to be installed using this module, as explained in the Installing and deleting Webmin modules sezione. However, there is an easier method - Webmin can be told to check for, download and install any updates that it does not already have. This can either be done explicitly using this module, or set up to happen on schedule.
To check for and install updates, follow these steps :
- Click on the Update Webmin icon on the Webmin Configuration module's main page.
- Scroll down to the second form, headed Upgrade modules now .
- Select the Update from www.webmin.com opzione. The alternate Update from another source mode is only useful if running your own repository of new modules, which is not covered in this book.
- If you just want to see what updates are needed without actually installing them, check the *Only show which modules would be updated *box. Otherwise, un-check it so that updates are actually done.
- If you have deleted some of the standard Webmin modules and don't want them to be re-installed by the update process, de-select the Install modules that are not currently installed option.
- Hit the Update Modules pulsante. A page listing all updates for your operating system will be displayed, along with the problems that they fix. As long as the box in step 4 was not checked, the progress of each needed module's download and the results of its installation will be shown as well. As well, if a new version of Webmin is available a message will appear at the end of the page informing you. Because module updates are only released for the latest version, it is advisable to upgrade the entire program as soon as possible.
Every Webmin module has a version number, which the update process uses to keep track of which ones it has already downloaded and installed. A message like Module cron is already up to date shown next to a potential update indicates that it has already been installed. A message like *Update to module cron is not related to this OS* means that the module does not support your operating system, or that the problem that the update fixes does not occur on your OS.
- Scheduled updates
Instead of manually following the steps above every now and then, you can configure Webmin to check for, report on and install new modules on schedule. When needed updates are found, an email can be sent to you listing the modules that should be or have been installed and the problems that they fix. As well the email will include notification of the availability of a new Webmin release, if there is one.
To enable automatic updates, follow these steps :
- Click on the Update Webmin icon and scroll down to the final form on the page, titled Update modules on schedule . \# Check the Scheduled updating currently enabled scatola. # Unless you run your own repository, select Update from www.webmin.com .
- The Update modules at field specifies the time of day that the scheduled update check is run. Typically you should enter something like _3_ to have updates done at 3 am, assuming that your system is turned on at that time. The every field next to it sets the number of days between checks. For example, if you enter _1_ then updating will be done only every third day. 1 or 2 days is usually a reasonable period.
- If the Only show which modules would be updated option is enabled, a reporting only showing which modules need updating will be sent out on schedule. This can be useful if you want to be reminded of new modules, but install them yourself to control which updates are used.
- The Install modules that are not currently installed option has exactly the same meaning as in the Update modules now form, and generally does not need to be enabled.
- If Only report updates is checked, an email report will not be sent if no needed updates are available and no new version of Webmin has been released. This is usually what you want, as it cuts down on the number of unnecessary email messages.
- In the Email update report to field enter the address to which the update report should be sent. If it is left empty automatic checking will still be done, just not reported. Email is always sent by calling the sendmail program, the path to which is taken from the Sendmail Configuration module's configuration.
- Hit the Save and Apply button to enable scheduled updating. A Cron job (covered in chapter 10) will be created, which you can see in the Schedule Cron Jobs module, but should not touch.
Automatic updating can be turned off at any time by de-selecting the Scheduled updating currently enabled box on this form and clicking on Save and Apply .
If webmin was installed using yum or apt-get and updating is enabled, yum/apt-get will update webmin on similar schedule as other components.
- Added modules after upgrade
Whenever a new module was added during (automated) upgrade, you will need to add that module to users who who may access the new module.
 Authentication
 Authentication
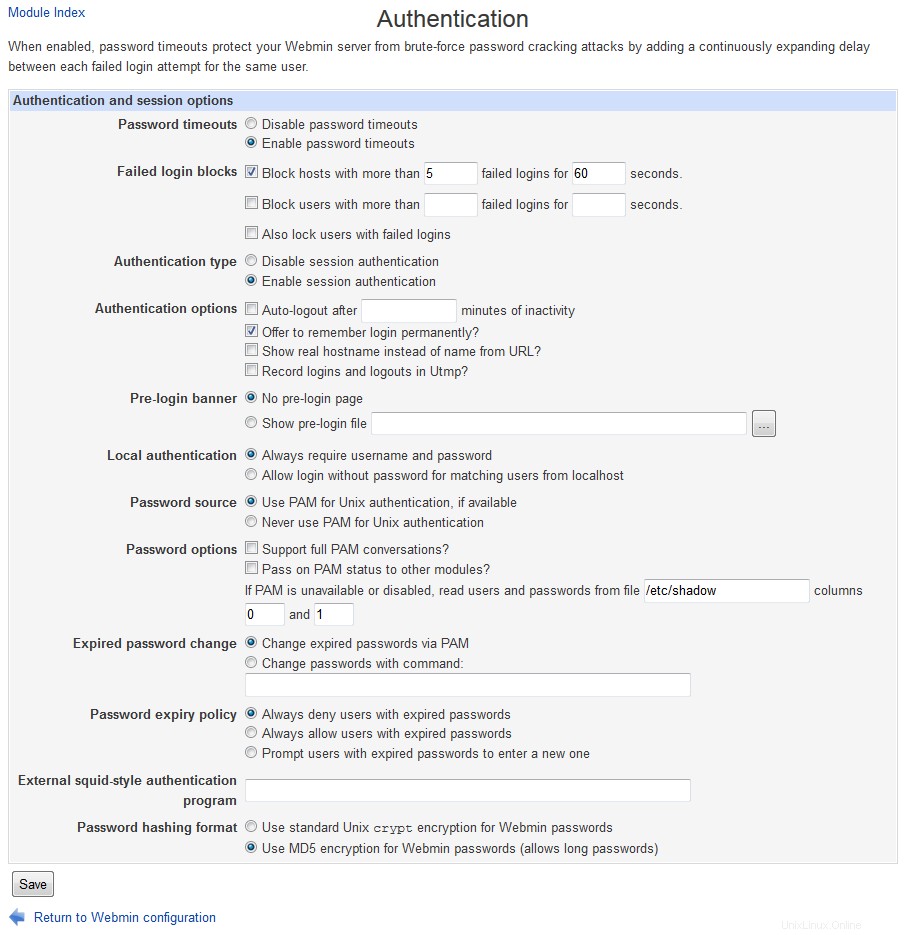
 Webmin has several options that control how multiple failed login attempts are handled, how users login and how Unix passwords are checked. The default authentication method uses cookies, but if your browser cannot handle them you may want to switch to basic HTTP authentication instead. The only problem with this method is that there is no way to properly log out, as there is no support for logging out in the HTTP protocol. However, it sometimes must be used - for example, browsers on MacOS X cannot load applets (such as the ones in the File Manager and SSH/Telnet Login modules) from web servers using cookie authentication.
To configure authentication for Webmin, follow these steps:
- Click on the Authentication icon on the module's main page to bring up the authentication form.
- When Enable password timeouts is selected, Webmin will detect multiple failed login attempts from the same IP address and lock that host out for a configurable amount of time. This feature should always be turned on, as it stops attackers using millions of login attempts to guess passwords on your system. The Block hosts with more than field specifies the number of login attempts allowed from a single host before blocking is triggered, while the failed logins for field sets the number of seconds that a host is blocked for. The defaults are reasonable, but you can increase the timeout if you are feeling paranoid.
- When *Log blocked hosts, logins and authentication failures to syslog* is selected Webmin will send messages to the system logs (covered in chapter 13) when a user logs in, logs out or enters an incorrect password. All messages are sent with the authpriv facility. You should leave this option turned on, so that suspiciously large numbers of login failures can be detected.
- When Enable session authentication is selected, Webmin will use its own login form to ask users for a username and password, and set a cookie after the login is complete to identify authenticated clients. To switch to normal HTTP authentication, select Disable session authentication invece.
- When using session authentication, Webmin can be configured to automatically log users out if they have been inactive for more than a certain amount of time. To enable this, check the Auto-logout after box and enter a number of minutes into the text field next to it. This feature and the next three are not available when using HTTP authentication.
- When Offer to remember login permanently? is checked (as it is by default), the login form will include a check box for permanently remembering the login. When selected, the cookie sent to the user's browser will be marked to indicate that it should be saved even if the browser is shut down and re-run later. This is convenient because is means that the user will not have to login to Webmin again, but you may consider it a security risk. If so, un-checking this box will remove the remember option from the login form.
- By default the login page includes the hostname from the URL in the message above the username and password fields. To hide it, de-select the Show hostname on login screen? scatola.
- Some people like to have a welcome message shown on the login page the first time a user accesses it, perhaps giving information about the server or telling unauthorized people to go away. To enable this on your system, first create an HTML page containing the message that you want to appear. Then select *Show pre-login file* and enter the full path to the HTML file in the text field. After a user reads it he must re-load or re-visit the page (perhaps by following a link in the page itself) to force the real login form to appear.
- Webmin can automatically authenticate connections from localhost by determining which Unix user is making the connection, and checking to see if a Webmin user of the same name exists. To enable this, select *Allow login without password for matching users from localhost*. If you run a browser as root on the same system as Webmin runs on and have a Webmin user called root, this feature allows you to access the URL http://localhost:10000/ and be logged in without needing to enter a username and password. It is convenient, but potentially insecure if an attacker can trick a program (such as Squid) into connecting to that URL, which would grant access to Webmin as the user that the program runs as. For this reason, *Always require username and password* is selected by default.
- When the Unix authentication option is selected for a user in the Webmin users module, his password can be checked by using PAM or by reading the Unix password file directly. If the Use PAM for Unix authentication, if available option is selected and the Authen::PAM Perl module installed, Webmin will attempt to use PAM to validate the user. However, on Linux this will only work if the /etc/pam.d/webmin service file is set up correctly. This file is included in the RPM package of Webmin though. If your operating system does not support PAM, if the Perl module is not installed or if the *Never use PAM for Unix authentication* option is selected, Webmin will fall back to directly reading the password file. This is more reliable, but will not prevent the use of passwords that are marked as expired. The *read users and passwords from file* fields specify the file to get passwords from and the columns to use for the username and password, but should rarely need to be changed as they are set by default to match your operating system. Because Webmin will use PAM where it can or read the appropriate password file if PAM is not available, the fields covered in this step should not need to be changed.
- The External squid-style authentication program field can be used to enter the full path and parameters to a program that validates passwords. If it is filled in, the option *External authentication program* will appear in the Password menu for a user in the Webmin Users module, indicating that the user's password should be checked using this command. The program must behave exactly like a Squid's external authenticator, covered in the Setting up proxy authentication section of of Squid Proxy Server.
- Finally, hit Save at the bottom of the form to activate the new authentication settings for subsequent logins.
 Two factor Authentication
Two-factor authentication can be used to add an extra layer of security to a Webmin account, as well as the regular username and password. When enabled, a user will need to provide an extra authentication token which typically comes from a smartphone app, hardware OTP generator or SMS.
This page allows you to select an authentication provider for Webmin users on your system. Once enabled, each user can then enroll for two-factor in the Webmin Users module. The available two-factor providers are:
- Authy
- This is a commercial service that provides a smartphone app and website for managing two-factor users. Each user must create an account on Authy's website and link it to their smartphone.
- Google Authenticator
- This is a smartphone app that implements the standard TOPT protocol. Each user must scan a QR code using the app to link their tokens with the Webmin server.
 Edit Categories
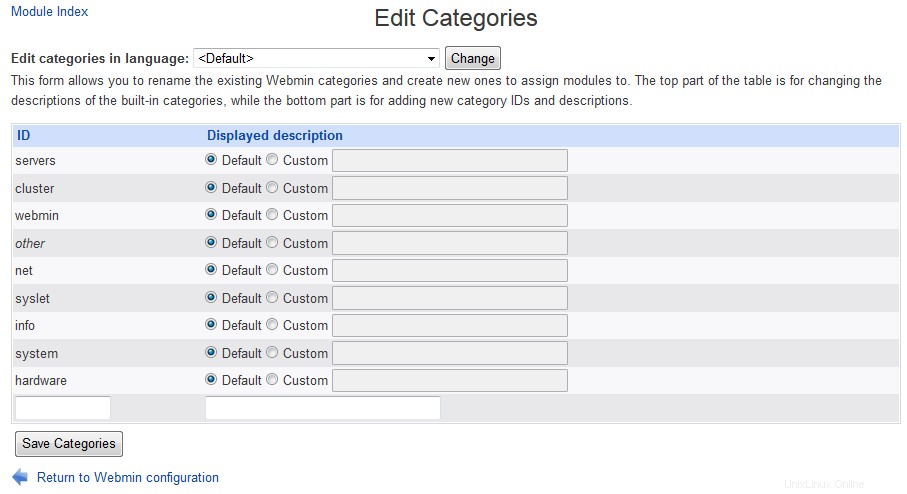
Every Webmin module has a category that controls where it appears on the module's main menu. You can create your own categories and move modules from their default locations into your own or existing categories, which can be useful if you don't like the default arrangement, or want to put everything into one huge category.
To create new categories or re-name existing ones, follow these steps:
- Click on Edit Categories on the module's main page to display the category editing page.
- To add a category, scroll down to the bottom of form. In the first empty field under ID enter a unique internal name for your new category, such as stuff . Then in the field next to it under Displayed description enter the name that will appear in Webmin, such as Thirdparty . Existing categories that you have added can be edited by changing the fields in this section as well. However, you should not change the entries in the ID column, as they are used internally to associate modules with categories. The ID is never visible to users anyway - only the displayed description is.
- To change the name of one of the default categories displayed at the top of the form, select the second radio button next to it and entering a new description into the text box to the right. If Default is chosen, the standard name determined by the current language will be used.
- Hit the Save Categories button at the bottom of the form to activate the new categories. You can now move modules into any that you have created.
 Edit Categories
  Reassign Modules
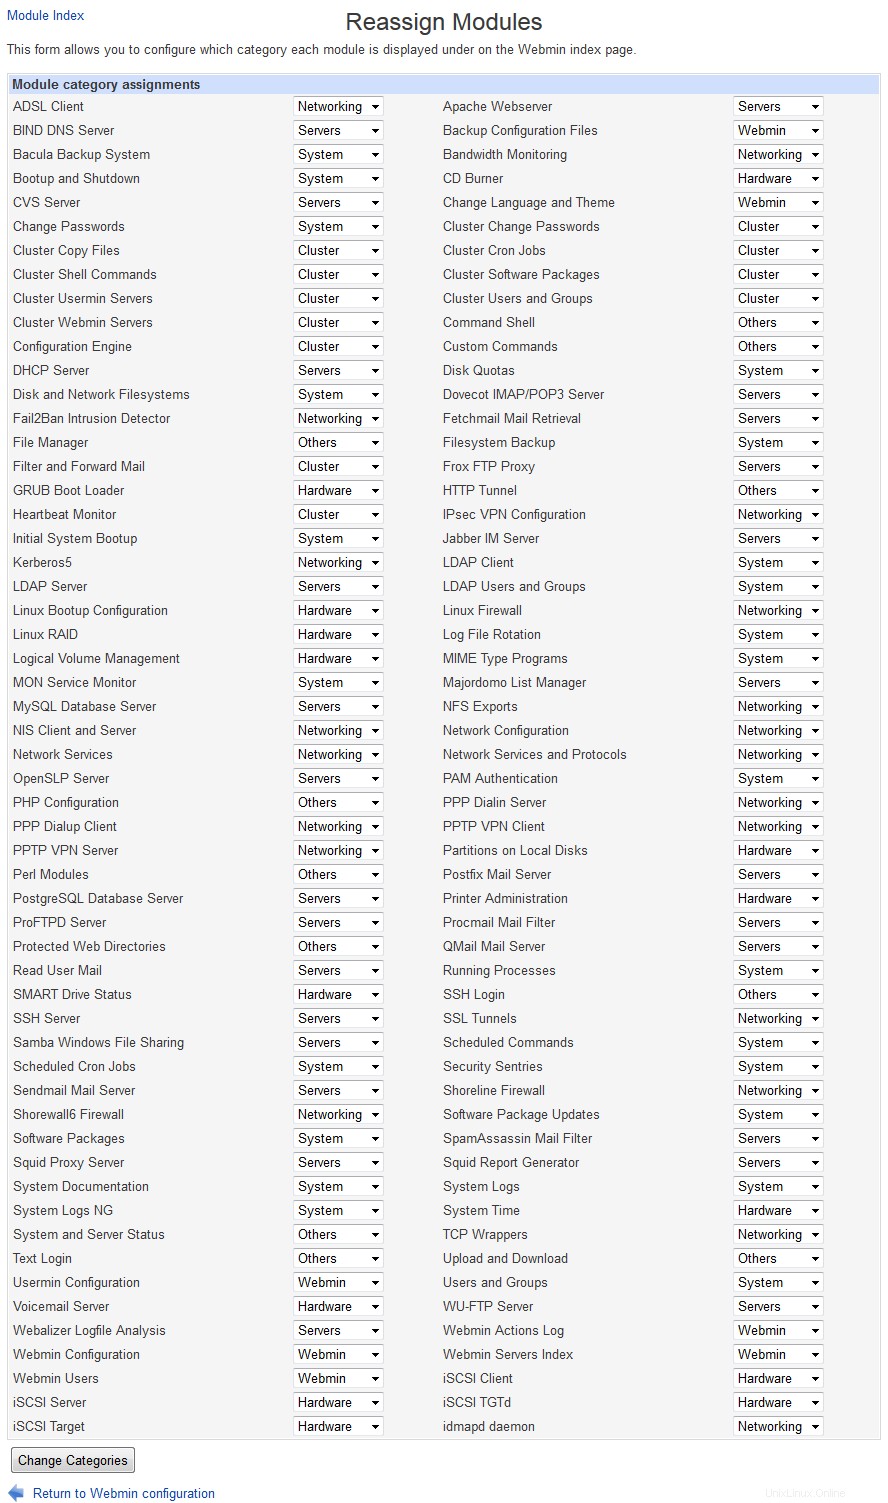
To change the categories that modules appear in, do the following:
- Click on the Reassign Modules icon on the main page.
- The page that appears lists every installed Webmin module and the category it is currently in. For each module that you want to move, select a new category from the menu next to its name.
- Click on the Change Categories button at the bottom of the page to move the modules.
 Reassign Modules
  Module Titles
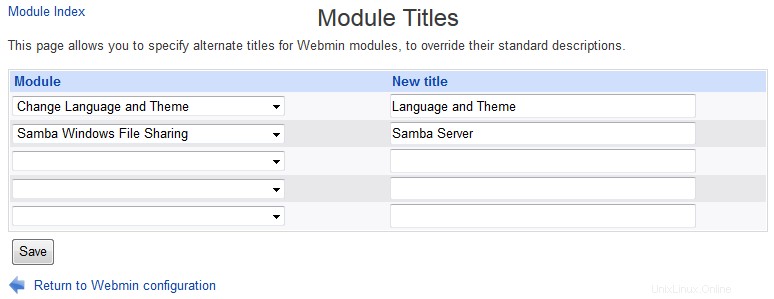
If you dont't like the the titles available (bacause they are too long or find them misleading) you may alter them at wish:
 Module Titles
  Webmin Themes
A theme is an extension to Webmin (much like a module) that controls how its interface appears. The currently active theme determines if and how the categories at the top of each page are displayed, what page background is used, what icons each module has, how titles appear and how each page ends. By changing themes you can significantly change the look of Webmin without effecting its functionality. Several themes are included by default, and you can install more that have been written by other developers.
Like the language, you can set the theme for all logins in this module, or override it for a specific user in the Webmin Users module. The steps to change the theme for everyone are :
- Click on the Webmin Themes icon on the module's main page. This will take you to a page for changing themes, installing a new theme and deleting existing ones.
- Select the theme to use from the Current theme menù. Those included as standard with Webmin are :*Old Webmin Theme *The very simple theme that the first versions of Webmin used before theming was added. If you find the default too slow, this may be a better alternative as it uses less images. *Caldera Theme *An improved layout that uses frames to place categories and module icons at the top, and actual forms and pages down the bottom. *MSC.Linux Theme *The current default Webmin theme. *MSC.Linux Mini Theme *A modified version of the default theme, designed for use on small-screen devices such as PDAs.
- Hit the Change button to activate the chosen theme.
New themes developed by other people can also be added to Webmin, and several are available for download from www.webmin.com/third.html.
To install a theme, follow these steps :
- Click on the Webmin Themes icon on the module's main page.
- Select the theme's file using the second form. Just as when installing a module, you can choose to install a theme from a file on the system running Webmin, the PC your browser is on, or an HTTP or FTP URL.
- Hit the Install Theme button to have it downloaded (if necessary) and installed.
The final thing that you can do on this page in delete one of the installed themes. The Old Webmin Theme cannot be deleted as it is built into the program, and the other standard themes should not be as they will be added again if you upgrade to the next version. To delete a theme that you have installed, follow these instructions:
- Click on the Webmin Themes icon on the module's main page.
- Select the one to remove from the Theme to delete menu at the bottom of the page. If that menu does not appear it means that all installed themes are in use either by an individual user or for everyone.
- Hit the Delete button to bring up a confirmation page asking if really want to go ahead.
- Click on Delete again to remove the theme.
 Trusted Referrers
One danger when using a web-based administration interface like Webmin is that a link from another website may point to a program on your Webmin server. For example, a malicious site could include HTML code like :
<a href="http://localhost:10000/proc/run.cgi?cmd=rm+*">click me</a>
Clicking on this harmless-looking link would cause Webmin's Running Processes module to run a command that deletes files on your system! Assuming that you have already logged into Webmin, no password would be required. Worse still, a similar URL could be used in an tag for an image, which is fetched automatically by your browser as soon as you open a page that seems innocuous.
Fortunately, there is a solution - most browsers send the full URL of the page that a link came from in their HTTP requests. By default, Webmin compares the hostname in this URL with the one used to access the current page, and displays a warning if they do not match. This blocks links from other web sites to your Webmin server, except for those that do not specify a program, such as http://localhost:10000/cron/ , and are thus harmless.
Sometimes though you will want to allow such links, such as from an internal Intranet webserver that you maintain and trust. For this reason Webmin can be configured to allow links where the referrer is from a list of trusted hosts. These steps explain how :
- Click on the Trusted Referers icon on the module's main page.
- To turn off referrer checking entirely (which is not a good idea), change the Referer checking enabled? field to No .
- To allow links from certain hosts, fill in the Trusted websites field with a list of hostnames, such intranet.example.com .
- In some cases the browser will not provide any referrer information at all, possibly because it does not support that HTTP feature. When the Trust links from unknown referers box is checked, Webmin will allow requests in this case. If you are paranoid and know that your browser always does supply referrer information, turn this option off.
- Hit the Save button to activate the settings.
Webmin does not simply deny links from un-trusted sites. Instead, it displays a warning and gives the user a chance to continue with the link. This warning form contains a checkbox labeled *Don't show this warning in future*, which if selected effectively changes the Referer checking enabled? field to No .
 Anonymous Module Access
It is possible to set up certain Webmin modules so that they can only be used to view information, or to execute harmless commands. For example, the System and Server Status module's access control features can be set to give a user read-only access, letting them see which monitors are up and which are down. Or the Custom Commands module can be configured for some user to let him only run commands that display information.
The anonymous access feature of this module lets you grant access to certain modules to clients without them needing to login at all. Such clients will be treated as a specified Webmin user, and thus have only the rights that you grant to that user. However, they will never need to supply its username and password when accessing allowed modules on your system. This can be useful for making certain information (such as the server status display) available to everyone on your network, without needing to tell them a username and password. However, it should be used with extreme care, as granting anonymous access as a powerful user could compromise your entire system.
To set up unauthenticated access to some modules, follow these steps :
- First, use the Webmin Users module to create a user, called anonymous for example, who has the modules and access control settings that you want to give to unauthenticated clients. Its password can be set to No login allowed , as this user will never login conventionally. The user should be given the Old Webmin Theme , to minimize the number of image directories that you will need to allow access to later.
- Then in the Webmin Configuration module, click on the *Anonymous Module Access* icon.
- The form that appears contains a table with two columns, and initially two empty rows. Each row specifies a URL path on your server to allow unauthenticated access to, and a Webmin user* that requests to that path should be treated as. In the first row enter /images for the path and anonymous for the user, so that the directory containing Webmin's title images can be accessed by unauthenticated clients. In the second row enter the path for the module that you want to allow (such as /status ), and anonymous as the user again. Never enter a path of /, as it will allow unauthorized access to your entire Webmin server! The path to a specific CGI program (such as /custom/run.cgi ) may make sense in some cases.
- Hit the Save button to turn on anonymous access. If you want to allow more that two URL paths, click on the icon again so that the table is re-displayed with two more empty rows.
If a user who has already logged visits a module that has been allowed anonymous access with the steps above, Webmin will still identify him correctly as the logged-in user.
 File Locking
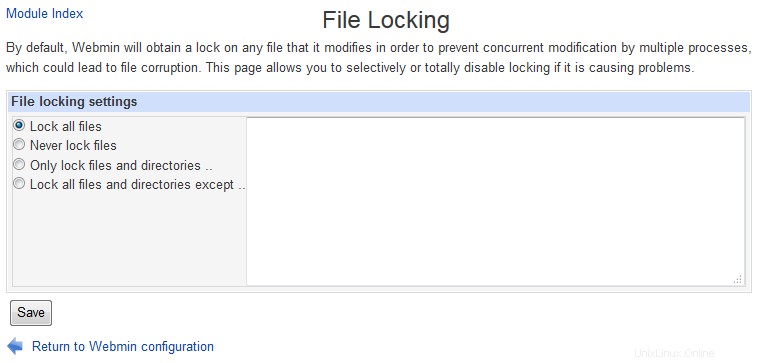 File Locking
  Mobile Device Options
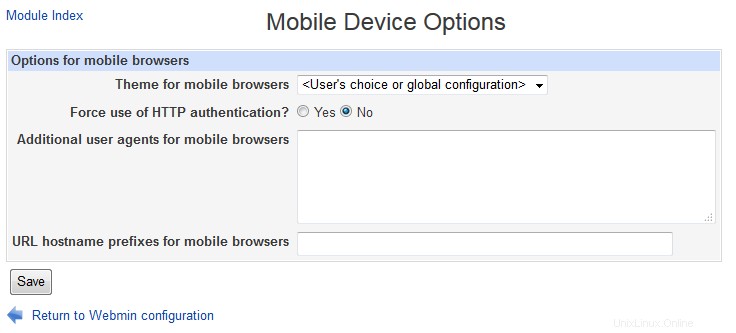 Mobile Device Options
  Blocked Hosts and Users
 Blocked Hosts and Users
  Background Status Collection
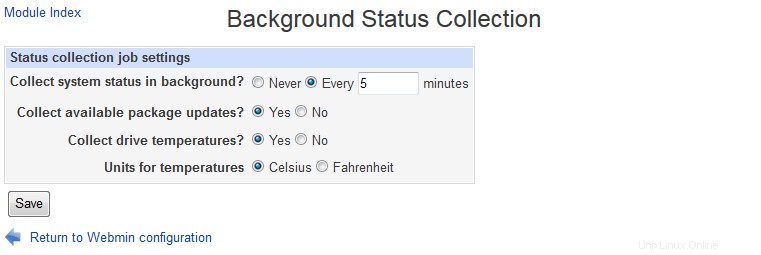 Background Status Collection
  Advanced Options
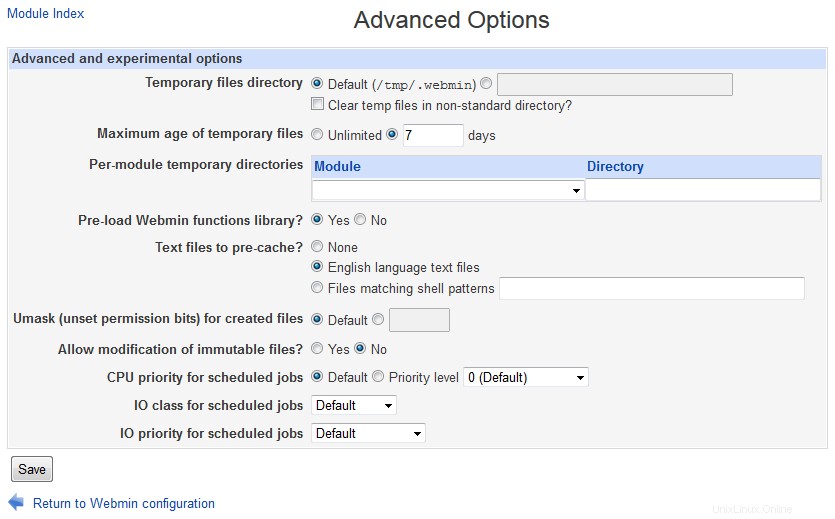 Advanced Options
  Debugging Log File
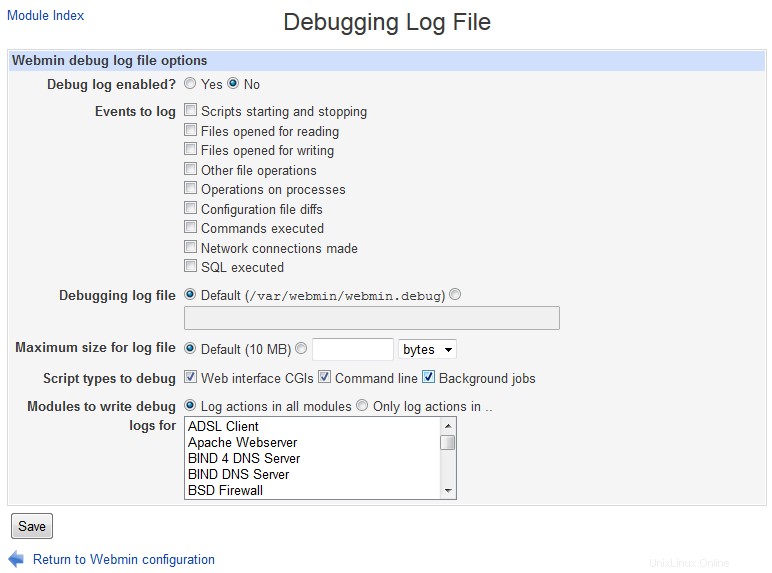 Debugging Log File
  Web Server Options
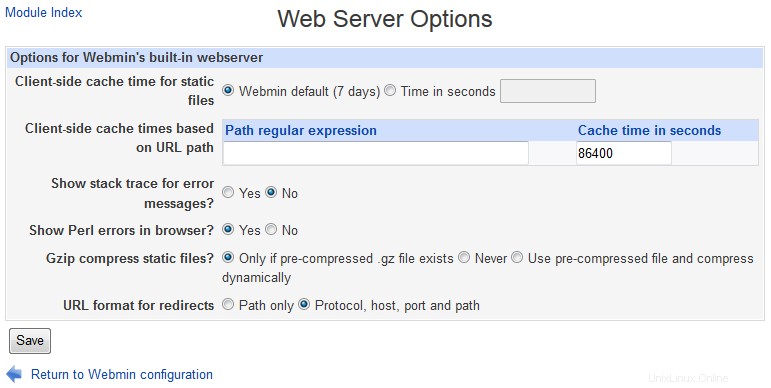 Web Server Options
  Webmin Scheduled Functions
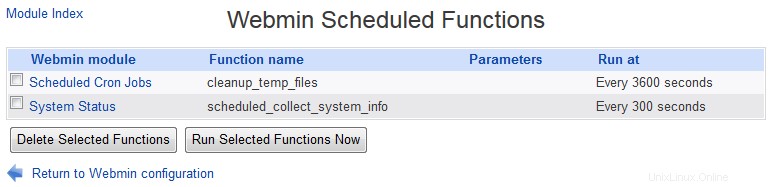 Webmin Scheduled Functions
  Sending Email
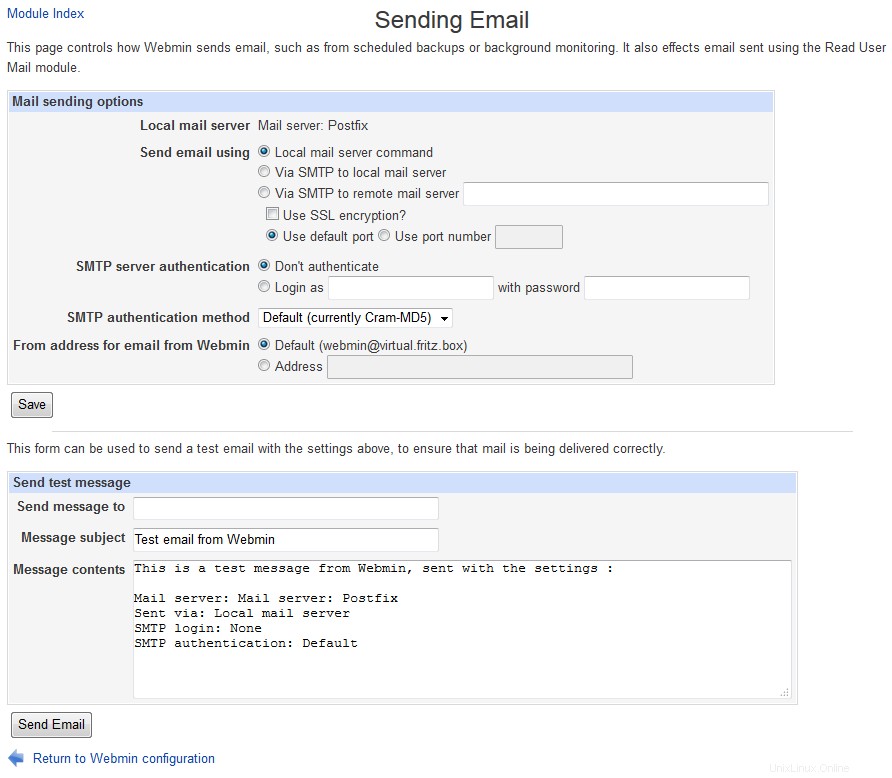 Sending Email
  SSL Encryption
The SSL Encryption page in this module can be used to turn on or off SSL mode or to generate another new key, all of which is explained in Securing Webmin. Free certificates can be obtained using Let's Encrypt.
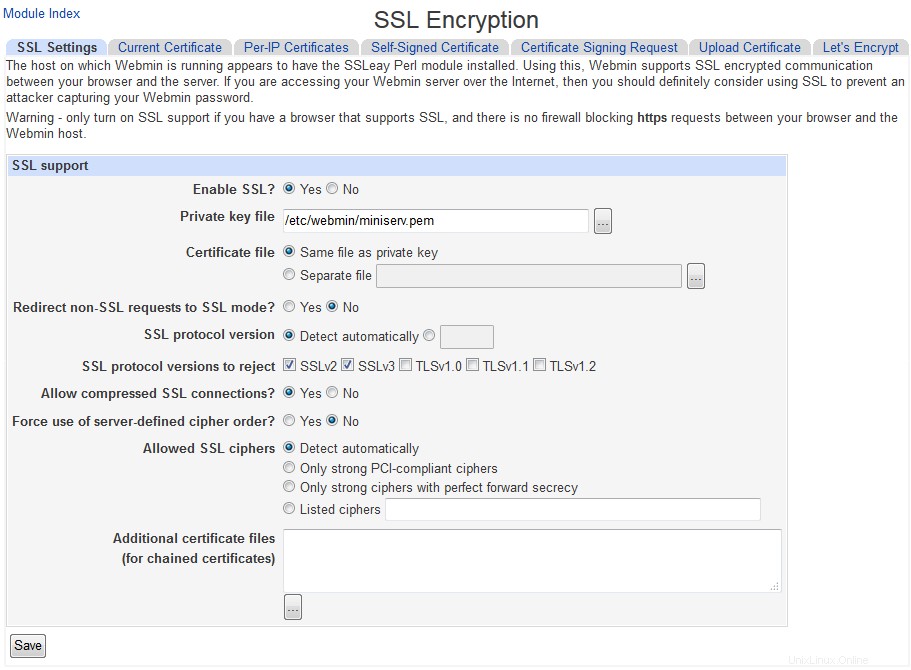 SSL Encryption main page
  Certificate Authority
 Webmin Certificate Authority
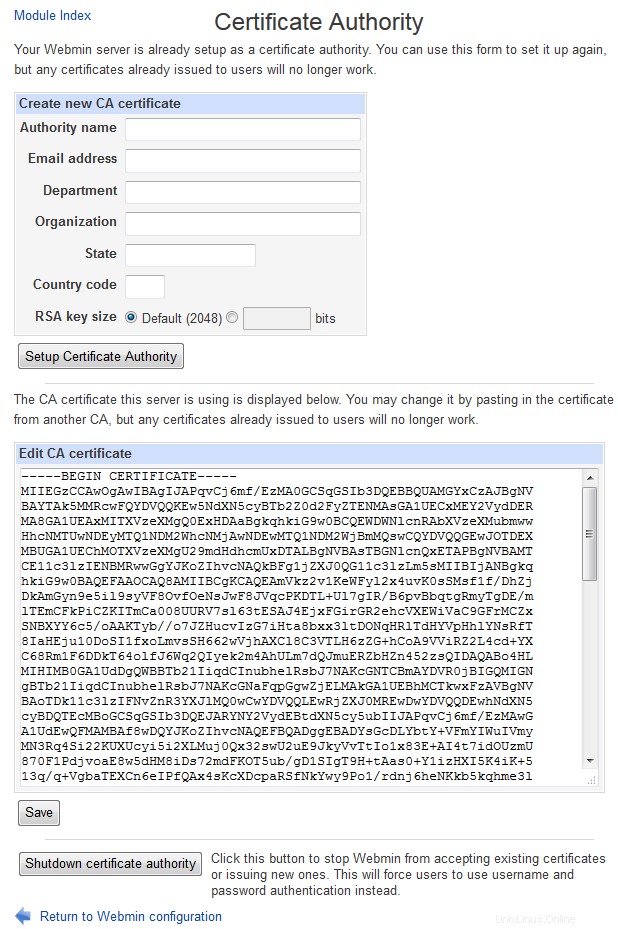
 As the Webmin Users page explains, the Webmin Users module can be used to request a client-side SSL certificate for a user. However, before this is possible you must set up your system as a certificate authority, or CA. An authority is basically just an SSL certificate that can be used to sign other newly issued client certificates, and to verify that those supplied by clients come from this CA.
Because client SSL authentication can only be used in SSL mode, Webmin must be running in that mode and thus have the openssl command installed before you can precede. Once these requirements have been satisfied, follow these steps to set up a CA:
- Click on the Certificate Authority icon on the module's main page to bring up a form for entering the new CAs details.
- In the Authority name field enter the name of the person issuing certificates, such as Network administrator .
- In the Email address field enter the address of the administrator for this server, such as bob@foo.com .
- In the Department field enter the subdivision of your organization that the server is in, such as Accounting . This can be left blank if it makes no sense, such as for a home server.
- In the Organization field enter the name of your company or organization, such as Foo Corporation . Again, this may not make sense in all cases and so can be left blank.
- Fill in the State field with the name of the state your server is in, such as California .
- Fill in the Country code field with the two-letter upper-case code for your country, such as AU .
- Click on the Setup certificate authority button to generate the CA certificate and configure Webmin to use it. If you have done this before, any existing certificate will be overwritten.
- Webmin users can now generate personal certificates using the Webmin Users module. Unfortunately, the web server will request that all clients supply a certificate as soon as one user has one, which can cause annoying dialog boxes to appear to people who are still username and password authentication in some older browsers.
To stop using a CA for validating clients altogether, hit the Shutdown certificate authority button on the same page. All users will be forced to revert to username and password authentication instead.