Introduzione
Una rete privata virtuale (VPN) ti consente di attraversare reti non affidabili come se fossi su una rete privata. Ti dà la libertà di accedere a Internet in modo sicuro dal tuo smartphone o laptop quando sei connesso a una rete non affidabile, come il Wi-Fi di un hotel o di un bar.
Se combinata con le connessioni HTTPS, questa configurazione consente di proteggere gli accessi e le transazioni wireless. Puoi aggirare le restrizioni geografiche e la censura e proteggere la tua posizione e qualsiasi traffico HTTP non crittografato da reti non affidabili.
OpenVPN è una soluzione VPN Transport Layer Security (TLS) open source completa che accoglie un'ampia gamma di configurazioni. In questo tutorial, configurerai OpenVPN su un server Ubuntu 22.04, quindi lo configurerai in modo che sia accessibile da un computer client.
Nota: Se prevedi di configurare un server OpenVPN su un droplet DigitalOcean, tieni presente che noi, come molti provider di hosting, addebitiamo i sovraccarichi di larghezza di banda. Per questo motivo, fai attenzione a quanto traffico sta gestendo il tuo server.
Vedi questa pagina per maggiori informazioni.
Prerequisiti
Per seguire questo tutorial, avrai bisogno di:
- Un server Ubuntu 22.04 con un utente sudo non root e un firewall abilitato. Per configurarlo, puoi seguire il nostro tutorial Configurazione iniziale del server con Ubuntu 22.04. Lo chiameremo Server OpenVPN in questa guida.
- Un server Ubuntu 22.04 separato configurato come autorità di certificazione (CA) privata, che chiameremo Server CA in tutta questa guida. Dopo aver eseguito i passaggi della Guida all'installazione iniziale del server su questo server, puoi seguire i passaggi da 1 a 3 della nostra guida su Come impostare e configurare un'autorità di certificazione (CA) su Ubuntu 22.04 per farlo.
Nota: Sebbene sia tecnicamente possibile utilizzare il tuo server OpenVPN o il tuo computer locale come CA, questo non è raccomandato in quanto apre la tua VPN ad alcune vulnerabilità di sicurezza. Secondo la documentazione ufficiale di OpenVPN, dovresti posizionare la tua CA su una macchina autonoma dedicata all'importazione e alla firma delle richieste di certificati. Per questo motivo, questa guida presuppone che la tua CA si trovi su un server Ubuntu 22.04 separato che ha anche un utente non root con privilegi sudo e un firewall di base abilitato.
In aggiunta a ciò, avrai bisogno di una macchina client che utilizzerai per connetterti al tuo server OpenVPN. In questa guida lo chiameremo Client OpenVPN . Ai fini di questo tutorial, ti consigliamo di utilizzare la tua macchina locale come client OpenVPN.
Con questi prerequisiti, sei pronto per iniziare a configurare e configurare un server OpenVPN su Ubuntu 22.04.
Nota: Tieni presente che se disabiliti l'autenticazione della password durante la configurazione di questi server, potresti incontrare difficoltà durante il trasferimento di file tra di loro più avanti in questa guida. Per risolvere questo problema, è possibile riattivare l'autenticazione tramite password su ciascun server. In alternativa, puoi generare una coppia di chiavi SSH per ciascun server, quindi aggiungere la chiave SSH pubblica del server OpenVPN alle authorized_keys della macchina CA. file e viceversa. Vedi Come impostare le chiavi SSH su Ubuntu 22.04 per istruzioni su come eseguire una di queste soluzioni.
Passaggio 1:installazione di OpenVPN e Easy-RSA
Il primo passo in questo tutorial è installare OpenVPN e Easy-RSA. Easy-RSA è uno strumento di gestione dell'infrastruttura a chiave pubblica (PKI) che utilizzerai sul server OpenVPN per generare una richiesta di certificato che verificherai e firmerai sul server CA.
Per iniziare, aggiorna l'indice del pacchetto del tuo server OpenVPN e installa OpenVPN e Easy-RSA. Entrambi i pacchetti sono disponibili nei repository predefiniti di Ubuntu, quindi puoi usare apt per l'installazione:
- sudo apt update
- sudo apt install openvpn easy-rsa
Successivamente dovrai creare una nuova directory sul server OpenVPN come utente non root chiamato ~/easy-rsa :
- mkdir ~/easy-rsa
Ora dovrai creare un collegamento simbolico da easyrsa script che il pacchetto ha installato in ~/easy-rsa directory che hai appena creato:
- ln -s /usr/share/easy-rsa/* ~/easy-rsa/
Nota: Mentre altre guide potrebbero indicarti di copiare easy-rsa file del pacchetto nella directory PKI, questo tutorial adotta un approccio di collegamento simbolico. Di conseguenza, qualsiasi aggiornamento a easy-rsa il pacchetto si rifletterà automaticamente negli script della tua PKI.
Infine, assicurati che il proprietario della directory sia il tuo utente sudo non root e limita l'accesso a quell'utente usando chmod :
- sudo chown sammy ~/easy-rsa
- chmod 700 ~/easy-rsa
Una volta che questi programmi sono installati e sono stati spostati nelle posizioni corrette sul tuo sistema, il passaggio successivo consiste nel creare un'infrastruttura a chiave pubblica (PKI) sul server OpenVPN in modo da poter richiedere e gestire i certificati TLS per client e altri server che lo faranno connettiti alla tua VPN.
Passaggio 2:creazione di una PKI per OpenVPN
Prima di poter creare la chiave privata e il certificato del tuo server OpenVPN, devi creare una directory dell'infrastruttura a chiave pubblica locale sul tuo server OpenVPN. Utilizzerai questa directory per gestire le richieste di certificati del server e dei client invece di farle direttamente sul tuo server CA.
Per creare una directory PKI sul tuo server OpenVPN, dovrai compilare un file chiamato vars con alcuni valori di default. Per prima cosa cd nel easy-rsa directory, quindi creerai e modificherai la vars file utilizzando nano o il tuo editor di testo preferito.
- cd ~/easy-rsa
- nano vars
Una volta aperto il file, incolla le seguenti due righe:
~/easy-rsa/varsset_var EASYRSA_ALGO "ec"
set_var EASYRSA_DIGEST "sha512"
Queste sono le uniche due righe di cui hai bisogno in questo vars file sul tuo server OpenVPN poiché non verrà utilizzato come autorità di certificazione. Garantiranno che le tue chiavi private e le richieste di certificati siano configurate per utilizzare la moderna crittografia a curva ellittica (ECC) per generare chiavi e proteggere le firme per i tuoi clienti e il server OpenVPN.
Configurare i tuoi server OpenVPN e CA per utilizzare ECC significa che quando un client e un server tentano di stabilire una chiave simmetrica condivisa, possono utilizzare algoritmi di curva ellittica per fare il loro scambio. L'utilizzo di ECC per uno scambio di chiavi è significativamente più veloce rispetto all'utilizzo di Diffie-Hellman con il classico algoritmo RSA poiché i numeri sono molto più piccoli e i calcoli sono più veloci.
Sfondo: Quando i client si connettono a OpenVPN, utilizzano la crittografia asimmetrica (nota anche come chiave pubblica/privata) per eseguire un handshake TLS. Tuttavia, durante la trasmissione del traffico VPN crittografato, il server e i client utilizzano la crittografia simmetrica, nota anche come crittografia a chiave condivisa.
C'è molto meno sovraccarico di calcolo con la crittografia simmetrica rispetto a quella asimmetrica:i numeri utilizzati sono molto più piccoli e le moderne CPU integrano istruzioni per eseguire operazioni di crittografia simmetrica ottimizzate. Per passare dalla crittografia asimmetrica a quella simmetrica, il server e il client OpenVPN utilizzeranno l'algoritmo Elliptic Curve Diffie-Hellman (ECDH) per concordare una chiave segreta condivisa il più rapidamente possibile.
Dopo aver popolato vars file è possibile procedere con la creazione della directory PKI. Per farlo, esegui easyrsa script con init-pki opzione. Sebbene tu abbia già eseguito questo comando sul server CA come parte dei prerequisiti, è necessario eseguirlo qui perché il tuo server OpenVPN e il server CA hanno directory PKI separate:
- ./easyrsa init-pki
Nota che sul tuo server OpenVPN non è necessario creare un'autorità di certificazione. Il tuo server CA è l'unico responsabile della convalida e della firma dei certificati. La PKI sul tuo server VPN viene utilizzata solo come luogo comodo e centralizzato per archiviare richieste di certificati e certificati pubblici.
Dopo aver inizializzato la tua PKI sul server OpenVPN, sei pronto per passare al passaggio successivo, che consiste nella creazione di una richiesta di certificato del server OpenVPN e di una chiave privata.
Passaggio 3:creazione di una richiesta di certificato del server OpenVPN e di una chiave privata
Ora che il tuo server OpenVPN ha tutti i prerequisiti installati, il passaggio successivo è generare una chiave privata e una richiesta di firma del certificato (CSR) sul tuo server OpenVPN. Dopodiché trasferirai la richiesta alla tua CA per essere firmata, creando il certificato richiesto. Dopo aver firmato un certificato, lo trasferirai di nuovo al server OpenVPN e lo installerai affinché il server possa usarlo.
Per iniziare, vai a ~/easy-rsa directory sul tuo server OpenVPN come utente non root:
- cd ~/easy-rsa
Ora chiamerai easyrsa con il gen-req opzione seguita da un nome comune (CN) per la macchina. Il CN può essere qualsiasi cosa tu voglia, ma può essere utile renderlo qualcosa di descrittivo. Durante questo tutorial, il CN del server OpenVPN sarà server . Assicurati di includere il nopass anche l'opzione. In caso contrario, il file di richiesta verrà protetto con password, il che potrebbe causare problemi di autorizzazione in seguito.
Nota: Se scegli un nome diverso da server qui, dovrai modificare alcune delle istruzioni seguenti. Ad esempio, quando si copiano i file generati in /etc/openvpn directory, dovrai sostituire i nomi corretti. Dovrai anche modificare il /etc/openvpn/server.conf file in seguito per puntare al .crt corretto e .key file.
- ./easyrsa gen-req server nopass
OutputCommon Name (eg: your user, host, or server name) [server]:

Keypair and certificate request completed. Your files are:
req: /home/sammy/easy-rsa/pki/reqs/server.req
key: /home/sammy/easy-rsa/pki/private/server.key
Questo creerà una chiave privata per il server e un file di richiesta di certificato chiamato server.req . Copia la chiave del server in /etc/openvpn/server directory:
- sudo cp /home/sammy/easy-rsa/pki/private/server.key /etc/openvpn/server/
Dopo aver completato questi passaggi, hai creato con successo una chiave privata per il tuo server OpenVPN. Hai anche generato una richiesta di firma del certificato per il server OpenVPN. La CSR è ora pronta per la firma da parte della tua CA. Nella prossima sezione di questo tutorial imparerai come firmare una CSR con la chiave privata del tuo server CA.
Passaggio 4:firma della richiesta di certificato del server OpenVPN
Nel passaggio precedente hai creato una richiesta di firma del certificato (CSR) e una chiave privata per il server OpenVPN. Ora il server CA deve conoscere il server certificato e convalidarlo. Una volta che la CA avrà convalidato e ritrasmesso il certificato al server OpenVPN, i client che si fidano della tua CA potranno fidarsi anche del server OpenVPN.
Sul server OpenVPN, come utente non root, usa SCP o un altro metodo di trasferimento per copiare server.req richiesta di certificato al server CA per la firma:
- scp /home/sammy/easy-rsa/pki/reqs/server.req sammy@your_ca_server_ip:/tmp
Se hai seguito il prerequisito Come impostare e configurare un'autorità di certificazione (CA) su Ubuntu 22.04 tutorial, il passaggio successivo consiste nell'accedere al server CA come utente non root che hai creato per gestire la tua CA. cd al ~/easy-rsa directory in cui hai creato la tua PK e quindi importa la richiesta di certificato utilizzando il easyrsa sceneggiatura:
- cd ~/easy-rsa
- ./easyrsa import-req /tmp/server.req server
Output. . .
The request has been successfully imported with a short name of: server
You may now use this name to perform signing operations on this request.
Quindi, firma la richiesta eseguendo easyrsa script con sign-req opzione, seguita dal tipo di richiesta e dal nome comune. Il tipo di richiesta può essere client o server . Poiché stai lavorando con la richiesta di certificato del server OpenVPN, assicurati di utilizzare il server tipo di richiesta:
- ./easyrsa sign-req server server
Nell'output, ti verrà chiesto di verificare che la richiesta provenga da una fonte attendibile. Digita yes quindi premere ENTER per confermare:
OutputYou are about to sign the following certificate.
Please check over the details shown below for accuracy. Note that this request
has not been cryptographically verified. Please be sure it came from a trusted
source or that you have verified the request checksum with the sender.

Request subject, to be signed as a server certificate for 3650 days:

subject=
commonName = server


Type the word 'yes' to continue, or any other input to abort.
Confirm request details: yes
. . .
Certificate created at: /home/sammy/easy-rsa/pki/issued/server.crt
Tieni presente che se hai crittografato la chiave privata della CA, a questo punto ti verrà richiesta la password.
Una volta completati questi passaggi, hai firmato la richiesta di certificato del server OpenVPN utilizzando la chiave privata del server CA. Il risultante server.crt contiene la chiave di crittografia pubblica del server OpenVPN, nonché una firma del server CA. Il punto della firma è dire a chiunque si fidi del server CA che può anche fidarsi del server OpenVPN quando si connette ad esso.
Per completare la configurazione dei certificati, copia il server.crt e ca.crt file dal server CA al server OpenVPN:
- scp pki/issued/server.crt sammy@your_vpn_server_ip:/tmp
- scp pki/ca.crt sammy@your_vpn_server_ip:/tmp
Ora di nuovo sul tuo server OpenVPN, copia i file da /tmp a /etc/openvpn/server :
- sudo cp /tmp/{server.crt,ca.crt} /etc/openvpn/server
Ora il tuo server OpenVPN è quasi pronto per accettare connessioni. Nel passaggio successivo eseguirai alcuni passaggi aggiuntivi per aumentare la sicurezza del server.
Passaggio 5:configurazione del materiale crittografico OpenVPN
Per un ulteriore livello di sicurezza, aggiungi una chiave segreta condivisa aggiuntiva che il server e tutti i client utilizzeranno con tls-crypt di OpenVPN direttiva. Questa opzione viene utilizzata per offuscare il certificato TLS utilizzato quando un server e un client si connettono inizialmente tra loro. Viene inoltre utilizzato dal server OpenVPN per eseguire controlli rapidi sui pacchetti in arrivo:se un pacchetto viene firmato utilizzando la chiave precondivisa, il server lo elabora; se non è firmato, il server sa che proviene da una fonte non attendibile e può eliminarlo senza dover eseguire ulteriori operazioni di decrittazione.
Questa opzione ti aiuterà a garantire che il tuo server OpenVPN sia in grado di far fronte a traffico non autenticato, scansioni delle porte e attacchi Denial of Service, che possono vincolare le risorse del server. Inoltre, rende più difficile identificare il traffico di rete OpenVPN.
Per generare il tls-crypt chiave precondivisa, esegui quanto segue sul server OpenVPN in ~/easy-rsa directory:
- cd ~/easy-rsa
- openvpn --genkey secret ta.key
Il risultato sarà un file chiamato ta.key . Copialo in /etc/openvpn/server/ directory:
- sudo cp ta.key /etc/openvpn/server
Con questi file sul server OpenVPN sei pronto per creare certificati client e file chiave per i tuoi utenti, che utilizzerai per connetterti alla VPN.
Passaggio 6:generazione di un certificato client e di una coppia di chiavi
Sebbene tu possa generare una chiave privata e una richiesta di certificato sul tuo computer client e quindi inviarla alla CA per la firma, questa guida delinea un processo per generare la richiesta di certificato sul server OpenVPN. Il vantaggio di questo approccio è che puoi creare uno script che genererà automaticamente i file di configurazione del client che contengono tutte le chiavi e i certificati richiesti. Ciò ti consente di evitare di trasferire chiavi, certificati e file di configurazione ai client e semplifica il processo di adesione alla VPN.
Genererai una singola chiave client e una coppia di certificati per questa guida. Se hai più di un cliente, puoi ripetere questo processo per ciascuno. Tieni presente, tuttavia, che dovrai passare un valore di nome univoco allo script per ogni client. In questo tutorial, la prima coppia certificato/chiave viene denominata client1 .
Inizia creando una struttura di directory all'interno della tua home directory per archiviare il certificato client e i file chiave:
- mkdir -p ~/client-configs/keys
Dal momento che memorizzerai le coppie certificato/chiave e i file di configurazione dei tuoi clienti in questa directory, dovresti bloccarne le autorizzazioni ora come misura di sicurezza:
- chmod -R 700 ~/client-configs
Quindi, torna alla directory EasyRSA ed esegui easyrsa script con gen-req e nopass opzioni, insieme al nome comune per il client:
- cd ~/easy-rsa
- ./easyrsa gen-req client1 nopass
Premi ENTER per confermare il nome comune. Quindi, copia il client1.key nel file ~/client-configs/keys/ directory che hai creato in precedenza:
- cp pki/private/client1.key ~/client-configs/keys/
Quindi, trasferisci il client1.req file sul server CA utilizzando un metodo sicuro:
- scp pki/reqs/client1.req sammy@your_ca_server_ip:/tmp
Ora accedi al tuo CA Server. Quindi, vai alla directory EasyRSA e importa la richiesta di certificato:
- cd ~/easy-rsa
- ./easyrsa import-req /tmp/client1.req client1
Quindi, firma la richiesta nello stesso modo in cui hai fatto per il server nel passaggio precedente. Questa volta, però, assicurati di specificare il client tipo di richiesta:
- ./easyrsa sign-req client client1
Quando richiesto, inserisci yes per confermare che intendi firmare la richiesta di certificato e che provenga da una fonte attendibile:
OutputType the word 'yes' to continue, or any other input to abort.
Confirm request details: yes
Anche in questo caso, se hai crittografato la tua chiave CA, ti verrà richiesta la password qui.
Questo creerà un file di certificato client denominato client1.crt . Trasferisci questo file sul server:
- scp pki/issued/client1.crt sammy@your_server_ip:/tmp
Di nuovo sul tuo server OpenVPN, copia il certificato client in ~/client-configs/keys/ directory:
- cp /tmp/client1.crt ~/client-configs/keys/
Quindi, copia il ca.crt e ta.key file in ~/client-configs/keys/ directory e imposta le autorizzazioni appropriate per il tuo utente sudo:
- cp ~/easy-rsa/ta.key ~/client-configs/keys/
- sudo cp /etc/openvpn/server/ca.crt ~/client-configs/keys/
- sudo chown sammy.sammy ~/client-configs/keys/*
Con ciò, i certificati e le chiavi del tuo server e client sono stati tutti generati e archiviati nelle directory appropriate sul tuo server OpenVPN. Ci sono ancora alcune azioni che devono essere eseguite con questi file, ma verranno in un passaggio successivo. Per ora, puoi passare alla configurazione di OpenVPN.
Passaggio 7:configurazione di OpenVPN
Come molti altri strumenti open source ampiamente utilizzati, OpenVPN ha numerose opzioni di configurazione disponibili per personalizzare il tuo server in base alle tue esigenze specifiche. In questa sezione, forniremo istruzioni su come impostare una configurazione del server OpenVPN basata su uno dei file di configurazione di esempio inclusi nella documentazione di questo software.
Per prima cosa, copia l'esempio server.conf come punto di partenza per il tuo file di configurazione:
- sudo cp /usr/share/doc/openvpn/examples/sample-config-files/server.conf /etc/openvpn/server/
Apri il nuovo file per la modifica con nano o l'editor di testo di tua scelta:
- sudo nano /etc/openvpn/server/server.conf
Dovrai modificare alcune righe in questo file. Per prima cosa, trova il HMAC sezione della configurazione cercando tls-auth direttiva. Questa linea sarà abilitata per impostazione predefinita. Commentalo aggiungendo un ; all'inizio della riga. Quindi aggiungi una nuova riga dopo di essa contenente il valore tls-crypt ta.key solo:
;tls-auth ta.key 0 # This file is secret
tls-crypt ta.key
Quindi, trova la sezione sui codici crittografici cercando il cipher Linee. Il valore predefinito è AES-256-CBC , tuttavia, il AES-256-GCM cipher offre un livello migliore di crittografia, prestazioni ed è ben supportato nei client OpenVPN aggiornati. Commenta il valore predefinito aggiungendo un ; firmare all'inizio di questa riga, quindi aggiungere un'altra riga dopo di essa contenente il valore aggiornato di AES-256-GCM :
;cipher AES-256-CBC
cipher AES-256-GCM
Subito dopo questa riga, aggiungi un auth direttiva per selezionare l'algoritmo di digest del messaggio HMAC. Per questo, SHA256 è una buona scelta:
auth SHA256
Quindi, trova la riga contenente un dh direttiva, che definisce i parametri Diffie-Hellman. Poiché hai configurato tutti i certificati per utilizzare la crittografia a curva ellittica, non è necessario un file seme Diffie-Hellman. Commenta la riga esistente che assomiglia a dh dh2048.pem o dh dh.pem . Il nome del file per la chiave Diffie-Hellman potrebbe essere diverso da quello elencato nel file di configurazione del server di esempio. Quindi aggiungi una riga dopo di essa con il contenuto dh none :
;dh dh2048.pem
dh none
Successivamente, OpenVPN dovrebbe funzionare senza privilegi una volta avviato, quindi dovrai dirgli di funzionare con un utente nessuno e il gruppo nogroup . Per abilitarlo, trova e decommenta user nobody e group nogroup righe rimuovendo il ; segno dall'inizio di ogni riga:
user nobody
group nogroup
(Facoltativo) Push modifiche DNS per reindirizzare tutto il traffico attraverso la VPN
Le impostazioni precedenti creeranno la connessione VPN tra il client e il server, ma non forzeranno alcuna connessione per utilizzare il tunnel. Se desideri utilizzare la VPN per instradare tutto il traffico del tuo client sulla VPN, probabilmente vorrai inviare alcune impostazioni extra ai computer client.
Per iniziare, trova e decommenta la riga contenente push "redirect-gateway def1 bypass-dhcp" . In questo modo dirai al tuo client di reindirizzare tutto il suo traffico attraverso il tuo server OpenVPN. Tieni presente che l'abilitazione di questa funzionalità può causare problemi di connettività con altri servizi di rete, come SSH:
push "redirect-gateway def1 bypass-dhcp"
Appena sotto questa riga, trova l'dhcp-option sezione. Ancora una volta, rimuovi il ; dall'inizio di entrambe le righe per decommentarle:
push "dhcp-option DNS 208.67.222.222"
push "dhcp-option DNS 208.67.220.220"
Queste righe diranno al tuo client di utilizzare i resolver OpenDNS gratuiti agli indirizzi IP elencati. Se preferisci altri resolver DNS puoi sostituirli al posto degli IP evidenziati.
Ciò aiuterà i clienti a riconfigurare le proprie impostazioni DNS per utilizzare il tunnel VPN come gateway predefinito.
(Facoltativo) Regola la porta e il protocollo
Per impostazione predefinita, il server OpenVPN utilizza la porta 1194 e il protocollo UDP per accettare le connessioni client. Se devi utilizzare una porta diversa a causa di ambienti di rete restrittivi in cui potrebbero trovarsi i tuoi client, puoi modificare la port opzione. Se non stai ospitando contenuti web sul tuo server OpenVPN, porta 443 è una scelta popolare poiché di solito è consentita dalle regole del firewall.
Per modificare OpenVPN in ascolto sulla porta 443, apri server.conf file e trova la riga che assomiglia a questa:
port 1194
Modificalo in modo che la porta sia 443:
/etc/openvpn/server/server.conf# Optional!
port 443
Spesso, il protocollo è limitato anche a quella porta. In tal caso, trova il proto riga sotto la port riga e cambia il protocollo da udp a tcp :
# Optional!
proto tcp
Se lo fai cambia il protocollo su TCP, dovrai cambiare explicit-exit-notify valore della direttiva da 1 a 0 , poiché questa direttiva è utilizzata solo da UDP. Non farlo durante l'utilizzo di TCP causerà errori all'avvio del servizio OpenVPN.
Trova la explicit-exit-notify riga alla fine del file e cambia il valore in 0 :
# Optional!
explicit-exit-notify 0
Se non è necessario utilizzare una porta e un protocollo diversi, è meglio lasciare invariate queste impostazioni.
(Facoltativo) Punta a credenziali non predefinite
Se hai selezionato un nome diverso durante il ./easyrsa gen-req server comando precedente, modificare il cert e key righe nel server.conf file di configurazione in modo che puntino al .crt appropriato e .key File. Se hai utilizzato il nome predefinito, server , questo è già impostato correttamente:
cert server.crt
key server.key
Al termine, salva e chiudi il file.
Ora hai finito di configurare le impostazioni generali di OpenVPN. Nel passaggio successivo personalizzerai le opzioni di rete del server.
Passaggio 8:regolazione della configurazione di rete del server OpenVPN
Ci sono alcuni aspetti della configurazione di rete del server che devono essere modificati in modo che OpenVPN possa instradare correttamente il traffico attraverso la VPN. Il primo di questi è inoltro IP , un metodo per determinare dove deve essere instradato il traffico IP. Questo è essenziale per la funzionalità VPN che il tuo server fornirà.
Per regolare l'impostazione di inoltro IP predefinita del tuo server OpenVPN, apri /etc/sysctl.conf file utilizzando nano o il tuo editor preferito:
- sudo nano /etc/sysctl.conf
Quindi aggiungi la seguente riga in fondo al file:
/etc/sysctl.confnet.ipv4.ip_forward = 1
Salva e chiudi il file quando hai finito.
Per leggere il file e caricare i nuovi valori per la sessione corrente, digitare:
- sudo sysctl -p
Outputnet.ipv4.ip_forward = 1
Ora il tuo server OpenVPN sarà in grado di inoltrare il traffico in entrata da un dispositivo Ethernet a un altro. Questa impostazione assicura che il server possa indirizzare il traffico dai client che si connettono all'interfaccia VPN virtuale sugli altri dispositivi fisici Ethernet. Questa configurazione indirizzerà tutto il traffico web dal tuo client tramite l'indirizzo IP del tuo server e l'indirizzo IP pubblico del tuo client sarà effettivamente nascosto.
Nel passaggio successivo dovrai configurare alcune regole del firewall per garantire che il traffico da e verso il tuo server OpenVPN fluisca correttamente.
Fase 9:configurazione del firewall
Finora, hai installato OpenVPN sul tuo server, lo hai configurato e generato le chiavi e i certificati necessari affinché il tuo client acceda alla VPN. Tuttavia, non hai ancora fornito a OpenVPN alcuna istruzione su dove inviare il traffico web in entrata dai client. Puoi stabilire come il server deve gestire il traffico client stabilendo alcune regole del firewall e configurazioni di routing.
Supponendo che tu abbia seguito i prerequisiti all'inizio di questo tutorial, dovresti già avere ufw installato e in esecuzione sul tuo server. Per consentire a OpenVPN attraverso il firewall, devi abilitare il masquerading, un concetto di iptables che fornisce la traduzione dinamica degli indirizzi di rete (NAT) al volo per instradare correttamente le connessioni client.
Prima di aprire il file di configurazione del firewall per aggiungere le regole di mascheramento, devi prima trovare l'interfaccia di rete pubblica della tua macchina. Per fare ciò, digita:
- ip route list default
Your public interface is the string found within this command’s output that follows the word “dev”. For example, this result shows the interface named eth0 , which is highlighted below:
Outputdefault via 159.65.160.1 dev eth0 proto static
When you have the interface associated with your default route, open the /etc/ufw/before.rules file to add the relevant configuration:
- sudo nano /etc/ufw/before.rules
UFW rules are typically added using the ufw comando. Rules listed in the before.rules file, though, are read and put into place before the conventional UFW rules are loaded. Towards the top of the file, add the highlighted lines below. This will set the default policy for the POSTROUTING chain in the nat table and masquerade any traffic coming from the VPN. Remember to replace eth0 in the -A POSTROUTING line below with the interface you found in the above command:
#
# rules.before
#
# Rules that should be run before the ufw command line added rules. Custom
# rules should be added to one of these chains:
#   ufw-before-input
#   ufw-before-output
#   ufw-before-forward
#

# START OPENVPN RULES
# NAT table rules
*nat
:POSTROUTING ACCEPT [0:0]
# Allow traffic from OpenVPN client to eth0 (change to the interface you discovered!)
-A POSTROUTING -s 10.8.0.0/8 -o eth0 -j MASQUERADE
COMMIT
# END OPENVPN RULES

# Don't delete these required lines, otherwise there will be errors
*filter
. . .
Save and close the file when you are finished.
Next, you need to tell UFW to allow forwarded packets by default as well. To do this, open the /etc/default/ufw file:
- sudo nano /etc/default/ufw
Inside, find the DEFAULT_FORWARD_POLICY directive and change the value from DROP to ACCEPT :
DEFAULT_FORWARD_POLICY="ACCEPT"
Save and close the file when you are finished.
Next, adjust the firewall itself to allow traffic to OpenVPN. If you did not change the port and protocol in the /etc/openvpn/server.conf file, you will need to open up UDP traffic to port 1194 . If you modified the port and/or protocol, substitute the values you selected here.
In case you forgot to add the SSH port when following the prerequisite tutorial, add it here as well:
- sudo ufw allow 1194/udp
- sudo ufw allow OpenSSH
Nota :If you are using a different firewall or have customized your UFW configuration, you may need to add additional firewall rules. For example, if you decide to tunnel all of your network traffic over the VPN connection, you will need to ensure that port 53 traffic is allowed for DNS requests, and ports like 80 and 443 for HTTP and HTTPS traffic respectively. If there are other protocols that you are using over the VPN then you will need to add rules for them as well.
After adding those rules, disable and re-enable UFW to restart it and load the changes from all of the files you’ve modified:
- sudo ufw disable
- sudo ufw enable
Your server is now configured to correctly handle OpenVPN traffic. With the firewall rules in place, you can start the OpenVPN service on the server.
Step 10 — Starting OpenVPN
OpenVPN runs as a systemd service, so you can use systemctl per gestirlo. You will configure OpenVPN to start up at boot so you can connect to your VPN at any time as long as your server is running. To do this, enable the OpenVPN service by adding it to systemctl :
- sudo systemctl -f enable openvpn-server@server.service
Then start the OpenVPN service:
- sudo systemctl start openvpn-server@server.service
Double check that the OpenVPN service is active with the following command. You should see active (running) in the output:
- sudo systemctl status openvpn-server@server.service
Output● openvpn-server@server.service - OpenVPN service for server
     Loaded: loaded (/lib/systemd/system/openvpn-server@.service; enabled; vendor preset: enabled)
     Active: active (running) since Thu 2022-04-21 17:58:24 UTC; 6s ago
       Docs: man:openvpn(8)
             https://community.openvpn.net/openvpn/wiki/Openvpn24ManPage
             https://community.openvpn.net/openvpn/wiki/HOWTO
   Main PID: 144351 (openvpn)
     Status: "Initialization Sequence Completed"
      Tasks: 1 (limit: 4665)
     Memory: 1.8M
        CPU: 27ms
     CGroup: /system.slice/system-openvpn\x2dserver.slice/openvpn-server@server.service
             └─144351 /usr/sbin/openvpn --status /run/openvpn-server/status-server.log --status-version 2 --suppress-timestamps --config server.conf

. . .
You have now completed the server-side configuration for OpenVPN. Next, you will configure your client machine and connect to the OpenVPN Server.
Step 11 — Creating the Client Configuration Infrastructure
Creating configuration files for OpenVPN clients can be somewhat involved, as every client must have its own config and each must align with the settings outlined in the server’s configuration file. Rather than writing a single configuration file that can only be used on one client, this step outlines a process for building a client configuration infrastructure which you can use to generate config files on-the-fly. You will first create a “base” configuration file then build a script which will allow you to generate unique client config files, certificates, and keys as needed.
Get started by creating a new directory where you will store client configuration files within the client-configs directory you created earlier:
- mkdir -p ~/client-configs/files
Next, copy an example client configuration file into the client-configs directory to use as your base configuration:
- cp /usr/share/doc/openvpn/examples/sample-config-files/client.conf ~/client-configs/base.conf
Open this new file using nano or your preferred text editor:
- nano ~/client-configs/base.conf
Inside, locate the remote direttiva. This points the client to your OpenVPN server address — the public IP address of your OpenVPN server. If you decided to change the port that the OpenVPN server is listening on, you will also need to change 1194 to the port you selected:
. . .
# The hostname/IP and port of the server.
# You can have multiple remote entries
# to load balance between the servers.
remote your_server_ip 1194
. . .
Be sure that the protocol matches the value you are using in the server configuration:
~/client-configs/base.confproto udp
Next, uncomment the user e group directives by removing the ; sign at the beginning of each line:
# Downgrade privileges after initialization (non-Windows only)
user nobody
group nogroup
Find the directives that set the ca , cert , and key . Comment out these directives since you will add the certs and keys within the file itself shortly:
# SSL/TLS parms.
# See the server config file for more
# description. It's best to use
# a separate .crt/.key file pair
# for each client. A single ca
# file can be used for all clients.
;ca ca.crt
;cert client.crt
;key client.key
Similarly, comment out the tls-auth directive, as you will add ta.key directly into the client configuration file (and the server is set up to use tls-crypt ):
# If a tls-auth key is used on the server
# then every client must also have the key.
;tls-auth ta.key 1
Mirror the cipher and auth settings that you set in the /etc/openvpn/server/server.conf file:
cipher AES-256-GCM
auth SHA256
Next, add the key-direction directive somewhere in the file. You must set this to “1” for the VPN to function correctly on the client machine:
key-direction 1
Finally, add a few commented out lines to handle various methods that Linux based VPN clients will use for DNS resolution. You’ll add two similar, but separate sets of commented out lines. The first set is for clients that do not use systemd-resolved to manage DNS. These clients rely on the resolvconf utility to update DNS information for Linux clients.
; script-security 2
; up /etc/openvpn/update-resolv-conf
; down /etc/openvpn/update-resolv-conf
Now add another set of lines for clients that use systemd-resolved for DNS resolution:
; script-security 2
; up /etc/openvpn/update-systemd-resolved
; down /etc/openvpn/update-systemd-resolved
; down-pre
; dhcp-option DOMAIN-ROUTE .
Save and close the file when you are finished.
Later in Step 13 - Installing the Client Configuration step of this tutorial you will learn how to determine how DNS resolution works on Linux clients and which section to uncomment.
Next, you’ll create a script that will compile your base configuration with the relevant certificate, key, and encryption files and then place the generated configuration in the ~/client-configs/files directory. Open a new file called make_config.sh within the ~/client-configs directory:
- nano ~/client-configs/make_config.sh
Inside, add the following content:
~/client-configs/make_config.sh#!/bin/bash
# First argument: Client identifier
KEY_DIR=~/client-configs/keys
OUTPUT_DIR=~/client-configs/files
BASE_CONFIG=~/client-configs/base.conf
cat ${BASE_CONFIG} \
<(echo -e '<ca>') \
${KEY_DIR}/ca.crt \
<(echo -e '</ca>\n<cert>') \
${KEY_DIR}/${1}.crt \
<(echo -e '</cert>\n<key>') \
${KEY_DIR}/${1}.key \
<(echo -e '</key>\n<tls-crypt>') \
${KEY_DIR}/ta.key \
<(echo -e '</tls-crypt>') \
> ${OUTPUT_DIR}/${1}.ovpn
Save and close the file when you are finished.
Before moving on, be sure to mark this file as executable by typing:
- chmod 700 ~/client-configs/make_config.sh
This script will make a copy of the base.conf file you made, collect all the certificate and key files you’ve created for your client, extract their contents, append them to the copy of the base configuration file, and export all of this content into a new client configuration file. This means that, rather than having to manage the client’s configuration, certificate, and key files separately, all the required information is stored in one place. The benefit of using this method is that if you ever need to add a client in the future, you can run this script to quickly create a new config file and ensure that all the important information is stored in a single, easy-to-access location.
Please note that any time you add a new client, you will need to generate new keys and certificates for it before you can run this script and generate its configuration file. You will get some practice using this script in the next step.
Step 12 — Generating Client Configurations
If you followed along with the guide, you created a client certificate and key named client1.crt and client1.key , respectively, in Step 6. You can generate a config file for these credentials by moving into your ~/client-configs directory and running the script you made at the end of the previous step:
- cd ~/client-configs
- ./make_config.sh client1
This will create a file named client1.ovpn in your ~/client-configs/files directory:
- ls ~/client-configs/files
Outputclient1.ovpn
You need to transfer this file to the device you plan to use as the client. For instance, this could be your local computer or a mobile device.
While the exact applications used to accomplish this transfer will depend on your device’s operating system and your personal preferences, a dependable and secure method is to use SFTP (SSH file transfer protocol) or SCP (Secure Copy) on the backend. This will transport your client’s VPN authentication files over an encrypted connection.
Here is an example SFTP command which you can run from your local computer (macOS or Linux). This will copy the client1.ovpn file you created in the last step to your home directory:
- sftp sammy@openvpn_server_ip:client-configs/files/client1.ovpn ~/
Here are several tools and tutorials for securely transferring files from the OpenVPN server to a local computer:
- WinSCP
- How To Use SFTP to Securely Transfer Files with a Remote Server
- How To Use Filezilla to Transfer and Manage Files Securely on your VPS
Step 13 — Installing the Client Configuration
This section covers how to install a client VPN profile on Windows, macOS, Linux, iOS, and Android. None of these client instructions are dependent on one another, so feel free to skip to whichever is applicable to your device.
The OpenVPN connection will have the same name as whatever you called the .ovpn file. In regards to this tutorial, this means that the connection is named client1.ovpn , aligning with the first client file you generated.
Windows
Installing
Download the OpenVPN client application for Windows from OpenVPN’s Downloads page. Choose the appropriate installer version for your version of Windows.
Nota :OpenVPN needs administrative privileges to install.
After installing OpenVPN, copy the .ovpn file to:
C:\Program Files\OpenVPN\config
When you launch OpenVPN, it will automatically locate the profile and make it available.
You must run OpenVPN as an administrator each time it’s used, even by administrative accounts. To do this without having to right-click and select Run as administrator every time you use the VPN, you must preset this from an administrative account. This also means that standard users will need to enter the administrator’s password to use OpenVPN. On the other hand, standard users can’t properly connect to the server unless the OpenVPN application on the client has admin rights, so the elevated privileges are necessary.
To set the OpenVPN application to always run as an administrator, right-click on its shortcut icon and go to Properties . At the bottom of the Compatibility tab, click the button to Change settings for all users . In the new window, check Run this program as an administrator .
Connecting
Each time you launch the OpenVPN GUI, Windows will ask if you want to allow the program to make changes to your computer. Fai clic su Sì . Launching the OpenVPN client application only puts the applet in the system tray so that you can connect and disconnect the VPN as needed; it does not actually make the VPN connection.
Once OpenVPN is started, initiate a connection by going into the system tray applet and right-clicking on the OpenVPN applet icon. This opens the context menu. Select client1 at the top of the menu (that’s your client1.ovpn profile) and choose Connect .
A status window will open showing the log output while the connection is established, and a message will show once the client is connected.
Disconnect from the VPN the same way:Go into the system tray applet, right-click the OpenVPN applet icon, select the client profile and click Disconnect .
macOS
Installing
Tunnelblick is a free, open source OpenVPN client for macOS. You can download the latest disk image from the Tunnelblick Downloads page. Double-click the downloaded .dmg file and follow the prompts to install.
Towards the end of the installation process, Tunnelblick will ask if you have any configuration files. Answer I have configuration files and let Tunnelblick finish. Open a Finder window and double-click client1.ovpn . Tunnelblick will install the client profile. Administrative privileges are required.
Connecting
Launch Tunnelblick by double-clicking the Tunnelblick icon in the Applications cartella. Once Tunnelblick has been launched, there will be a Tunnelblick icon in the menu bar at the top right of the screen for controlling connections. Click on the icon, and then the Connect client1 menu item to initiate the VPN connection. If you are using custom DNS settings with Tunnelblick, you may need check “Allow changes to manually-set network settings” in the advanced configuration dialog.
Linux
Installing
If you are using Linux, there are a variety of tools that you can use depending on your distribution. Your desktop environment or window manager might also include connection utilities.
The most universal way of connecting, however, is to just use the OpenVPN software.
On Ubuntu or Debian, you can install it just as you did on the server by typing:
- sudo apt update
- sudo apt install openvpn
On CentOS you can enable the EPEL repositories and then install it by typing:
- sudo dnf install epel-release
- sudo dnf install openvpn
Configuring Clients that use systemd-resolved
First determine if your system is using systemd-resolved to handle DNS resolution by checking the /etc/resolv.conf file:
- cat /etc/resolv.conf
Output# This file is managed by man:systemd-resolved(8). Do not edit.
. . .

nameserver 127.0.0.53
options edns0
If your system is configured to use systemd-resolved for DNS resolution, the IP address after the nameserver option will be 127.0.0.53 . There should also be comments in the file like the output that is shown that explain how systemd-resolved is managing the file. If you have a different IP address than 127.0.0.53 then chances are your system is not using systemd-resolved and you can go to the next section on configuring Linux clients that have an update-resolv-conf script instead.
To support these clients, first install the openvpn-systemd-resolved pacchetto. It provides scripts that will force systemd-resolved to use the VPN server for DNS resolution.
- sudo apt install openvpn-systemd-resolved
One that package is installed, configure the client to use it, and to send all DNS queries over the VPN interface. Open the client’s VPN file:
- nano client1.ovpn
Now uncomment the following lines that you added earlier:
client1.ovpnscript-security 2
up /etc/openvpn/update-systemd-resolved
down /etc/openvpn/update-systemd-resolved
down-pre
dhcp-option DOMAIN-ROUTE .
Configuring Clients that use update-resolv-conf
If your system is not using systemd-resolved to manage DNS, check to see if your distribution includes an /etc/openvpn/update-resolv-conf script instead:
- ls /etc/openvpn
Outputupdate-resolv-conf
If your client includes the update-resolv-conf file, then edit the OpenVPN client configuration file that you transferred earlier:
- nano client1.ovpn
Uncomment the three lines you added to adjust the DNS settings:
client1.ovpnscript-security 2
up /etc/openvpn/update-resolv-conf
down /etc/openvpn/update-resolv-conf
If you are using CentOS, change the group directive from nogroup to nobody to match the distribution’s available groups:
group nobody
Save and close the file.
Connecting
Now, you can connect to the VPN by just pointing the openvpn command to the client configuration file:
- sudo openvpn --config client1.ovpn
This should connect you to your VPN.
Nota: If your client uses systemd-resolved to manage DNS, check the settings are applied correctly by running the systemd-resolve --status comando in questo modo:
- systemd-resolve --status tun0
You should see output like the following:
OutputLink 22 (tun0)
. . .
         DNS Servers: 208.67.222.222
                      208.67.220.220
          DNS Domain: ~.
If you see the IP addresses of the DNS servers that you configured on the OpenVPN server, along with the ~. setting for DNS Domain in the output, then you have correctly configured your client to use the VPN server’s DNS resolver. You can also check that you are sending DNS queries over the VPN by using a site like DNS leak test.com.
iOS
Installing
From the iTunes App Store, search for and install OpenVPN Connect, the official iOS OpenVPN client application. To transfer your iOS client configuration onto the device, connect it directly to a computer.
The process of completing the transfer with iTunes is outlined here. Open iTunes on the computer and click on iPhone> apps . Scroll down to the bottom to the File Sharing section and click the OpenVPN app. The blank window to the right, OpenVPN Documents , is for sharing files. Drag the .ovpn file to the OpenVPN Documents window. 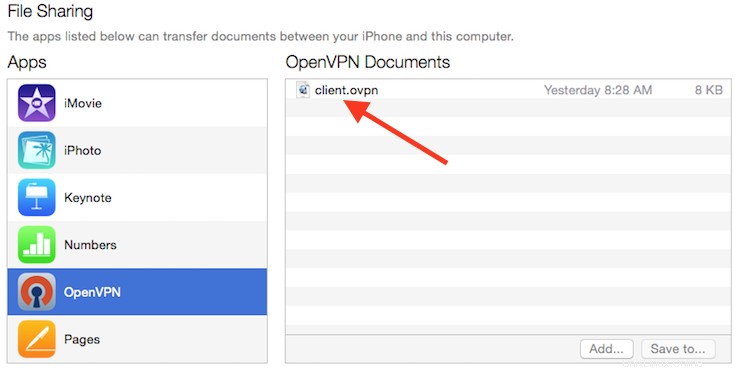
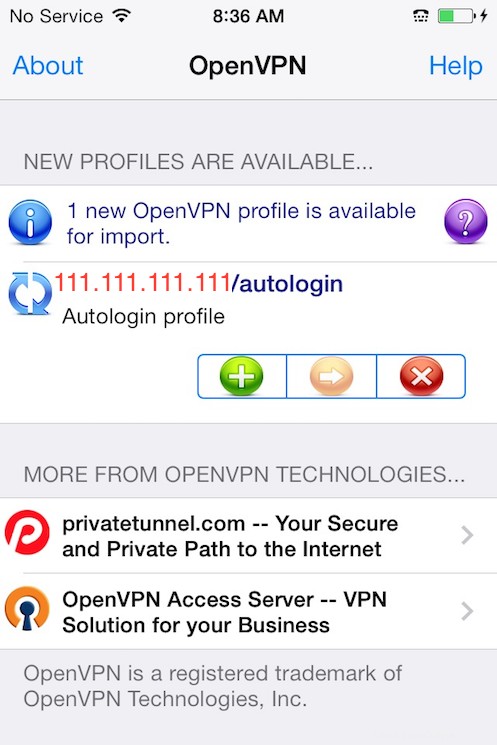
Now launch the OpenVPN app on the iPhone. You will receive a notification that a new profile is ready to import. Tap the green plus sign to import it.
 Connecting
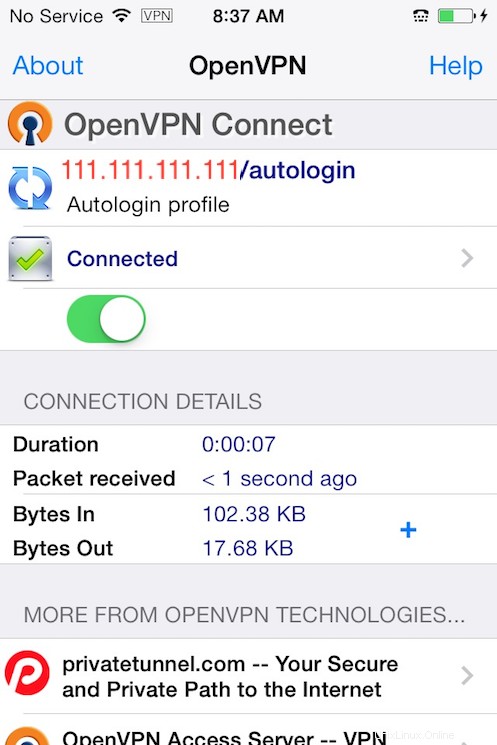
OpenVPN is now ready to use with the new profile. Start the connection by sliding the Connect button to the On posizione. Disconnect by sliding the same button to Off .
Nota :The VPN switch under Settings cannot be used to connect to the VPN. If you try, you will receive a notice to only connect using the OpenVPN app.
Android
Installing
Open the Google Play Store. Search for and install Android OpenVPN Connect, the official Android OpenVPN client application.
You can transfer the .ovpn profile by connecting the Android device to your computer by USB and copying the file over. Alternatively, if you have an SD card reader, you can remove the device’s SD card, copy the profile onto it and then insert the card back into the Android device.
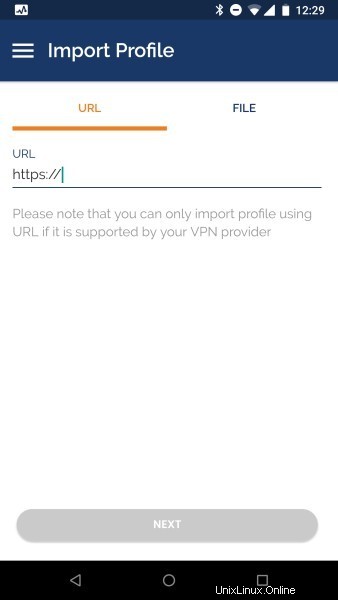
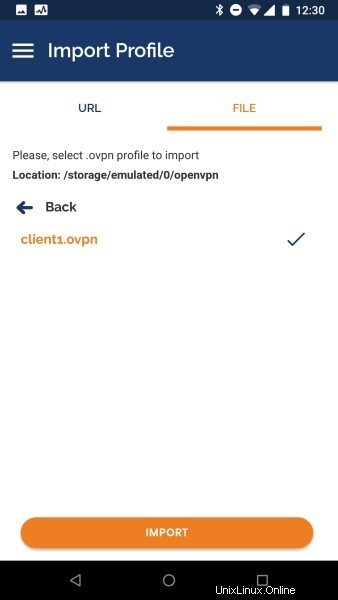
Start the OpenVPN app and tap the FILE menu to import the profile.
Then navigate to the location of the saved profile (the screenshot uses /storage/emulated/0/openvpn ) and select your .ovpn file. Tap the IMPORT button to finish importing this profile.
Connecting Once the profile is added, you will see a screen like this:
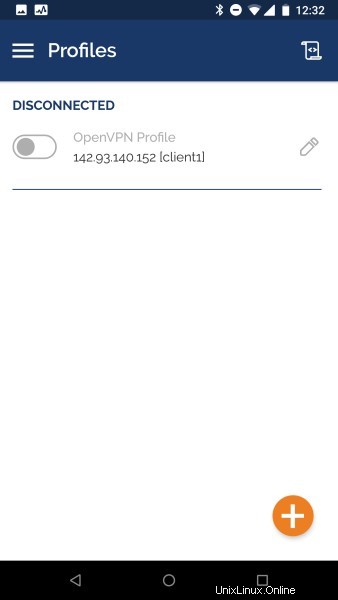
To connect, tap the toggle button close to the profile you want to use. You’ll see real time stats of your connection and traffic being routed through your OpenVPN server: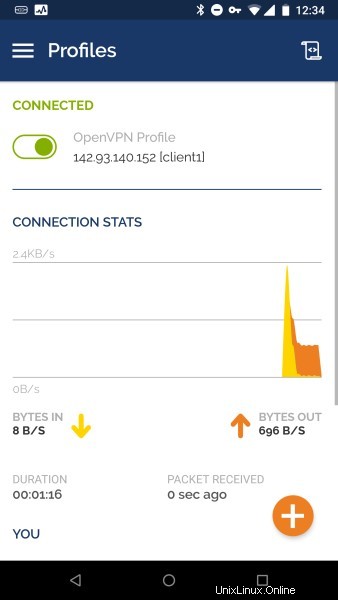
To disconnect, just tap the toggle button on the top left once again. You will be prompted to confirm that you want to disconnect from your VPN.
Step 14 — Testing Your VPN Connection (Optional)
Nota: This method for testing your VPN connection will only work if you opted to route all your traffic through the VPN in Step 7 when you edited the server.conf file for OpenVPN.
Once everything is installed, a simple check confirms everything is working properly. Without having a VPN connection enabled, open a browser and go to DNSLeakTest.
The site will return the IP address assigned by your internet service provider and as you appear to the rest of the world. To check your DNS settings through the same website, click on Extended Test and it will tell you which DNS servers you are using.
Now connect the OpenVPN client to your Droplet’s VPN and refresh the browser. A completely different IP address (that of your VPN server) should now appear, and this is how you appear to the world. Again, DNSLeakTest’s Extended Test will check your DNS settings and confirm you are now using the DNS resolvers pushed by your VPN.
Step 15 — Revoking Client Certificates
Occasionally, you may need to revoke a client certificate to prevent further access to the OpenVPN server.
To do so, follow the example in the prerequisite tutorial on How to Set Up and Configure a Certificate Authority on Ubuntu 22.04 under the Revoking a Certificate section.
Once you have revoked a certificate for a client using those instructions, you’ll need to copy the generated crl.pem file to your OpenVPN server in the /etc/openvpn/server directory:
- sudo cp /tmp/crl.pem /etc/openvpn/server/
Next, open the OpenVPN server configuration file:
- sudo nano /etc/openvpn/server/server.conf
At the bottom of the file, add the crl-verify option, which will instruct the OpenVPN server to check the certificate revocation list that you created each time a connection attempt is made:
crl-verify crl.pem
Save and close the file.
Finally, restart OpenVPN to implement the certificate revocation:
- sudo systemctl restart openvpn-server@server.service
The client should no longer be able to successfully connect to the server using the old credential.
To revoke additional clients, follow this process:
- Revoke the certificate with the
./easyrsa revoke client_namecomando - Generate a new CRL
- Transfer the new
crl.pemfile to your OpenVPN server and copy it to the/etc/openvpn/server/directory to overwrite the old list. - Restart the OpenVPN service.
You can use this process to revoke any certificates that you’ve previously issued for your server.
Conclusione
You should now have a fully operational virtual private network running on your OpenVPN Server. You can browse the web and download content without worrying about malicious actors tracking your activity.
There are several steps you could take to customize your OpenVPN installation even further, such as configuring your client to connect to the VPN automatically or configuring client-specific rules and access policies. For these and other OpenVPN customizations, you should consult the official OpenVPN documentation.
To configure more clients, you only need to follow steps 6 and 11-13 for each additional device. To revoke access to clients, follow step 15 .