Oggi impareremo come installare lo stack LAMP su AlmaLinux 8 / Rocky Linux 8, una LAMP stack è un gruppo di software open source che viene in genere installato insieme per consentire a un server di ospitare siti Web dinamici e app Web. Questo termine è in realtà un acronimo che rappresenta il sistema operativo Linux, con il web server Apache. I dati del sito vengono archiviati in un database MySQL e il contenuto dinamico viene elaborato da PHP.
Installa Apache Web Server su AlmaLinux 8 / Rocky Linux 8
Innanzitutto, inizieremo installando il server Web Apache. Per completare l'installazione, utilizzare il seguente comando.
yum install httpd httpd-toolsUscita:
[[email protected] ~]# yum install httpd
AlmaLinux 8.3 - BaseOS                           14 MB/s | 2.6 MB     00:00
AlmaLinux 8.3 - AppStream                        21 MB/s | 6.5 MB     00:00
AlmaLinux 8.3 - PowerTools                      8.0 MB/s | 1.9 MB     00:00
AlmaLinux 8.3 - Extras                           12 kB/s | 1.2 kB     00:00
Dependencies resolved.
================================================================================
 Package     Arch   Version                                     Repo       Size
================================================================================
Installing:
 httpd       x86_64 2.4.37-30.module_el8.3.0+2016+8bf57d29.alma appstream 1.4 M
Una volta completata l'installazione, abilita Apache (per l'avvio automatico all'avvio del sistema), avvia il server web e verifica lo stato utilizzando i comandi seguenti.
systemctl enable httpd

systemctl start httpd

systemctl status httpd
Uscita:
 [[email protected] ~]# systemctl status httpd
● httpd.service - The Apache HTTP Server
   Loaded: loaded (/usr/lib/systemd/system/httpd.service; enabled; vendor prese>
   Active: active (running) since Mon 2021-02-08 15:03:51 EST; 5s ago
     Docs: man:httpd.service(8)
 Main PID: 26398 (httpd)
   Status: "Started, listening on: port 80"
    Tasks: 213 (limit: 23680)
   Memory: 29.1M
   CGroup: /system.slice/httpd.service
           ├─26398 /usr/sbin/httpd -DFOREGROUND
           ├─26399 /usr/sbin/httpd -DFOREGROUND
Per rendere le tue pagine disponibili al pubblico, dovrai modificare le regole del firewall per consentire le richieste HTTP e HTTPS sul tuo server web utilizzando i seguenti comandi.
firewall-cmd --permanent --zone=public --add-service=http

firewall-cmd --permanent --zone=public --add-service=https

firewall-cmd --reload
Uscita:
[[email protected] ~]# firewall-cmd --permanent --zone=public --add-service=http
success
[[email protected] ~]# firewall-cmd --permanent --zone=public --add-service=https
success
[[email protected] ~]# firewall-cmd --reload
success
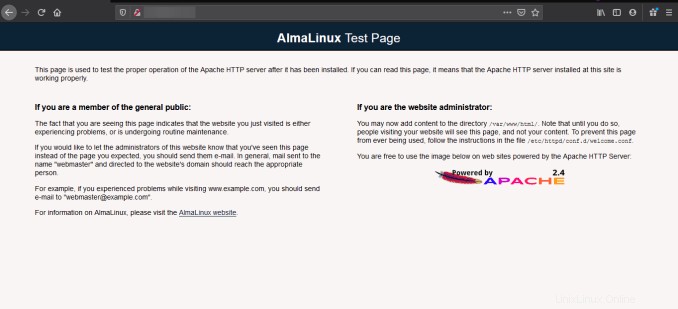
Verifica che il server web sia in esecuzione e accessibile accedendo all'indirizzo IP del tuo server.
echo "Hello there, Apache webserver is now running" > /var/www/html/index.htmlE riavvia il server Web per riflettere le modifiche apportate.
systemctl restart httpdDal tuo browser,
http://IP_address
Come installare Linux Kernel 5.13 su Rocky Linux 8 / AlmaLinux 8/CentOS 8
Installa PHP su AlmaLinux 8 / Rocky Linux 8
Per installare PHP sul tuo RHEL 8 usa il comando seguente.
yum install -y php-mysqlnd php-dom php-simplexml php-xml php-xmlreader php-curl php-exif php-ftp php-gd php-iconv php-json php-mbstring php-posix php-sockets php-tokenizerOra riavvia il tuo server web in modo che Apache sappia che servirà anche richieste PHP.
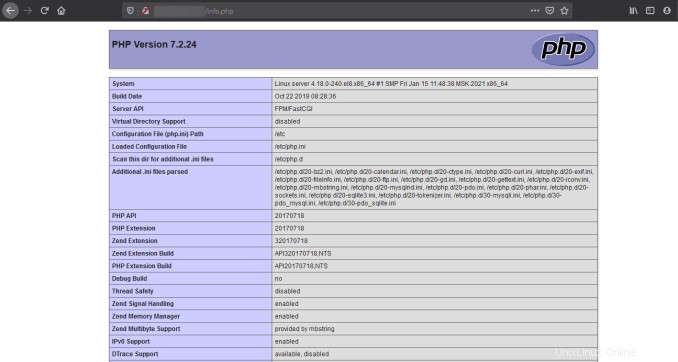
systemctl restart httpd Metti alla prova il tuo PHP, creando un semplice file info.php con un phinfo() al suo interno. Il file dovrebbe essere posizionato nella directory root del tuo server web, che è /var/www/html.
Per creare il file usa:
echo "<?php phpinfo() ?>" > /var/www/html/info.phpOra di nuovo, accedi a http://localhost/info.php o http://yourserver-ip-address/info.php. Dovresti vedere una pagina simile a quella sotto.

Abilita Servizio SSH su Rocky Linux 8 / CentOS 8
Installa MariaDB Server AlmaLinux 8 / Rocky Linux 8
MariaDB è un popolare server di database. L'installazione è semplice e richiede solo pochi passaggi come mostrato.
yum install mariadb-server mariadbUscita:
[[email protected] ~]# yum install mariadb-server mariadb
Last metadata expiration check: 0:05:56 ago on Mon 08 Feb 2021 03:03:08 PM EST.
Dependencies resolved.
================================================================================
 Package                    Arch   Version                      Repo       Size
================================================================================
Installing:
 mariadb                    x86_64 3:10.3.27-3.module_el8.3.0+2028+5e3224e9
                                                                appstream 6.0 M
 mariadb-server             x86_64 3:10.3.27-3.module_el8.3.0+2028+5e3224e9
                                                                appstream  16 M
Installing dependencies:
 mariadb-common             x86_64 3:10.3.27-3.module_el8.3.0+2028+5e3224e9
Una volta completata l'installazione, abilita MariaDB (per l'avvio automatico all'avvio del sistema), avvia MariaDB e verifica lo stato utilizzando i comandi seguenti.
systemctl enable mariadb

systemctl start mariadb

systemctl status mariadb
Uscita:
[[email protected] ~]# systemctl status mariadb
● mariadb.service - MariaDB 10.3 database server
   Loaded: loaded (/usr/lib/systemd/system/mariadb.service; enabled; vendor pre>
   Active: active (running) since Mon 2021-02-08 15:10:12 EST; 5s ago
     Docs: man:mysqld(8)
           https://mariadb.com/kb/en/library/systemd/
  Process: 30138 ExecStartPost=/usr/libexec/mysql-check-upgrade (code=exited, s>
  Process: 30004 ExecStartPre=/usr/libexec/mysql-prepare-db-dir mariadb.service>
  Process: 29979 ExecStartPre=/usr/libexec/mysql-check-socket (code=exited, sta>
 Main PID: 30107 (mysqld)
Infine, vorrai proteggere la tua installazione di MariaDB emettendo il seguente comando.
mysql_secure_installationUscita:
[[email protected] ~]# mysql_secure_installation

NOTE: RUNNING ALL PARTS OF THIS SCRIPT IS RECOMMENDED FOR ALL MariaDB
      SERVERS IN PRODUCTION USE!  PLEASE READ EACH STEP CAREFULLY!

In order to log into MariaDB to secure it, we'll need the current
password for the root user.  If you've just installed MariaDB, and
you haven't set the root password yet, the password will be blank,
so you should just press enter here.

Enter current password for root (enter for none):
OK, successfully used password, moving on...

Setting the root password ensures that nobody can log into the MariaDB
root user without the proper authorisation.

Set root password? [Y/n] asdfghjkl
Set root password? [Y/n] y
New password:
Re-enter new password:
Password updated successfully!
Reloading privilege tables..
 ... Success!
Una volta protetto, puoi connetterti a MySQL e rivedere i database esistenti sul tuo server di database utilizzando il comando seguente.
mysql -e "SHOW DATABASES;" -pUscita:
[[email protected] ~]# mysql -e "SHOW DATABASES;" -p
Enter password:
+--------------------+
| Database           |
+--------------------+
| information_schema |
| mysql              |
| performance_schema |
+--------------------+
Fatto!