
In questo articolo, avremo spiegato i passaggi necessari per installare e configurare Samba su Ubuntu 20.04 LTS. Prima di continuare con questo tutorial, assicurati di aver effettuato l'accesso come utente con sudo privilegi. Tutti i comandi in questo tutorial devono essere eseguiti come utente non root.
Samba è una re-implementazione gratuita e open source del protocollo di condivisione file di rete SMB/CIFS che consente agli utenti finali di accedere a file, stampanti e altre risorse condivise.
Installa Samba su Ubuntu 20.04
Passaggio 1. Innanzitutto, prima di iniziare a installare qualsiasi pacchetto sul tuo server Ubuntu, ti consigliamo sempre di assicurarti che tutti i pacchetti di sistema siano aggiornati.
sudo apt update
sudo apt upgrade
Passaggio 2. Installazione di Samba sul sistema Ubuntu.
Per installare Samba, esegui i comandi seguenti:
sudo apt install samba
Per verificare se i servizi Samba sono in esecuzione, esegui i comandi seguenti:
sudo systemctl status smbd
Passaggio 3. Configurazione di Samba.
Ora il primo backup del file di configurazione predefinito:
sudo cp /etc/samba/smb.conf{,.backup} Avanti, apri il file di configurazione di Samba:
sudo nano /etc/samba/smb.conf
Aggiungi quanto segue del file:
======================= Global Settings =======================
[global]
## Browsing/Identification ###
# Change this to the workgroup/NT-domain name your Samba server will part of
   workgroup = WORKGROUPnetbios name = linuxtips
   security = user
   proxy = no
   map to guest = bad user
#### Networking ####
# The specific set of interfaces / networks to bind to
# This can be either the interface name or an IP address/netmask;
# interface names are normally preferred
   interfaces = 127.0.0.0/8 eth0
# Only bind to the named interfaces and/or networks; you must use the
# 'interfaces' option above to use this.
bind interfaces only = yes

#Most people will want "standalone server" or "member server".
#Running as "active directory domain controller" will require firstserver role = standalone server
obey pam restrictions = yes
#This boolean parameter controls whether Samba attempts to sync the Unix[public]
   path = /samba/public
   browseable = yes
   guest ok = yes
   guest only = yes
   read only = no
   force user = nobody
   force create mode = 0777
   force directory mode = 0777
Ora che abbiamo configurato la nostra nuova condivisione, salvala e riavvia Samba affinché abbia effetto:
sudo systemctl restart nmbd
Passaggio 4. Impostazione degli account utente e connessione alla condivisione.
Samba non utilizza account utente di sistema, quindi dobbiamo creare account samba per condividere file con altri. Per creare un utente eseguire il comando seguente:
sudo smbpasswd -a yourusername
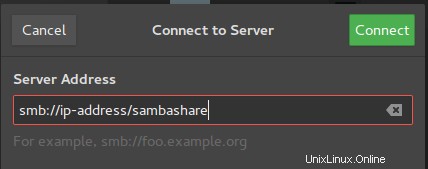
Passaggio 5. Connessione alla condivisione.
Apri il file manager predefinito e fai clic su Connetti al server quindi inserisci:
Questo è tutto ciò che devi fare per installare Samba su Ubuntu 20.04 LTS Focal Fossa. Spero che tu possa trovare utile questo suggerimento rapido. Per ulteriori letture su Samba, fare riferimento alla loro knowledge base ufficiale. Se hai domande o suggerimenti, sentiti libero di lasciare un commento qui sotto.