
In questo tutorial, ti mostreremo come installare Apache su Ubuntu 14.04. Per chi non lo sapesse, Apache è un server web HTTP, il più popolare in uso. serve le pagine Web quando sono richieste dai browser Web. Quando si digita un URL sul server Web e si preme Invio, è molto probabile che le pagine visualizzate sullo schermo siano servite dal server Web Apache.
Questo articolo presuppone che tu abbia almeno una conoscenza di base di Linux, sappia come usare la shell e, soprattutto, che ospiti il tuo sito sul tuo VPS. L'installazione è abbastanza semplice. Lo farò mostrarti l'installazione passo passo di Apache sul server Ubuntu 14.04.
Installa Apache su Ubuntu 14.04
Passaggio 1. Prima di tutto, assicurati che tutti i pacchetti siano aggiornati.
apt-get update
apt-get upgrade
Passaggio 2. Installazione del server Web Apache su Ubuntu 14.04.
Installeremo Apache con apt-get, che è il gestore di pacchetti predefinito per Ubuntu:
apt-get install apache2 apache2-utils
Avvia Apache e aggiungilo per avviarlo automaticamente all'avvio del tuo sistema usando:
service apache2 start
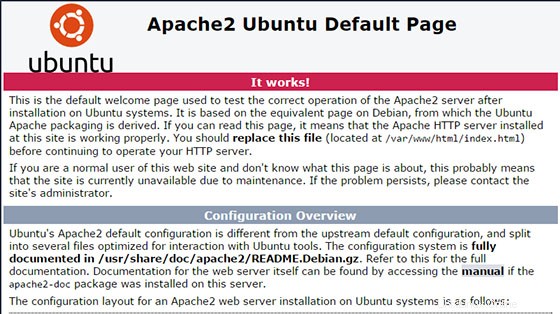
Puoi verificare che Apache sia realmente in esecuzione aprendo il tuo browser web preferito e inserendo l'URL http://your-server's-address , se è installato, vedrai questo:
Configura Apache (host singolo)
Ora configureremo Apache aprendo il file di configurazione principale e modificheremo le righe ServerName e ServerAdmin di conseguenza:
nano /etc/apache2/sites-available/000-default.conf
<VirtualHost *:80>
        # The ServerName directive sets the request scheme, hostname and port that
        # the server uses to identify itself. This is used when creating
        # redirection URLs. In the context of virtual hosts, the ServerName
        # specifies what hostname must appear in the request's Host: header to
        # match this virtual host. For the default virtual host (this file) this
        # value is not decisive as it is used as a last resort host regardless.
        # However, you must set it for any further virtual host explicitly.
        #ServerName www.example.com
        ServerAdmin webmaster@localhost
        DocumentRoot /var/www/html
        # Available loglevels: trace8, ..., trace1, debug, info, notice, warn,
        # error, crit, alert, emerg.
        # It is also possible to configure the loglevel for particular
        # modules, e.g.
        #LogLevel info ssl:warn
        ErrorLog ${APACHE_LOG_DIR}/error.log
        CustomLog ${APACHE_LOG_DIR}/access.log combined
        # For most configuration files from conf-available/, which are
        # enabled or disabled at a global level, it is possible to
        # include a line for only one particular virtual host. For example the
        # following line enables the CGI configuration for this host only
        # after it has been globally disabled with "a2disconf".
        #Include conf-available/serve-cgi-bin.conf
</VirtualHost>
Ora possiamo riavviare Apache in modo che avvengano le modifiche:
service apache2 restart
Ora puoi creare/caricare il tuo contenuto web nella directory HTML di Apache. (Ricorda di sostituire il file index.html esistente con il tuo index.html che è il tuo pagina iniziale).
Configura Apache (Multi-Host)
Se desideri ospitare più siti web, procedi aprendo il file di configurazione principale, copia la voce dell'Host Virtuale esistente e incollala sotto di essa. Quindi modifica ServerName, ServerAdmin e DocumentRoot righe di conseguenza.
nano /etc/apache2/sites-available/000-default.conf
In alternativa, puoi semplicemente copiare le seguenti voci e modificarle di conseguenza:
    <VirtualHost *:80>
    ServerAdmin youremail@address.com
    DocumentRoot /var/www/site1
    ServerName site1.com
    ServerAlias www.site1.com
    ErrorLog ${APACHE_LOG_DIR}/error.log
    CustomLog ${APACHE_LOG_DIR}/access.log combined
    </VirtualHost>
    <VirtualHost *:80>
    ServerAdmin youremail@address.com
    DocumentRoot /var/www/site2
    ServerName site2.com
    ServerAlias www.site2.com
    ErrorLog ${APACHE_LOG_DIR}/error.log
    CustomLog ${APACHE_LOG_DIR}/access.log combined
    </VirtualHost>
Ora dobbiamo creare directory per i siti appena configurati, site1 e site2.
mkdir -p /var/www/site1
mkdir -p /var/www/site2
Ora possiamo riavviare Apache in modo che avvengano le modifiche:
service apache2 restart
Congratulazioni! Hai installato con successo Apache. Grazie per aver utilizzato questo tutorial per l'installazione del server Web Apache nel sistema Ubuntu 14.04. Per ulteriore aiuto o informazioni utili, ti consigliamo di controllare il sito Web ufficiale di Apache.