
In questo tutorial, ti mostreremo come installare Ntopng su Ubuntu 14.04. Per chi non lo sapesse, Ntopng è uno strumento relativamente utile se stai cercando di monitorare reti diverse protocolli sui tuoi server. Fornisce una serie di strumenti per il monitoraggio di vari protocolli, varianti di traffico e sì, larghezza di banda su più intervalli di tempo. Ntopng è basato su libpcap ed è stato scritto in modo portatile per funzionare virtualmente su ogni Unix piattaforma, macOS e anche su Win32.
Questo articolo presuppone che tu abbia almeno una conoscenza di base di Linux, sappia come usare la shell e, soprattutto, che ospiti il tuo sito sul tuo VPS. L'installazione è abbastanza semplice. Lo farò mostrarti l'installazione passo passo di Ntopng su Ubuntu 14.04.
Installa Ntopng su Ubuntu 14.04
Passaggio 1. Innanzitutto, aggiungi il repository Ntopng al nostro elenco di repository.
sudo nano /etc/apt/sources.list.d/ntop.list
Quindi aggiungi questa riga:
deb http://www.nmon.net/apt-stable/12.04/ x64/
deb http://www.nmon.net/apt-stable/12.04/ all/
Aggiungi la chiave ed esegui l'aggiornamento:
wget -qO - http://www.nmon.net/apt-stable/ntop.key | sudo apt-key add -
sudo apt-get update
Passaggio 2. Installa Ntopng e le dipendenze.
sudo apt-get install libpcap-dev libglib2.0-dev libgeoip-dev redis-server libxml2-dev libnl1
sudo apt-get install ntopng pfring nprobe ntopng-data n2disk nbox
Passaggio 3. Configura Ntopng.
Crea un file di configurazione Ntopng, in questo articolo utilizziamo nano come editor di testo. Puoi usare il tuo editor di testo preferito per creare file di configurazione Ntopng:
sudo nano /etc/ntopng/ntopng.conf
# /etc/ntopng/ntopng.conf
#
#        The  configuration  file is similar to the command line, with the exception that an equal
#        sign '=' must be used between key and value. Example:  -i=p1p2  or  --interface=p1p2  For
#        options with no value (e.g. -v) the equal is also necessary. Example: "-v=" must be used.
#
#
#       -G|--pid-path
#        Specifies the path where the PID (process ID) is saved.
#
-G=/var/tmp/ntopng.pid
#
#       -e|--daemon
#        This  parameter  causes ntop to become a daemon, i.e. a task which runs in the background
#        without connection to a specific terminal. To use ntop other than as a casual  monitoring
#        tool, you probably will want to use this option.
#
-e=
#
#       -i|--interface
#        Specifies  the  network  interface or collector endpoint to be used by ntopng for network
#        monitoring. On Unix you can specify both the interface name  (e.g.  lo)  or  the  numeric
#        interface id as shown by ntopng -h. On Windows you must use the interface number instead.
#        Note that you can specify -i multiple times in order to instruct ntopng to create  multi‐
#        ple interfaces.
#
-i=1
#
#       -w|--http-port
#        Sets the HTTP port of the embedded web server.
#
-w=3000
#
#       -m|--local-networks
#        ntopng determines the ip addresses and netmasks for each active interface. Any traffic on
#        those  networks  is considered local. This parameter allows the user to define additional
#        networks and subnetworks whose traffic is also considered local in  ntopng  reports.  All
#        other hosts are considered remote. If not specified the default is set to 192.168.1.0/24.
#
#        Commas  separate  multiple  network  values.  Both netmask and CIDR notation may be used,
#        even mixed together, for instance "131.114.21.0/24,10.0.0.0/255.0.0.0".
#
-m=192.168.1.0/24
#
#       -n|--dns-mode
#        Sets the DNS address resolution mode: 0 - Decode DNS responses  and  resolve  only  local
#        (-m)  numeric  IPs  1  -  Decode DNS responses and resolve all numeric IPs 2 - Decode DNS
#        responses and don't resolve numeric IPs 3 - Don't decode DNS responses and don't  resolve
#
-n=1
#
#       -S|--sticky-hosts
#        ntopng  periodically purges idle hosts. With this option you can modify this behaviour by
#        telling ntopng not to purge the hosts specified by -S. This parameter requires  an  argu‐
#        ment  that  can  be  "all"  (Keep  all hosts in memory), "local" (Keep only local hosts),
#        "remote" (Keep only remote hosts), "none" (Flush hosts when idle).
#
-S=
#
#       -d|--data-dir
#        Specifies the data directory (it must be writable). Default directory is ./data
#
-d=/var/tmp/ntopng
#
#       -q|--disable-autologout
#        Disable web interface logout for inactivity.
#
-q=
Crea il file ntopng.start:
sudo nano /etc/ntopng/ntopng.start

##Add this line##

--local-networks "192.168.0.0/24"  ## give your local IP Ranges here.
--interface 1
Per vedere tutte le interfacce e le opzioni disponibili, usa ntopng -h opzione:
sudo ntopng -h
Passaggio 4. Avvia il demone del server Ntopng e Redis.
sudo service redis-server start
sudo service ntopng start
Passaggio 5. Verifica Ntopng.
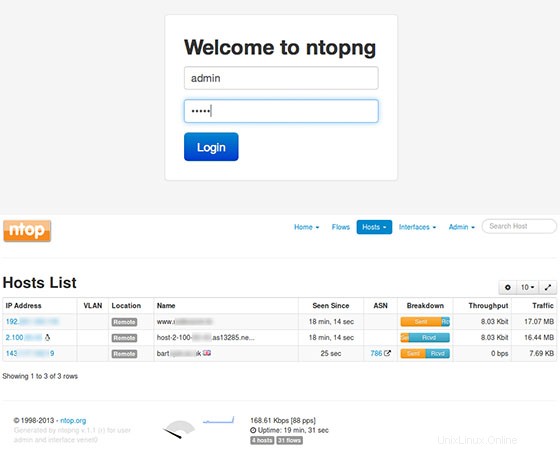
Ora puoi testare la tua applicazione Ntopng digitando http://nome.server:3000. Vedrai l'interfaccia della pagina di accesso di Ntopng. Per la prima volta, può utilizzare l'utente 'admin' e la password 'admin'.
Congratulazioni! Hai installato con successo Ntopng. Grazie per aver utilizzato questo tutorial per l'installazione del monitoraggio del server Ntopng su sistemi Ubuntu 14.04. Per ulteriore aiuto o informazioni utili, ti consigliamo di controllare il sito Web ufficiale di Ntopng.