Questo articolo illustra vari modi per distribuire Jenkins sul tuo server. Utilizza la nostra guida aggiornata per l'installazione manuale o l'avvio di Jenkins nei container Docker. Come bonus, mostreremo come distribuire Jenkins utilizzando CloudFormation. Distribuisci Jenkins sul tuo server in 5 minuti utilizzando la nostra guida.
Cos'è Jenkins

Jenkins è il server di automazione gratuito più popolare. Puoi utilizzare Jenkins per automatizzare quasi tutti i processi della tua azienda. Ma il mercato tradizionale per Jenkins è l'automazione dei processi di sviluppo del software.
Vantaggi di Jenkins:
- Scritto in Java, quindi puoi eseguirlo su tutte le piattaforme
- Ha molti plug-in che possono aiutarti a risolvere quasi tutti i problemi che puoi immaginare.
- Aiuta gli sviluppatori a integrare le modifiche al codice e a produrre sempre build software stabili
Installa Jenkins manualmente
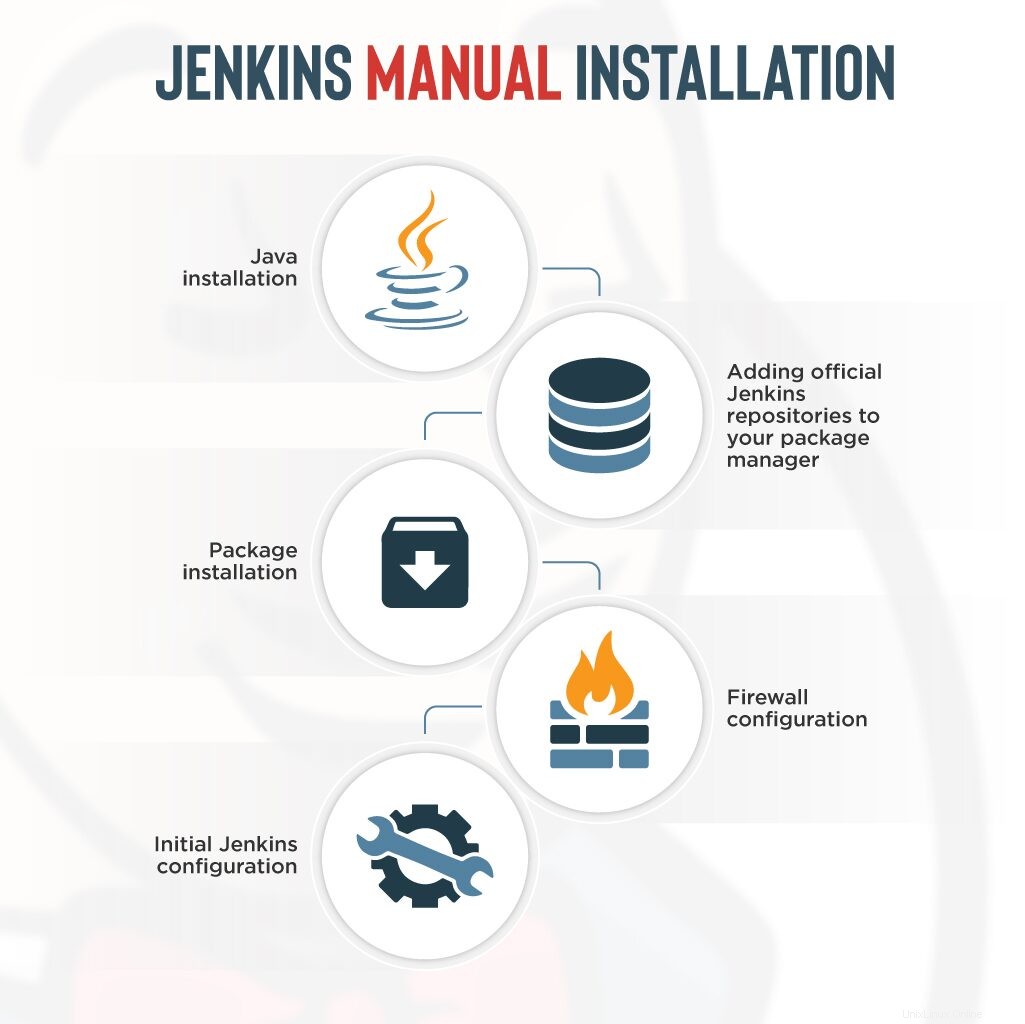
Il processo di installazione è semplice e diretto. Si compone di diversi semplici passaggi:
- Installazione Java.
- Aggiunta di repository Jenkins ufficiali al tuo gestore di pacchetti.
- Installazione del pacchetto.
- Configurazione firewall.
- Configurazione iniziale di Jenkins.
Facciamoli uno per uno.
Installazione Java
Per poter eseguire Jenkins, devi prima installare Java.
Innanzitutto, aggiorna l'indice del pacchetto apt usando questo:
$ sudo apt updateQuindi, installa il pacchetto Java OpenJDK predefinito usando questo:
$ sudo apt install openjdk-8-jreVerifica l'installazione usando questo comando:
$ java -version
Ecco l'output dopo una corretta installazione:
Importante :dovresti vedere che Java ha la versione 1.8.
Al momento della stesura di questo articolo, Jenkins utilizza la versione Java 8. Se vedi un'altra versione, passa a quella corretta:
$ sudo update-alternatives --config javaAggiungi repository Jenkins
Per impostazione predefinita, Jenkins non è incluso nei repository di Ubuntu e devi aggiungerlo.
Per prima cosa, dobbiamo importare la chiave del repository:
$ wget -q -O - https://pkg.jenkins.io/debian-stable/jenkins.io.key | sudo apt-key add -Il passaggio successivo consiste nell'aggiungere l'indirizzo del repository all'elenco dei repository del server:
$ sudo sh -c 'echo deb https://pkg.jenkins.io/debian-stable binary/ > \
    /etc/apt/sources.list.d/jenkins.list'
Una volta fatto, dobbiamo aggiornare le informazioni sul software, che possiamo utilizzare dal nuovo repository:
$ sudo apt-get update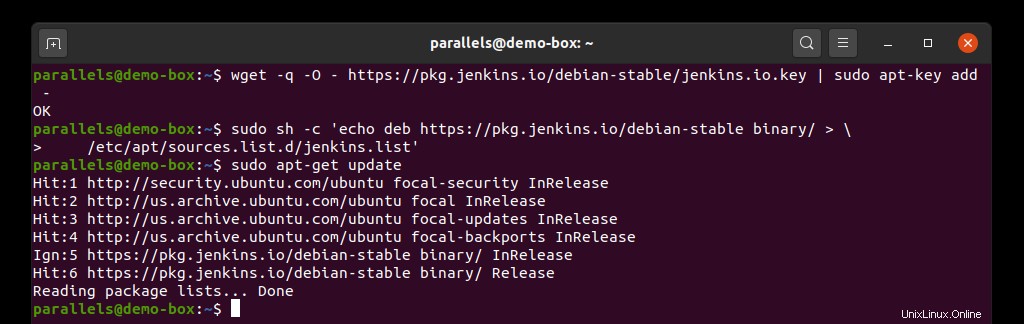
Installazione del pacchetto Jenkins
Dato che abbiamo il repository aggiornato, eseguiamo il seguente comando:
$ sudo apt-get -y install jenkinsL'esecuzione di questo comando ti chiederà di confermare il download e l'installazione.
Per impostazione predefinita, Jenkins si avvia dopo il processo di installazione. In caso contrario, utilizzare il comando seguente per farlo manualmente:
$ sudo systemctl start jenkinsControlliamo se lo stato del servizio Jenkins:
$ sudo systemctl status jenkins
Dopo aver eseguito correttamente il comando precedente, dovresti ottenere un tale output: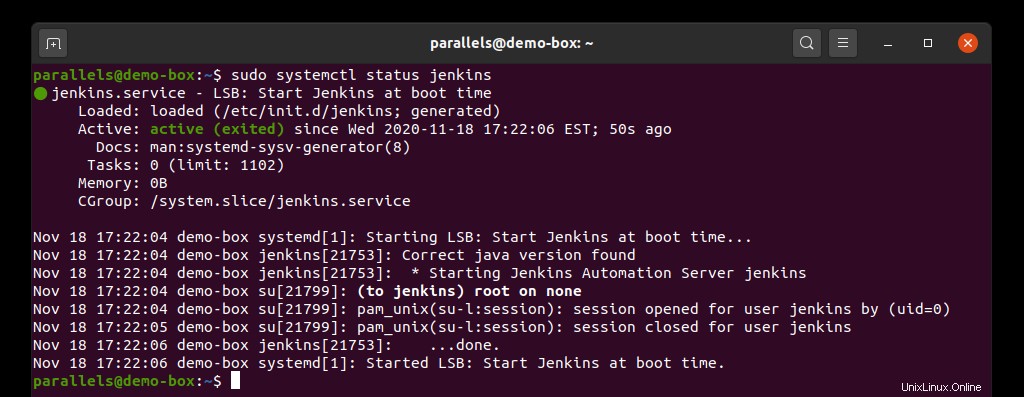
Configurazione firewall
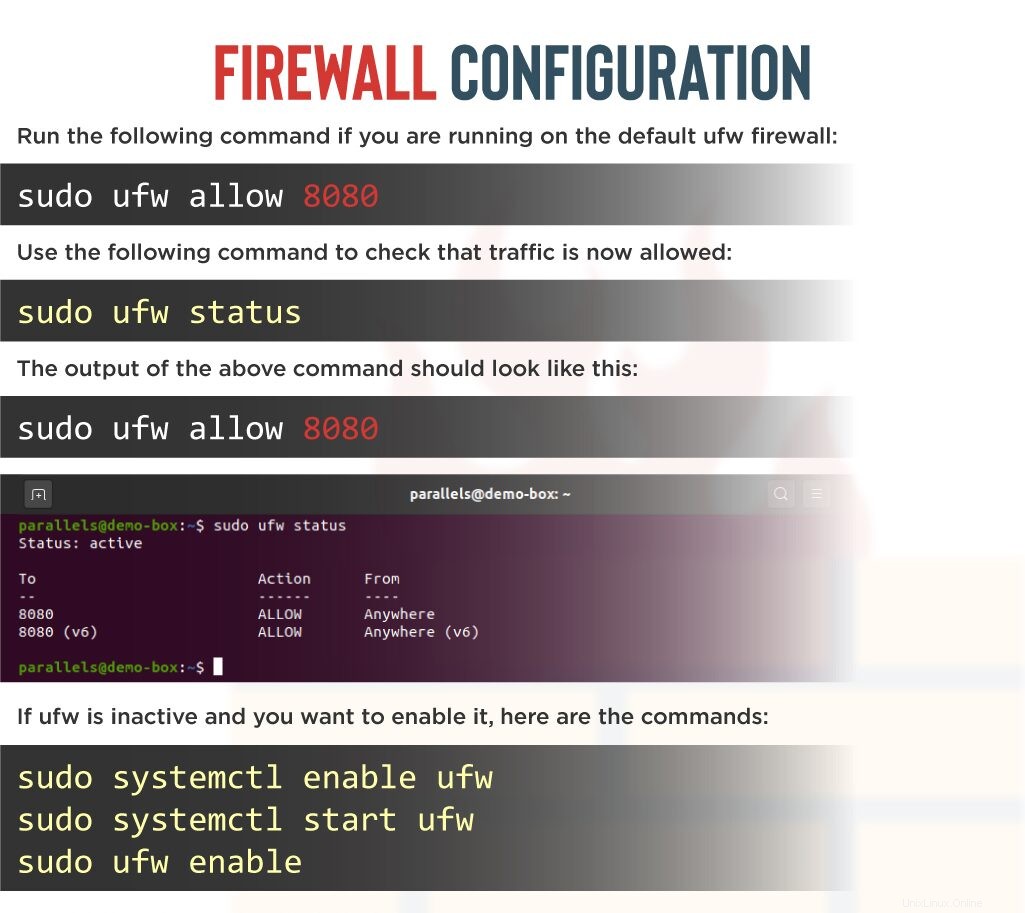
Per impostazione predefinita, Jenkins viene eseguito sulla porta 8080 , quindi apriamolo per consentire a Jenkins di comunicare.
Esegui il comando seguente se stai utilizzando il firewall UFW predefinito:
$ sudo ufw allow 8080Utilizza il comando seguente per verificare che il traffico sia ora consentito:
$ sudo ufw status
L'output del comando precedente dovrebbe essere simile a questo: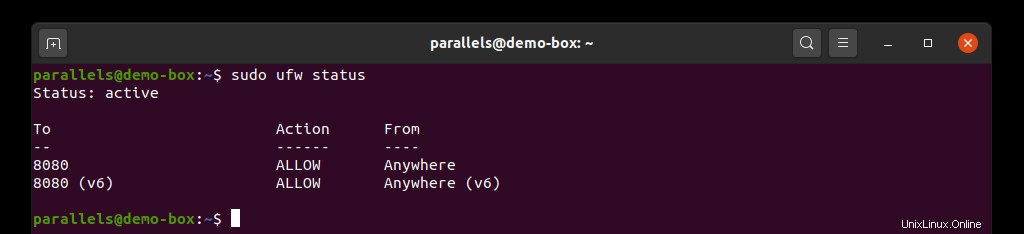
Se ufw è inattivo e vuoi abilitarlo, ecco i comandi:
$ sudo systemctl enable ufw

$ sudo systemctl start ufw

$ sudo ufw enable
Ora puoi accedere a Jenkins all'indirizzo http://localhost:8080 .
La password iniziale è disponibile qui:
$ sudo cat /var/lib/jenkins/secrets/initialAdminPasswordAvvia Jenkins nel contenitore Docker
Per avviare Jenkins in un container Docker, devi avere Docker installato. Il processo di installazione completo è descritto nella documentazione ufficiale di Docker, quindi forniremo i comandi necessari qui:
$ sudo apt-get install \
    apt-transport-https \
    ca-certificates \
    curl \
    gnupg-agent \
    software-properties-common


$ curl -fsSL https://download.docker.com/linux/ubuntu/gpg | sudo apt-key add -

$ sudo add-apt-repository \
   "deb [arch=amd64] https://download.docker.com/linux/ubuntu \
   $(lsb_release -cs) \
   stable"
$ sudo apt-get update

$ sudo apt-get install docker-ce docker-ce-cli containerd.io
Una volta che Docker è stato installato correttamente, puoi eseguire il contenitore Docker.
Tira immagine Docker Jenkins
Estrarre Jenkins dal repository pubblico utilizzando il seguente comando:
$ sudo docker pull jenkins/jenkins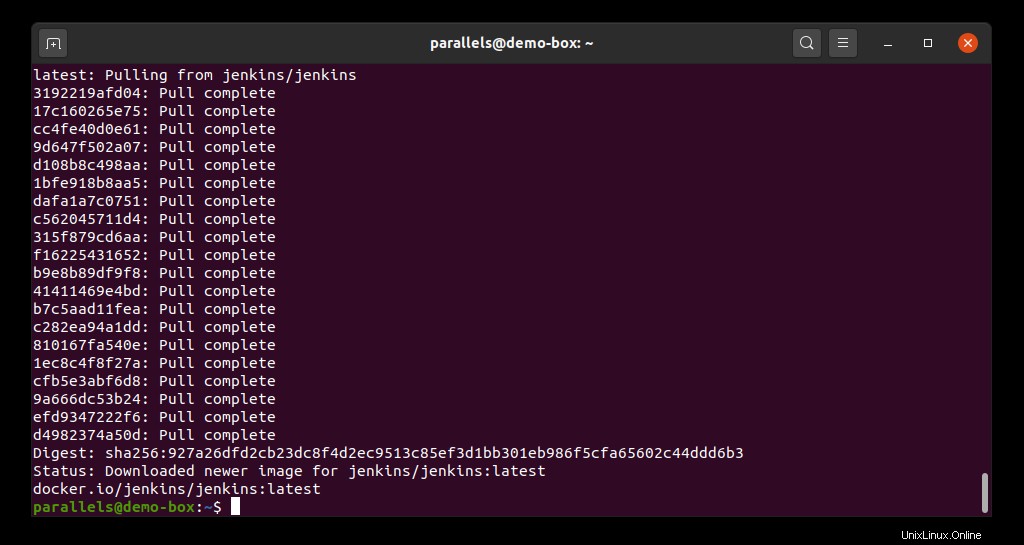
Per avviare il contenitore Jenkins Docker, esegui il comando seguente:
$ sudo docker run -p 8080:8080 -d --name=jenkins-master jenkins/jenkinsSe ricevi il seguente messaggio di errore:
docker: Error response from daemon: driver failed programming external connectivity on endpoint jenkins-master
(627574f0c75a8e4598abf0acfc2700caf53775a9dc34073fdbfb69cd408a9a36):
Error starting userland proxy: listen tcp 0.0.0.0:8080: bind: address already in use.
ERRO[0000] error waiting for container: context canceled
Ciò significa che stai tentando di avviare Jenkins nel contenitore Docker sulla stessa porta utilizzata da Jenkins a livello di sistema.
Basta avviarlo sulla porta 8082 :
$ sudo docker rm jenkins-master

$ sudo docker run -p 8082:8080 -d --name=jenkins-master jenkins/jenkins
Questo comando comporta l'apertura del contenitore Docker Jenkins sulla porta 8082 :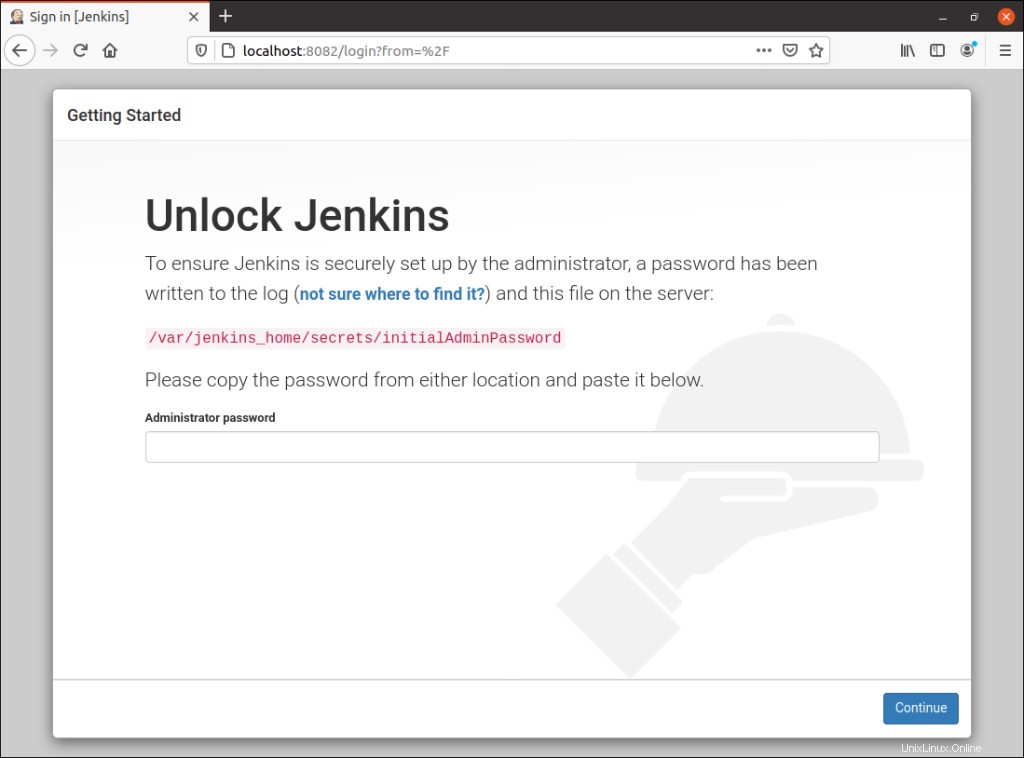
Configurazione iniziale di Jenkins
Per configurare Jenkins, apri un browser e vai all'indirizzo IP effettivo o al nome di dominio che stai utilizzando Jenkins:http://ip_address_or_domain:8080 .
Password Jenkins
Vedrai la pagina che mostra la posizione della password Jenkins iniziale: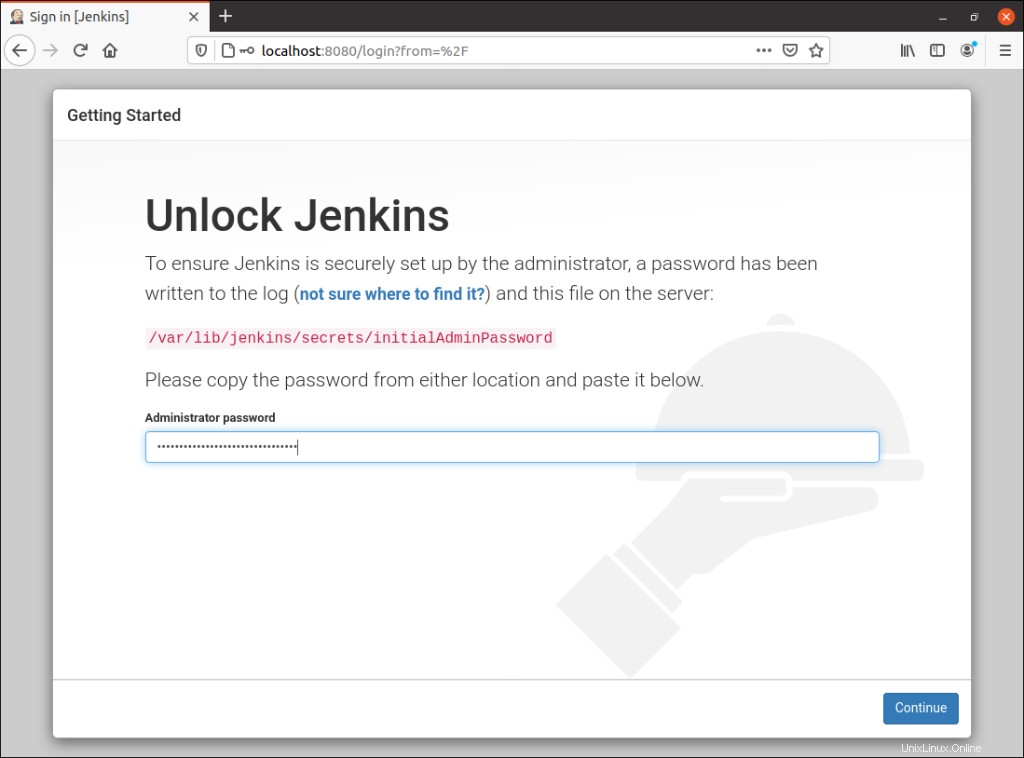
Eccolo:
$ sudo cat /var/lib/jenkins/secrets/initialAdminPasswordPlugin Jenkins
Nella schermata successiva, ti verrà richiesto di scegliere i plug-in per l'installazione iniziale. Se non sai ancora quali plug-in impostare, utilizza "Installa plug-in suggeriti " opzione. 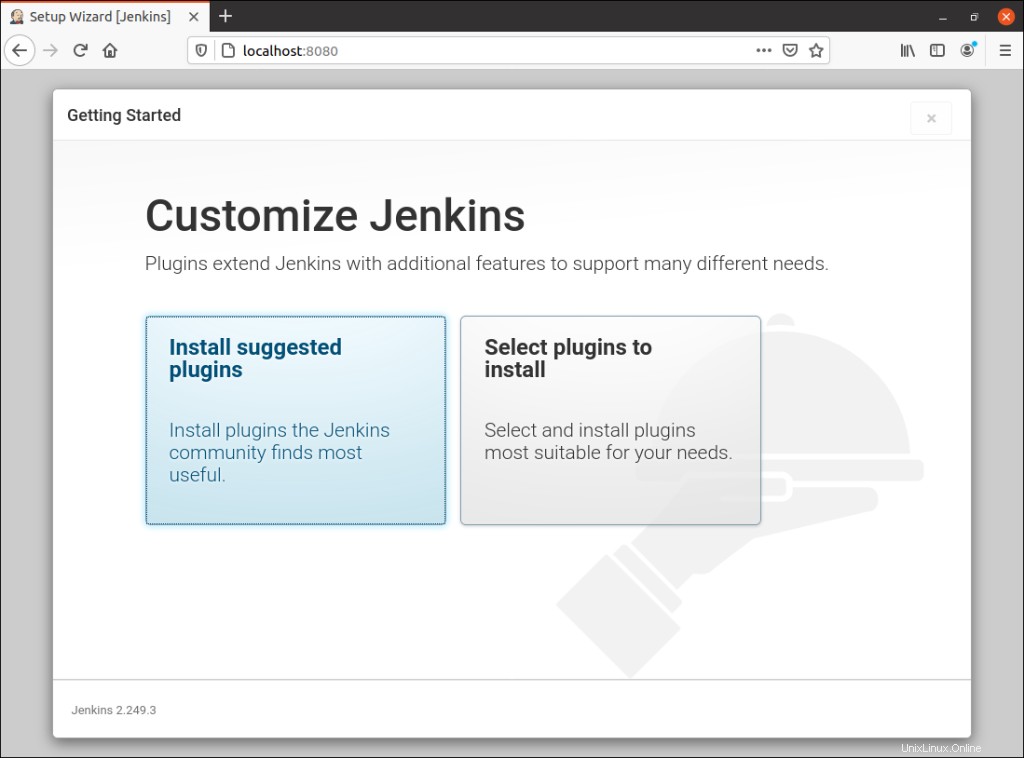
Utente amministratore Jenkins
Una volta completata l'installazione, ti verrà chiesto di creare il primo utente amministratore Jenkins. 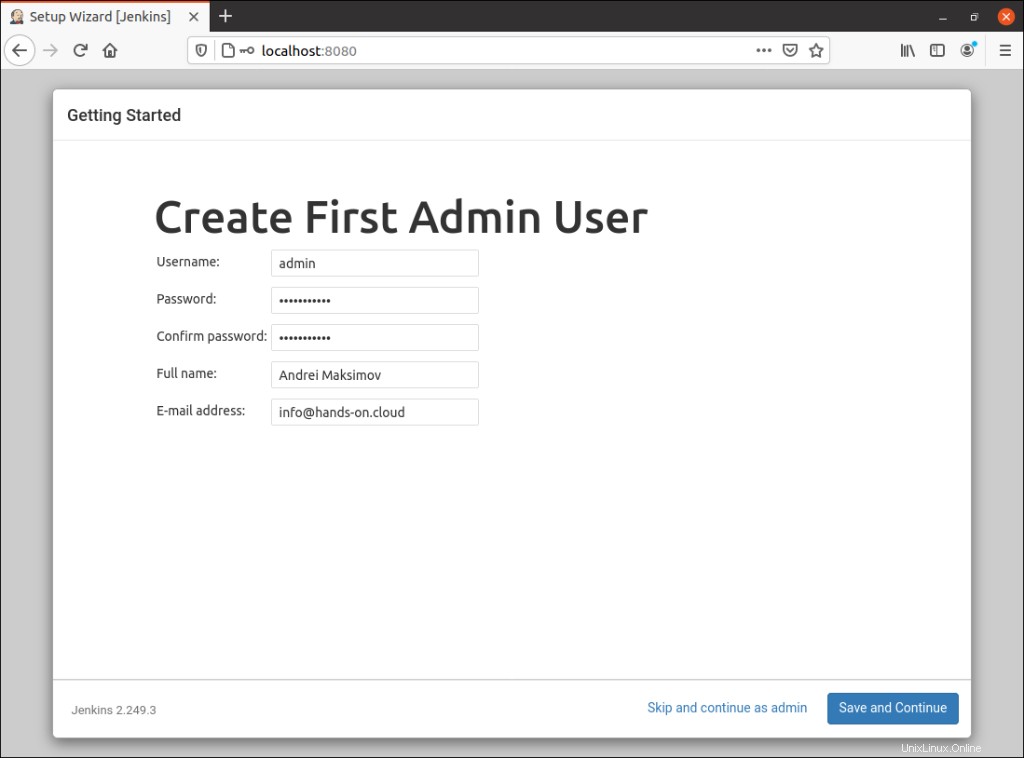
Dopo aver inserito correttamente i dettagli utente, verrai indirizzato alla pagina di configurazione dell'istanza per confermare l'URL dell'istanza Jenkins.
Per accedere alla dashboard principale di Jenkins, fai clic su "Inizia a utilizzare Jenkins pulsante ". Questa azione ti porterà all'interfaccia principale di Jenkins: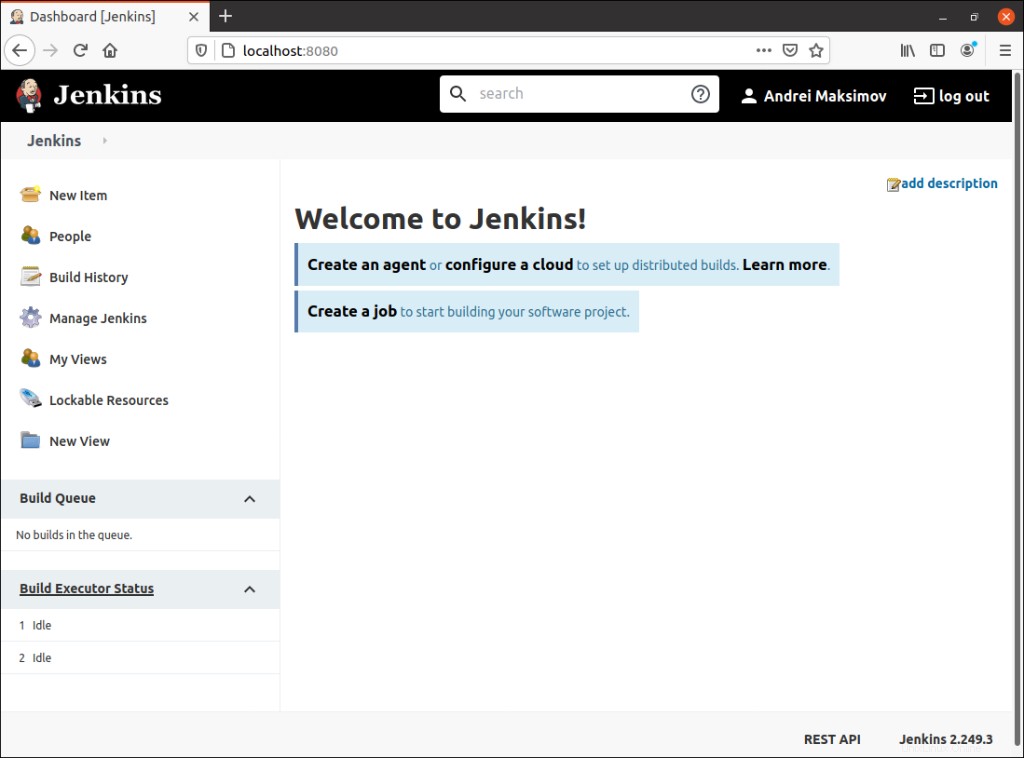
Installa Jenkins utilizzando CloudFormation
L'articolo "Esercitazione su CloudFormation:come automatizzare l'istanza EC2 in 5 minuti" descrive come utilizzare CloudFormation e i metadati cloud-init per automatizzare l'installazione del software nelle istanze EC2.
Qui forniremo un modello, che distribuirà il server Jenkins dietro il server proxy Nginx.
Attenzione :il seguente modello CloudFormation creerà un server Jenkins in una sottorete VPC pubblica, che ha accesso illimitato al tuo account AWS. Se desideri limitare l'accesso di Jenkins, modifica JenkinsPolicy o il profilo dell'istanza remota dal server Jenkins.
Ecco il modello CloudFormation (fonti GitHub):
AWSTemplateFormatVersion: 2010-09-09
Description: >-
This CloudFormation stack will deploy Jenkins on Ubuntu 20.04
in us-east-1 region.
Parameters:
JenkinsInstanceType:
Description: EC2 instance type for Jenkins EC2 instance
Type: String
Default: t2.small
ConstraintDescription: must be a valid Jenkins EC2 instance type.
KeyName:
Description: >-
The EC2 Key Pair to allow SSH access to Jenkins EC2 instance
Type: 'AWS::EC2::KeyPair::KeyName'
ConstraintDescription: must be the name of an existing EC2 KeyPair.
VpcId:
Description: The VPC Id where the Jenkins EC2 instance will be launched.
Type: 'AWS::EC2::VPC::Id'
ConstraintDescription: must be the ID of an existing VPC.
YourIPRange:
Description: >-
CIDR block of the network from where you will connect to the Jenkins
server using HTTP, HTTPS and SSH
Type: String
MinLength: '9'
MaxLength: '18'
AllowedPattern: '(\d{1,3})\.(\d{1,3})\.(\d{1,3})\.(\d{1,3})/(\d{1,2})'
Default: 0.0.0.0/0
ConstraintDescription: must be a valid IP CIDR range of the form x.x.x.x/x.
PublicSubnet1:
Description: >-
The public subnet where the Jenkins Jenkins EC2 instance will be launched.
Type: 'AWS::EC2::Subnet::Id'
ConstraintDescription: Must be a valid Public VPC Subnet.
JenkinsInstanceAMI:
Description: Ubuntu 20.04 EC2 instance AMI
Type: String
Default: ami-0885b1f6bd170450c
Resources:
JenkinsAddress:
Type: AWS::EC2::EIP
Properties:
Domain: vpc
JenkinsAddressAssociaation:
Type: AWS::EC2::EIPAssociation
Properties:
AllocationId: !GetAtt JenkinsAddress.AllocationId
NetworkInterfaceId: !Ref JenkinsInterface
JenkinsInterface:
Type: AWS::EC2::NetworkInterface
Properties:
SubnetId: !Ref PublicSubnet1
Description: Interface for controlling traffic such as Web
GroupSet:
- !Ref JenkinsSecurityGroup
SourceDestCheck: true
Tags:
-
Key: Network
Value: Web
JenkinsServer:
Type: 'AWS::EC2::Instance'
CreationPolicy:
ResourceSignal:
Timeout: PT15M
Metadata:
Comment: 'Install Jenkins, nginx and the Jenkins CodeDeploy plugin'
'AWS::CloudFormation::Init':
configSets:
install_all:
- install_base
- install_nginx
- install_jenkins_repo
- install_jenkins
- jenkins_post_install
install_base:
packages:
apt:
git: []
python3-pip: []
awscli: []
files:
/etc/cfn/cfn-hup.conf:
content:
!Sub |
[main]
stack=${AWS::StackName}
region=${AWS::Region}
mode: "000400"
owner: "root"
group: "root"
/etc/cfn/hooks.d/cfn-auto-reloader.conf:
content:
!Sub |
[cfn-auto-reloader-hook]
triggers=post.update
path=Resources.LaunchConfig.Metadata.AWS::CloudFormation::Init
action=/opt/aws/bin/cfn-init -v --stack ${AWS::StackName} --resource JenkinsServer --configsets install_all --region ${AWS::Region}
runas=root
mode: "000400"
owner: "root"
group: "root"
/lib/systemd/system/cfn-hup.service:
content:
!Sub |
[Unit]
Description=cfn-hup daemon
[Service]
Type=simple
ExecStart=/opt/aws/bin/cfn-hup
Restart=always
[Install]
WantedBy=multi-user.target
mode: "000400"
owner: "root"
group: "root"
commands:
01_enable_cfn_hup:
command: systemctl enable cfn-hup.service > /dev/null 2>&1
02_start_cfn_hup:
command: systemctl start cfn-hup.service > /dev/null 2>&1
install_nginx:
packages:
apt:
nginx: []
certbot: []
python3-certbot-nginx: []
files:
/etc/nginx/nginx.conf:
content:
!Sub |
user www-data;
worker_processes 1;
error_log /var/log/nginx/error.log;
pid /var/run/nginx.pid;
events {
worker_connections 1024;
}
http {
include /etc/nginx/mime.types;
default_type application/octet-stream;
log_format main '$remote_addr - $remote_user [$time_local] "$request" '
'$status $body_bytes_sent "$http_referer" '
'"$http_user_agent" "$http_x_forwarded_for"';
access_log /var/log/nginx/access.log main;
sendfile on;
keepalive_timeout 65;
include /etc/nginx/conf.d/*.conf;
index index.html index.htm;
server {
listen 80;
server_name _;
location / {
proxy_pass http://127.0.0.1:8080;
proxy_set_header Host $host;
proxy_set_header X-Real-IP $remote_addr;
proxy_set_header X-Forwarded-For $proxy_add_x_forwarded_for;
proxy_connect_timeout 150;
proxy_send_timeout 100;
proxy_read_timeout 100;
proxy_buffers 4 32k;
client_max_body_size 8m;
client_body_buffer_size 128k;
}
location /password.txt {
alias /web/initalpass.html;
}
}
}
mode: '000644'
owner: root
group: root
services:
sysvinit:
nginx:
enabled: 'true'
ensureRunning: 'true'
files:
- /etc/nginx/nginx.conf
install_jenkins_repo:
commands:
01_download_repo_file:
command: echo deb https://pkg.jenkins.io/debian-stable binary/ > /etc/apt/sources.list.d/jenkins.list
02_import_repo_file:
command: wget -q -O - https://pkg.jenkins.io/debian-stable/jenkins.io.key | apt-key add - > /dev/null 2>&1
03_update_pkg_mngr:
command: apt-get update -y > /dev/null 2>&1
install_jenkins:
packages:
apt:
jenkins: []
services:
sysvinit:
jenkins:
enabled: 'true'
ensureRunning: 'true'
jenkins_post_install:
commands:
01_web_folder:
command: mkdir -p /web
02_import_repo_file:
command: while [ ! -f /var/lib/jenkins/secrets/initialAdminPassword ]; do sleep 10; done
03_copy_jenkins_password:
command: cp -Rf /var/lib/jenkins/secrets/initialAdminPassword /web/initalpass.html && chown www-data:www-data /web/initalpass.html
Properties:
KeyName: !Ref KeyName
ImageId: !Ref JenkinsInstanceAMI
NetworkInterfaces:
-
NetworkInterfaceId: !Ref JenkinsInterface
DeviceIndex: '0'
InstanceType: !Ref JenkinsInstanceType
IamInstanceProfile: !Ref JenkinsInstanceProfile
UserData:
Fn::Base64:
!Sub |
#!/bin/bash -xe
apt-get update -y
apt-get install -y python-setuptools openjdk-8-jre
mkdir -p /opt/aws/bin
wget https://s3.amazonaws.com/cloudformation-examples/aws-cfn-bootstrap-latest.tar.gz
python2 -m easy_install --script-dir /opt/aws/bin aws-cfn-bootstrap-latest.tar.gz
echo "Executing config-sets"
/opt/aws/bin/cfn-init -v --stack ${AWS::StackName} \
--resource JenkinsServer \
--configsets install_all \
--region ${AWS::Region}
/opt/aws/bin/cfn-signal -e $? --stack ${AWS::StackName} \
--resource JenkinsServer \
--region ${AWS::Region}
Tags:
-
Key: Name
Value: Jenkins Server
JenkinsSecurityGroup:
Type: 'AWS::EC2::SecurityGroup'
Properties:
GroupDescription: Enable SSH and HTTP access from specific CIDR block
VpcId: !Ref VpcId
SecurityGroupIngress:
-
IpProtocol: tcp
FromPort: 22
ToPort: 22
CidrIp: !Ref YourIPRange
-
IpProtocol: tcp
FromPort: 80
ToPort: 80
CidrIp: !Ref YourIPRange
-
IpProtocol: tcp
FromPort: 443
ToPort: 443
CidrIp: !Ref YourIPRange
SecurityGroupEgress:
-
IpProtocol: tcp
FromPort: 0
ToPort: 65535
CidrIp: 0.0.0.0/0
JenkinsRole:
Type: 'AWS::IAM::Role'
Properties:
Path: /
AssumeRolePolicyDocument:
Statement:
-
Effect: Allow
Principal:
Service:
- ec2.amazonaws.com
Action:
- 'sts:AssumeRole'
JenkinsInstanceProfile:
Type: 'AWS::IAM::InstanceProfile'
Properties:
Path: /
Roles:
- !Ref JenkinsRole
JenkinsPolicy:
Type: 'AWS::IAM::Policy'
Properties:
PolicyName: JenkinsPolicy
PolicyDocument:
Version: 2012-10-17
Statement:
-
Effect: Allow
Action:
- '*'
Resource: '*'
Roles:
- !Ref JenkinsRole
Outputs:
JenkinsServerDNSName:
Description: DNS Name of Jenkins Server
Value: !GetAtt
- JenkinsServer
- PublicDnsName
Questo modello CloudFormation serve per distribuire Jenkins dietro il proxy Nginx nella tua infrastruttura AWS.
Questo modello ha le seguenti caratteristiche:
- Ti arriccia per ottenere la password iniziale di Jenkins: curva http://ec2-host/password.txt .
- Puoi utilizzare LetsEncrypt per creare certificati SSL:
sudo certbot --nginx -d jenkins.example.com.
Riepilogo
In questo articolo, abbiamo trattato vari modi per distribuire Jenkins sul tuo server. Ora sei pronto per l'installazione manuale di Jenkins, l'avvio di Jenkins nel container Docker o la distribuzione di Jenkins utilizzando il modello CloudFormation.
Per favore, fateci sapere nella sezione commenti qui sotto se avete domande. Inoltre, ti consigliamo di controllare altri articoli relativi a Linux nel nostro blog.
Ci auguriamo che questo articolo ti sia utile! Se sì, per favore, aiutaci a diffonderlo nel mondo!