Let's Encrypt è un'autorità di certificazione ampiamente nota che fornisce certificati SSL X.509 gratuiti per la crittografia TLS. È stato lanciato nell'aprile 2016.
Let's Encrypt automatizza il processo di creazione, convalida, firma, implementazione e rinnovo dei certificati.
Attualmente, Apache, Nginx, Plex e Haproxy sono supportati per il processo automatizzato.
Prerequisiti
Prima di procedere, imposta lo stack LEMP per avere Nginx sul tuo sistema Ubuntu.
LEGGI :Come installare lo stack LEMP su Ubuntu 18.04
LEGGI :Come installare lo stack LEMP su Ubuntu 16.04
Installa Certbot
Per generare un certificato per il tuo dominio, dovresti avere accesso a terminale/shell e client Certbot ACME. Gestisce l'emissione e l'installazione dei certificati senza tempi di inattività.
Per installare il client Certbot, dobbiamo configurare Certbot PPA su Ubuntu.
sudo apt update

sudo apt install -y software-properties-common

sudo add-apt-repository universe

sudo add-apt-repository ppa:certbot/certbot

sudo apt update
Ora installa il client certbot.
sudo apt install -y certbot python-certbot-nginx
Crea host virtuale Nginx
Creeremo ora un file di configurazione dell'host virtuale per il dominio www.itzgeek.net.
Questo host virtuale serve la versione HTTP del tuo dominio.sudo nano /etc/nginx/conf.d/www.itzgeek.net.conf
Usa le informazioni di seguito.
server {
   server_name www.itzgeek.net;
   root /opt/nginx/www.itzgeek.net;

   location / {
       index index.html index.htm index.php;
   }

   access_log /var/log/nginx/www.itzgeek.net.access.log;
   error_log /var/log/nginx/www.itzgeek.net.error.log;

   location ~ \.php$ {
      include /etc/nginx/fastcgi_params;
      fastcgi_pass 127.0.0.1:9000;
      fastcgi_index index.php;
      fastcgi_param SCRIPT_FILENAME $document_root$fastcgi_script_name;
   }
}
Crea una radice del documento per contenere i tuoi file HTML.
sudo mkdir -p /opt/nginx/www.itzgeek.net
Modifica l'autorizzazione della directory.
sudo chown -R nginx:nginx /opt/nginx/
Inserisci il file HTML di prova nella radice del documento del tuo dominio.
echo "This is a test site @ www.itzgeek.net" | sudo tee /opt/nginx/www.itzgeek.net/index.html
Riavvia il servizio Nginx.
sudo systemctl restart nginx
Aggiorna/Modifica record DNS
Accedi al tuo strumento di gestione DNS o registrar di domini e crea un record A/CNAME per il dominio. Es:www.itzgeek.net.

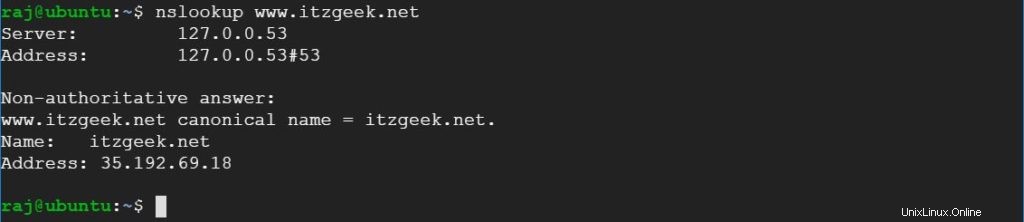
Attendi un po' di tempo per consentire la propagazione del record.
Controlla la propagazione DNS con Nslookup sudo apt install -y dnsutils utility.
Installa il certificato SSL Let's Encrypt
Usa il comando certbot per creare manualmente un certificato Let's Encrypt.
sudo certbot --nginx
Segui il prompt interattivo e genera il certificato richiesto.
Saving debug log to /var/log/letsencrypt/letsencrypt.log
Plugins selected: Authenticator nginx, Installer nginx
Enter email address (used for urgent renewal and security notices) (Enter 'c' to
cancel): itzgeek.web@gmail.com  << Enter email address to receive notifications

- - - - - - - - - - - - - - - - - - - - - - - - - - - - - - - - - - - - - - - -
Please read the Terms of Service at
https://letsencrypt.org/documents/LE-SA-v1.2-November-15-2017.pdf. You must
agree in order to register with the ACME server at
https://acme-v02.api.letsencrypt.org/directory
- - - - - - - - - - - - - - - - - - - - - - - - - - - - - - - - - - - - - - - -
(A)gree/(C)ancel: A  << Agree to Terms of Service

- - - - - - - - - - - - - - - - - - - - - - - - - - - - - - - - - - - - - - - -
Would you be willing to share your email address with the Electronic Frontier
Foundation, a founding partner of the Let's Encrypt project and the non-profit
organization that develops Certbot? We'd like to send you email about our work
encrypting the web, EFF news, campaigns, and ways to support digital freedom.
- - - - - - - - - - - - - - - - - - - - - - - - - - - - - - - - - - - - - - - -
(Y)es/(N)o: Y  << Subscribe to Newsletter

Which names would you like to activate HTTPS for?
- - - - - - - - - - - - - - - - - - - - - - - - - - - - - - - - - - - - - - - -
1: www.itzgeek.net
- - - - - - - - - - - - - - - - - - - - - - - - - - - - - - - - - - - - - - - -
Select the appropriate numbers separated by commas and/or spaces, or leave input
blank to select all options shown (Enter 'c' to cancel): 1  << Select domain to install Let's Encrypt SSL certificate
Obtaining a new certificate
Performing the following challenges:
http-01 challenge for www.itzgeek.net
Waiting for verification...
Cleaning up challenges
Deploying Certificate to VirtualHost /etc/nginx/conf.d/www.itzgeek.net.conf

Please choose whether or not to redirect HTTP traffic to HTTPS, removing HTTP access.
- - - - - - - - - - - - - - - - - - - - - - - - - - - - - - - - - - - - - - - -
1: No redirect - Make no further changes to the webserver configuration.
2: Redirect - Make all requests redirect to secure HTTPS access. Choose this for
new sites, or if you're confident your site works on HTTPS. You can undo this
change by editing your web server's configuration.
- - - - - - - - - - - - - - - - - - - - - - - - - - - - - - - - - - - - - - - -
Select the appropriate number [1-2] then [enter] (press 'c' to cancel): 2  << Redirect from HTTP to HTTPS
Redirecting all traffic on port 80 to ssl in /etc/nginx/conf.d/www.itzgeek.net.conf

- - - - - - - - - - - - - - - - - - - - - - - - - - - - - - - - - - - - - - - -
Congratulations! You have successfully enabled https://www.itzgeek.net

You should test your configuration at:
https://www.ssllabs.com/ssltest/analyze.html?d=www.itzgeek.net
- - - - - - - - - - - - - - - - - - - - - - - - - - - - - - - - - - - - - - - -

IMPORTANT NOTES:
 - Congratulations! Your certificate and chain have been saved at:
   /etc/letsencrypt/live/www.itzgeek.net/fullchain.pem
   Your key file has been saved at:
   /etc/letsencrypt/live/www.itzgeek.net/privkey.pem
   Your cert will expire on 2019-11-04. To obtain a new or tweaked
   version of this certificate in the future, simply run certbot again
   with the "certonly" option. To non-interactively renew *all* of
   your certificates, run "certbot renew"
 - Your account credentials have been saved in your Certbot
   configuration directory at /etc/letsencrypt. You should make a
   secure backup of this folder now. This configuration directory will
   also contain certificates and private keys obtained by Certbot so
   making regular backups of this folder is ideal.
 - If you like Certbot, please consider supporting our work by:

   Donating to ISRG / Let's Encrypt:   https://letsencrypt.org/donate
   Donating to EFF:                    https://eff.org/donate-le
Reindirizza le richieste HTTP non www a www HTTPS con Nginx (opzionale)
Ora configureremo il server Nginx per reindirizzare il traffico proveniente dal sito HTTP non www al sito HTTPS WW, ovvero http://itzgeek.net>> https://www.itzgeek.net .
Qui utilizzeremo lo stesso file di configurazione che abbiamo creato per la versione HTTP del sito per eseguire il reindirizzamento del sito HTTP non www al reindirizzamento HTTPS WW.
sudo nano /etc/nginx/conf.d/www.itzgeek.net.conf
Aggiungi le seguenti informazioni alla fine del file.
# Redirect NON-WWW HTTP to WWW HTTPS

server {
    if ($host = itzgeek.net) {
        return 301 https://www.itzgeek.net$request_uri;
    }


   server_name itzgeek.net;
    listen 80;
    return 404;

}
Riavvia il servizio Nginx.
sudo systemctl restart nginx
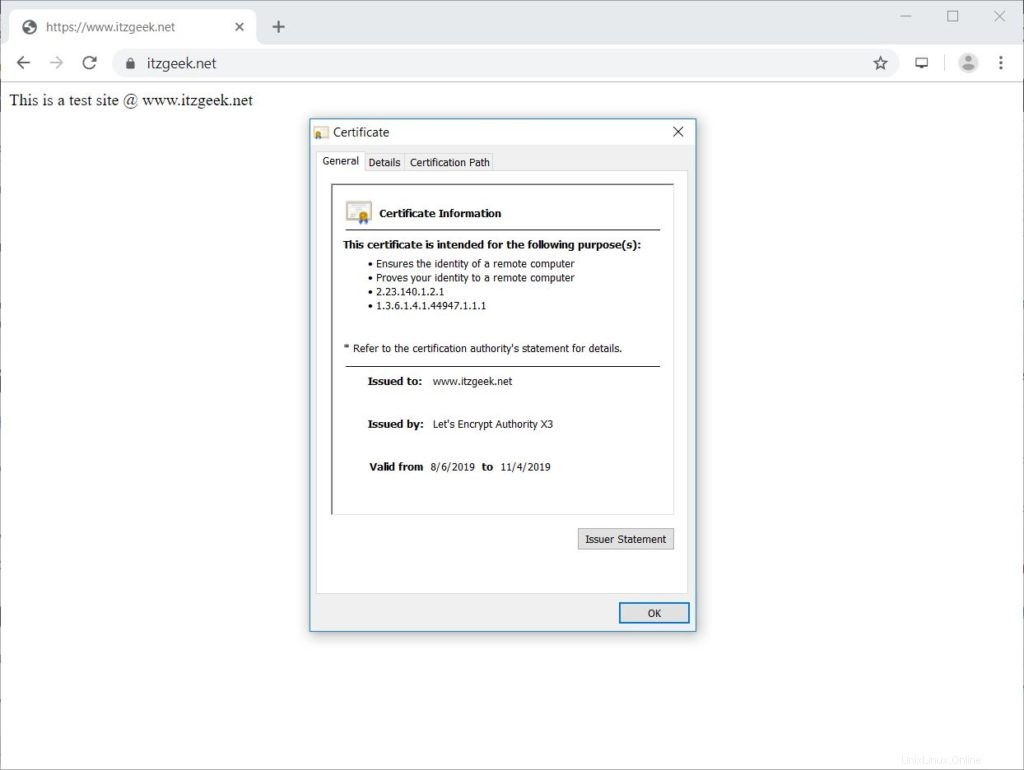
Verifica il certificato SSL Let's Encrypt
Verifica il certificato Let's Encrypt visitando la versione HTTPS del tuo sito web.
http://il-tuo-http-sito-webO
https://tuo-https-sito-webDovresti ottenere la versione HTTPS del tuo sito ora.
Prova il certificato SSL Let's Encrypt
Verifica il tuo certificato SSL per eventuali problemi e le relative valutazioni di sicurezza andando all'URL di seguito.
https://www.ssllabs.com/ssltest/analyze.html?d=www.itzgeek.net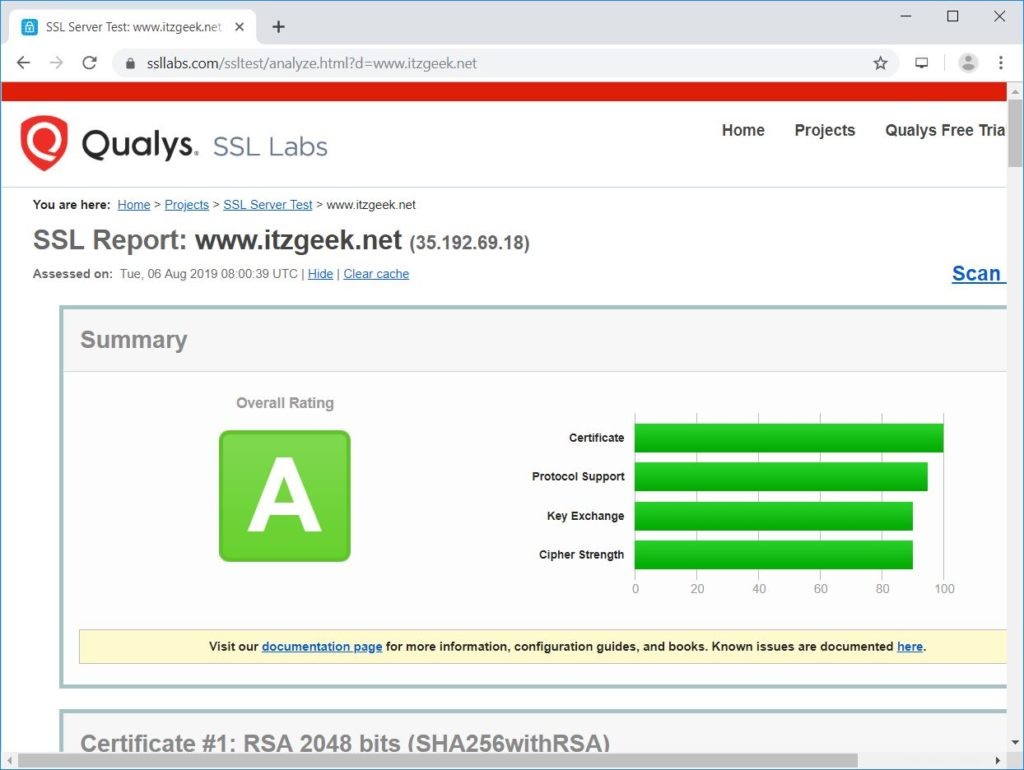
Rinnova il certificato SSL Let's Encrypt
I certificati Let's Encrypt hanno una validità di 90 giorni ed è altamente consigliabile rinnovare i certificati prima che scadano.
Grazie alla voce dello scheduler cron integrata fornita con il client Certbot. Questo processo cron viene eseguito due volte al giorno per rinnovare i certificati che stanno per scadere.
Puoi simulare il processo di rinnovo del certificato con il comando seguente per assicurarti che il rinnovo proceda senza intoppi.
sudo certbot renew --dry-run
Risultato:
Saving debug log to /var/log/letsencrypt/letsencrypt.log

- - - - - - - - - - - - - - - - - - - - - - - - - - - - - - - - - - - - - - - -
Processing /etc/letsencrypt/renewal/www.itzgeek.net.conf
- - - - - - - - - - - - - - - - - - - - - - - - - - - - - - - - - - - - - - - -
Cert not due for renewal, but simulating renewal for dry run
Plugins selected: Authenticator nginx, Installer nginx
Renewing an existing certificate
Performing the following challenges:
http-01 challenge for www.itzgeek.net
Waiting for verification...
Cleaning up challenges

- - - - - - - - - - - - - - - - - - - - - - - - - - - - - - - - - - - - - - - -
new certificate deployed with reload of nginx server; fullchain is
/etc/letsencrypt/live/www.itzgeek.net/fullchain.pem
- - - - - - - - - - - - - - - - - - - - - - - - - - - - - - - - - - - - - - - -

- - - - - - - - - - - - - - - - - - - - - - - - - - - - - - - - - - - - - - - -
** DRY RUN: simulating 'certbot renew' close to cert expiry
**          (The test certificates below have not been saved.)

Congratulations, all renewals succeeded. The following certs have been renewed:
  /etc/letsencrypt/live/www.itzgeek.net/fullchain.pem (success)
** DRY RUN: simulating 'certbot renew' close to cert expiry
**          (The test certificates above have not been saved.)
- - - - - - - - - - - - - - - - - - - - - - - - - - - - - - - - - - - - - - - -

IMPORTANT NOTES:
 - Your account credentials have been saved in your Certbot
   configuration directory at /etc/letsencrypt. You should make a
   secure backup of this folder now. This configuration directory will
   also contain certificates and private keys obtained by Certbot so
   making regular backups of this folder is ideal.
L'output di cui sopra conferma che il rinnovo funzionerà come previsto.
Conclusione
È tutto. Spero che tu abbia imparato a configurare Let's Encrypt SSL Certificate con Nginx su Ubuntu 18.04 e Ubuntu 16.04. Condividi il tuo feedback nella sezione commenti.