Questo tutorial spiega come utilizzare il modulo GeoIP con nginx su Ubuntu 16.04 per scoprire da dove provengono i tuoi visitatori. Il modulo GeoIP imposta più variabili come $geoip_country_name, $geoip_country_code, $geoip_city, ecc. che puoi utilizzare nei tuoi script PHP o direttamente nella tua configurazione nginx, ad esempio per servire contenuti in diverse lingue in base al paese dell'utente.
1 Nota preliminare
Sto utilizzando il sito Web www.example.com qui con la radice del documento /var/www/www.example.com/web/ e il file di configurazione di Nginx vhost /etc/nginx/sites-enabled/www.example.com. vhost. Userò questo tutorial per la configurazione di base di Ubuntu-Nginx. https://www.howtoforge.com/tutorial/installing-nginx-with-php7-fpm-and-mysql-on-ubuntu-16.04-lts-lemp/
Questo tutorial è compatibile anche con le configurazioni nginx di ISPConfig.
Una nota per gli utenti di Ubuntu:
Poiché dobbiamo eseguire tutti i passaggi di questo tutorial con i privilegi di root, possiamo anteporre tutti i comandi in questo tutorial con la stringa sudo, oppure diventare root in questo momento digitando
sudo -s
2 Scopri se Nginx supporta GeoIP
Prima di iniziare dobbiamo scoprire se il modulo GeoIP è integrato nel nostro server nginx:
nginx -V
[email protected]:~# nginx -V
nginx version: nginx/1.10.0 (Ubuntu)
built with OpenSSL 1.0.2g-fips 1 Mar 2016
TLS SNI support enabled
configure arguments: --with-cc-opt='-g -O2 -fPIE -fstack-protector-strong -Wformat -Werror=format-security -Wdate-time -D_FORTIFY_SOURCE=2' --with-ld-opt='-Wl,-Bsymbolic-functions -fPIE -pie -Wl,-z,relro -Wl,-z,now' --prefix=/usr/share/nginx --conf-path=/etc/nginx/nginx.conf --http-log-path=/var/log/nginx/access.log --error-log-path=/var/log/nginx/error.log --lock-path=/var/lock/nginx.lock --pid-path=/run/nginx.pid --http-client-body-temp-path=/var/lib/nginx/body --http-fastcgi-temp-path=/var/lib/nginx/fastcgi --http-proxy-temp-path=/var/lib/nginx/proxy --http-scgi-temp-path=/var/lib/nginx/scgi --http-uwsgi-temp-path=/var/lib/nginx/uwsgi --with-debug --with-pcre-jit --with-ipv6 --with-http_ssl_module --with-http_stub_status_module --with-http_realip_module --with-http_auth_request_module --with-http_addition_module --with-http_dav_module --with-http_geoip_module --with-http_gunzip_module --with-http_gzip_static_module --with-http_image_filter_module --with-http_v2_module --with-http_sub_module --with-http_xslt_module --with-stream --with-stream_ssl_module --with-mail --with-mail_ssl_module --with-threads
3 Scarica i database GeoIP
Su Debian e Ubuntu c'è il pacchetto geoip-database che può essere installato tramite apt, ma è un po' datato e contiene solo GeoIP.dat (database paese), non GeoLiteCity.dat (database città). Pertanto non installiamo quel pacchetto, ma scarichiamo nuove copie dal sito Web GeoIP nella directory /etc/nginx/geoip:
mkdir /etc/nginx/geoip
cd /etc/nginx/geoip
wget http://geolite.maxmind.com/download/geoip/database/GeoLiteCountry/GeoIP.dat.gz
gunzip GeoIP.dat.gz
wget http://geolite.maxmind.com/download/geoip/database/GeoLiteCity.dat.gz
gunzip GeoLiteCity.dat.gz
4 Configura Nginx
Ora configuriamo nginx. Apri /etc/nginx/nginx.conf...
nano /etc/nginx/nginx.conf
... e aggiungi le direttive geoip_country e geoip_city al contenitore http {}:
[...]
http {

 ##
 # Basic Settings
 ##

 geoip_country /etc/nginx/geoip/GeoIP.dat; # the country IP database
 geoip_city /etc/nginx/geoip/GeoLiteCity.dat; # the city IP database
[...]
La direttiva geoip_country rende disponibili le seguenti variabili:
- $geoip_country_code - codice paese di due lettere, ad esempio RU, USA.
- $geoip_country_code3 - codice paese di tre lettere, ad esempio RUS, USA.
- $geoip_country_name - il nome (verboso) del paese, ad esempio Federazione Russa, Stati Uniti, ecc.
La direttiva geoip_city fornisce le seguenti variabili:
- $geoip_city_country_code - codice paese di due lettere, ad esempio RU, USA.
- $geoip_city_country_code3 - codice paese di tre lettere, ad esempio RUS, USA.
- $geoip_city_country_name - il nome del paese, ad esempio Federazione Russa, Stati Uniti - se disponibile.
- $geoip_region - il nome della regione (provincia, regione, stato, provincia, territorio federale e simili), ad esempio Moscow City, DC - se disponibile.
- $geoip_city - il nome della città, ad esempio Mosca, Washington, Lisbona, ecc. - se disponibile.
- $geoip_postal_code - codice postale o codice postale - se disponibile.
- $geoip_city_continent_code - se disponibile.
- $geoip_latitude - latitude - se disponibile.
- $geoip_longitude - longitude - se disponibile.
Per rendere queste variabili disponibili anche per i tuoi script PHP, dobbiamo impostare alcune direttive fastcgi_param. È meglio farlo nel file /etc/nginx/fastcgi_params dove sono le altre direttive fastcgi_param:
nano /etc/nginx/fastcgi_params
[...]
### SET GEOIP Variables ###
fastcgi_param GEOIP_COUNTRY_CODE $geoip_country_code;
fastcgi_param GEOIP_COUNTRY_CODE3 $geoip_country_code3;
fastcgi_param GEOIP_COUNTRY_NAME $geoip_country_name;

fastcgi_param GEOIP_CITY_COUNTRY_CODE $geoip_city_country_code;
fastcgi_param GEOIP_CITY_COUNTRY_CODE3 $geoip_city_country_code3;
fastcgi_param GEOIP_CITY_COUNTRY_NAME $geoip_city_country_name;
fastcgi_param GEOIP_REGION $geoip_region;
fastcgi_param GEOIP_CITY $geoip_city;
fastcgi_param GEOIP_POSTAL_CODE $geoip_postal_code;
fastcgi_param GEOIP_CITY_CONTINENT_CODE $geoip_city_continent_code;
fastcgi_param GEOIP_LATITUDE $geoip_latitude;
fastcgi_param GEOIP_LONGITUDE $geoip_longitude;
(Assicurati di avere la riga include /etc/nginx/fastcgi_params; nella tua posizione ~ \.php$ {} container nella tua configurazione vhost, perché altrimenti, la configurazione sopra è inutile per il tuo vhost.)
Se usi nginx come proxy inverso e vuoi passare le variabili GeoIP al backend, dovresti creare/modificare il file /etc/nginx/proxy.conf...
nano /etc/nginx/proxy.conf
... e aggiungi le seguenti righe:
[...]
### SET GEOIP Variables ###
proxy_set_header GEOIP_COUNTRY_CODE $geoip_country_code;
proxy_set_header GEOIP_COUNTRY_CODE3 $geoip_country_code3;
proxy_set_header GEOIP_COUNTRY_NAME $geoip_country_name;

proxy_set_header GEOIP_CITY_COUNTRY_CODE $geoip_city_country_code;
proxy_set_header GEOIP_CITY_COUNTRY_CODE3 $geoip_city_country_code3;
proxy_set_header GEOIP_CITY_COUNTRY_NAME $geoip_city_country_name;
proxy_set_header GEOIP_REGION $geoip_region;
proxy_set_header GEOIP_CITY $geoip_city;
proxy_set_header GEOIP_POSTAL_CODE $geoip_postal_code;
proxy_set_header GEOIP_CITY_CONTINENT_CODE $geoip_city_continent_code;
proxy_set_header GEOIP_LATITUDE $geoip_latitude;
proxy_set_header GEOIP_LONGITUDE $geoip_longitude;
(Assicurati di utilizzare la riga include /etc/nginx/proxy.conf; nella configurazione del proxy nginx perché altrimenti il backend non può utilizzare le variabili GeoIP.)
Ora ricarica nginx...
systemctl reload nginx.service
... affinché le modifiche abbiano effetto.
Riavvia PHP-FPM come segue:
systemctl restart php7.0-fpm.service
5 Un breve test
Per vedere se il modulo GeoIP funziona correttamente, possiamo creare un piccolo file PHP nel nostro spazio web www.example.com (es. /var/www/www.example.com/web):
nano /var/www/www.example.com/web/geoiptest.php
Possiamo accedere alle variabili GeoIP come segue:
$geoip_country_code = getenv(GEOIP_COUNTRY_CODE);
O così:
$geoip_country_code = $_SERVER['GEOIP_COUNTRY_CODE'];
<html>
<body>
<?php

$geoip_country_code = getenv(GEOIP_COUNTRY_CODE);
/*
$geoip_country_code = $_SERVER['GEOIP_COUNTRY_CODE']; // works as well
*/
$geoip_country_code3 = getenv(GEOIP_COUNTRY_CODE3);
$geoip_country_name = getenv(GEOIP_COUNTRY_NAME);

$geoip_city_country_code = getenv(GEOIP_CITY_COUNTRY_CODE);
$geoip_city_country_code3 = getenv(GEOIP_CITY_COUNTRY_CODE3);
$geoip_city_country_name = getenv(GEOIP_CITY_COUNTRY_NAME);
$geoip_region = getenv(GEOIP_REGION);
$geoip_city = getenv(GEOIP_CITY);
$geoip_postal_code = getenv(GEOIP_POSTAL_CODE);
$geoip_city_continent_code = getenv(GEOIP_CITY_CONTINENT_CODE);
$geoip_latitude = getenv(GEOIP_LATITUDE);
$geoip_longitude = getenv(GEOIP_LONGITUDE);

echo 'country_code: '.$geoip_country_code.'<br>';
echo 'country_code3: '.$geoip_country_code3.'<br>';
echo 'country_name: '.$geoip_country_name.'<br>';

echo 'city_country_code: '.$geoip_city_country_code.'<br>';
echo 'city_country_code3: '.$geoip_city_country_code3.'<br>';
echo 'city_country_name: '.$geoip_city_country_name.'<br>';
echo 'region: '.$geoip_region.'<br>';
echo 'city: '.$geoip_city.'<br>';
echo 'postal_code: '.$geoip_postal_code.'<br>';
echo 'city_continent_code: '.$geoip_city_continent_code.'<br>';
echo 'latitude: '.$geoip_latitude.'<br>';
echo 'longitude: '.$geoip_longitude.'<br>';

?>
</body>
</html>
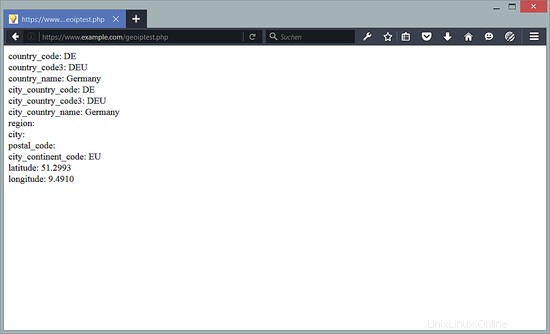
Chiama quel file in un browser (http://www.example.com/geoiptest.php) e dovresti vedere GeoIP al lavoro (assicurati di chiamare il file da un indirizzo IP pubblico, non locale) :
È anche possibile utilizzare le variabili GeoIP direttamente nella configurazione di nginx, ad es. come segue:
nano /etc/nginx/sites-enabled/www.example.com.vhost
[...]
        location / {
            index index.html index.php;
            try_files /index_$geoip_country_code.html /index.html;
        }
[...]
systemctl reload nginx.service
In questo esempio, se un visitatore proviene dalla Germania (codice paese:DE) ed esiste il file index_DE.html, questo file viene servito, altrimenti viene servito il file index.html predefinito.
Può essere utilizzato per offrire contenuti in diverse lingue, in base all'origine dell'utente.
6 link
- nginx:http://nginx.org/
- Wiki di nginx:http://wiki.nginx.org/
- Ubuntu:http://www.ubuntu.com/