Netdata è uno strumento gratuito, open source e in tempo reale per il monitoraggio delle prestazioni e della salute. Supporta Linux, MacOS e FreeBSD. Con Netdata puoi risolvere e monitorare i server, i container e l'intera infrastruttura IT basati su cloud. Fornisce metriche di sistema in tempo reale tra cui utilizzo della memoria, CPU, larghezza di banda, utilizzo del disco e altro ancora. Puoi anche integrarlo con altri strumenti di monitoraggio come Prometheus, Graphite, OpenTSDB, Kafka, Grafana e altri.
In questo tutorial, ti mostreremo come installare lo strumento di monitoraggio Netdata sul server Ubuntu 20.04.
Prerequisiti
- Un server che esegue Ubuntu 20.04.
- Una password di root è configurata sul server.
Installa Netdata con script automatico
Il modo più semplice e veloce per installare Netdata dallo script di installazione automatica.
Innanzitutto, installa l'utilità curl con il seguente comando:
apt-get install curl -y
Una volta installato, puoi scaricare ed eseguire lo script di installazione automatica di Netdata con il seguente comando:
bash <(curl -Ss https://my-netdata.io/kickstart.sh)
Ti verrà chiesto di installare le dipendenze richieste nel tuo sistema come mostrato di seguito:
NOTE: Running apt-get update and updating your APT caches ...
apt-get update
apt-get install autoconf autoconf-archive autogen automake cmake gcc git libelf-dev libjson-c-dev libjudy-dev liblz4-dev libmnl-dev libssl-dev libtool libuv1-dev make pkg-config uuid-dev zlib1g-dev


Press ENTER to run it >
Premi Invio per installare tutte le dipendenze nel tuo sistema. Ti verrà chiesto di costruire Netdata come mostrato di seguito:
 --- Installing netdata... ---
[/tmp/netdata-kickstart-LnvxPHJfuV/netdata-v1.26.0-292-gfbb5d8e2]# ./netdata-installer.sh --auto-update
  ^
  |.-.   .-.   .-.   .-.   .  netdata
  |   '-'   '-'   '-'   '-'   real-time performance monitoring, done right!
  +----+-----+-----+-----+-----+-----+-----+-----+-----+-----+-----+-----+--->


  You are about to build and install netdata to your system.

  The build process will use /tmp for
  any temporary files. You can override this by setting $TMPDIR to a
  writable directory where you can execute files.

  It will be installed at these locations:

   - the daemon     at /usr/sbin/netdata
   - config files   in /etc/netdata
   - web files      in /usr/share/netdata
   - plugins        in /usr/libexec/netdata
   - cache files    in /var/cache/netdata
   - db files       in /var/lib/netdata
   - log files      in /var/log/netdata
   - pid file       at /var/run/netdata.pid
   - logrotate file at /etc/logrotate.d/netdata

  This installer allows you to change the installation path.
  Press Control-C and run the same command with --help for help.


  NOTE:
  Anonymous usage stats will be collected and sent to Google Analytics.
  To opt-out, pass --disable-telemetry option to the installer or export
  the environment variable DO_NOT_TRACK to a non-zero or non-empty value
  (e.g: export DO_NOT_TRACK=1).

Press ENTER to build and install netdata to your system >
Premi Invio per installare Netdata. Al termine dell'installazione, dovresti ottenere il seguente output:
Setting netdata.tarball.checksum to 'new_installation'

 --- We are done! ---

  ^
  |.-.   .-.   .-.   .-.   .-.   .  netdata                          .-.   .-
  |   '-'   '-'   '-'   '-'   '-'   is installed and running now!  -'   '-'
  +----+-----+-----+-----+-----+-----+-----+-----+-----+-----+-----+-----+--->

  enjoy real-time performance and health monitoring...

 OK
Installa Netdata dal repository di Ubuntu
Per impostazione predefinita, Netdata è disponibile nel repository standard di Ubuntu 20.04. Puoi installarlo semplicemente eseguendo il seguente comando:
apt-get install netdata -y
Una volta installato Netdata, modifica il file di configurazione predefinito di Netdata e cambia l'indirizzo di collegamento con l'ip del tuo server:
nano /etc/netdata/netdata.conf
Modifica le seguenti righe:
[global]
        run as user = netdata
        web files owner = root
        web files group = root
        # Netdata is not designed to be exposed to potentially hostile
        # networks. See https://github.com/netdata/netdata/issues/164
        bind socket to IP = your-server-ip
Salva e chiudi il file quando hai finito. Quindi, riavvia il servizio Netdata per applicare le modifiche:
systemctl restart netdata
Puoi verificare lo stato del Netdata con il seguente comando:
systemctl status netdata
Dovresti ottenere il seguente output:
? netdata.service - netdata - Real-time performance monitoring
     Loaded: loaded (/lib/systemd/system/netdata.service; enabled; vendor preset: enabled)
     Active: active (running) since Wed 2020-12-02 04:55:57 UTC; 9s ago
       Docs: man:netdata
             file:///usr/share/doc/netdata/html/index.html
             https://github.com/netdata/netdata
   Main PID: 18021 (netdata)
      Tasks: 22 (limit: 4691)
     Memory: 35.4M
     CGroup: /system.slice/netdata.service
             ??18021 /usr/sbin/netdata -D
             ??18100 /usr/bin/python3 /usr/lib/netdata/plugins.d/python.d.plugin 1
             ??18106 bash /usr/lib/netdata/plugins.d/tc-qos-helper.sh 1
             ??18108 /usr/lib/netdata/plugins.d/nfacct.plugin 1
             ??18109 /usr/lib/netdata/plugins.d/apps.plugin 1

Dec 02 04:55:57 ubuntu2004 systemd[1]: Started netdata - Real-time performance monitoring.
Dec 02 04:55:57 ubuntu2004 netdata[18021]: SIGNAL: Not enabling reaper
Dec 02 04:55:57 ubuntu2004 netdata[18021]: 2020-12-02 04:55:57: netdata INFO  : MAIN : SIGNAL: Not enabling reaper
A questo punto Netdata è installato ed è in ascolto sulla porta 19999.
ss -antpl | grep 19999
Dovresti ottenere il seguente output:
LISTEN 0 4096 216.98.11.171:19999 0.0.0.0:* users:(("netdata",pid=18021,fd=4))
Una volta terminato, puoi procedere al passaggio successivo.
Accedi all'interfaccia web di Netdata
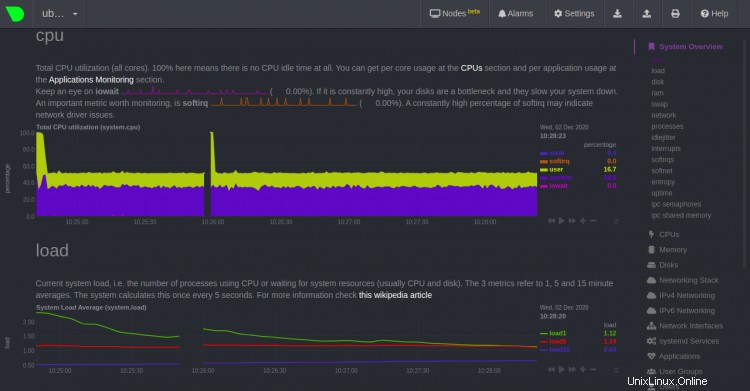
Ora apri il tuo browser web e accedi all'interfaccia web di Netdata utilizzando l'URL http://your-server-ip:19999 . Dovresti vedere l'interfaccia web di Netdata nella schermata seguente:

CPU e carico
Utilizzo disco e RAM

Scambia e fai rete

Conclusione
Congratulazioni! hai installato con successo Netdata sul server Ubuntu 20.04. È ora possibile installare l'agente Netdata sul computer client e iniziare a monitorare le risorse di sistema dal dashboard Web di Netdata. Sentiti libero di chiedermi se hai domande.