Etherpad è un editor online in tempo reale basato sul Web che consente agli autori di modificare contemporaneamente un documento di testo e monitorare tutte le modifiche in tempo reale. È open-source, personalizzabile e consente di visualizzare il testo di ogni autore nel proprio colore. Fornisce inoltre un'API HTTP che puoi integrare con le tue applicazioni per gestire utenti e gruppi. Offre diversi plugin che ti aiutano a integrare le notifiche e-mail, il caricamento di file, le videochiamate in Etherpad. In questo tutorial, ti mostreremo come installare l'editor basato sul Web Etherpad sul server Ubuntu 20.04.
Prerequisiti
- Un server che esegue Ubuntu 20.04.
- Un nome di dominio valido puntato all'IP del tuo server.
- Una password di root è configurata sul server.
Per iniziare
Prima di iniziare, dovrai aggiornare i pacchetti di sistema all'ultima versione. Puoi aggiornarli eseguendo il seguente comando:
apt-get update -y
Una volta aggiornati tutti i pacchetti, dovrai installare alcune dipendenze nel tuo sistema. Puoi installarli tutti con il seguente comando:
apt-get install gnupg2 git unzip libssl-dev pkg-config gcc g++ make build-essential -y
Una volta installati tutti i pacchetti, puoi procedere al passaggio successivo.
Installa e configura il database MariaDB
Etherpad utilizza MariaDB come backend del database. Quindi dovrai installare il server MariaDB nel tuo sistema. Puoi installarlo con il seguente comando:
apt-get install mariadb-server -y
Dopo aver installato MariaDB, accedi alla shell MariaDB con il seguente comando:
mysql
Dopo il login, crea un database e un utente per Etherpad con il seguente comando:
MariaDB [(none)]> create database etherpad;
MariaDB [(none)]> grant all privileges on etherpad.* to [email protected] identified by 'password';
Quindi, svuota i privilegi ed esci da MariaDB con il seguente comando:
MariaDB [(none)]> flush privileges;
MariaDB [(none)]> exit;
A questo punto, il database è configurato per Etherpad. Ora puoi procedere al passaggio successivo.
Installa Node.js
Etherpad è basato su Node.js. Quindi dovrai installare Node.js nel tuo sistema. Per impostazione predefinita, l'ultima versione di Node.js non è disponibile nel repository standard di Ubuntu 20.04. Quindi dovrai aggiungere il repository Node.js al tuo sistema. Puoi aggiungerlo con il seguente comando:
curl -sL https://deb.nodesource.com/setup_14.x -o nodesource_setup.sh
bash nodesource_setup.sh
Una volta aggiunto il repository, installa Node.js con il seguente comando:
apt-get install nodejs -y
Dopo aver installato Node.js, verifica la versione installata di Node.js con il seguente comando:
node -v
Dovresti ottenere il seguente output:
v14.15.0
Una volta terminato, puoi procedere al passaggio successivo.
Installa e configura Etherpad
Prima, l'installazione di Etherpad. Si consiglia di eseguire Etherpad come utente separato. Puoi creare un nuovo utente per Etherpad con il seguente comando:
adduser --home /opt/etherpad --shell /bin/bash etherpad
Ti verrà chiesto di impostare una password come mostrato di seguito:
Adding user `etherpad' ...
Adding new group `etherpad' (1000) ...
Adding new user `etherpad' (1000) with group `etherpad' ...
Creating home directory `/opt/etherpad' ...
Copying files from `/etc/skel' ...
New password:
Retype new password:
passwd: password updated successfully
Changing the user information for etherpad
Enter the new value, or press ENTER for the default
	Full Name []: Hitesh
	Room Number []: 1
	Work Phone []:
	Home Phone []:
	Other []:
Is the information correct? [Y/n] Y
Quindi, fornisci le autorizzazioni appropriate alla home directory di Etherpad con il seguente comando:
install -d -m 755 -o etherpad -g etherpad /opt/etherpad
Quindi, passa l'utente a Etherpad e scarica l'ultima versione di Etherpad dal repository Git usando il seguente comando:
su - etherpad
git clone --branch master https://github.com/ether/etherpad-lite.git
Quindi, cambia la directory nella directory scaricata ed esegui l'Etherpad usando il seguente comando:
cd etherpad-lite
bin/run.sh
Questo installerà tutte le dipendenze e avvierà il server Etherpad. Una volta che il server è stato avviato correttamente, dovresti ottenere il seguente output:
[2020-11-11 06:46:44.783] [INFO] console - Your Etherpad version is 1.8.6 (2c8769a)
[2020-11-11 06:46:44.958] [INFO] console - You can access your Etherpad instance at http://0.0.0.0:9001/
[2020-11-11 06:46:44.958] [WARN] console - Admin username and password not set in settings.json.  To access admin please uncomment and edit 'users' in settings.json
[2020-11-11 06:46:44.958] [WARN] console - Etherpad is running in Development mode.  This mode is slower for users and less secure than production mode.  You should set the NODE_ENV environment variable to production by using: export NODE_ENV=production
Quindi, premi CTRL + C per arrestare il server. Successivamente, dovrai modificare il file settings.json e definire il database e le impostazioni di amministrazione:
nano settings.json
Rimuovere le seguenti righe:
"dbType" : "dirty",
  "dbSettings" : {
                   "filename" : "var/dirty.db"
                 },
Modifica le impostazioni MySQL come mostrato di seguito:
  "dbType" : "mysql",
  "dbSettings" : {
    "user":     "etherpad",
    "host":     "localhost",
    "port":     3306,
    "password": "password",
    "database": "etherpad",
    "charset":  "utf8mb4"
  },
Cambia la riga trustProxy in true:
"trustProxy": true,
Definisci una password per l'utente amministratore:
  "users": {
    "admin": {
      "password": "adminpassword",
      "is_admin": true
    },
Salva e chiudi il file, quindi installa le dipendenze richieste con il seguente comando:
./bin/installDeps.sh
Una volta installate tutte le dipendenze, esci dall'utente Etherpad con il seguente comando:
exit
A questo punto Etherpad è installato e configurato. Ora puoi procedere al passaggio successivo.
Crea un file di servizio Systemd per Etherpad
Successivamente, dovrai creare un file di servizio systemd per gestire il servizio Etherpad. Puoi crearlo con il seguente comando:
nano /etc/systemd/system/etherpad.service
Aggiungi le seguenti righe:
[Unit]
Description=Etherpad-lite, the collaborative editor.
After=syslog.target network.target

[Service]
Type=simple
User=etherpad
Group=etherpad
WorkingDirectory=/opt/etherpad/etherpad-lite
Environment=NODE_ENV=production

ExecStart=/usr/bin/node /opt/etherpad/etherpad-lite/src/node/server.js

Restart=always

[Install]
WantedBy=multi-user.target
Salva e chiudi il file, quindi ricarica il demone systemd eseguendo il comando seguente:
systemctl daemon-reload
Quindi, avvia il servizio Etherpad e abilitalo all'avvio al riavvio del sistema con il seguente comando:
systemctl start etherpad
systemctl enable etherpad
Puoi anche verificare lo stato del servizio Etherpad con il seguente comando:
systemctl status etherpad
Dovresti vedere il seguente output:
? etherpad.service - Etherpad-lite, the collaborative editor.
     Loaded: loaded (/etc/systemd/system/etherpad.service; disabled; vendor preset: enabled)
     Active: active (running) since Wed 2020-11-11 06:50:49 UTC; 4s ago
   Main PID: 12269 (node)
      Tasks: 13 (limit: 4691)
     Memory: 119.1M
     CGroup: /system.slice/etherpad.service
             ??12269 /usr/bin/node /opt/etherpad/etherpad-lite/src/node/server.js
Configura Nginx per Etherpad
A questo punto, Etherpad viene avviato e rimane in ascolto sulla porta 9001. Successivamente, sarà necessario installare e configurare Nginx come proxy inverso per accedere all'Etherpad. Innanzitutto, installa Nginx con il seguente comando:
apt-get install nginx -y
Quindi, crea un nuovo file di configurazione dell'host virtuale Nginx con il seguente comando:
nano /etc/nginx/sites-available/etherpad.conf
Aggiungi le seguenti righe:
upstream etherpad {
   server localhost:9001;
   keepalive 32;
}

server {
   listen 80;
   server_name etherpad.mydomain.com;

   location / {
       client_max_body_size 50M;
       proxy_set_header X-Real-IP $remote_addr;
       proxy_http_version 1.1;
       proxy_pass http://etherpad;
   }
}
Salva e chiudi il file, quindi attiva il file di configurazione dell'host virtuale Nginx con il seguente comando:
ln -s /etc/nginx/sites-available/etherpad.conf /etc/nginx/sites-enabled/
Quindi, controlla Nginx per eventuali errori di sintassi con il seguente comando:
nginx -t
Dovresti ottenere il seguente output:
nginx: the configuration file /etc/nginx/nginx.conf syntax is ok
nginx: configuration file /etc/nginx/nginx.conf test is successful
Quindi, riavvia il servizio Nginx per applicare le modifiche:
systemctl restart nginx
Puoi anche verificare lo stato di Nginx con il seguente comando:
systemctl status nginx
Dovresti ottenere il seguente output:
? nginx.service - A high performance web server and a reverse proxy server
     Loaded: loaded (/lib/systemd/system/nginx.service; enabled; vendor preset: enabled)
     Active: active (running) since Wed 2020-11-11 06:53:44 UTC; 6s ago
       Docs: man:nginx(8)
    Process: 12984 ExecStartPre=/usr/sbin/nginx -t -q -g daemon on; master_process on; (code=exited, status=0/SUCCESS)
    Process: 12985 ExecStart=/usr/sbin/nginx -g daemon on; master_process on; (code=exited, status=0/SUCCESS)
   Main PID: 13001 (nginx)
      Tasks: 3 (limit: 4691)
     Memory: 3.5M
     CGroup: /system.slice/nginx.service
             ??13001 nginx: master process /usr/sbin/nginx -g daemon on; master_process on;
             ??13002 nginx: worker process
             ??13003 nginx: worker process

Nov 11 06:53:44 ubuntu2004 systemd[1]: Starting A high performance web server and a reverse proxy server...
Nov 11 06:53:44 ubuntu2004 systemd[1]: Started A high performance web server and a reverse proxy server.
Accedi a Etherpad
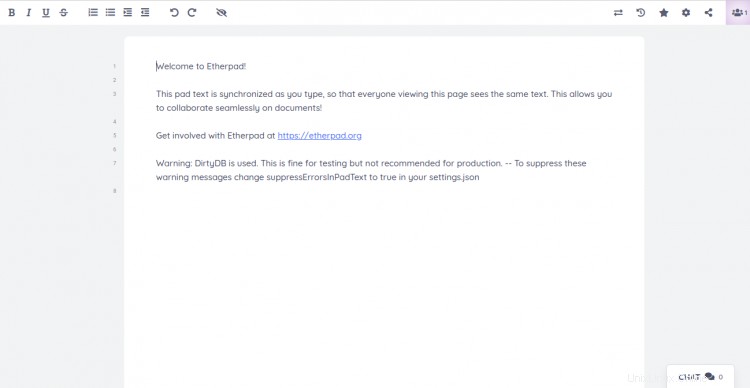
Ora apri il tuo browser web e digita l'URL http://etherpad.mydomain.com . Verrai reindirizzato alla seguente pagina:

Fornisci il nome della tua pagina e fai clic su OK pulsante. Dovresti vedere la dashboard dell'Etherpad nella pagina seguente:
Conclusione
Congratulazioni! hai installato e configurato correttamente Etherpad con Nginx come proxy inverso sul server Ubuntu 20.04. È possibile utilizzare facilmente l'Etherpad nell'ambiente di produzione. Sentiti libero di chiedermi se hai domande.