OpenShift è un Platform as a Service (PaaS) gratuito, open source e cloud sviluppato da Red Hat che consente agli sviluppatori di sviluppare e distribuire le proprie applicazioni su un'infrastruttura cloud . È una distribuzione comunitaria di Kubernetes e consente cicli di sviluppo e rilascio più rapidi per le applicazioni. Viene fornito con un'interfaccia Web semplice e facile da usare che consente di monitorare le risorse del container, lo stato del container, i nodi su cui risiedono i container, gli indirizzi IP dei nodi, ecc.
In questo tutorial, spiegheremo come installare OpenShift Origin sul server Ubuntu 20.04.
Prerequisiti
- Un server che esegue Ubuntu 20.04.
- Sul tuo server è configurata una password di root.
Installa Docker CE
Innanzitutto, dovrai installare Docker CE nel tuo sistema per eseguire tutti i servizi OKD nei contenitori docker. Per impostazione predefinita, l'ultima versione di Docker CE è disponibile nel repository predefinito di Ubuntu 20.04. Puoi installarlo semplicemente eseguendo il seguente comando:
apt-get install docker.io -y
Una volta installato Docker, avvia il servizio Docker e abilitalo all'avvio all'avvio con il seguente comando:
systemctl start docker
systemctl enable docker
Puoi anche verificare lo stato del servizio Docker con il seguente comando:
systemctl status docker
Dovresti vedere il seguente output:
? docker.service - Docker Application Container Engine
     Loaded: loaded (/lib/systemd/system/docker.service; disabled; vendor preset: enabled)
     Active: active (running) since Fri 2020-05-29 12:25:47 UTC; 2s ago
TriggeredBy: ? docker.socket
       Docs: https://docs.docker.com
   Main PID: 48433 (dockerd)
      Tasks: 10
     Memory: 36.5M
     CGroup: /system.slice/docker.service
             ??48433 /usr/bin/dockerd -H fd:// --containerd=/run/containerd/containerd.sock

May 29 12:25:47 ubuntu2004 dockerd[48433]: time="2020-05-29T12:25:47.215078550Z" level=warning msg="Your kernel does not support swap memory l>
May 29 12:25:47 ubuntu2004 dockerd[48433]: time="2020-05-29T12:25:47.215139097Z" level=warning msg="Your kernel does not support cgroup blkio >
May 29 12:25:47 ubuntu2004 dockerd[48433]: time="2020-05-29T12:25:47.215169580Z" level=warning msg="Your kernel does not support cgroup blkio >
May 29 12:25:47 ubuntu2004 dockerd[48433]: time="2020-05-29T12:25:47.215721944Z" level=info msg="Loading containers: start."
May 29 12:25:47 ubuntu2004 dockerd[48433]: time="2020-05-29T12:25:47.418058547Z" level=info msg="Default bridge (docker0) is assigned with an >
May 29 12:25:47 ubuntu2004 dockerd[48433]: time="2020-05-29T12:25:47.515158041Z" level=info msg="Loading containers: done."
May 29 12:25:47 ubuntu2004 dockerd[48433]: time="2020-05-29T12:25:47.545778830Z" level=info msg="Docker daemon" commit=afacb8b7f0 graphdriver(>
May 29 12:25:47 ubuntu2004 dockerd[48433]: time="2020-05-29T12:25:47.546068892Z" level=info msg="Daemon has completed initialization"
May 29 12:25:47 ubuntu2004 dockerd[48433]: time="2020-05-29T12:25:47.599029431Z" level=info msg="API listen on /run/docker.sock"
May 29 12:25:47 ubuntu2004 systemd[1]: Started Docker Application Container Engine.
A questo punto, Docker è installato e funzionante. Ora puoi procedere al passaggio successivo.
Scarica OpenShift Origin
Al momento della stesura di questo tutorial, l'ultima versione di OpenShift Origin è la v3.11.0. Puoi scaricarlo dal repository Git Hub usando il seguente comando:
wget https://github.com/openshift/origin/releases/download/v3.11.0/openshift-origin-client-tools-v3.11.0-0cbc58b-linux-64bit.tar.gz
Una volta completato il download, estrai il file scaricato con il seguente comando:
tar -xvzf openshift-origin-client-tools-v3.11.0-0cbc58b-linux-64bit.tar.gz
Quindi, cambia la directory nella directory estratta e copia i binari kubectl e oc nella directory /usr/local/bin.
cd openshift-origin-client-tools-v3.11.0-0cbc58b-linux-64bit
cp oc kubectl /usr/local/bin/
Quindi, verifica l'installazione dell'utilità client OpenShift utilizzando il seguente comando:
oc version
Dovresti vedere il seguente output:
oc v3.11.0+0cbc58b
kubernetes v1.11.0+d4cacc0
features: Basic-Auth GSSAPI Kerberos SPNEGO
Successivamente, dovrai creare un nuovo file daemon.json e consentire l'uso del registro Insecure Docker.
nano /etc/docker/daemon.json
Aggiungi la seguente riga:
 {
     "insecure-registries" : [ "172.30.0.0/16" ]
 }
Salva e chiudi il file, quindi riavvia il servizio Docker per implementare le modifiche.
systemctl restart docker
Avvia OpenShif Origin Cluster
Ora avvia il cluster OpenShift Origin specificando l'IP del tuo sistema:
oc cluster up --public-hostname=your-server-ip
Una volta avviato correttamente il server, dovresti ottenere il seguente output:
Login to server ...
Creating initial project "myproject" ...
Server Information ...
OpenShift server started.

The server is accessible via web console at:
    https://your-server-ip:8443

You are logged in as:
    User:     developer
    Password:

To login as administrator:
    oc login -u system:admin
Ora accedi al tuo cluster come utente amministratore con il seguente comando:
oc login -u system:admin
Una volta effettuato l'accesso, dovresti ottenere il seguente output:
Logged into "https://your-server-ip:8443" as "system:admin" using existing credentials. You have access to the following projects and can switch between them with 'oc project': default kube-dns kube-proxy kube-public kube-system * myproject openshift openshift-apiserver openshift-controller-manager openshift-core-operators openshift-infra openshift-node openshift-service-cert-signer openshift-web-console Using project "myproject".
Quindi, passa al progetto predefinito con il seguente comando:
oc project default
Uscita:
Now using project "default" on server "https://your-server-ip:8443".
Ora verifica lo stato attuale del tuo progetto con il seguente comando:
oc status
Dovresti ottenere il seguente output:
In project default on server https://your-server-ip:8443

svc/docker-registry - 172.30.1.1:5000
  dc/docker-registry deploys docker.io/openshift/origin-docker-registry:v3.11
    deployment #1 deployed 2 minutes ago - 1 pod

svc/kubernetes - 172.30.0.1:443 -> 8443

svc/router - 172.30.94.157 ports 80, 443, 1936
  dc/router deploys docker.io/openshift/origin-haproxy-router:v3.11
    deployment #1 deployed 2 minutes ago - 1 pod

View details with 'oc describe /' or list everything with 'oc get all'.
Crea progetto su OpenShift
Ora, accedi a OpenShift con l'utente sviluppatore con il seguente comando:
oc login
Ti verrà chiesto di fornire un nome utente e una password come mostrato di seguito:
Authentication required for https://your-server-ip:8443 (openshift)
Username: developer
Password:
Fornisci il nome utente come sviluppatore e la password come sviluppatore e premi Invio. Dovresti vedere il seguente output:
Login successful.

You have one project on this server: "myproject"

Using project "myproject".
Per creare un nuovo progetto, esegui il seguente comando:
oc new-project dev --display-name="Project - Dev" --description="My Project"
Dovresti vedere il seguente output:
Now using project "dev" on server "https://your-server-ip:8443".

You can add applications to this project with the 'new-app' command. For example, try:

    oc new-app centos/ruby-25-centos7~https://github.com/sclorg/ruby-ex.git

to build a new example application in Ruby.
Accedi alla console Web di OpenShift
Ora apri il tuo browser web e digita l'URL https://your-server-ip:8443/console. Dovresti vedere la pagina di accesso di OpenShift:

Fornisci il nome utente e la password dello sviluppatore e fai clic sul Registro In pulsante. Dovresti vedere la seguente pagina:
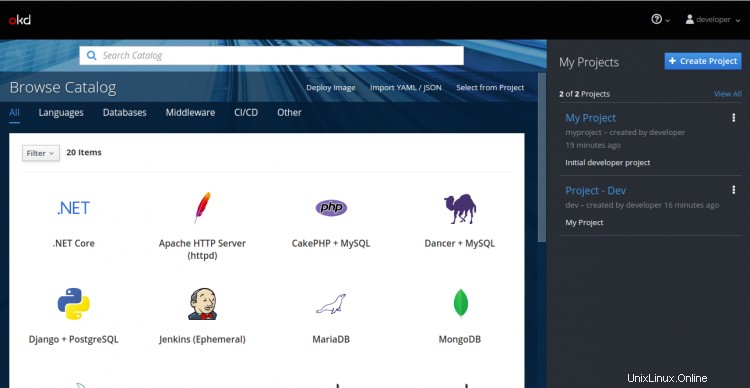
Fai clic su Crea Progetto pulsante. Dovresti vedere la seguente pagina:
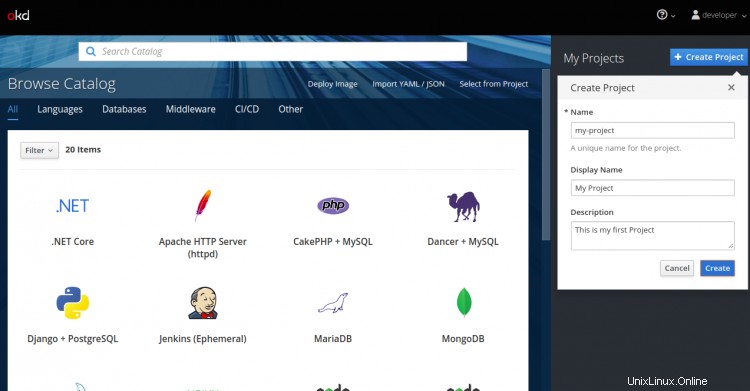
Fornisci tutte le informazioni richieste e fai clic su Crea pulsante per creare un nuovo progetto.
Distribuisci applicazione su OpenShift Origin
Innanzitutto, accedi a OpenShift con l'utente sviluppatore eseguendo il seguente comando:
oc login
Accedi con l'utente sviluppatore come mostrato di seguito:
Authentication required for https://your-server-ip:8443 (openshift) Username: developer Password: Login successful. You have access to the following projects and can switch between them with 'oc project': * dev my-project myproject Using project "dev".
Una volta effettuato l'accesso, cambia il progetto nel mio progetto che hai creato tramite la console web di OpenShift:
oc project my-project
Uscita:
Now using project "my-project" on server "https://your-server-ip:8443".
Successivamente, verifica lo stato del tuo progetto attuale con il seguente comando:
oc status
Uscita:
In project My Project (my-project) on server https://your-server-ip:8443

You have no services, deployment configs, or build configs.
Run 'oc new-app' to create an application.
Quindi, tagga un'immagine dell'applicazione dal registro Docker Hub con il comando seguente:
oc tag --source=docker openshift/deployment-example:v2 deployment-example:latest
Uscita:
Tag deployment-example:latest set to openshift/deployment-example:v2.
Quindi, distribuisci un'applicazione su OpenShift con il seguente comando:
oc new-app deployment-example
Dovresti vedere il seguente output:
--> Found image da61bb2 (4 years old) in image stream "my-project/deployment-example" under tag "latest" for "deployment-example"

    * This image will be deployed in deployment config "deployment-example"
    * Port 8080/tcp will be load balanced by service "deployment-example"
      * Other containers can access this service through the hostname "deployment-example"
    * WARNING: Image "my-project/deployment-example:latest" runs as the 'root' user which may not be permitted by your cluster administrator

--> Creating resources ...
    deploymentconfig.apps.openshift.io "deployment-example" created
    service "deployment-example" created
--> Success
    Application is not exposed. You can expose services to the outside world by executing one or more of the commands below:
     'oc expose svc/deployment-example'
    Run 'oc status' to view your app.
Ora verifica lo stato di distribuzione dell'applicazione con il seguente comando:
oc status
Dovresti vedere il seguente output:
In project My Project (my-project) on server https://your-server-ip:8443

svc/deployment-example - 172.30.87.146:8080
  dc/deployment-example deploys istag/deployment-example:latest
    deployment #1 deployed 36 seconds ago - 1 pod


2 infos identified, use 'oc status --suggest' to see details.
Per ottenere informazioni sul tuo servizio, esegui il seguente comando:
oc get svc
Uscita:
NAME TYPE CLUSTER-IP EXTERNAL-IP PORT(S) AGE deployment-example ClusterIP 172.30.87.1468080/TCP 1m
Per ottenere informazioni dettagliate, esegui il seguente comando:
oc describe svc deployment-example
Uscita:
Name:              deployment-example
Namespace:         my-project
Labels:            app=deployment-example
Annotations:       openshift.io/generated-by=OpenShiftNewApp
Selector:          app=deployment-example,deploymentconfig=deployment-example
Type:              ClusterIP
IP:                172.30.87.146
Port:              8080-tcp  8080/TCP
TargetPort:        8080/TCP
Endpoints:         172.17.0.10:8080
Session Affinity:  None
Events:
Puoi anche verificare lo stato dei Pod utilizzando il seguente comando:
oc get pods
Uscita:
NAME                         READY     STATUS    RESTARTS   AGE
deployment-example-1-b9prf   1/1       Running   0          2m
Ora, esponi l'applicazione per l'accesso esterno usando il seguente comando:
oc expose service/deployment-example
Uscita:
route.route.openshift.io/deployment-example exposed
Per visualizzare le informazioni sui percorsi, esegui il seguente comando:
oc get routes
Dovresti ottenere il seguente output:
NAME                 HOST/PORT                                           PATH      SERVICES             PORT       TERMINATION   WILDCARD
deployment-example   deployment-example-my-project.your-server-ip.nip.io             deployment-example   8080-tcp                 None
Verifica accesso esterno
Ora la tua applicazione è pronta per l'accesso esterno. Apri il tuo browser web e digita l'URL sopra http://deployment-example-my-project.your-server-ip.nip.io. Dovresti vedere la tua applicazione nella pagina seguente:

Se desideri eliminare la tua applicazione, esegui il seguente comando:
oc delete all -l app=deployment-example
Dovresti vedere il seguente output:
pod "deployment-example-1-b9prf" deleted
replicationcontroller "deployment-example-1" deleted
service "deployment-example" deleted
deploymentconfig.apps.openshift.io "deployment-example" deleted
route.route.openshift.io "deployment-example" deleted
Conclusione
In questo articolo, abbiamo installato e configurato con successo un OpenShift Origin a nodo singolo su Ubuntu 20.04. Ora puoi iniziare a sviluppare la tua prima applicazione nell'ambiente OpenShift. sentiti libero di chiedermi se hai domande.