ArangoDB è un database gratuito e open source, NoSQL e multi-modello che fornisce tutte le funzionalità di database necessarie per una moderna applicazione web. ArangoDB non utilizza il tradizionale sistema di archiviazione dati come in MySQL o PostgreSQL. È appositamente progettato per essere ad alte prestazioni, open source e facilmente scalabile. È semplice, facile da usare e fornisce un'interfaccia web intuitiva per l'amministrazione del sistema e il monitoraggio del sistema. ArangoDB è utilizzato in piccole e grandi organizzazioni che elaborano enormi quantità di dati. ArangoDB supporta tre modelli di dati chiave/valore, documenti e grafici. ArangoDB fornisce un motore di archiviazione per gestire set di dati molto più grandi della RAM. ArangoDB ti aiuta a configurare il database in un master-slave per la replica e lo sharding.
In questo tutorial impareremo come installare ArangoDB3 sul server Ubuntu 18.04.
Requisiti
- Un server che esegue Ubuntu 18.04.
- Un indirizzo IP statico 192.168.0.104 è impostato sul tuo server
- È stata impostata una password di root sul tuo server.
Per iniziare
Prima di iniziare, dovrai aggiornare il tuo sistema con l'ultima versione. Puoi farlo eseguendo il seguente comando:
apt-get update -y
 apt-get upgrade -y
Una volta aggiornato il server, riavvia il server per applicare le modifiche.
Installa ArangoDB3
Per impostazione predefinita, ArangoDB non è disponibile nel repository predefinito di Ubuntu 18.04. Quindi, dovrai aggiungere il repository per quello. Innanzitutto, scarica e aggiungi la chiave GPG con il seguente comando:
wget -q https://download.arangodb.com/arangodb34/DEBIAN/Release.key -O- | apt-key add -
Successivamente, aggiungi il repository con il seguente comando:
nano /etc/apt/sources.list.d/arangodb.list
Aggiungi la seguente riga:
deb https://download.arangodb.com/arangodb34/DEBIAN/ /
Salva e chiudi il file, quando hai finito. Quindi, aggiorna il repository e installa ArangoDB3 con il seguente comando:
apt-get update -y
apt-get install apt-transport-https arangodb3 -y
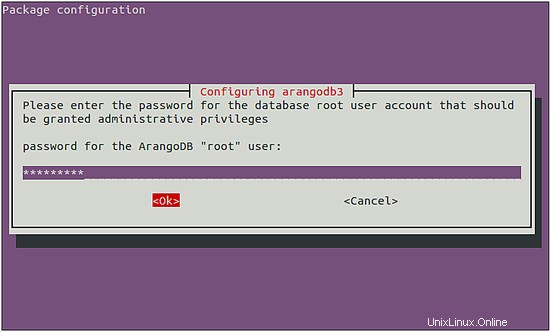
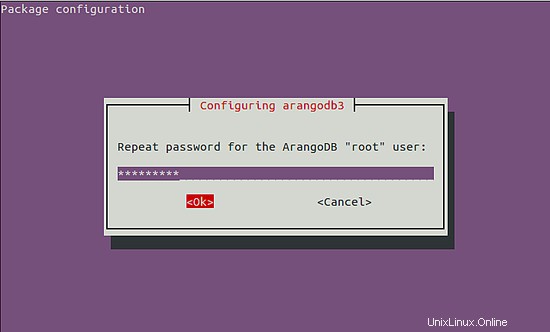
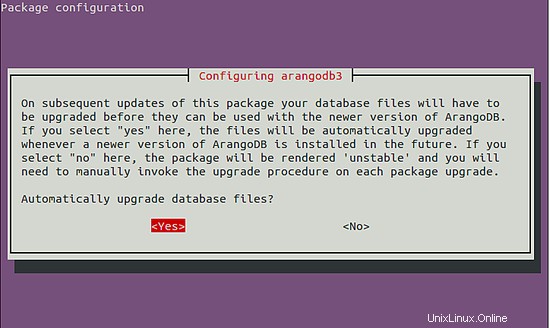
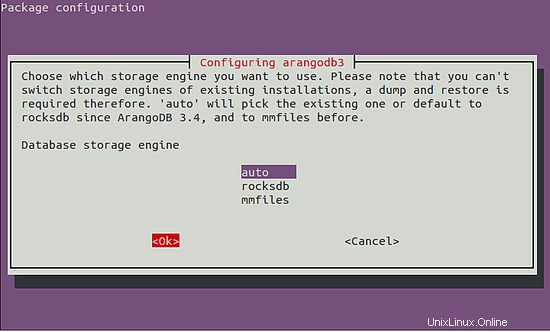
Durante l'installazione, dovrai rispondere ad alcune domande:
Impostare la password di root del database come mostrato di seguito:
Seleziona l'aggiornamento automatico dei file di database come mostrato di seguito:
Seleziona il motore di archiviazione del database come mostrato di seguito:
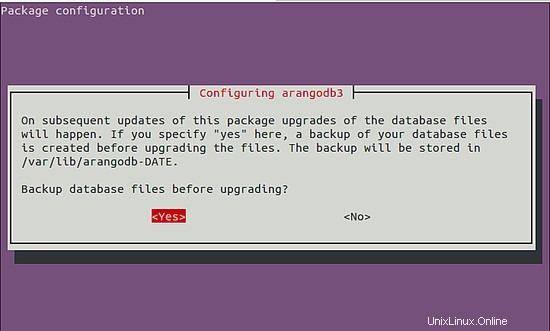
Eseguire il backup del database prima di eseguire un aggiornamento come mostrato di seguito:
Una volta completata l'installazione, avvia il servizio ArangoDB e abilitalo all'avvio all'avvio con il seguente comando:
systemctl start arangodb3
systemctl enable arangodb3
Puoi controllare lo stato di ArangoDB con il seguente comando:
systemctl status arangodb3
Dovresti vedere il seguente output:
? arangodb3.service - ArangoDB database server
   Loaded: loaded (/lib/systemd/system/arangodb3.service; enabled; vendor preset: enabled)
   Active: active (running) since Tue 2019-05-07 16:00:21 UTC; 2min 57s ago
 Main PID: 14070 (arangod)
    Tasks: 18 (limit: 131072)
   CGroup: /system.slice/arangodb3.service
           ??14070 /usr/sbin/arangod --uid arangodb --gid arangodb --pid-file /var/run/arangodb3/arangod.pid --temp.path /var/tmp/arangodb3 --l

May 07 16:00:21 ubuntu1804 arangod[14070]: 2019-05-07T16:00:21Z [14070] INFO ArangoDB 3.4.5 [linux] 64bit, using jemalloc, build tags/v3.4.5-0-
May 07 16:00:21 ubuntu1804 arangod[14070]: 2019-05-07T16:00:21Z [14070] INFO detected operating system: Linux version 4.15.0-20-generic (buildd
May 07 16:00:21 ubuntu1804 arangod[14070]: 2019-05-07T16:00:21Z [14070] INFO {authentication} Jwt secret not specified, generating...
May 07 16:00:21 ubuntu1804 arangod[14070]: 2019-05-07T16:00:21Z [14070] INFO using storage engine rocksdb
May 07 16:00:21 ubuntu1804 arangod[14070]: 2019-05-07T16:00:21Z [14070] INFO {cluster} Starting up with role SINGLE
May 07 16:00:21 ubuntu1804 arangod[14070]: 2019-05-07T16:00:21Z [14070] INFO {syscall} file-descriptors (nofiles) hard limit is 131072, soft li
May 07 16:00:21 ubuntu1804 arangod[14070]: 2019-05-07T16:00:21Z [14070] WARNING {threads} --server.threads (64) is more than eight times the nu
May 07 16:00:22 ubuntu1804 arangod[14070]: 2019-05-07T16:00:22Z [14070] INFO {authentication} Authentication is turned on (system only), authen
May 07 16:00:25 ubuntu1804 arangod[14070]: 2019-05-07T16:00:25Z [14070] INFO using endpoint 'http+tcp://127.0.0.1:8529' for non-encrypted reque
May 07 16:00:27 ubuntu1804 arangod[14070]: 2019-05-07T16:00:27Z [14070] INFO ArangoDB (version 3.4.5 [linux]) is ready for business. Have fun!
Puoi anche proteggere ArangoDB eseguendo lo script arango-secure-installation.
Innanzitutto, arresta il servizio ArangoDB con il seguente comando:
systemctl stop arangodb3
Quindi, proteggi ArangoDB con il seguente comando:
arango-secure-installation
 Please enter password for root user:
 Repeat password:
Fornisci la tua radice e premi Invio, dovresti vedere il seguente output:
2019-05-07T16:03:53Z [14322] INFO {syscall} file-descriptors (nofiles) hard limit is 1048576, soft limit is 1048576
2019-05-07T16:03:53Z [14322] WARNING {threads} --server.threads (64) is more than eight times the number of cores (1), this might overload the server
2019-05-07T16:03:55Z [14322] INFO Password changed.
2019-05-07T16:03:55Z [14322] INFO {startup} server will now shut down due to upgrade, database initialization or admin restoration.
Lavorare con ArangoDB
ArangoDB è ora installato e funzionante. Ora puoi avviare la shell ArangoDB con il seguente comando:
arangosh
 Please specify a password:
Dopo aver fornito la password di root, dovresti vedere il seguente output:
                                       _
  __ _ _ __ __ _ _ __   __ _  ___  ___| |__
 / _` | '__/ _` | '_ \ / _` |/ _ \/ __| '_ \
| (_| | | | (_| | | | | (_| | (_) \__ \ | | |
 \__,_|_|  \__,_|_| |_|\__, |\___/|___/_| |_|
                       |___/

arangosh (ArangoDB 3.4.5 [linux] 64bit, using jemalloc, build tags/v3.4.5-0-g648fbb8191, VPack 0.1.33, RocksDB 5.16.0, ICU 58.1, V8 5.7.492.77, OpenSSL 1.1.0j  20 Nov 2018)
Copyright (c) ArangoDB GmbH

Command-line history will be persisted when the shell is exited.
Connected to ArangoDB 'http+tcp://127.0.0.1:8529' version: 3.4.5 [SINGLE, server], database: '_system', username: 'root'

Type 'tutorial' for a tutorial or 'help' to see common examples
127.0.0.1:[email protected]_system>
Ora, crea un database di esempio con nome mydb usando il seguente comando:
127.0.0.1:[email protected]_system> db._createDatabase("mydb"); Quindi, crea l'utente del database e imposta la password con il seguente comando:
127.0.0.1:[email protected]_system> var users = require("@arangodb/users");
 127.0.0.1:[email protected]_system> users.save("[email protected]", "password");
 {
 "user" : "[email protected]",
 "active" : true,
 "extra" : {
 },
 "code" : 201
 }
Quindi, concedi l'accesso al database con il seguente comando:
127.0.0.1:[email protected]_system> users.grantDatabase("[email protected]", "mydb"); Quindi, elenca il tuo database con il seguente comando:
127.0.0.1:[email protected]_system> db._databases()
Uscita:
[
  "_system",
  "mydb"
]
Quindi, connettiti al tuo database mydb usando myuser con il seguente comando:
arangosh --server.username "[email protected]" --server.database mydb
 Please specify a password:
Fornisci la tua password utente e premi Invio, dovresti vedere il seguente output:
                                       _
  __ _ _ __ __ _ _ __   __ _  ___  ___| |__
 / _` | '__/ _` | '_ \ / _` |/ _ \/ __| '_ \
| (_| | | | (_| | | | | (_| | (_) \__ \ | | |
 \__,_|_|  \__,_|_| |_|\__, |\___/|___/_| |_|
                       |___/

arangosh (ArangoDB 3.4.5 [linux] 64bit, using jemalloc, build tags/v3.4.5-0-g648fbb8191, VPack 0.1.33, RocksDB 5.16.0, ICU 58.1, V8 5.7.492.77, OpenSSL 1.1.0j  20 Nov 2018)
Copyright (c) ArangoDB GmbH

Command-line history will be persisted when the shell is exited.
Connected to ArangoDB 'http+tcp://127.0.0.1:8529' version: 3.4.5 [SINGLE, server], database: 'mydb', username: '[email protected]'

Type 'tutorial' for a tutorial or 'help' to see common examples
127.0.0.1:[email protected]>
Accedi all'interfaccia web di ArangoDB
ArangoDB è ora installato e configurato, è ora di accedere all'interfaccia web di ArangoDB. L'interfaccia web di ArangoDB può essere utilizzata per gestire database, raccolte, documenti, utenti, grafici e controllare lo stato del server.
Per impostazione predefinita, ArangoDB è configurato per accedere solo da localhost. Quindi, dovrai configurare ArangoDB per accedere da una posizione remota. Puoi farlo modificando il file /etc/arangodb3/arangod.conf:
nano /etc/arangodb3/arangod.conf
Modifica la seguente riga:
Da :
endpoint = tcp://127.0.0.1:8529
a
endpoint = tcp://192.168.0.104:8529
Salva e chiudi il file, quando hai finito. Quindi, riavvia il servizio ArangoDB per applicare tutte queste modifiche:
systemctl restart arangodb3
Ora apri il tuo browser web e digita l'URL http://192.168.0.104:8529. Verrai reindirizzato alla seguente pagina:

Ora, fornisci il tuo nome utente e password di root. Quindi, fai clic su Accedi pulsante. Dovresti vedere la seguente pagina:

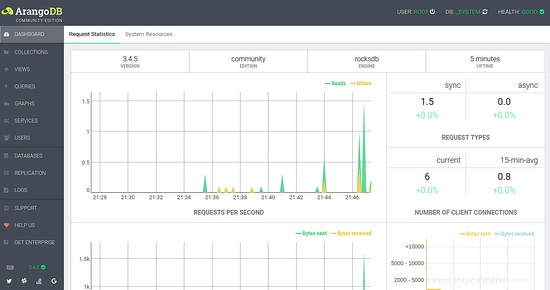
Ora seleziona il database e fai clic su Seleziona DB . Dovresti vedere la dashboard di ArangoDB nella pagina seguente:
Congratulazioni! hai installato e configurato correttamente ArangoDB sul server Ubuntu 18.04. Sentiti libero di chiedermi se hai domande.