Roundcube è una soluzione webmail gratuita e open source scritta in PHP. È un client IMAP basato sul Web, quindi puoi anche accedere al tuo server di posta elettronica dal tuo browser web. Non è necessario leggere e inviare e-mail da un client di posta desktop. Questo tutorial mostra come installare RoundCube con il server web Apache e protetto da un certificato SSL Let's encrypt su Ubuntu 18.04 LTS (Bionic Beaver).
Funzionalità RoundCube
- Supporto MIME, ricerca messaggi e controllo ortografico.
- Integrazione della directory LDAP per le rubriche.
- Supporta più lingue.
- Supporto per cartelle condivise/globali e ACL IMAP.
- Memorizzazione nella cache integrata per un rapido accesso alla casella di posta.
- Supporto per server SMTP esterno e IDNA.
Requisiti
- Un server che esegue Ubuntu 18.04 LTS.
- Un utente non root con privilegi sudo.
Installa il server LAMP
Prima di iniziare, dovresti aggiornare l'elenco dei pacchetti e installare gli aggiornamenti in sospeso:
sudo apt-get update
sudo apt-get upgrade
Quindi, installa Apache e MariaDB con il seguente comando:
sudo apt-get install apache2 mariadb-server php7.2 php7.2-gd php-mysql php7.2-curl php7.2-zip php7.2-ldap php7.2-mbstring php-imagick php7.2-intl php7.2-xml unzip wget curl -y
Una volta installati tutti i pacchetti, dovrai modificare l'impostazione del fuso orario nel file php.ini. Puoi farlo con il seguente comando:
sudo nano /etc/php/7.2/apache2/php.ini
Apporta le seguenti modifiche:
date.timezone = Europe/Berlin
Salva e chiudi il file, quindi avvia il servizio Apache e MariaDB e consenti loro di avviarsi all'avvio utilizzando il seguente comando:
sudo systemctl start apache2
sudo systemctl enable apache2
sudo systemctl start mariadb
sudo systemctl enable mariadb
Scarica Roundcube
Innanzitutto, dovrai scaricare l'ultima versione di Roundcube sul tuo sistema. Puoi scaricarlo con il seguente comando:
cd /tmp
wget https://github.com/roundcube/roundcubemail/releases/download/1.3.8/roundcubemail-1.3.8-complete.tar.gz
Una volta completato il download, estrai il file scaricato con il seguente comando:
tar -xvzf roundcubemail-1.3.8-complete.tar.gz
Quindi, sposta la directory estratta nella directory principale web di Apache:
mv roundcubemail-1.3.8 /var/www/html/roundcube
Quindi, dai le autorizzazioni appropriate alla directory roundcube:
sudo chown -R www-data:www-data /var/www/html/roundcube
sudo chmod -R 775 /var/www/html/roundcube
Configura il database
Per impostazione predefinita, l'installazione di MariaDB non è protetta. Quindi dovrai prima proteggerlo. Puoi proteggerlo eseguendo il seguente script:
mysql_secure_installation
Rispondi a tutte le domande come mostrato di seguito:
Change the password for root ? N
Remove anonymous users? Y
Disallow root login remotely? Y
Remove test database and access to it? Y
Reload privilege tables now? Y
Una volta che MariaDB è protetto, accedi alla shell di MariaDB usando il seguente comando:
mysql -u root -p
Inserisci la tua password di root, quindi crea un database e un utente per Roundcube:
MariaDB [(none)]> CREATE DATABASE roundcubedb;
MariaDB [(none)]> CREATE USER 'roundcube'@'localhost' IDENTIFIED BY 'password';
MariaDB [(none)]> GRANT ALL PRIVILEGES ON roundcubedb.* to 'roundcube'@'localhost';
Sostituisci la parola "password" con una password sicura a tua scelta e ricorda questa password, ne avremo bisogno per l'installazione di roundcube in seguito. Quindi, svuota i privilegi ed esci dalla shell MariaDB usando il seguente comando:
MariaDB [(none)]> FLUSH PRIVILEGES;
MariaDB [(none)]> exit;
Successivamente, è necessario importare le tabelle iniziali nel database roundcubedb. Puoi farlo usando il seguente comando:
cd /var/www/html/roundcube
mysql -u roundcube -p roundcubedb < SQL/mysql.initial.sql
Digitare la password utente del database roundcube quando richiesto.
Configura Apache per Roundcube
Successivamente, dovrai creare un file host virtuale Apache per Roundcube. Puoi farlo con il seguente comando:
sudo nano /etc/apache2/sites-available/roundcube.conf
Aggiungi le seguenti righe:
<VirtualHost *:80>
        ServerName example.com
        ServerAdmin [email protected]
        DocumentRoot /var/www/html/roundcube

        ErrorLog ${APACHE_LOG_DIR}/roundcube_error.log
        CustomLog ${APACHE_LOG_DIR}/roundcube_access.log combined

        <Directory /var/www/html/roundcube>
                Options -Indexes
                AllowOverride All
                Order allow,deny
                allow from all
        </Directory>
</VirtualHost>
sostituisci esempio.com con il tuo nome di dominio. Salva e chiudi il file, quindi abilita il file host virtuale utilizzando il comando seguente:
sudo a2ensite roundcube
Quindi, abilita il modulo di riscrittura di Apache e riavvia il server Apache con il seguente comando:
sudo a2enmod rewrite
sudo systemctl restart apache2
Abilita SSL con Let's encrypt per RoundCube
In questo passaggio, abiliteremo SSL per RoundCube utilizzando un certificato SSL Let's encrypt gratuito. Il primo passo è installare il client Let's encrypt di certbot che utilizzeremo per ottenere il certificato SSL.
sudo apt-get install certbot python-certbot-apache
Richiedi il certificato SSL con questo comando:
sudo certbot --apache
IMPORTANTE:il nome di dominio o il sottodominio che utilizzi per il sito Web RoundCube deve essere accessibile da Internet per ottenere un certificato SSL. Certbot ora farà alcune domande. Vedi le risposte in rosso.
[email protected]: certbot --apache
Saving debug log to /var/log/letsencrypt/letsencrypt.log
Plugins selected: Authenticator apache, Installer apache
Enter email address (used for urgent renewal and security notices) (Enter 'c' to
cancel): [email protected]
-------------------------------------------------------------------------------
Please read the Terms of Service at
https://letsencrypt.org/documents/LE-SA-v1.2-November-15-2017.pdf. You must
agree in order to register with the ACME server at
https://acme-v01.api.letsencrypt.org/directory
-------------------------------------------------------------------------------
(A)gree/(C)ancel: a
-------------------------------------------------------------------------------
Would you be willing to share your email address with the Electronic Frontier
Foundation, a founding partner of the Let's Encrypt project and the non-profit
organization that develops Certbot? We'd like to send you email about EFF and
our work to encrypt the web, protect its users and defend digital rights.
-------------------------------------------------------------------------------
(Y)es/(N)o: n
Which names would you like to activate HTTPS for?
-------------------------------------------------------------------------------
1: roundcube.example.com
-------------------------------------------------------------------------------
Select the appropriate numbers separated by commas and/or spaces, or leave input
blank to select all options shown (Enter 'c' to cancel): 1
Obtaining a new certificate
Performing the following challenges:
http-01 challenge for roundcube.example.com
Waiting for verification...
Cleaning up challenges
Created an SSL vhost at /etc/apache2/sites-available/roundcube-le-ssl.conf
Enabled Apache socache_shmcb module
Enabled Apache ssl module
Deploying Certificate to VirtualHost /etc/apache2/sites-available/roundcube-le-ssl.conf
Enabling available site: /etc/apache2/sites-available/roundcube-le-ssl.conf
Please choose whether or not to redirect HTTP traffic to HTTPS, removing HTTP access.
-------------------------------------------------------------------------------
1: No redirect - Make no further changes to the webserver configuration.
2: Redirect - Make all requests redirect to secure HTTPS access. Choose this for
new sites, or if you're confident your site works on HTTPS. You can undo this
change by editing your web server's configuration.
-------------------------------------------------------------------------------
Select the appropriate number [1-2] then [enter] (press 'c' to cancel): 2
Redirecting vhost in /etc/apache2/sites-enabled/roundcube.conf to ssl vhost in /etc/apache2/sites-available/roundcube-le-ssl.conf
-------------------------------------------------------------------------------
Congratulations! You have successfully enabled https://roundcube.example.com
You should test your configuration at:
https://www.ssllabs.com/ssltest/analyze.html?d=roundcube.example.com
-------------------------------------------------------------------------------
IMPORTANT NOTES:
- Congratulations! Your certificate and chain have been saved at:
/etc/letsencrypt/live/roundcube.example.com/fullchain.pem
Your key file has been saved at:
/etc/letsencrypt/live/roundcube.example.com/privkey.pem
Your cert will expire on 2019-06-25. To obtain a new or tweaked
version of this certificate in the future, simply run certbot again
with the "certonly" option. To non-interactively renew *all* of
your certificates, run "certbot renew"
- Your account credentials have been saved in your Certbot
configuration directory at /etc/letsencrypt. You should make a
secure backup of this folder now. This configuration directory will
also contain certificates and private keys obtained by Certbot so
making regular backups of this folder is ideal.
- If you like Certbot, please consider supporting our work by:
Donating to ISRG / Let's Encrypt: https://letsencrypt.org/donate
Donating to EFF: https://eff.org/donate-le
Il vhost RoundCube è ora accessibile da https.
Accedi alla Webmail
Ora apri il tuo browser web e digita l'URL https://example.com/installer (sostituisci esempio.com con il tuo nome di dominio nell'URL!). Verrai reindirizzato alla seguente pagina:
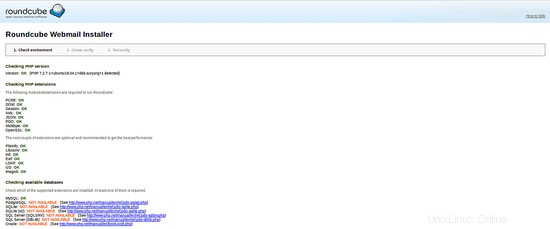

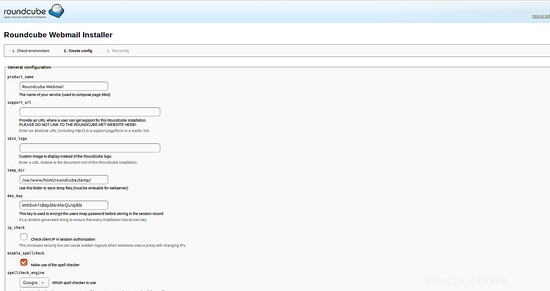
Una volta completati tutti i requisiti, fai clic su Avanti pulsante. Dovresti vedere la seguente pagina:
Configurazione generale:
Impostazioni di registrazione e database:
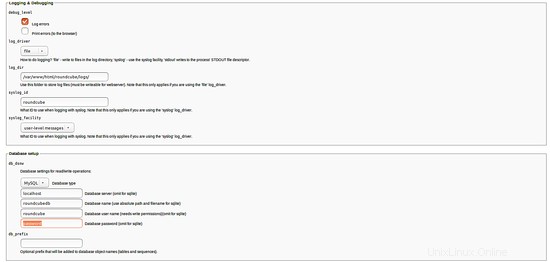
Inserisci qui i dettagli del database del roundcubedb che hai creato nella fase di configurazione del database.
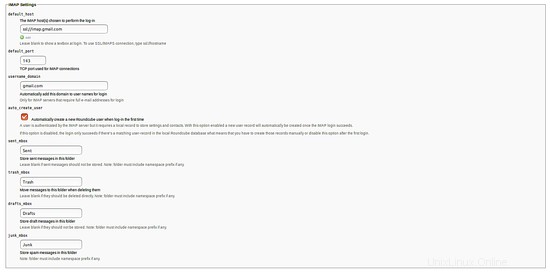
Impostazioni SMTP e IMAP:

Plugin:
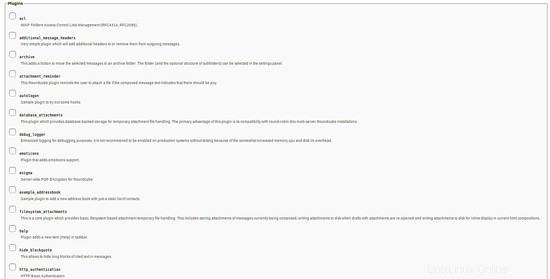
Qui, fornisci tutti i dettagli secondo le tue necessità, quindi fai clic su CREA CONFIG pulsante. Dovresti vedere la seguente pagina:

Quindi, fai clic su Continua pulsante. Dovresti vedere la seguente pagina:
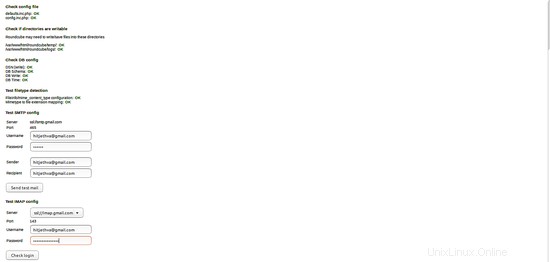
Ora, fai clic su Verifica accesso pulsante. Dopo aver completato l'installazione, rimuovere la directory /var/www/html/roundcube/installer:
sudo rm -rf /var/www/html/roundcube/installer
Ora accedi alla tua webmail utilizzando l'URL http://tuo-indirizzo-ip o http://tuo-dominio.com e accedi utilizzando la tua email.
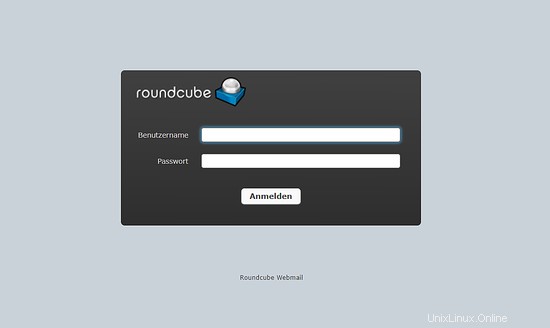
RoundCube è stato installato con successo su Ubuntu 18.04 LTS.