Questo articolo riguarda il protocollo di tunneling di livello 2 (L2TP) con IPsec per fornire la crittografia end-to-end nella VPN di livello 2 perché le funzionalità di sicurezza non sono disponibili in L2TP. Le implementazioni open source di IPsec sono StrongSwan e OpenSwan, entrambe sono supportate su tutte le distribuzioni Linux. In questo tutorial, OpenSwan viene utilizzato per fornire il canale di sicurezza per L2TP VPN. Freeradius è un noto strumento open source che fornisce diversi tipi di autenticazione per gli utenti. Freeradius viene utilizzato per autenticare l'utente VPN L2TP prima di stabilire un canale sicuro. Un client basato su Android verrà utilizzato per il tunnel sicuro basato su L2TP.
Installazione dei pacchetti richiesti
I seguenti pacchetti importanti verranno installati su Ubuntu 16.04 LTS.
- Server/Client Freeradius
- Server Poptop
- xl2tpd
- Openswan per IPsec
- Server/client MySQL
- Bison &Flex
- Libreria di sviluppo GMP
Come mostrato di seguito, la maggior parte dei pacchetti richiesti sono tutti disponibili nel repository LTS di Ubuntu 16.04.
apt-get update

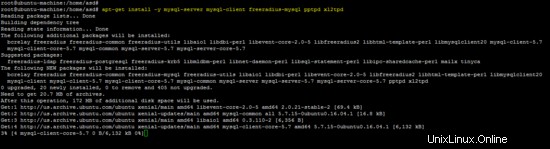
apt-get install -y mysql-server mysql-client freeradius-mysql pptpd xl2tpd
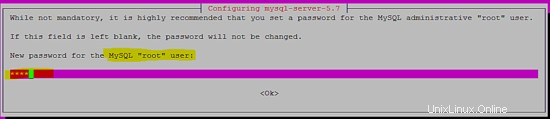
Lo screenshot seguente mostra come viene impostata la password per l'utente "root" del server di database MySQL durante il processo di installazione.
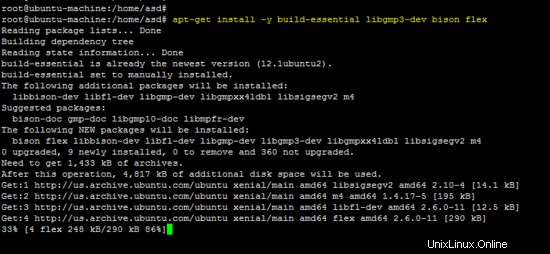
I seguenti pacchetti sono richiesti per l'installazione di OpenSwan dal sorgente sulla piattaforma Ubuntu 16.04.
apt-get install -y build-essential libgmp3-dev bison flex
Il client Freeradius ei pacchetti OpenSwan non sono disponibili nel repository, quindi entrambi gli strumenti sono stati installati dal sorgente.
Installazione del client Freeradius
Scarica l'ultimo client Freeradius dal seguente link:
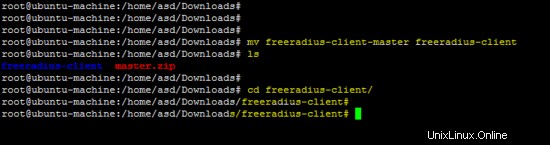
wget https://github.com/FreeRADIUS/freeradius-client/archive/master.zip
unzip master.zip
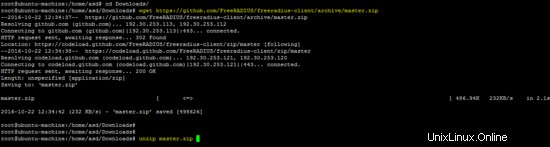
mv freeradius-client-master freeradius-client
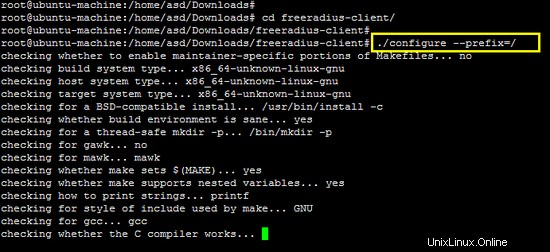
cd freeradius-client
Innanzitutto, esegui lo script configure con l'opzione del prefisso e installa il software utilizzando il comando make.
./configure --prefix=/
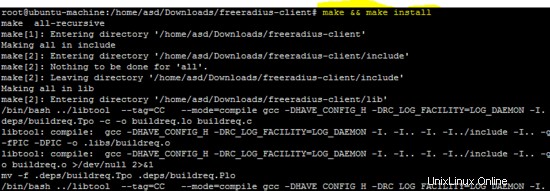
make && make install
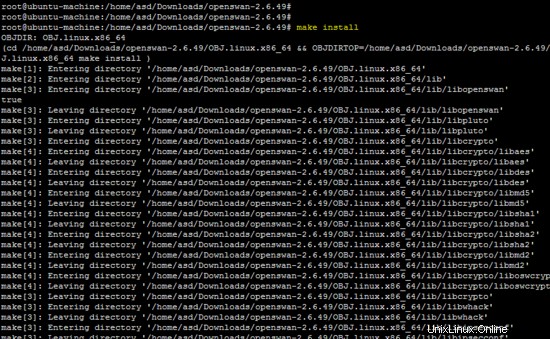
Installazione di OpenSwan
Il codice sorgente dello strumento OpenSwan IPsec è disponibile al seguente link. Scarica l'archivio e decomprimilo.
wget https://download.openswan.org/openswan/openswan-latest.tar.gz
tar -xzf openswan-latest.tar.gz
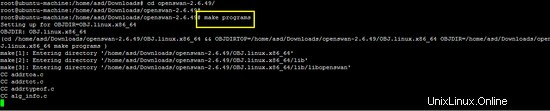
cd openswan-*

Esegui il comando seguente per compilare e installare OpenSwan.
make programs
make install
Configurazione
Prima di iniziare con la configurazione dei pacchetti installati, sulla piattaforma Ubuntu sono necessarie le seguenti configurazioni di base (iptables e sysctl).
Inserisci le seguenti regole iptables per entrambe le reti (10.20.30.0/24 e 10.10.10.0/24) sul terminale.
iptables -t nat -I POSTROUTING -s 10.20.30.0/24 -j SNAT --to 192.168.15.4
iptables -t nat -I POSTROUTING -s 10.10.10.0/24 -j SNAT --to 192.168.15.4

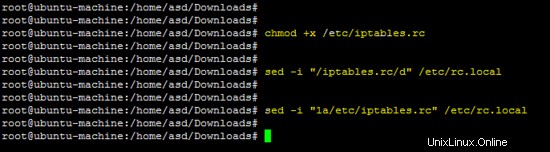
Le regole di cui sopra devono essere salvate in /etc/iptables.rc per applicarli all'avvio.

chmod +x /etc/iptables.rc
sed -i "/iptables.rc/d" /etc/rc.local
sed -i "1a/etc/iptables.rc" /etc/rc.local
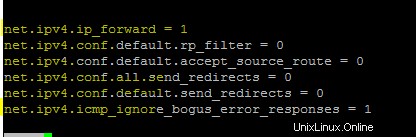
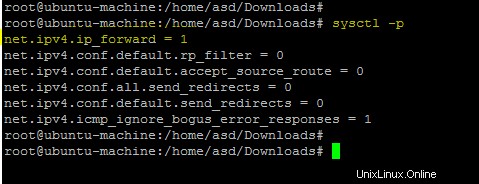
Aggiungi le seguenti righe in /etc/sysctl.conf file per abilitare l'inoltro sulla macchina Linux.
net.ipv4.ip_forward = 1
net.ipv4.conf.default.rp_filter = 0
net.ipv4.conf.default.accept_source_route = 0
net.ipv4.conf.all.send_redirects = 0
net.ipv4.conf.default.send_redirects = 0
net.ipv4.icmp_ignore_bogus_error_responses = 1
Esegui il comando seguente per applicare le modifiche.
sysctl -p
Configurazione del server Freeradius
Esegui il comando seguente per modificare la password per freeradius.
sed -i "s/PASSWORD('radpass')/PASSWORD('test')/g" /etc/freeradius/sql/mysql/admin.sql
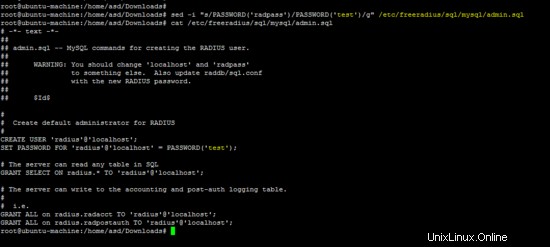
I seguenti comandi MySQL configureranno il server Freeradius su Ubuntu.
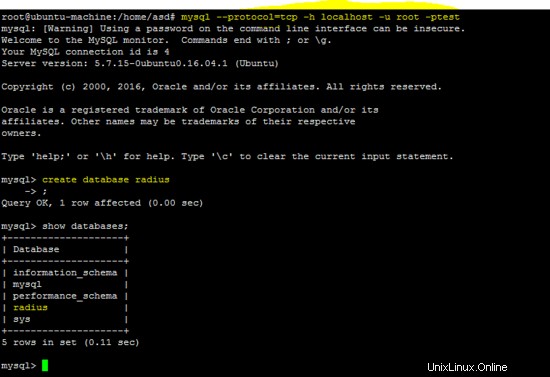
mysql --protocol=tcp -h localhost -u root -ptest
create database radius # create DB radius
mysql --protocol=tcp -h localhost -u root -ptest raggio

mysql --protocol=tcp -h localhost -u root -ptest radius < /etc/freeradius/sql/mysql/cui.sql

Aggiunta di una data corretta per risolvere il problema relativo al valore predefinito non valido in /etc/freeradius/sql/mysql/cui.sql .
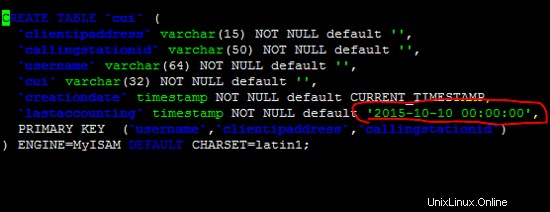
Dopo la correzione in /etc/freeradius/sql/mysql/cui.sql file ed esegui nuovamente il comando precedente per correggere l'errore precedente.

mysql --protocol=tcp -h localhost -u root -ptest radius < /etc/freeradius/sql/mysql/ippool.sql

mysql --protocol=tcp -h localhost -u root -ptest radius < /etc/freeradius/sql/mysql/nas.sql

mysql --protocol=tcp -h localhost -u root -ptest radius < /etc/freeradius/sql/mysql/schema.sql

mysql --protocol=tcp -h localhost -u root -ptest radius < /etc/freeradius/sql/mysql/wimax.sql

Esegui il seguente comando sed per modificare la password predefinita dell'utente "radius". In questo tutorial, la password per l'utente "raggio" è "test". Scegli una password sicura sul tuo server.
sed -i "s/password = \"radpass\"/password = \"test\"/g" /etc/freeradius/sql.conf
Creazione di un collegamento software per la configurazione sql nella directory dei moduli del server Freeradius.
ln -sf /etc/freeradius/sql.conf /etc/freeradius/modules/sql

I seguenti file non sono presenti su Ubuntu 16.04, quindi creare tutti i file richiesti con il contenuto descritto .
- /etc/freeradius/modules/hourlytraffic
- /etc/freeradius/modules/dailytraffic
- /etc/freeradius/modules/monthlytraffic
/etc/freeradius/modules/hourlytraffic
sqlcounter hourlytrafficcounter {
    counter-name = Hourly-Traffic
    check-name = Hourly-Traffic
    sqlmod-inst = sql
    key = User-Name
    reset = 1h
    query = "SELECT SUM(acctinputoctets + acctoutputoctets) DIV 1048576 FROM radacct WHERE UserName='%{%k}' AND UNIX_TIMESTAMP(AcctStartTime) > '%b'"
}

/etc/freeradius/modules/dailytraffic
sqlcounter dailytrafficcounter {
    counter-name = Daily-Traffic
    check-name = Daily-Traffic
    sqlmod-inst = sql
    key = User-Name
    reset = daily
    query = "SELECT SUM(acctinputoctets + acctoutputoctets) DIV 1048576 FROM radacct WHERE UserName='%{%k}' AND UNIX_TIMESTAMP(AcctStartTime) > '%b'"
}

/etc/freeradius/modules/monthlytraffic
sqlcounter monthlytrafficcounter {
    counter-name = Monthly-Traffic
    check-name = Monthly-Traffic
    sqlmod-inst = sql
    key = User-Name
    reset = monthly
    query = "SELECT SUM(acctinputoctets + acctoutputoctets) DIV 1048576 FROM radacct WHERE UserName='%{%k}' AND UNIX_TIMESTAMP(AcctStartTime) > '%b'"
}

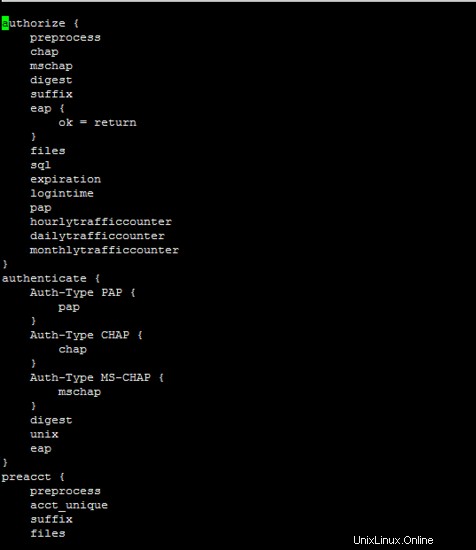
Il seguente file è importante per la configurazione del server freeradius. Le nostre configurazioni in esecuzione sono riportate di seguito.
/etc/freeradius/sites-enabled/default
authorize {
    preprocess
    chap
    mschap
    digest
    suffix
    eap {
        ok = return
    }
    files
    sql
    expiration
    logintime
    pap
    hourlytrafficcounter
    dailytrafficcounter
    monthlytrafficcounter
}
authenticate {
    Auth-Type PAP {
        pap
    }
    Auth-Type CHAP {
        chap
    }
    Auth-Type MS-CHAP {
        mschap
    }
    digest
    unix
    eap
}
preacct {
    preprocess
    acct_unique
    suffix
    files
}
accounting {
    detail
    unix
    radutmp
    sql
    exec
    attr_filter.accounting_response
}
session {
    radutmp
    sql
}
post-auth {
    sql
    exec
    Post-Auth-Type REJECT {
        attr_filter.access_reject
    }
}
pre-proxy {
}
post-proxy {
    eap
}
Utilizzare il comando seguente per riavviare il server freeradius e per verificare la configurazione.
/etc/init.d/freeradius restart
Configurazione del client Freeradius
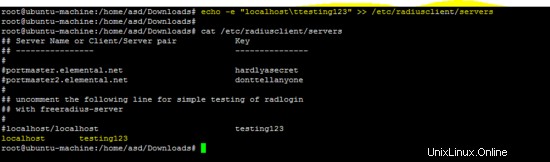
Il comando seguente imposta il nome host e il segreto nel file "server" del client freeradius.
echo -e "localhost\ttesting123" >> /etc/radiusclient/servers
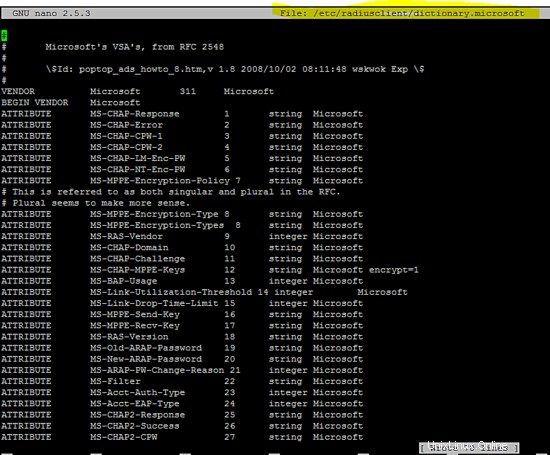
Crea il file di configurazione dictionary.microsoft per i client basati su Windows.
vi /etc/radiusclient/dictionary.microsoft
#
#       Microsoft's VSA's, from RFC 2548
#
#       \$Id: poptop_ads_howto_8.htm,v 1.8 2008/10/02 08:11:48 wskwok Exp \$
#
VENDOR          Microsoft       311     Microsoft
BEGIN VENDOR    Microsoft
ATTRIBUTE       MS-CHAP-Response        1       string  Microsoft
ATTRIBUTE       MS-CHAP-Error           2       string  Microsoft
ATTRIBUTE       MS-CHAP-CPW-1           3       string  Microsoft
ATTRIBUTE       MS-CHAP-CPW-2           4       string  Microsoft
ATTRIBUTE       MS-CHAP-LM-Enc-PW       5       string  Microsoft
ATTRIBUTE       MS-CHAP-NT-Enc-PW       6       string  Microsoft
ATTRIBUTE       MS-MPPE-Encryption-Policy 7     string  Microsoft
# This is referred to as both singular and plural in the RFC.
# Plural seems to make more sense.
ATTRIBUTE       MS-MPPE-Encryption-Type 8       string  Microsoft
ATTRIBUTE       MS-MPPE-Encryption-Types  8     string  Microsoft
ATTRIBUTE       MS-RAS-Vendor           9       integer Microsoft
ATTRIBUTE       MS-CHAP-Domain          10      string  Microsoft
ATTRIBUTE       MS-CHAP-Challenge       11      string  Microsoft
ATTRIBUTE       MS-CHAP-MPPE-Keys       12      string  Microsoft encrypt=1
ATTRIBUTE       MS-BAP-Usage            13      integer Microsoft
ATTRIBUTE       MS-Link-Utilization-Threshold 14 integer        Microsoft
ATTRIBUTE       MS-Link-Drop-Time-Limit 15      integer Microsoft
ATTRIBUTE       MS-MPPE-Send-Key        16      string  Microsoft
ATTRIBUTE       MS-MPPE-Recv-Key        17      string  Microsoft
ATTRIBUTE       MS-RAS-Version          18      string  Microsoft
ATTRIBUTE       MS-Old-ARAP-Password    19      string  Microsoft
ATTRIBUTE       MS-New-ARAP-Password    20      string  Microsoft
ATTRIBUTE       MS-ARAP-PW-Change-Reason 21     integer Microsoft
ATTRIBUTE       MS-Filter               22      string  Microsoft
ATTRIBUTE       MS-Acct-Auth-Type       23      integer Microsoft
ATTRIBUTE       MS-Acct-EAP-Type        24      integer Microsoft
ATTRIBUTE       MS-CHAP2-Response       25      string  Microsoft
ATTRIBUTE       MS-CHAP2-Success        26      string  Microsoft
ATTRIBUTE       MS-CHAP2-CPW            27      string  Microsoft
ATTRIBUTE       MS-Primary-DNS-Server   28      ipaddr
ATTRIBUTE       MS-Secondary-DNS-Server 29      ipaddr
ATTRIBUTE       MS-Primary-NBNS-Server  30      ipaddr Microsoft
ATTRIBUTE       MS-Secondary-NBNS-Server 31     ipaddr Microsoft
#ATTRIBUTE      MS-ARAP-Challenge       33      string  Microsoft
#
#       Integer Translations
#
#       MS-BAP-Usage Values
VALUE           MS-BAP-Usage            Not-Allowed     0
VALUE           MS-BAP-Usage            Allowed         1
VALUE           MS-BAP-Usage            Required        2
#       MS-ARAP-Password-Change-Reason Values
VALUE   MS-ARAP-PW-Change-Reason        Just-Change-Password            1
VALUE   MS-ARAP-PW-Change-Reason        Expired-Password                2
VALUE   MS-ARAP-PW-Change-Reason        Admin-Requires-Password-Change  3
VALUE   MS-ARAP-PW-Change-Reason        Password-Too-Short              4
#       MS-Acct-Auth-Type Values
VALUE           MS-Acct-Auth-Type       PAP             1
VALUE           MS-Acct-Auth-Type       CHAP            2
VALUE           MS-Acct-Auth-Type       MS-CHAP-1       3
VALUE           MS-Acct-Auth-Type       MS-CHAP-2       4
VALUE           MS-Acct-Auth-Type       EAP             5
#       MS-Acct-EAP-Type Values
VALUE           MS-Acct-EAP-Type        MD5             4
VALUE           MS-Acct-EAP-Type        OTP             5
VALUE           MS-Acct-EAP-Type        Generic-Token-Card      6
VALUE           MS-Acct-EAP-Type        TLS             13
END-VENDOR Microsoft
vi /etc/radiusclient/dictionary.merit
#
#       Experimental extensions, configuration only (for check-items)
#       Names/numbers as per the MERIT extensions (if possible).
#
ATTRIBUTE       NAS-Identifier          32      string
ATTRIBUTE       Proxy-State             33      string
ATTRIBUTE       Login-LAT-Service       34      string
ATTRIBUTE       Login-LAT-Node          35      string
ATTRIBUTE       Login-LAT-Group         36      string
ATTRIBUTE       Framed-AppleTalk-Link   37      integer
ATTRIBUTE       Framed-AppleTalk-Network 38     integer
ATTRIBUTE       Framed-AppleTalk-Zone   39      string
ATTRIBUTE       Acct-Input-Packets      47      integer
ATTRIBUTE       Acct-Output-Packets     48      integer
# 8 is a MERIT extension.
VALUE           Service-Type            Authenticate-Only       8
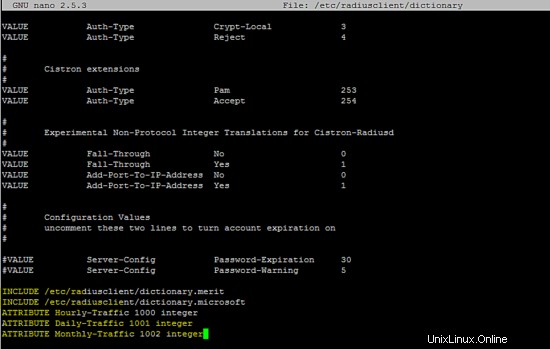
Aggiungi le seguenti righe a /etc/radiusclient/dictionary file.
INCLUDE /etc/radiusclient/dictionary.merit
INCLUDE /etc/radiusclient/dictionary.microsoft
ATTRIBUTE Hourly-Traffic 1000 integer
ATTRIBUTE Daily-Traffic 1001 integer
ATTRIBUTE Monthly-Traffic 1002 integer
Quella seguente è la configurazione di esecuzione del client radius.
/etc/radiusclient/radiusclient.conf
# General settings
# specify which authentication comes first respectively which
# authentication is used. possible values are: "radius" and "local".
# if you specify "radius,local" then the RADIUS server is asked
# first then the local one. if only one keyword is specified only
# this server is asked.
auth_order    radius,local
# maximum login tries a user has
login_tries    4
# timeout for all login tries
# if this time is exceeded the user is kicked out
login_timeout    60
# name of the nologin file which when it exists disables logins. it may
# be extended by the ttyname which will result in
#a terminal specific lock (e.g. /etc/nologin.ttyS2 will disable
# logins on /dev/ttyS2)
nologin /etc/nologin
# name of the issue file. it's only display when no username is passed
# on the radlogin command line
issue    /etc/radiusclient/issue
seqfile /var/run/freeradius/freeradius.pid

## RADIUS listens separated by a colon from the hostname. if
# no port is specified /etc/services is consulted of the radius
authserver     localhost
# RADIUS server to use for accouting requests. All that I
# said for authserver applies, too.
acctserver     localhost

# file holding shared secrets used for the communication
# between the RADIUS client and server
servers        /etc/radiusclient/servers
# dictionary of allowed attributes and values just like in the normal
# RADIUS distributions
dictionary     /etc/radiusclient/dictionary

# program to call for a RADIUS authenticated login
login_radius    /sbin/login.radius
# file which specifies mapping between ttyname and NAS-Port attribute
mapfile        /etc/radiusclient/port-id-map
# default authentication realm to append to all usernames if no
# realm was explicitly specified by the user
default_realm

# time to wait for a reply from the RADIUS server
radius_timeout    10
# resend request this many times before trying the next server
radius_retries    3
# local address from which radius packets have to be sent
bindaddr *
# program to execute for local login
# it must support the -f flag for preauthenticated login
login_local    /bin/login
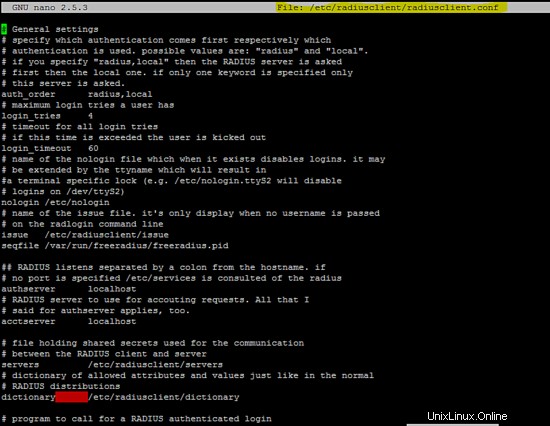
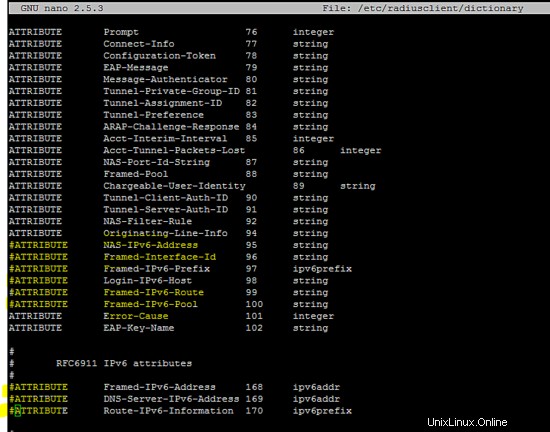
La configurazione seguente (relativa a IPv6) in /etc/radiusclient/dictionary file dovrebbe essere commentato per eseguire il client raggio.
ATTRIBUTE       NAS-Filter-Rule         92      string
ATTRIBUTE       Originating-Line-Info   94      string
ATTRIBUTE       NAS-IPv6-Address        95      string
ATTRIBUTE       Framed-Interface-Id     96      string
ATTRIBUTE       Framed-IPv6-Prefix      97      ipv6prefix
ATTRIBUTE       Login-IPv6-Host         98      string
ATTRIBUTE       Framed-IPv6-Route       99      string
ATTRIBUTE       Framed-IPv6-Pool        100     string
ATTRIBUTE       Error-Cause             101     integer
ATTRIBUTE       EAP-Key-Name            102     string
#
#       RFC6911 IPv6 attributes
#
ATTRIBUTE       Framed-IPv6-Address     168     ipv6addr
ATTRIBUTE       DNS-Server-IPv6-Address 169     ipv6addr
ATTRIBUTE       Route-IPv6-Information  170     ipv6prefix
Configurazione del server Poptop
Aggiungi la seguente configurazione in /etc/pptpd.conf file.
localip 10.20.30.1
remoteip 10.20.30.2-254

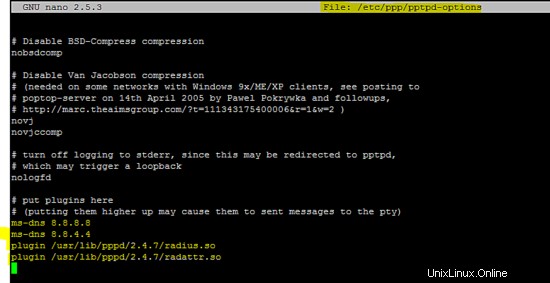
Esegui seguendo il comando sed su /etc/ppp/pptpd-options file.
sed -i "/^ms-dns/d" /etc/ppp/pptpd-options
sed -i -e "/radius.so/d" -e "/radattr.so/d" /etc/ppp/pptpd-options

Aggiungi le seguenti righe in /etc/ppp/pptpd-options file.
ms-dns 8.8.8.8
ms-dns 8.8.4.4
plugin /usr/lib/pppd/2.4.7/radius.so
plugin /usr/lib/pppd/2.4.7/radattr.so
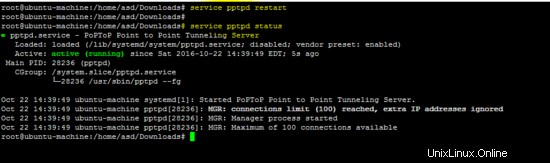
Riavvia il servizio pptpd per applicare le modifiche precedenti.
service pptpd restart
Configurazione di xl2tp
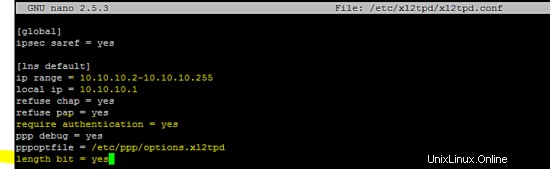
Includi le seguenti righe di configurazione in /etc/xl2tpd/xl2tpd.conf file come mostrato nella figura seguente.
[global]
ipsec saref = yes

[lns default]
ip range = 10.10.10.2-10.10.10.255
local ip = 10.10.10.1
refuse chap = yes
refuse pap = yes
require authentication = yes
ppp debug = yes
pppoptfile = /etc/ppp/options.xl2tpd
length bit = yes
Configurazione di OpenSwan
Aggiungi la seguente impostazione del file segreto ipsec in /etc/ipsec.secrets .
192.168.15.4 %any 0.0.0.0: PSK "test"

La configurazione IPsec per il tunnel L2TP è inclusa in /etc/ipsec.conf file.
version 2.0

config setup
        nat_traversal=yes
        virtual_private=%v4:192.168.0.0/16,%v4:10.0.0.0/8,%v4:172.16.0.0/12,%v4:25.0.0.0/8,%v4:!10.254.253.0/24
        protostack=netkey
        #protostack=mast  # used for SAref + MAST only
        interfaces="%defaultroute"
        oe=off

conn psk-l2tp
        pfs=no
        auto=add
        rekey=no
        # overlapip=yes   # for SAref + MAST
        # sareftrack=yes  # for SAref + MAST
        type=transport
        left=192.168.15.4
        leftprotoport=17/1701
        right=%any
        rightprotoport=17/%any
        rightsubnet=vhost:%priv,%no
        authby=secret
Configurazione del server PPP
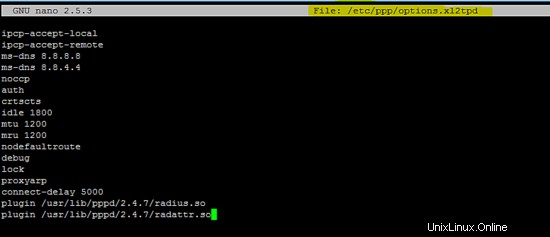
Aggiungi la seguente configurazione in /etc/ppp/options.xl2tpd file.
ipcp-accept-local
ipcp-accept-remote
ms-dns 8.8.8.8
ms-dns 8.8.4.4
noccp
auth
crtscts
idle 1800
mtu 1200
mru 1200
nodefaultroute
debug
lock
proxyarp
connect-delay 5000
plugin /usr/lib/pppd/2.4.7/radius.so
plugin /usr/lib/pppd/2.4.7/radattr.so
Dopo aver configurato correttamente tutti i pacchetti richiesti, ora riavvia tutti i servizi per testare la VPN L2TP.
Riavvio dei servizi IPsec e xl2tp.

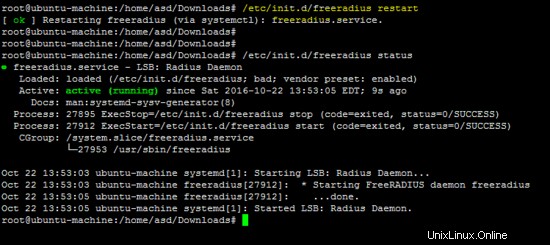
La figura seguente mostra che il server freeradius è in esecuzione in modalità demone, utile per identificare il funzionamento del server.

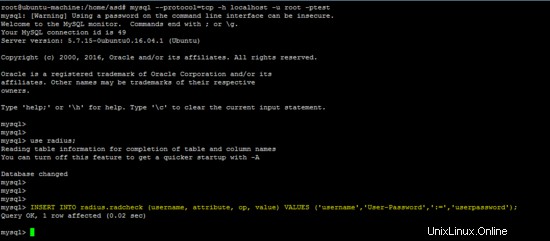
Inserisci un account utente nel database MySQL per testare la configurazione.
INSERT INTO radius.radcheck (username, attribute, op, value) VALUES ('username','User-Password',':=','userpassword');
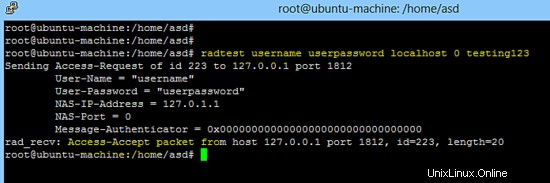
Il seguente comando verifica che il server Freeradius funzioni su localhost.
radtest username userpassword localhost 0 testing123
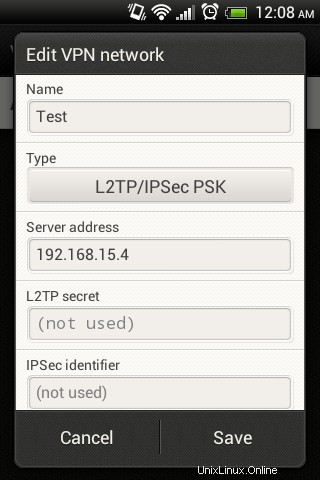
Configurazione del client Android L2TP
Vai a impostazioni ==> Altro ==> VPN ==>Aggiungi rete VPN sul telefono Android e crea il nuovo L2TP PSK VPN come mostrato di seguito.
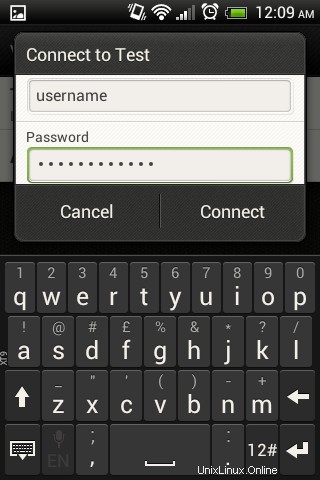
Dopo aver creato la nuova VPN L2TP, fai clic su di essa e inserisci nome utente/password (configurata sul server freeradius).
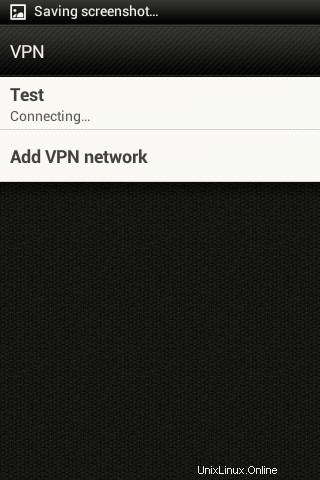
La figura seguente mostra che la VPN L2TP si sta connettendo.
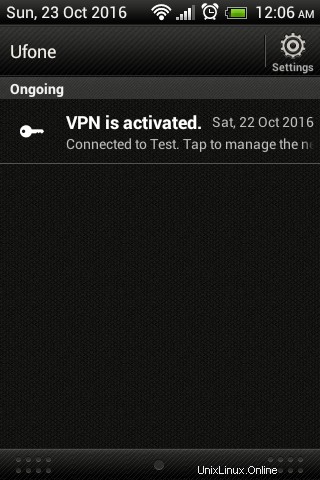
Le schermate seguenti mostrano che L2TP VPN è connesso correttamente utilizzando un client Android.
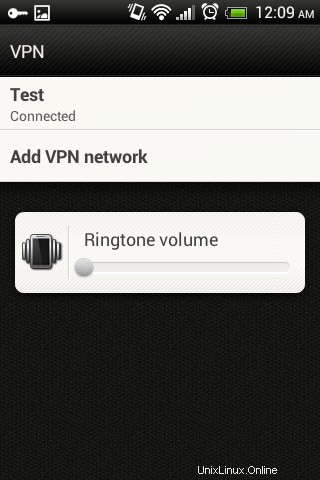
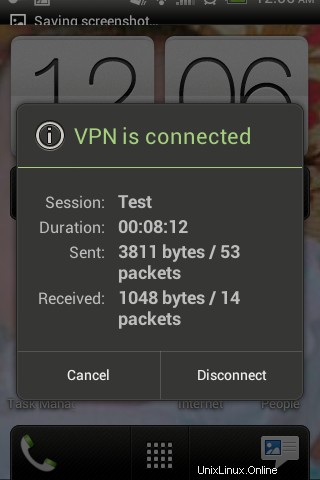
Stato VPN L2TP
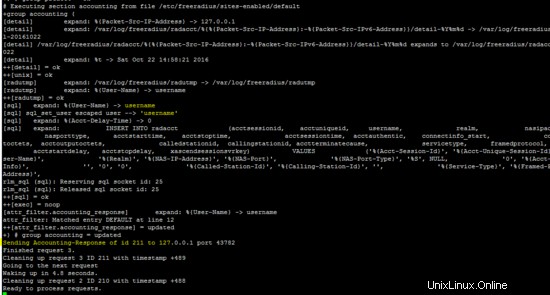
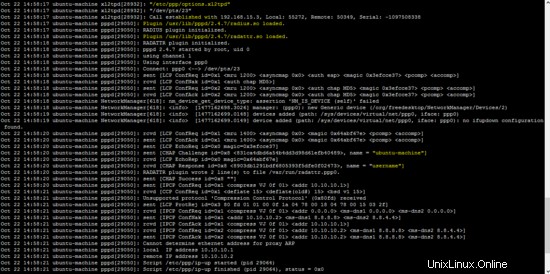
Freeradius mostra l'autenticazione riuscita del client Android L2TP.
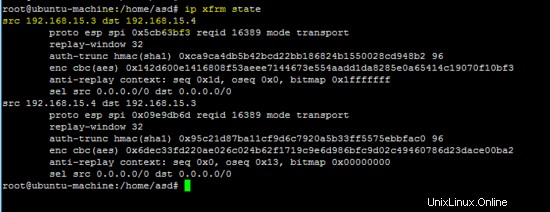
Il comando seguente mostra lo stato del tunnel IPsec
ip xfrm state
Registro di OpenSwan (/var/log/auth.log ) e registro xl2tp (/var/log/syslog ) mostra anche lo stato della VPN L2TP.
tail -f /var/log/auth.log
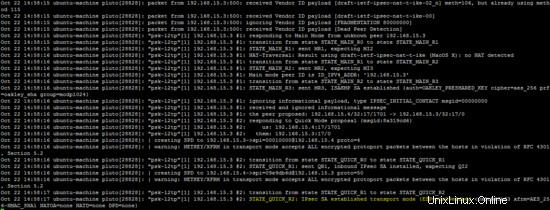
tail -f /var/log/syslog
In questo tutorial, il protocollo di tunneling di livello 2 viene utilizzato con IPSec e Freeradius per fornire meccanismi di sicurezza e autenticazione. Un client basato su Android viene utilizzato per dimostrare il funzionamento di L2TP su IPsec.