Chef è uno strumento di gestione della configurazione basato su Ruby utilizzato per definire l'infrastruttura come codice. Ciò consente agli utenti di automatizzare la gestione di molti nodi e mantenere la coerenza tra quei nodi. Le ricette dichiarano lo stato desiderato per i nodi gestiti e vengono create sulla workstation di un utente utilizzando il pacchetto Chef Workstation. Le tue ricette sono distribuite tra i nodi tramite un server Chef. Un client Chef, installato su ogni nodo, ha il compito di applicare la ricetta al nodo corrispondente. Questa guida ti mostrerà come installare e configurare uno Chef Server e una Chef Workstation. Inoltre, avvieremo un nodo da gestire con Chef.
In questo tutorial imparerai:
- Installa e configura Chef Server
- Crea utente e organizzazione Chef
- Installa e configura la workstation Chef
- Configura Knife e bootstrap di un nodo client
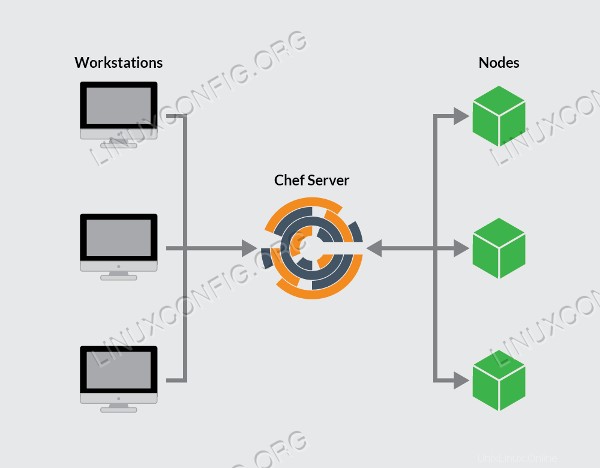 Chef Architettura.
Requisiti e convenzioni software utilizzati
| Categoria | Requisiti, convenzioni o versione del software utilizzata |
|---|---|
| Sistema | Ubuntu Linux 18.04 |
| Software | Core del server per chef, workstation per chef, client per chef, kit di sviluppo per chef |
| Altro | Accesso privilegiato al tuo sistema Linux come root o tramite sudo comando. |
| Convenzioni | # – richiede che i comandi linux dati vengano eseguiti con i privilegi di root direttamente come utente root o usando sudo comando$ – richiede che i comandi linux dati vengano eseguiti come un normale utente non privilegiato |
Installa e configura Chef Server
Il server Chef è il fulcro di interazione tra tutte le workstation e i nodi gestiti da Chef. Le modifiche apportate al codice di configurazione sulle workstation vengono inviate al server Chef e quindi estratte dal client chef di un nodo per applicare le configurazioni.
Scarica l'ultimo server Chef eseguendo il comando seguente:
# wget https://packages.chef.io/files/stable/chef-server/12.18.14/ubuntu/18.04/chef-server-core_12.18.14-1_amd64.deb
Ora installa il pacchetto del server con il seguente comando:
# dpkg -i chef-server-core_*.deb
Il server Chef include un'utilità della riga di comando denominata chef-server-ctl. Esegui chef-server-ctl per avviare i servizi del server Chef.
# chef-server-ctl reconfigure
Dopo aver configurato correttamente il server chef, vedrai il seguente messaggio e controllerai anche lo stato di esecuzione del server chef.
Chef Client finished, 493/1100 resources updated in 12 minutes 02 seconds
Chef Server Reconfigured!
root@ubuntubox1:~# chef-server-ctl status
run: bookshelf: (pid 1435) 6644s; run: log: (pid 1440) 6644s
run: nginx: (pid 1235) 6653s; run: log: (pid 1744) 6631s
run: oc_bifrost: (pid 1196) 6657s; run: log: (pid 1203) 6657s
run: oc_id: (pid 1220) 6655s; run: log: (pid 1227) 6655s
run: opscode-erchef: (pid 4376) 6432s; run: log: (pid 1508) 6644s
run: opscode-expander: (pid 1335) 6648s; run: log: (pid 1431) 6646s
run: opscode-solr4: (pid 1244) 6650s; run: log: (pid 1285) 6649s
run: postgresql: (pid 1176) 6659s; run: log: (pid 1180) 6659s
run: rabbitmq: (pid 4188) 6443s; run: log: (pid 1748) 6631s
run: redis_lb: (pid 27397) 6931s; run: log: (pid 1735) 6632s
root@ubuntubox1:~#
Crea utente e organizzazione Chef
Per collegare workstation e nodi al server Chef, crea un amministratore e un'organizzazione con chiavi private RSA associate.
Dalla home directory, crea una directory .chef in cui archiviare le chiavi.
# mkdir .chef
Usa chef-server-ctl per creare un utente. In questo esempio, modifica quanto segue in base alle tue esigenze:USER_NAME, FIRST_NAME, LAST_NAME, EMAIL e PASSWORD. Modifica USER_NAME.pem e lascia l'estensione .pem.
chef-server-ctl user-create USER_NAME FIRST_NAME LAST_NAME EMAIL 'PASSWORD' --filename ~/.chef/USER_NAME.pem
root@ubuntubox1:~# chef-server-ctl user-create chefadmin Chef Administrator chefadmin@@ubuntubox1.com '*******' --filename ~/.chef/chefadmin.pem
Per visualizzare l'elenco di tutti gli utenti sul tuo server Chef emetti il seguente comando:
root@ubuntubox1:~# chef-server-ctl user-list
chefadmin
pivotal
Crea un'organizzazione e aggiungi l'utente creato nel passaggio precedente. Sostituisci ORG_NAME con un identificatore breve per l'organizzazione, ORG_FULL_NAME con il nome completo dell'organizzazione, USER_NAME con il nome utente creato nel passaggio precedente e ORG_NAME.pem con l'identificatore breve dell'organizzazione seguito da .pem.
chef-server-ctl org-create ORG_NAME "ORG_FULL_NAME" --association_user USER_NAME --filename ~/.chef/ORG_NAME.pem
root@ubuntubox1:~# chef-server-ctl org-create chef-on-ubuntu "Chef Infrastructure on Ubuntu 18.04" --association_user chefadmin --filename ~/.chef/chef-on-ubuntu.pem
Per visualizzare l'elenco di tutte le organizzazioni sul tuo server Chef, utilizza il comando seguente:
root@ubuntubox1:~# chef-server-ctl org-list
chef-on-ubuntu
Con il server Chef installato e le chiavi RSA generate, inizieremo a configurare la workstation Chef. La workstation è il luogo in cui verranno create tutte le principali configurazioni per i tuoi nodi.
Installa e configura la workstation Chef
La workstation Chef è dove crei e configuri qualsiasi ricetta, ricettario, attributo e altre modifiche necessarie per gestire i tuoi nodi. Sebbene questa possa essere una macchina locale che esegue qualsiasi sistema operativo, c'è qualche vantaggio nel mantenere un server remoto come workstation in modo da potervi accedere da qualsiasi luogo.
In questa sezione scaricherai e installerai il pacchetto Chef Workstation, che fornisce tutti gli strumenti inclusi anche con ChefDK, il kit di sviluppo di Chef.
Scarica l'ultima workstation Chef:
root@ubuntubox2:~# wget  https://packages.chef.io/files/stable/chef-workstation/0.2.43/ubuntu/18.04/chef-workstation_0.2.43-1_amd64.deb
--2019-06-03 13:35:51--  https://packages.chef.io/files/stable/chef-workstation/0.2.43/ubuntu/18.04/chef-workstation_0.2.43-1_amd64.deb
Resolving packages.chef.io (packages.chef.io)... 151.101.142.110
Connecting to packages.chef.io (packages.chef.io)|151.101.142.110|:443... connected.
HTTP request sent, awaiting response... 200 OK
Length: 129713682 (124M) [application/x-debian-package]
Saving to: ‘chef-workstation_0.2.43-1_amd64.deb’

chef-workstation_0.2.43-1_amd64.deb       100%[=====================================================================================>] 123.70M  1.51MB/s    in 80s

2019-06-03 13:37:17 (1.55 MB/s) - ‘chef-workstation_0.2.43-1_amd64.deb’ saved [129713682/129713682]
Installa Chef Workstation:
root@ubuntubox2:~# dpkg -i chef-workstation_*.deb
Selecting previously unselected package chef-workstation.
(Reading database ... 117468 files and directories currently installed.)
Preparing to unpack chef-workstation_0.2.43-1_amd64.deb ...
Unpacking chef-workstation (0.2.43-1) ...
Setting up chef-workstation (0.2.43-1) ...

To run the experimental Chef Workstation App, use your
platform's package manager to install these dependencies:

        libgconf-2.so.4 => not found
You can then launch the App by running 'chef-workstation-app'.
The App will then be available in the system tray.

Thank you for installing Chef Workstation!
You can find some tips on getting started at https://chef.sh/
Ora dobbiamo creare il repository Chef. La directory chef-repo memorizzerà i tuoi libri di cucina Chef e altri file correlati.
# chef generate repo chef-repo
Crea una sottodirectory .chef. La sottodirectory .chef memorizzerà il file di configurazione Knife e i file .pem utilizzati per l'autenticazione della coppia di chiavi RSA con il server Chef. Sposta nella directory chef-repo:
root@ubuntubox2:~# mkdir ~/chef-repo/.chef
root@ubuntubox2:~# cd chef-repo
root@ubuntubox2:~/chef-repo#
L'autenticazione tra il server Chef e la workstation e/o i nodi viene completata con la crittografia a chiave pubblica. Ciò garantisce che il server Chef comunichi solo con macchine affidabili. In questa sezione, le chiavi private RSA, generate durante la configurazione del server Chef, verranno copiate sulla workstation per consentire la comunicazione tra il server Chef e la workstation.
Genereremo una coppia di chiavi RSA sul server della workstation. Questa coppia di chiavi verrà utilizzata per accedere al server Chef e quindi trasferire i file .pem:
root@ubuntubox2:~# ssh-keygen -b 4096
Generating public/private rsa key pair.
Enter file in which to save the key (/root/.ssh/id_rsa):
Created directory '/root/.ssh'.
Enter passphrase (empty for no passphrase):
Enter same passphrase again:
Your identification has been saved in /root/.ssh/id_rsa.
Your public key has been saved in /root/.ssh/id_rsa.pub.
The key fingerprint is:
SHA256:sR+Nloq6vsc7rX4ZmMInP3SKdk4fYEJH1iLoKNm1YMg root@ubuntubox2.com
The key's randomart image is:
+---[RSA 4096]----+
|.. .  o.         |
|.E+ oo. .        |
| * o.o...        |
|+ o...   o +     |
|.  .. ooS = .    |
|    +o=oo+ .     |
|     Oo+oo.      |
|    ooO.+.       |
|   o=B=*.        |
+----[SHA256]-----+
root@ubuntubox2:~#
Carica la chiave pubblica del nodo della workstation sul nodo del server Chef.
root@ubuntubox2:~# ssh-copy-id root@ubuntubox1.com
/usr/bin/ssh-copy-id: INFO: Source of key(s) to be installed: "/root/.ssh/id_rsa.pub"
/usr/bin/ssh-copy-id: INFO: attempting to log in with the new key(s), to filter out any that are already installed
/usr/bin/ssh-copy-id: INFO: 1 key(s) remain to be installed -- if you are prompted now it is to install the new keys
root@ubuntubox1.com's password:

Number of key(s) added: 1

Now try logging into the machine, with:   "ssh 'root@ubuntubox1.com'"
and check to make sure that only the key(s) you wanted were added.

root@ubuntubox2:~#
Copia i file .pem dal tuo server Chef alla tua workstation usando il comando scp.
root@ubuntubox2:~# scp root@ubuntubox1.com:~/.chef/*.pem ~/chef-repo/.chef/
chefadmin.pem                                                                                                                         100% 1674    27.9KB/s   00:00
chef-on-ubuntu.pem                                                                                                                    100% 1674   496.8KB/s   00:00
Conferma che i file sono stati copiati correttamente elencando il contenuto della directory .chef. I file .pem dovrebbero essere elencati.
root@ubuntubox2:~# ls ~/chef-repo/.chef
chefadmin.pem  chef-on-ubuntu.pem
Genera un nuovo ricettario Chef:
root@ubuntubox2:~# chef generate cookbook chef-first-cookbook
Hyphens are discouraged in cookbook names as they may cause problems with custom resources. See https://docs.chef.io/ctl_chef.html#chef-generate-cookbook for more information.
Generating cookbook chef-first-cookbook
- Ensuring correct cookbook file content
- Ensuring delivery configuration
- Ensuring correct delivery build cookbook content

Your cookbook is ready. Type `cd chef-first-cookbook` to enter it.

There are several commands you can run to get started locally developing and testing your cookbook.
Type `delivery local --help` to see a full list.

Why not start by writing a test? Tests for the default recipe are stored at:

test/integration/default/default_test.rb

If you'd prefer to dive right in, the default recipe can be found at:

recipes/default.rb
Genera lo chef-repo e spostati nella directory appena creata:
# chef generate app chef-repo
# cd chef-repo
Configura Knife e bootstrap di un nodo client
Crea un file di configurazione del coltello navigando nella directory ~/chef-repo/.chef e creando un file chiamato config.rb usando il tuo editor di testo preferito.
Copia la seguente configurazione nel file config.rb:
current_dir = File.dirname(__FILE__)
log_level                :info
log_location             STDOUT
node_name                'node_name'
client_key               "USER.pem"
validation_client_name   'ORG_NAME-validator'
validation_key           "ORGANIZATION-validator.pem"
chef_server_url          'https://ubuntubox1.com/organizations/ORG_NAME'
cache_type               'BasicFile'
cache_options( :path => "#{ENV['HOME']}/.chef/checksums" )
cookbook_path            ["#{current_dir}/../cookbooks"]
Il valore per node_name deve essere il nome utente che è stato creato sul server Chef.
Modifica USER.pem in client_key per riflettere il file .pem per l'utente chef.
Il validation_client_name deve essere l'ORG_NAME dell'organizzazione seguito da - validator.
ORGANIZATION-validator.pem nel percorso validation_key dovrebbe essere impostato su ORG_NAME seguito da -validator.pem.
Infine, chef_server_url dovrebbe essere il dominio del server Chef con /organizations/ORG_NAME aggiunto. Assicurati di sostituire ORG_NAME con il nome dell'organizzazione.
Passa alla directory chef-repo e copia i certificati SSL necessari dal server:
root@ubuntubox2:~/chef-repo/.chef# cd ..
root@ubuntubox2:~/chef-repo# knife ssl fetch
WARNING: Certificates from ubuntubox1.com will be fetched and placed in your trusted_cert
directory (/root/chef-repo/.chef/trusted_certs).

Knife has no means to verify these are the correct certificates. You should
verify the authenticity of these certificates after downloading.

Adding certificate for ubuntubox1_com in /root/chef-repo/.chef/trusted_certs/ubuntubox1_com.crt
Conferma che config.rb sia impostato correttamente eseguendo l'elenco dei client. Questo comando dovrebbe restituire il nome del validatore.
root@ubuntubox2:~/chef-repo# knife client list
chef-on-ubuntu-validator
Il bootstrap di un nodo installa il client Chef sul nodo e convalida il nodo. Ciò consente al nodo di leggere dal server Chef, estrarre e applicare eventuali aggiornamenti di configurazione necessari rilevati dal client chef.
Dalla workstation, accedere alla directory ~/chef-repo/.chef:
# cd ~/chef-repo/.chef
Avvia il nodo client utilizzando l'utente root del nodo client o un utente con privilegi elevati:
root@ubuntubox2:~/chef-repo/.chef# knife bootstrap ubuntubox3.com -x root -P ******* --node-name chef-client-node
Creating new client for chef-client-node
Creating new node for chef-client-node
Connecting to ubuntubox3.com
ubuntubox3.com -----> Installing Chef Omnibus (-v 14)
ubuntubox3.com downloading https://omnitruck-direct.chef.io/chef/install.sh
ubuntubox3.com   to file /tmp/install.sh.2019/install.sh
ubuntubox3.com trying wget...
ubuntubox3.com ubuntu 18.04 x86_64
ubuntubox3.com Getting information for chef stable 14 for ubuntu...
ubuntubox3.com downloading https://omnitruck-direct.chef.io/stable/chef/metadata?v=14&p=ubuntu&pv=18.04&m=x86_64
ubuntubox3.com   to file /tmp/install.sh.2023/metadata.txt
ubuntubox3.com trying wget...
ubuntubox3.com sha1     ed9b1fcdaf947d9a3d60e6d196308183a082bcff
ubuntubox3.com sha256   9ddcd5ceef19c95ecc1f34bef080c23d9cb42ae8ebc69fd41dcf1c768a6a708f
ubuntubox3.com url      https://packages.chef.io/files/stable/chef/14.13.11/ubuntu/18.04/chef_14.13.11-1_amd64.deb
ubuntubox3.com version  14.13.11
ubuntubox3.com downloaded metadata file looks valid...
ubuntubox3.com downloading https://packages.chef.io/files/stable/chef/14.13.11/ubuntu/18.04/chef_14.13.11-1_amd64.deb
ubuntubox3.com   to file /tmp/install.sh.2023/chef_14.13.11-1_amd64.deb
ubuntubox3.com trying wget...
ubuntubox3.com Comparing checksum with sha256sum...
ubuntubox3.com Installing chef 14
ubuntubox3.com installing with dpkg...
ubuntubox3.com Selecting previously unselected package chef.
(Reading database ... 117468 files and directories currently installed.)
ubuntubox3.com Preparing to unpack .../chef_14.13.11-1_amd64.deb ...
ubuntubox3.com Unpacking chef (14.13.11-1) ...
ubuntubox3.com Setting up chef (14.13.11-1) ...
ubuntubox3.com Thank you for installing Chef Infra Client! For help getting started visit https://learn.chef.io
ubuntubox3.com Starting the first Chef Client run...
ubuntubox3.com Starting Chef Client, version 14.13.11
ubuntubox3.com resolving cookbooks for run list: []
ubuntubox3.com Synchronizing Cookbooks:
ubuntubox3.com Installing Cookbook Gems:
ubuntubox3.com Compiling Cookbooks...
ubuntubox3.com [2019-06-03T14:01:44+04:00] WARN: Node chef-client-node has an empty run list.
ubuntubox3.com Converging 0 resources
ubuntubox3.com
ubuntubox3.com Running handlers:
ubuntubox3.com Running handlers complete
ubuntubox3.com Chef Client finished, 0/0 resources updated in 05 seconds
Confirm that the node has been bootstrapped by listing the client nodes:
root@ubuntubox2:~/chef-repo/.chef#
Conferma che il nodo è stato avviato correttamente elencando i nodi:
root@ubuntubox2:~/chef-repo/.chef# knife node list
chef-client-node
root@ubuntubox2:~/chef-repo/.chef# knife node show chef-client-node
Node Name:   chef-client-node
Environment: _default
FQDN:        ubuntubox3.com
IP:          192.168.1.107
Run List:
Roles:
Recipes:
Platform:    ubuntu 18.04
Tags:
Conclusione
In questo articolo dettagliato abbiamo appreso lo strumento Chef Configuration Management con la sua comprensione di base e la panoramica dei suoi componenti con le impostazioni di installazione e configurazione. Puoi saperne di più su Chef visitando il sito web di Chef ovvero https://www.chef.io/