L'intenzione di questo post è spiegare come eseguire la configurazione di base del server CUPS e dei client per sfogliare le stampanti disponibili sulla rete quando questo non funziona correttamente su CentOS/RHEL 7.
Configurazione del server CUPS
1. Verifica che i pacchetti di tazze siano installati
# rpm -qa | grep cups
cups-client-1.6.3-35.el7.x86_64
cups-filesystem-1.6.3-35.el7.noarch
cups-filters-libs-1.0.35-22.el7.x86_64
cups-filters-1.0.35-22.el7.x86_64
cups-1.6.3-35.el7.x86_64
cups-libs-1.6.3-35.el7.x86_64
ghostscript-cups-9.07-28.el7_4.2.x86_64
se non è disponibile nel sistema, installalo:
# yum install cups
Installed:
cups.x86_64 1:1.6.3-35.el7

Dependency Installed:
avahi-glib.x86_64 0:0.6.31-19.el7 bc.x86_64 0:1.06.95-13.el7 cairo.x86_64 0:1.14.8-2.el7
cups-client.x86_64 1:1.6.3-35.el7 cups-filesystem.noarch 1:1.6.3-35.el7 cups-filters.x86_64 0:1.0.35-22.el7
cups-filters-libs.x86_64 0:1.0.35-22.el7 fontconfig.x86_64 0:2.10.95-11.el7 fontpackages-filesystem.noarch 0:1.44-8.el7
ghostscript.x86_64 0:9.07-28.el7_4.2 ghostscript-cups.x86_64 0:9.07-28.el7_4.2 ghostscript-fonts.noarch 0:5.50-32.el7
jbigkit-libs.x86_64 0:2.0-11.el7 lcms2.x86_64 0:2.6-3.el7 libICE.x86_64 0:1.0.9-9.el7
libSM.x86_64 0:1.2.2-2.el7 libX11.x86_64 0:1.6.5-1.el7 libX11-common.noarch 0:1.6.5-1.el7
libXau.x86_64 0:1.0.8-2.1.el7 libXdamage.x86_64 0:1.1.4-4.1.el7 libXext.x86_64 0:1.3.3-3.el7
libXfixes.x86_64 0:5.0.3-1.el7 libXfont.x86_64 0:1.5.2-1.el7 libXrender.x86_64 0:0.9.10-1.el7
libXt.x86_64 0:1.1.5-3.el7 libXxf86vm.x86_64 0:1.1.4-1.el7 liberation-fonts-common.noarch 1:1.07.2-16.el7
liberation-mono-fonts.noarch 1:1.07.2-16.el7 libfontenc.x86_64 0:1.1.3-3.el7 libjpeg-turbo.x86_64 0:1.2.90-5.el7
libpng.x86_64 2:1.5.13-7.el7_2 libtiff.x86_64 0:4.0.3-27.el7_3 libusbx.x86_64 0:1.0.21-1.el7
libwayland-client.x86_64 0:1.14.0-2.el7 libwayland-server.x86_64 0:1.14.0-2.el7 libxcb.x86_64 0:1.12-1.el7
libxshmfence.x86_64 0:1.2-1.el7 mesa-libEGL.x86_64 0:17.2.3-8.20171019.el7 mesa-libGL.x86_64 0:17.2.3-8.20171019.el7
mesa-libgbm.x86_64 0:17.2.3-8.20171019.el7 mesa-libglapi.x86_64 0:17.2.3-8.20171019.el7 openjpeg-libs.x86_64 0:1.5.1-17.el7
pixman.x86_64 0:0.34.0-1.el7 poppler.x86_64 0:0.26.5-17.el7_4 poppler-data.noarch 0:0.4.6-3.el7
poppler-utils.x86_64 0:0.26.5-17.el7_4 qpdf-libs.x86_64 0:5.0.1-3.el7 urw-fonts.noarch 0:2.4-16.el7
xorg-x11-font-utils.x86_64 1:7.5-20.el7

Complete!
2. Avvia cups e servizi di cups-browse:
# systemctl enable cups
# systemctl start cups
# systemctl enable cups-browsed.service
# systemctl start cups-browsed.service
3. Modifica il file di configurazione di cups “/etc/cups/cupsd.conf ” per consentire ad altri server di connettersi alle stampanti su questo server master. Quello che segue è un file di configurazione di cups da un server CentOS/RHEL 7.
# grep -v '#' /etc/cups/cupsd.conf
MaxLogSize 0
LogLevel warn
Listen *:631
Listen /var/run/cups/cups.sock
Browsing On
BrowseLocalProtocols all
DefaultAuthType Basic
WebInterface Yes

<Location />
Order allow,deny
Allow all
</Location>

<Location /admin>
Order allow,deny
</Location>

<Location /admin/conf>
AuthType Default
Require user @SYSTEM
Order allow,deny
</Location>

<Policy default>
JobPrivateAccess default
JobPrivateValues default
SubscriptionPrivateAccess default
SubscriptionPrivateValues default

<Limit Create-Job Print-Job Print-URI Validate-Job>
Order deny,allow
</Limit>

<Limit Send-Document Send-URI Hold-Job Release-Job Restart-Job Purge-Jobs Set-Job-Attributes Create-Job-Subscription Renew-Subscription Cancel-Subscription Get-Notifications Reprocess-Job Cancel-Current-Job Suspend-Current-Job Resume-Job Cancel-My-Jobs Close-Job CUPS-Move-Job CUPS-Get-Document>
Require user @OWNER @SYSTEM
Order deny,allow
</Limit>

<Limit CUPS-Add-Modify-Printer CUPS-Delete-Printer CUPS-Add-Modify-Class CUPS-Delete-Class CUPS-Set-Default CUPS-Get-Devices>
AuthType Default
Require user @SYSTEM
Order deny,allow
</Limit>

<Limit Pause-Printer Resume-Printer Enable-Printer Disable-Printer Pause-Printer-After-Current-Job Hold-New-Jobs Release-Held-New-Jobs Deactivate-Printer Activate-Printer Restart-Printer Shutdown-Printer Startup-Printer Promote-Job Schedule-Job-After Cancel-Jobs CUPS-Accept-Jobs CUPS-Reject-Jobs>
AuthType Default
Require user @SYSTEM
Order deny,allow
</Limit>

<Limit Cancel-Job CUPS-Authenticate-Job>
Require user @OWNER @SYSTEM
Order deny,allow
</Limit>

<Limit All>
Order deny,allow
</Limit>
</Policy>

<Policy authenticated>
JobPrivateAccess default
JobPrivateValues default
SubscriptionPrivateAccess default
SubscriptionPrivateValues default

<Limit Create-Job Print-Job Print-URI Validate-Job>
AuthType Default
Order deny,allow
</Limit>

<Limit Send-Document Send-URI Hold-Job Release-Job Restart-Job Purge-Jobs Set-Job-Attributes Create-Job-Subscription Renew-Subscription Cancel-Subscription Get-Notifications Reprocess-Job Cancel-Current-Job Suspend-Current-Job Resume-Job Cancel-My-Jobs Close-Job CUPS-Move-Job CUPS-Get-Document>
AuthType Default
Require user @OWNER @SYSTEM
Order deny,allow
</Limit>

<Limit CUPS-Add-Modify-Printer CUPS-Delete-Printer CUPS-Add-Modify-Class CUPS-Delete-Class CUPS-Set-Default>
AuthType Default
Require user @SYSTEM
Order deny,allow
</Limit>

<Limit Pause-Printer Resume-Printer Enable-Printer Disable-Printer Pause-Printer-After-Current-Job Hold-New-Jobs Release-Held-New-Jobs Deactivate-Printer Activate-Printer Restart-Printer Shutdown-Printer Startup-Printer Promote-Job Schedule-Job-After Cancel-Jobs CUPS-Accept-Jobs CUPS-Reject-Jobs>
AuthType Default
Require user @SYSTEM
Order deny,allow
</Limit>

<Limit Cancel-Job CUPS-Authenticate-Job>
AuthType Default
Require user @OWNER @SYSTEM
Order deny,allow
</Limit>

<Limit All>
Order deny,allow
</Limit>
</Policy>
Per configurare CUPS per l'ascolto su tutte le interfacce di rete, modificare:
Listen localhost:631
a
Listen *:631
Per configurare le tazze per l'ascolto su un'interfaccia di rete specifica, usa invece l'indirizzo IP:
Listen 10.157.100.45:631
Per consentire ai client sulla stessa sottorete in cui si trova il server master, aggiungi "Consenti @LOCAL ” in fondo alla stanza
<Location />
# Allow shared printing
Order allow,deny
Allow @LOCAL
</Location>
ma se abbiamo bisogno che tutti i client accedano a questo server principale, usa "Consenti tutto ” invece:
<Location />
# Allow shared printing
Order allow,deny
Allow all
</Location>
Per impostazione predefinita, il file di configurazione di cups è impostato per inviare pacchetti broadcast con informazioni di condivisione della stampante, assicurati che sia presente il seguente parametro.
Browsing On
BrowseLocalProtocols cups dnssd
Se non necessario, impostalo su "Navigazione disattivata “.
4. Avviare il servizio avahi-daemon. Se non è disponibile, installalo.
# yum -y install avahi
# systemctl enable avahi-daemon
# systemctl start avahi-daemon
Verifica che il server ora funzioni correttamente
# systemctl status avahi-daemon
● avahi-daemon.service - Avahi mDNS/DNS-SD Stack
Loaded: loaded (/usr/lib/systemd/system/avahi-daemon.service; enabled; vendor preset: enabled)
Active: active (running) since Tue 2018-07-24 13:15:02 EDT; 3 days ago
Main PID: 635 (avahi-daemon)
Status: "avahi-daemon 0.6.31 starting up."
CGroup: /system.slice/avahi-daemon.service
├─635 avahi-daemon: running [gerald-vmol7.local]
└─646 avahi-daemon: chroot helper

Jul 24 13:15:01 ol7-master avahi-daemon[635]: Registering HINFO record with values 'X86_64'/'LINUX'.
Jul 24 13:15:01 ol7-master avahi-daemon[635]: Server startup complete. Host name is gerald-vmol7.local. Local service cookie is 3732296456.
Jul 24 13:15:02 ol7-master systemd[1]: Started Avahi mDNS/DNS-SD Stack.
Jul 24 13:15:07 ol7-master avahi-daemon[635]: Joining mDNS multicast group on interface eth0.IPv4 with address 10.157.10.122.
Jul 24 13:15:07 ol7-master avahi-daemon[635]: New relevant interface eth0.IPv4 for mDNS.
Jul 24 13:15:07 ol7-master avahi-daemon[635]: Registering new address record for 10.157.10.122 on eth0.IPv4.
Jul 24 13:15:09 ol7-master avahi-daemon[635]: Registering new address record for fe80::221:f6ff:feb0:3f6e on eth0.*.
Jul 24 13:15:13 ol7-master avahi-daemon[635]: Joining mDNS multicast group on interface virbr0.IPv4 with address 192.168.122.1.
Jul 24 13:15:13 ol7-master avahi-daemon[635]: New relevant interface virbr0.IPv4 for mDNS.
Jul 24 13:15:13 ol7-master avahi-daemon[635]: Registering new address record for 192.168.122.1 on virbr0.IPv4.
5. Avvia il servizio di navigazione delle tazze.
# systemctl enable cups-browsed
Created symlink from /etc/systemd/system/multi-user.target.wants/cups-browsed.service to /usr/lib/systemd/system/cups-browsed.service.
# systemctl start cups-browsed
Check that the service is now runnning
# systemctl status cups-browsed
● cups-browsed.service - Make remote CUPS printers available locally
Loaded: loaded (/usr/lib/systemd/system/cups-browsed.service; enabled; vendor preset: disabled)
Active: active (running) since Fri 2018-07-27 15:20:03 EDT; 2s ago
Main PID: 14388 (cups-browsed)
CGroup: /system.slice/cups-browsed.service
└─14388 /usr/sbin/cups-browsed

Jul 27 15:20:03 ol7-master systemd[1]: Started Make remote CUPS printers available locally.
Jul 27 15:20:03 ol7-master systemd[1]: Starting Make remote CUPS printers available locally...
6. Avvia il servizio bicchieri.
# systemctl start cups
 Check that the service is now running
# systemctl status cups
● cups.service - CUPS Printing Service
Loaded: loaded (/usr/lib/systemd/system/cups.service; enabled; vendor preset: enabled)
Active: active (running) since Fri 2018-07-27 15:20:03 EDT; 33s ago
Main PID: 14387 (cupsd)
CGroup: /system.slice/cups.service
└─14387 /usr/sbin/cupsd -f

Jul 27 15:20:03 ol7-master systemd[1]: Started CUPS Printing Service.
Jul 27 15:20:03 ol7-master systemd[1]: Starting CUPS Printing Service...
7. Configura il firewall per consentire l'accesso esterno alle porte 631 e 5353 oppure interrompilo.
Per aggiungere una regola:
# iptables -A OUTPUT -p tcp -m tcp --dport 631 -j ACCEPT
# iptables -A INPUT -p tcp --dport 631 -j ACCEPT
# iptables -A OUTPUT -p tcp -m tcp --dport 5353 -j ACCEPT
# iptables -A INPUT -p tcp --dport 5353 -j ACCEPT
Per fermare il firewall:
# systemctl stop firewalld
# systemctl disable firewalld
Removed symlink /etc/systemd/system/dbus-org.fedoraproject.FirewallD1.service.
Removed symlink /etc/systemd/system/basic.target.wants/firewalld.service.
# systemctl status firewalld
● firewalld.service - firewalld - dynamic firewall daemon
Loaded: loaded (/usr/lib/systemd/system/firewalld.service; disabled; vendor preset: enabled)
Active: inactive (dead)
Docs: man:firewalld(1)

Jul 30 12:49:58 ol7-master systemd[1]: Starting firewalld - dynamic firewall daemon...
Jul 30 12:49:59 ol7-master systemd[1]: Started firewalld - dynamic firewall daemon.
Jul 30 12:54:48 ol7-master systemd[1]: Stopping firewalld - dynamic firewall daemon...
Jul 30 12:54:49 ol7-master systemd[1]: Stopped firewalld - dynamic firewall daemon.
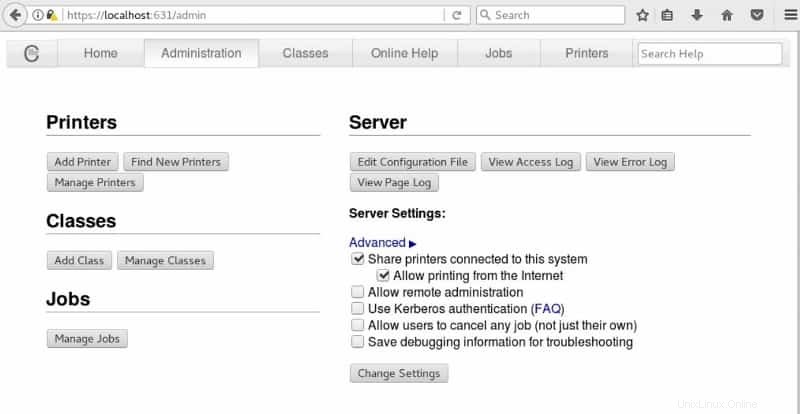
8. Aggiungere la stampante tramite l'interfaccia Web CUPS sul server principale:
Apri un browser web, inserisci l'URI nel seguente formato "https://localhost:631/" e vai su Amministrazione scheda. È invece possibile utilizzare l'IP o il nome host del server Master cups.
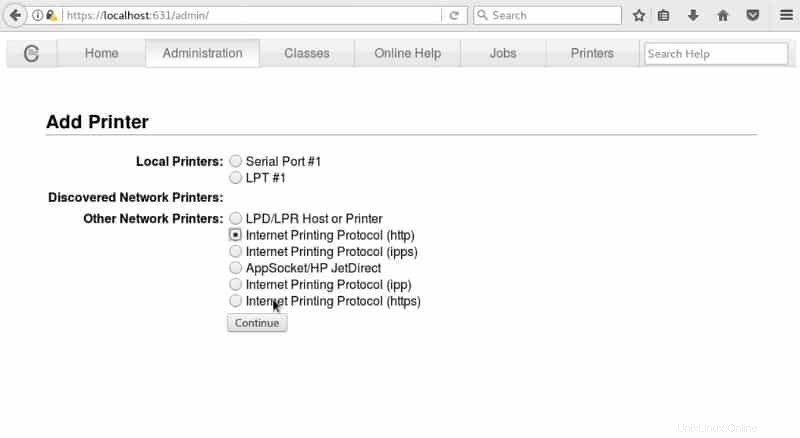
Nella scheda Amministrazione, scegli "Aggiungi una nuova stampante", quindi seleziona Altre stampanti di rete:Internet Printing Protocol (http) utilizzato nel nostro test case. Quindi premi Continua.
Immettere l'URI del dispositivo nella casella Connessione, come nell'esempio seguente, quindi premere Continua.
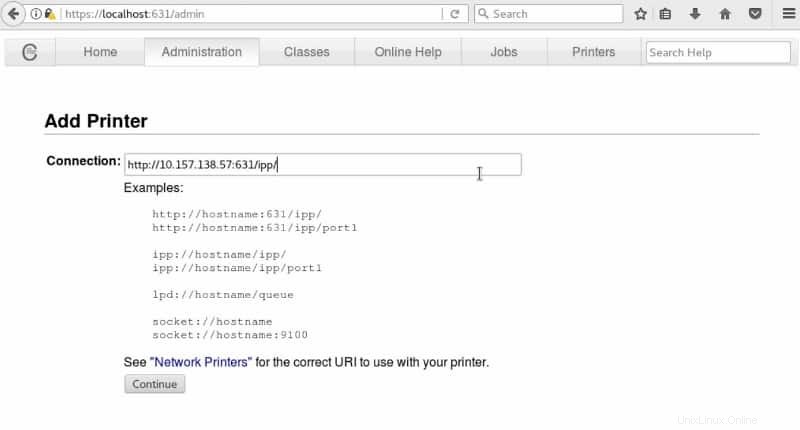
Dove “10.157.138.57” è l'IP della stampante in rete e 631 la porta utilizzata da cups per stabilire la connessione. Immettere le informazioni corrispondenti richieste sulla stampante come nell'esempio seguente e fare clic su Continua.
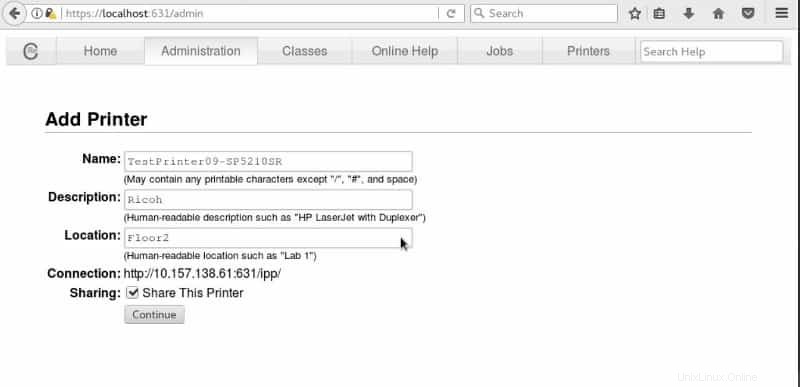
Nella pagina successiva selezionare il fornitore della stampante o il file PPD (Postscript Printer Description), se necessario, e premere Aggiungi stampante
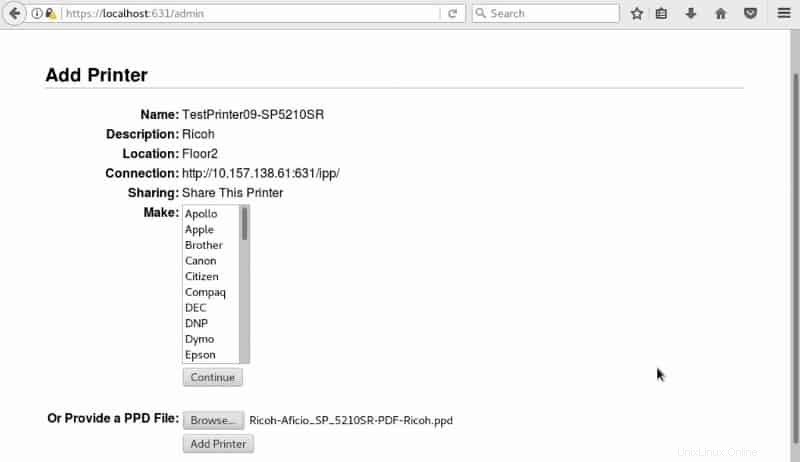
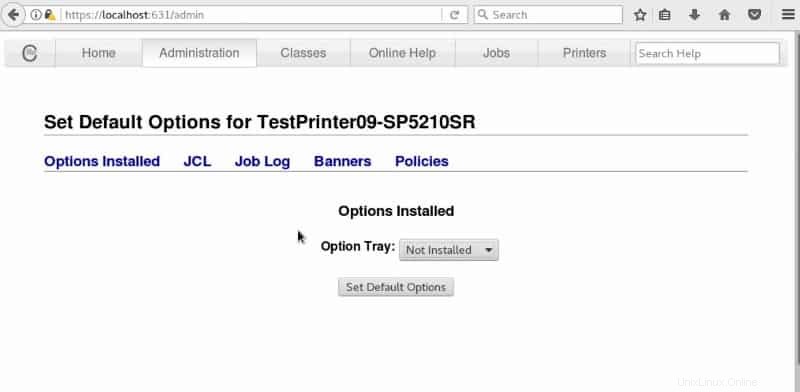
Completare la configurazione della stampante con le rispettive impostazioni.
9. Ora controlla che la stampante sia stata rilevata sul server Master cups
# lpstat -t
scheduler is running
no system default destination
device for TestPrinter08-SP5210SR: http://10.157.138.57:631/ipp/
device for TestPrinter09-SP5210SR: http://10.157.138.61:631/ipp/
TestPrinter08-SP5210SR accepting requests since Mon 30 Jul 2018 12:46:47 PM EDT
TestPrinter09-SP5210SR accepting requests since Mon 03 Sep 2018 03:53:53 PM EDT
printer TestPrinter08-SP5210SR is idle. enabled since Mon 30 Jul 2018 12:46:47 PM EDT
printer TestPrinter09-SP5210SR is idle. enabled since Mon 03 Sep 2018 03:53:53 PM EDT
Nota la nostra stampante aggiunta di recente e la stampante precedente scoperta in passato
TestPrinter08-SP5210SR accepting requests since Mon 30 Jul 2018 12:46:47 PM EDT
TestPrinter09-SP5210SR accepting requests since Mon 03 Sep 2018 03:53:53 PM EDT
Configurazione client CUPS
1. Verifica che i pacchetti di tazze siano installati
# rpm -qa | grep cups
cups-libs-1.6.3-35.el7.x86_64
Se non è installato procedi con l'installazione del pacchetto
# yum install cups-1.6.3-35
Installed:
cups.x86_64 1:1.6.3-35.el7

Dependency Installed:
avahi-glib.x86_64 0:0.6.31-19.el7 bc.x86_64 0:1.06.95-13.el7 cairo.x86_64 0:1.14.8-2.el7
cups-client.x86_64 1:1.6.3-35.el7 cups-filesystem.noarch 1:1.6.3-35.el7 cups-filters.x86_64 0:1.0.35-22.el7
cups-filters-libs.x86_64 0:1.0.35-22.el7 fontconfig.x86_64 0:2.10.95-11.el7 fontpackages-filesystem.noarch 0:1.44-8.el7
ghostscript.x86_64 0:9.07-28.el7_4.2 ghostscript-cups.x86_64 0:9.07-28.el7_4.2 ghostscript-fonts.noarch 0:5.50-32.el7
jbigkit-libs.x86_64 0:2.0-11.el7 lcms2.x86_64 0:2.6-3.el7 libICE.x86_64 0:1.0.9-9.el7
libSM.x86_64 0:1.2.2-2.el7 libX11.x86_64 0:1.6.5-1.el7 libX11-common.noarch 0:1.6.5-1.el7
libXau.x86_64 0:1.0.8-2.1.el7 libXdamage.x86_64 0:1.1.4-4.1.el7 libXext.x86_64 0:1.3.3-3.el7
libXfixes.x86_64 0:5.0.3-1.el7 libXfont.x86_64 0:1.5.2-1.el7 libXrender.x86_64 0:0.9.10-1.el7
libXt.x86_64 0:1.1.5-3.el7 libXxf86vm.x86_64 0:1.1.4-1.el7 liberation-fonts-common.noarch 1:1.07.2-16.el7
liberation-mono-fonts.noarch 1:1.07.2-16.el7 libfontenc.x86_64 0:1.1.3-3.el7 libjpeg-turbo.x86_64 0:1.2.90-5.el7
libpng.x86_64 2:1.5.13-7.el7_2 libtiff.x86_64 0:4.0.3-27.el7_3 libusbx.x86_64 0:1.0.21-1.el7
libwayland-client.x86_64 0:1.14.0-2.el7 libwayland-server.x86_64 0:1.14.0-2.el7 libxcb.x86_64 0:1.12-1.el7
libxshmfence.x86_64 0:1.2-1.el7 mesa-libEGL.x86_64 0:17.2.3-8.20171019.el7 mesa-libGL.x86_64 0:17.2.3-8.20171019.el7
mesa-libgbm.x86_64 0:17.2.3-8.20171019.el7 mesa-libglapi.x86_64 0:17.2.3-8.20171019.el7 openjpeg-libs.x86_64 0:1.5.1-17.el7
pixman.x86_64 0:0.34.0-1.el7 poppler.x86_64 0:0.26.5-17.el7_4 poppler-data.noarch 0:0.4.6-3.el7
poppler-utils.x86_64 0:0.26.5-17.el7_4 qpdf-libs.x86_64 0:5.0.1-3.el7 urw-fonts.noarch 0:2.4-16.el7
xorg-x11-font-utils.x86_64 1:7.5-20.el7

Complete!
2. Modifica il file di configurazione /etc/cups/cups-browsed.conf e aggiungi le direttive di configurazione richieste, alcune delle seguenti sono quelle disponibili:
BrowsePoll
BrowseAllow
BrowseLocalProtocols
BrowseRemoteProtocols
BrowseProtocols
Prima di CentOS/RHEL 7, queste direttive venivano utilizzate in /etc/cups/cupsd.conf ma su CentOS/RHEL 7 e più recenti questi non funzionano più su di esso ma nel file /etc/cups/cups-browsed.conf . Per ulteriori informazioni sulle direttive disponibili, utilizzare le pagine man di cups-browsed.conf, “# man cups-browsed.conf”.
# vi /etc/cups/cups-browsed.conf
<<< IN THIS TEST WE JUST ADDED BrowseAllow 10.157.10.122 IN WHICH THE IP IS OUR CUPS SERVER >>>
# cat /etc/cups/cups-browsed.conf | grep -v '#'
BrowseRemoteProtocols dnssd cups
BrowseAllow 10.157.10.122
3. Avvia il servizio bicchieri
# systemctl enable cups.service
# systemctl start cups.service
4. Avviare il servizio avahi-daemon. Se non è disponibile, installalo:
# yum -y install avahi
# systemctl enable avahi-daemon
# systemctl start avahi-daemon
5. Avvia il servizio di navigazione delle tazze
# systemctl enable cups-browsed
# systemctl start cups-browsed
6. Usa il comando lpstat per verificare che la navigazione funzioni come previsto:
# lpstat -t
scheduler is running
no system default destination
device for TestPrinter08-SP5210SR: ipps://ol7-master.local:631/printers/TestPrinter08-SP5210SR
device for TestPrinter09-SP5210SR: ipps://ol7-master.local:631/printers/TestPrinter09-SP5210SR
TestPrinter08-SP5210SR accepting requests since Mon 03 Sep 2018 04:19:49 PM EDT
TestPrinter09-SP5210SR accepting requests since Mon 03 Sep 2018 04:19:49 PM EDT
printer TestPrinter08-SP5210SR is idle. enabled since Mon 03 Sep 2018 04:19:49 PM EDT
printer TestPrinter09-SP5210SR is idle. enabled since Mon 03 Sep 2018 04:19:49 PM EDT
o
# lpstat -v
device for TestPrinter08-SP5210SR: ipps://ol7-master.local:631/printers/TestPrinter08-SP5210SR
device for TestPrinter09-SP5210SR: ipps://ol7-master.local:631/printers/TestPrinter09-SP5210SR
Per maggiori informazioni su lpstat fare riferimento alle pagine man, “# man lpstat”. Ora i tuoi server master e client CUPS sono configurati e pronti per l'uso.