Chef è una piattaforma di automazione che configura e gestisce la tua infrastruttura. Trasforma l'infrastruttura in codice. È uno strumento di gestione della configurazione basato su Ruby. Questa piattaforma di automazione è composta da una workstation Chef, un server Chef e client chef che sono i nodi gestiti dal server Chef. Tutti i file di configurazione dello chef, le ricette, i libri di cucina, i modelli, ecc. vengono creati e testati sulla workstation Chef e vengono caricati sullo Chef Server, quindi li distribuisce su tutti i possibili nodi registrati all'interno delle organizzazioni. È un framework di automazione ideale per Ceph e OpenStack. Non solo ci dà il controllo completo, ma è semplicissimo da usare.
In questo articolo spiego i passaggi che ho seguito per implementare un ambiente di automazione Chef sui miei server CentOS 7.
Prerequisiti
- Si consiglia di avere un nome host FQDN
- Chef supporta solo l'architettura a 64 bit
- Si consiglia una corretta configurazione di rete/firewall/host
Come funziona Chef?
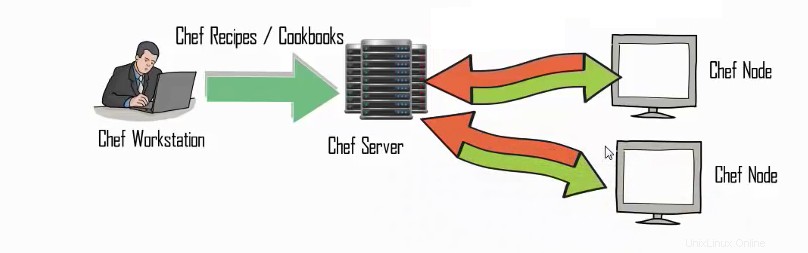
Chef comprende una postazione di lavoro configurata per sviluppare ricette e libri di cucina. È inoltre configurato per eseguire il coltello e si sincronizza con lo chef-repo per mantenerlo aggiornato. Aiuta nella configurazione della politica organizzativa, inclusa la definizione di ruoli e ambienti e la garanzia che i dati critici vengano archiviati nei data bag. Una volta che queste ricette/ricettari sono stati testati nelle workstation, possiamo caricarli sul nostro server Chef. Il server Chef memorizza queste ricette e le assegna ai nodi in base alle loro esigenze. Fondamentalmente nodes comunica solo con il server chef e da lì prende istruzioni e ricette.
Nella mia configurazione demo, ho tre server in particolare
- chefserver.test20.com - Server Chef
- chefwork.test20.com - Postazione per chef
- chefnode.test20.com - Nodo Chef
Iniziamo con la creazione di Workstation.
Configura una workstation
Prima di tutto, accedi al nostro server chefwork, quindi scarica il pacchetto di sviluppo Chef. Una volta scaricato il pacchetto, possiamo installarlo usando il comando rpm.
root@chefwork ~]# wget https://packages.chef.io/stable/el/7/chefdk-0.14.25-1.el7.x86_64.rpm
--2016-05-20 03:47:31-- https://packages.chef.io/stable/el/7/chefdk-0.14.25-1.el7.x86_64.rpm
Resolving packages.chef.io (packages.chef.io)... 75.126.118.188, 108.168.243.150
Connecting to packages.chef.io (packages.chef.io)|75.126.118.188|:443... connected.
HTTP request sent, awaiting response... 302
Location: https://akamai.bintray.com/87/879656c7736ef2a061937c1f45c623e99fd57aaa2f6d802e9799d333d7e5342f?__gda__=exp=1463716772~hmac=ef9ce287129ab2f035449b76a1adc32b7bf8cae37f018f59da5a642d3e2650fc&response-content-disposition=attachment%3Bfilename%3D%22chefdk-0.14.25-1.el7.x86_64.rpm%22&response-content-type=application%2Foctet-stream [following]
--2016-05-20 03:47:32-- https://akamai.bintray.com/87/879656c7736ef2a061937c1f45c623e99fd57aaa2f6d802e9799d333d7e5342f?__gda__=exp=1463716772~hmac=ef9ce287129ab2f035449b76a1adc32b7bf8cae37f018f59da5a642d3e2650fc&response-content-disposition=attachment%3Bfilename%3D%22chefdk-0.14.25-1.el7.x86_64.rpm%22&response-content-type=application%2Foctet-stream
Resolving akamai.bintray.com (akamai.bintray.com)... 104.123.250.232
Connecting to akamai.bintray.com (akamai.bintray.com)|104.123.250.232|:443... connected.
HTTP request sent, awaiting response... 200 OK
Length: 143927478 (137M) [application/octet-stream]
Saving to: ‘chefdk-0.14.25-1.el7.x86_64.rpm’

100%[====================================================================================================>] 14,39,27,478 2.52MB/s in 55s

2016-05-20 03:48:29 (2.49 MB/s) - ‘chefdk-0.14.25-1.el7.x86_64.rpm’ saved [143927478/143927478]

[root@chefwork ~]# rpm -ivh chefdk-0.14.25-1.el7.x86_64.rpm
warning: chefdk-0.14.25-1.el7.x86_64.rpm: Header V4 DSA/SHA1 Signature, key ID 83ef826a: NOKEY
Preparing... ################################# [100%]
Updating / installing...
1:chefdk-0.14.25-1.el7 ################################# [100%]
Thank you for installing Chef Development Kit!
Cos'è ChefDK?
Lo Chef Development Kit contiene tutto per iniziare con Chef, insieme agli strumenti essenziali per la gestione del codice.
- Contiene un nuovo strumento da riga di comando, "chef"
- Il gestore delle dipendenze del ricettario Berkshelf
- Il framework di test di integrazione di Test Kitchen.
- ChefSpec per testare la sintassi del ricettario
- Foodcritic, uno strumento per l'analisi statica del codice sui libri di cucina.
- Ha anche tutti gli strumenti Chef come Chef Client, Knife, Ohai e Chef Zero
Iniziamo con la creazione di alcune ricette nella Workstation e testiamo in locale per assicurarne il funzionamento.
Crea una cartella denominata chef-repo su /root/ e all'interno di quella cartella possiamo creare le nostre ricette.
[root@chefwork ~]# mkdir chef-repo
[root@chefwork ~]# cd chef-repo

Creating a recipe called hello.rb.
[root@chefwork chef-repo]# vim hello.rb
[root@chefwork chef-repo]#
[root@chefwork chef-repo]# cat hello.rb
file '/etc/motd' do
content 'Welcome to Chef'
end
Questa ricetta hello.rb crea un file chiamato /etc/motd con contenuto "Benvenuto in Chef". Questa ricetta utilizza il file di risorse per migliorare questa attività. Ora possiamo eseguire questa ricetta per verificarne il funzionamento.
[root@chefwork chef-repo]# chef-apply hello.rb
Recipe: (chef-apply cookbook)::(chef-apply recipe)
* file[/etc/motd] action create (up to date)

Confirm the recipe execution:

[root@chefwork chef-repo]# cat /etc/motd
Welcome to Chef
Eliminazione del file
Possiamo modificare il nostro file di ricetta per eliminare il file creato ed eseguirlo utilizzando il comando chef-applica come di seguito:
[root@chefwork chef-repo]# cat hello.rb
file '/etc/motd' do
action :delete
end

[root@chefwork chef-repo]# chef-apply hello.rb
Recipe: (chef-apply cookbook)::(chef-apply recipe)
* file[/etc/motd] action delete
- delete file /etc/motd
Installazione di un pacchetto
Stiamo modificando il nostro file di ricetta per installare il pacchetto httpd sul nostro server e copiare un file index.html nella root del documento predefinita per confermare l'installazione. Il pacchetto e le risorse del servizio vengono utilizzati per implementarlo. L'azione predefinita per una risorsa del pacchetto è l'installazione, quindi non è necessario specificare tale azione separatamente.
[root@chefwork chef-conf]# cat hello.rb
package 'httpd'
service 'httpd' do
action [:enable, :start]
end

file '/var/www/html/index.html' do
content 'Welcome to Apache in Chef'
end
[root@chefwork chef-conf]# chef-apply hello.rb
Recipe: (chef-apply cookbook)::(chef-apply recipe)
* yum_package[httpd] action install
 - install version 2.4.6-40.el7.centos.1 of package httpd
 * service[httpd] action enable
 - enable service service[httpd]
 * service[httpd] action start
 - start service service[httpd]
 * file[/var/www/html/index.html] action create (up to date)
L'esecuzione del comando descrive chiaramente ogni istanza nella ricetta. Installa il pacchetto Apache, abilita e avvia il servizio httpd sul server. E crea un file index.html nella root del documento predefinita con il contenuto "Benvenuto in Apache in Chef". Quindi possiamo verificarlo eseguendo l'IP del server nel browser.

Creazione di libri di cucina
Ora possiamo creare il nostro primo ricettario, creare una cartella chiamata chef-repo nella directory /root ed eseguire il comando "chef generate cookbook [nome ricettario]" per generare il nostro ricettario.
root@chefwork chef-repo]# mkdir cookbooks
[root@chefwork chef-repo]# cd cookbooks/
[root@chefwork cookbooks]# chef generate cookbook httpd_deploy
Installing Cookbook Gems:
Compiling Cookbooks...
Recipe: code_generator::cookbook
* directory[/root/chef-repo/cookbook/httpd_deploy] action create
- create new directory /root/chef-repo/cookbook/httpd_deploy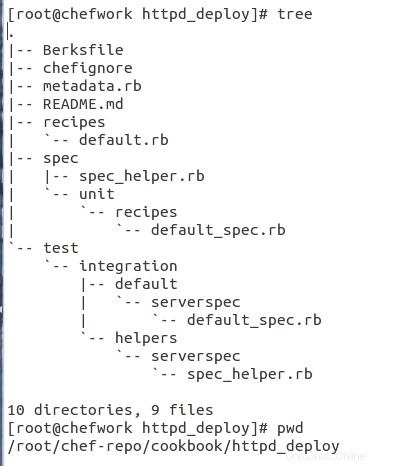
Questa è la struttura dei file del ricettario creato, vediamo uno per uno l'utilizzo di questi file/cartelle all'interno del ricettario.
Berksfile :È il file di configurazione, che dice principalmente a BerkShelf quali sono le dipendenze del ricettario, che possono essere specificate direttamente all'interno di questo file o indirettamente tramite metadata.rb. Dice anche a Berkshelf dove dovrebbe cercare quelle dipendenze.
Chefigura :indica a Chef quali file devono essere ignorati durante il caricamento di un libro di cucina sul server Chef.
metadata.rb :contiene meta informazioni sul tuo libro di cucina, come nome, contatti o descrizione. Può anche indicare le dipendenze del ricettario.
LEGGIMI.md :contiene il punto di ingresso della documentazione per il repository.
Ricette :Contiene le ricette del ricettario. Inizia con l'esecuzione del file default.rb.
default.rb :Il formato della ricetta predefinito.
specifiche :conserverà gli unit test case delle tue librerie.
prova :Memorizzerà i casi di test unitari delle tue ricette.
Creazione di un modello
Successivamente creeremo un file modello per noi stessi. In precedenza, abbiamo creato un file con alcuni contenuti, ma che non possono adattarsi alle nostre ricette e alle strutture dei libri di cucina. quindi vediamo come possiamo creare un modello.
[root@chefwork cookbook]# chef generate template httpd_deploy index.html
Installing Cookbook Gems:
Compiling Cookbooks...
Recipe: code_generator::template
* directory[./httpd_deploy/templates/default] action create
- create new directory ./httpd_deploy/templates/default
* template[./httpd_deploy/templates/default/index.html.erb] action create
- create new file ./httpd_deploy/templates/default/index.html.erb
- update content in file ./httpd_deploy/templates/default/index.html.erb from none to e3b0c4
(diff output suppressed by config)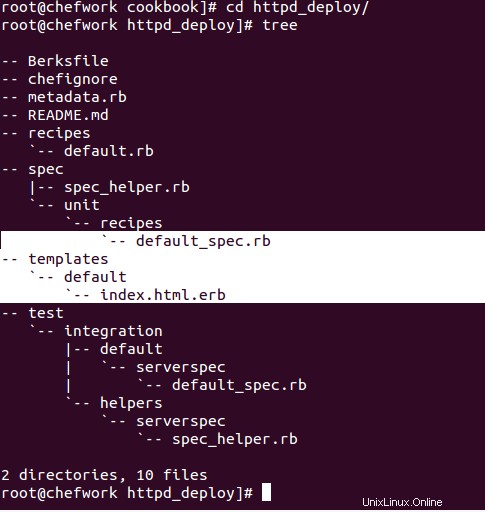
Ora, se vedi la struttura dei file del nostro libro di cucina, c'è una cartella creata con il modello di nome con index.html.erb file. Possiamo modificare il nostro file modello index.html.erb e aggiungerlo alla nostra ricetta come di seguito:
root@chefwork default]# cat index.html.erb
Welcome to Chef Apache Deployment
[root@chefwork default]# pwd
/root/chef-repo/cookbook/httpd_deploy/templates/default
Creazione della ricetta con questo modello
[root@chefwork recipes]# pwd
/root/chef-repo/cookbook/httpd_deploy/recipes
[root@chefwork recipes]# cat default.rb
#
# Cookbook Name:: httpd_deploy
# Recipe:: default
#
# Copyright (c) 2016 The Authors, All Rights Reserved.
package 'httpd'
service 'httpd' do
action [:enable, :start]
end

template '/var/www/html/index.html' do
 source 'index.html.erb'
end
Ora torna alla nostra cartella chef-repo ed esegui/testa la nostra ricetta sulla nostra workstation.
[root@chefwork chef-repo]# chef-client --local-mode --runlist 'recipe[httpd_deploy]'
[2016-05-20T05:44:40+00:00] WARN: No config file found or specified on command line, using command line options.
Starting Chef Client, version 12.10.24
resolving cookbooks for run list: ["httpd_deploy"]
Synchronizing Cookbooks:
- httpd_deploy (0.1.0)
Installing Cookbook Gems:
Compiling Cookbooks...
Converging 3 resources
Recipe: httpd_deploy::default
* yum_package[httpd] action install
 - install version 2.4.6-40.el7.centos.1 of package httpd
 * service[httpd] action enable
 - enable service service[httpd]
 * service[httpd] action start
 - start service service[httpd]
* template[/var/www/html/index.html] action create
 - update content in file /var/www/html/index.html from 152204 to 748cbd
 --- /var/www/html/index.html 2016-05-20 04:18:38.553231745 +0000
 +++ /var/www/html/.chef-index.html20160520-20425-1bez4qs 2016-05-20 05:44:47.344848833 +0000
 @@ -1,2 +1,2 @@
 -Welcome to Apache in Chef
 +Welcome to Chef Apache Deployment

Running handlers:
Running handlers complete
Chef Client finished, 4/4 resources updated in 06 seconds

[root@chefwork chef-repo]# cat /var/www/html/index.html
Welcome to Chef Apache Deployment
Secondo la nostra ricetta, Apache è installato sulla nostra workstation, il servizio viene avviato e abilitato all'avvio. E un file modello è stato creato sulla nostra radice del documento predefinita.
Ora abbiamo testato la nostra workstation. È il momento della configurazione del server Chef.
Configurazione del server Chef
Prima di tutto accedi al nostro server Chef "chefserver.test20.com" e scarica il pacchetto server chef compatibile con la nostra versione OS.
[root@chefserver ~]# wget https://packages.chef.io/stable/el/7/chef-server-core-12.6.0-1.el7.x86_64.rpm
--2016-05-20 07:23:46-- https://packages.chef.io/stable/el/7/chef-server-core-12.6.0-1.el7.x86_64.rpm
Resolving packages.chef.io (packages.chef.io)... 75.126.118.188, 108.168.243.150
Connecting to packages.chef.io (packages.chef.io)|75.126.118.188|:443... connected.
HTTP request sent, awaiting response... 302
Location: https://akamai.bintray.com/5a/5a36d0ffa692bf788e90315171582a758d4c5d8033a892dca9a81d3c03c44d14?__gda__=exp=1463729747~hmac=86e28bf2d5197154c84b571330b4c897006c2cb7f14cc9fc386c62d8b6e34c2d&response-content-disposition=attachment%3Bfilename%3D%22chef-server-core-12.6.0-1.el7.x86_64.rpm%22&response-content-type=application%2Foctet-stream [following]
--2016-05-20 07:23:47-- https://akamai.bintray.com/5a/5a36d0ffa692bf788e90315171582a758d4c5d8033a892dca9a81d3c03c44d14?__gda__=exp=1463729747~hmac=86e28bf2d5197154c84b571330b4c897006c2cb7f14cc9fc386c62d8b6e34c2d&response-content-disposition=attachment%3Bfilename%3D%22chef-server-core-12.6.0-1.el7.x86_64.rpm%22&response-content-type=application%2Foctet-stream
Resolving akamai.bintray.com (akamai.bintray.com)... 23.15.249.68
Connecting to akamai.bintray.com (akamai.bintray.com)|23.15.249.68|:443... connected.
HTTP request sent, awaiting response... 200 OK
Length: 481817688 (459M) [application/octet-stream]
Saving to: ‘chef-server-core-12.6.0-1.el7.x86_64.rpm’

100%[====================================================================================================>] 48,18,17,688 2.90MB/s in 3m 53s

[root@chefserver ~]# rpm -ivh chef-server-core-12.6.0-1.el7.x86_64.rpm
warning: chef-server-core-12.6.0-1.el7.x86_64.rpm: Header V4 DSA/SHA1 Signature, key ID 83ef826a: NOKEY
Preparing... ################################# [100%]
Updating / installing...
1:chef-server-core-12.6.0-1.el7 ################################# [100%]
Ora il nostro server Chef è installato. Ma dobbiamo riconfigurare il server Chef per abilitare e avviare tutti i servizi che sono composti nel server Chef. Possiamo eseguire questo comando per riconfigurare.
root@chefserver ~]# chef-server-ctl reconfigure
Starting Chef Client, version 12.10.26
resolving cookbooks for run list: ["private-chef::default"]
Synchronizing Cookbooks:
- enterprise (0.10.0)
- apt (2.9.2)
- yum (3.10.0)
- openssl (4.4.0)
- chef-sugar (3.3.0)
- packagecloud (0.0.18)
- runit (1.6.0)
- private-chef (0.1.0)
Installing Cookbook Gems:
Compiling Cookbooks...
[2016-05-19T02:38:37+00:00] WARN: Chef::Provider::AptRepository already exists! Cannot create deprecation class for LWRP provider apt_repository from cookbook apt
Chef Client finished, 394/459 resources updated in 04 minutes 05 seconds
Chef Server Reconfigured!
Conferma lo stato del servizio e i relativi pid eseguendo questo comando.
[root@chefserver ~]# chef-server-ctl status
run: bookshelf: (pid 6140) 162s; run: log: (pid 6156) 162s
run: nginx: (pid 6051) 165s; run: log: (pid 6295) 156s
run: oc_bifrost: (pid 5987) 167s; run: log: (pid 6022) 167s
run: oc_id: (pid 6038) 165s; run: log: (pid 6042) 165s
run: opscode-erchef: (pid 6226) 159s; run: log: (pid 6214) 161s
run: opscode-expander: (pid 6102) 162s; run: log: (pid 6133) 162s
run: opscode-solr4: (pid 6067) 164s; run: log: (pid 6095) 163s
run: postgresql: (pid 5918) 168s; run: log: (pid 5960) 168s
run: rabbitmq: (pid 5876) 168s; run: log: (pid 5869) 169s
run: redis_lb: (pid 5795) 290s; run: log: (pid 6280) 156s
Evviva!! Il nostro Chef Server è pronto :). Ora possiamo installare la console di gestione per ottenere un'interfaccia web per gestire il nostro server Chef.
Installazione della Console di gestione per Chef Server
Possiamo installare la console di gestione semplicemente eseguendo questo comando "chef-server-ctl install chef-manag e" dal server dello chef.
[root@chefserver ~]# chef-server-ctl install chef-manage
Starting Chef Client, version 12.10.26
resolving cookbooks for run list: ["private-chef::add_ons_wrapper"]
Synchronizing Cookbooks:
- enterprise (0.10.0)
- apt (2.9.2)
- yum (3.10.0)
- openssl (4.4.0)
- runit (1.6.0)
- chef-sugar (3.3.0)
- packagecloud (0.0.18)
- private-chef (0.1.0)
Installing Cookbook Gems:
Compiling Cookbooks...
Converging 4 resources
Recipe: private-chef::add_ons_wrapper
* ruby_block[addon_install_notification_chef-manage] action nothing (skipped due to action :nothing)
* remote_file[/var/opt/opscode/local-mode-cache/chef-manage-2.3.0-1.el7.x86_64.rpm] action create
- create new file /var/opt/opscode/local-mode-cache/chef-manage-2.3.0-1.el7.x86_64.rpm
- update content in file /var/opt/opscode/local-mode-cache/chef-manage-2.3.0-1.el7.x86_64.rpm from none to 098cc4
(file sizes exceed 10000000 bytes, diff output suppressed)
* ruby_block[locate_addon_package_chef-manage] action run
- execute the ruby block locate_addon_package_chef-manage
* yum_package[chef-manage] action install
- install version 2.3.0-1.el7 of package chef-manage
* ruby_block[addon_install_notification_chef-manage] action create
- execute the ruby block addon_install_notification_chef-manage

Running handlers:
-- Installed Add-On Package: chef-manage
- #<Class:0x00000006032b80>::AddonInstallHandler
Running handlers complete
Chef Client finished, 4/5 resources updated in 02 minutes 39 seconds
Dopo aver installato la console di gestione, è necessario riconfigurare il server chef per riavviare il server chef e i suoi servizi per aggiornare queste modifiche.
[root@chefserver ~]# opscode-manage-ctl reconfigure
To use this software, you must agree to the terms of the software license agreement.
Press any key to continue.
Type 'yes' to accept the software license agreement, or anything else to cancel.
yes
Starting Chef Client, version 12.4.1
resolving cookbooks for run list: ["omnibus-chef-manage::default"]
Synchronizing Cookbooks:
- omnibus-chef-manage
- chef-server-ingredient
- enterprise
Recipe: omnibus-chef-manage::default
* private_chef_addon[chef-manage] action create (up to date)
Recipe: omnibus-chef-manage::config
Running handlers:
Running handlers complete
Chef Client finished, 62/79 resources updated in 44.764229437 seconds
chef-manage Reconfigured!

[root@chefserver ~]# chef-server-ctl reconfigure
Ora la nostra Console di gestione è pronta, dobbiamo configurare il nostro utente amministratore per gestire il nostro Chef Server.
Creazione dell'utente amministratore/organizzazione
Ho creato l'utente amministratore chiamato chefadmin con un'organizzazione linox sul mio server chef per gestirlo. Possiamo creare l'utente usando il comando chef chef-server-ctl user-create e organizzazione utilizzando il comandochef-server-ctl org-create.
root@chefserver ~]# chef-server-ctl user-create chefadmin saheetha shameer saheetha@gmail.com 'chef123' --filename /root/.chef/chefadmin.pem
[root@chefserver ~]#

[root@chefserver .chef]# chef-server-ctl org-create linox Chef Linoxide --association_user chefadmin --filename /root/.chef/linoxvalidator.pem
Le nostre chiavi sono salvate nella cartella /root/.chef. Dobbiamo copiare queste chiavi dal server Chef alla workstation per avviare la comunicazione tra il server Chef e la workstation.
Copiare le chiavi
Sto copiando le mie chiavi utente e validatore dal server Chef alla workstation per migliorare la connessione tra i server.
[root@chefserver .chef]# scp chefadmin.pem root@139.162.35.39:/root/chef-repo/.chef/
The authenticity of host '139.162.35.39 (139.162.35.39)' can't be established.
ECDSA key fingerprint is 5b:0b:07:85:9a:fb:b6:59:51:07:7f:14:1b:07:07:f0.
Are you sure you want to continue connecting (yes/no)? yes
Warning: Permanently added '139.162.35.39' (ECDSA) to the list of known hosts.
root@139.162.35.39's password:
chefadmin.pem 100% 1678 1.6KB/s 00:00
[root@chefserver .chef]#

[root@chefserver .chef]# scp linoxvalidator.pem root@139.162.35.39:/root/chef-repo/.chef/
The authenticity of host '139.162.35.39 (139.162.35.39)' can't be established.
ECDSA key fingerprint is 5b:0b:07:85:9a:fb:b6:59:51:07:7f:14:1b:07:07:f0.
Are you sure you want to continue connecting (yes/no)? yes
Warning: Permanently added '139.162.35.39' (ECDSA) to the list of known hosts.
root@139.162.35.39's password:
linoxvalidator.pem 100% 1678 1.6KB/s 00:00
[root@chefserver .chef]#

Now login to our Management console for our Chef server with the user/password  "chefadmin" created.
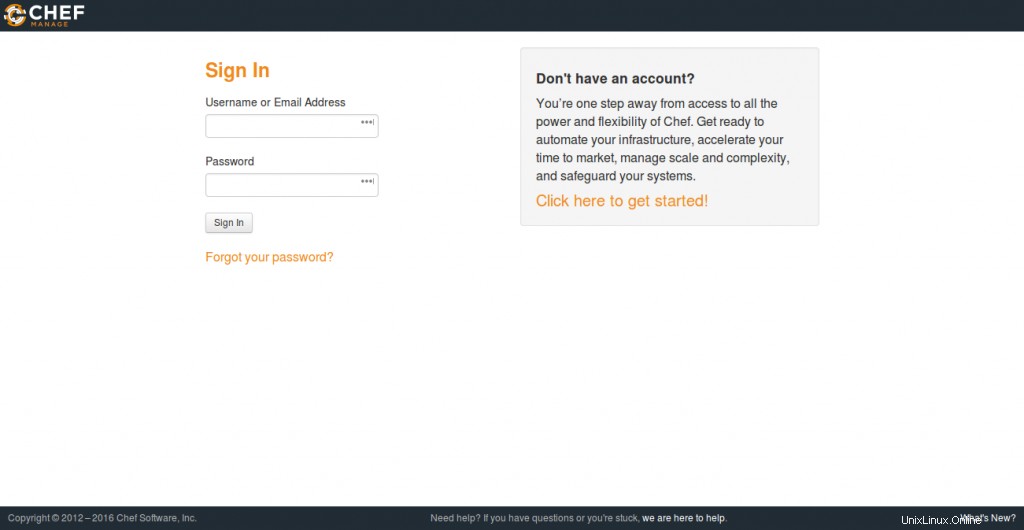
Ti verrà chiesto di creare un'organizzazione dal Pannello su Iscriviti. Basta crearne uno diverso.
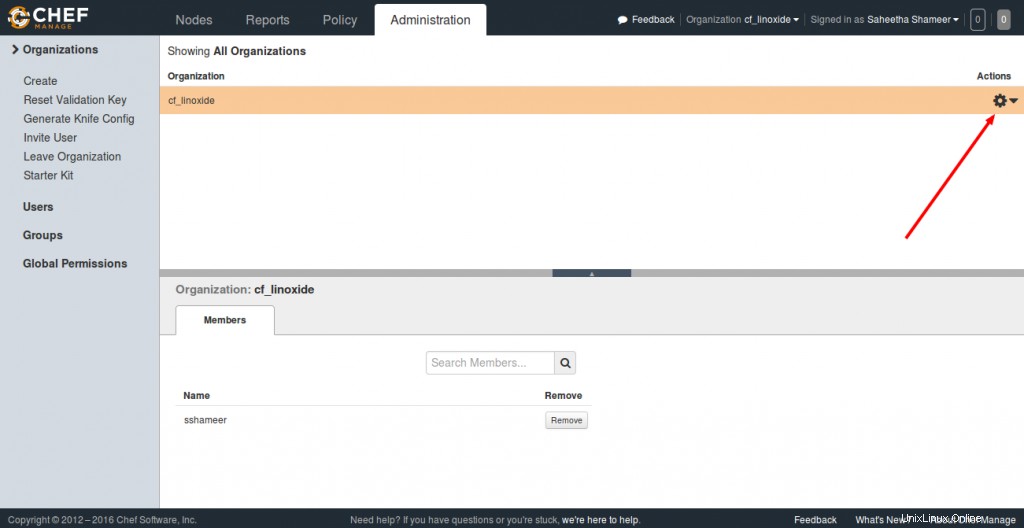
Scarica lo Starter Kit per WorkStation
Scegli una delle tue organizzazioni e scarica lo Starter Kit dallo Chef Server alla nostra Work Station.
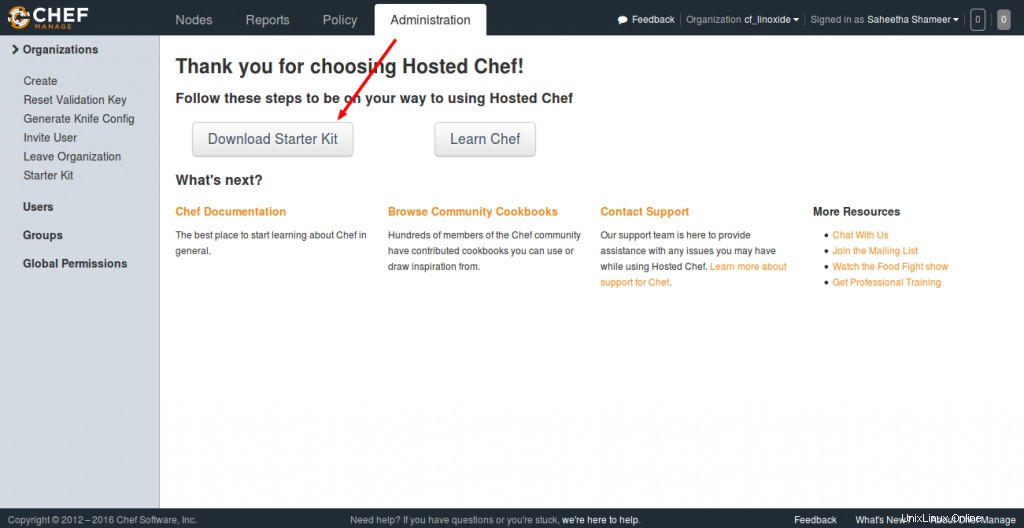
Dopo aver scaricato questo kit. Spostalo nella cartella Workstation/root ed estrai. Questo ti fornisce uno Starter Kit predefinito per l'avvio con il tuo server Chef. Include uno chef-repo.
root@chefwork ~]# ls
chef-starter.zip hello.rb
[root@chefwork~]# unzip chef-starter.zip
Archive: chef-starter.zip
creating: chef-repo/cookbooks/
creating: chef-repo/cookbooks/starter/
creating: chef-repo/cookbooks/starter/recipes/
inflating: chef-repo/cookbooks/starter/recipes/default.rb
creating: chef-repo/cookbooks/starter/files/
creating: chef-repo/cookbooks/starter/files/default/
inflating: chef-repo/cookbooks/starter/files/default/sample.txt
creating: chef-repo/cookbooks/starter/templates/
creating: chef-repo/cookbooks/starter/templates/default/
inflating: chef-repo/cookbooks/starter/templates/default/sample.erb
inflating: chef-repo/cookbooks/starter/metadata.rb
creating: chef-repo/cookbooks/starter/attributes/
inflating: chef-repo/cookbooks/starter/attributes/default.rb
inflating: chef-repo/cookbooks/chefignore
inflating: chef-repo/README.md
inflating: chef-repo/.gitignore
creating: chef-repo/.chef/
creating: chef-repo/roles/
inflating: chef-repo/.chef/knife.rb
inflating: chef-repo/roles/starter.rb
inflating: chef-repo/.chef/chefadmin.pem
inflating: chef-repo/.chef/ln_blog-validator.pem
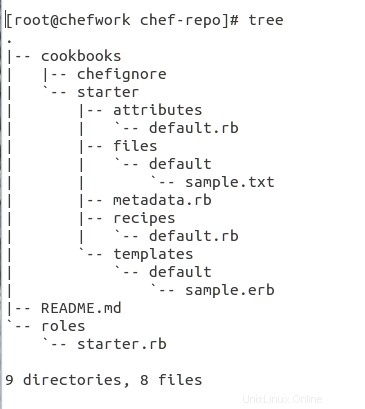
Questa è la struttura del file per il repository Chef scaricato. Contiene tutte le strutture di file richieste per iniziare.
Supermercato di libri di cucina
I libri di cucina dello chef sono disponibili nel Cookbook Super Market, possiamo andare allo Chef SuperMarket qui. Scarica i libri di cucina richiesti da lì. Sto scaricando uno dei ricettari per installare Apache da lì.
root@chefwork chef-repo]# knife cookbook site download learn_chef_httpd
Downloading learn_chef_httpd from Supermarket at version 0.2.0 to /root/chef-repo/learn_chef_httpd-0.2.0.tar.gz
Cookbook saved: /root/chef-repo/learn_chef_httpd-0.2.0.tar.gz

Extract this cookbook inside the "cookbooks" folder.

[root@chefwork chef-repo]# tar -xvf learn_chef_httpd-0.2.0.tar.gz

Tutti i file richiesti vengono creati automaticamente in questo ricettario. Non abbiamo richiesto alcuna modifica. Controlliamo la descrizione della nostra ricetta all'interno della nostra cartella delle ricette.
[root@chefwork recipes]# cat default.rb
#
# Cookbook Name:: learn_chef_httpd
# Recipe:: default
#
# Copyright (C) 2014
#
#
#
package 'httpd'

service 'httpd' do
 action [:enable, :start]
end

template '/var/www/html/index.html' do
 source 'index.html.erb'
end

service 'iptables' do
 action :stop
end
[root@chefwork recipes]#
[root@chefwork recipes]# pwd
/root/chef-repo/cookbooks/learn_chef_httpd/recipes
[root@chefwork recipes]#
Quindi dobbiamo solo caricare questo libro di cucina sul nostro server Chef perché sembra perfetto.
Convalida della connessione b/n Server e Workstation
Prima di caricare il ricettario, dobbiamo controllare e confermare la connessione tra il nostro server Chef e la Workstation. Prima di tutto, assicurati di avere un file di configurazione Knife corretto.
[root@chefwork .chef]# cat knife.rb
current_dir = File.dirname(__FILE__)
log_level :info
log_location STDOUT
node_name "chefadmin"
client_key "#{current_dir}/chefadmin.pem"
validation_client_name "linox-validator"
validation_key "#{current_dir}/linox-validator.pem"
chef_server_url "https://chefserver.test20.com:443/organizations/linox"

cookbook_path ["#{current_dir}/../cookbooks"]
Questo file di configurazione si trova in /root/chef-repo/.chef cartella. Le porzioni evidenziate sono le cose principali da curare. Ora puoi eseguire questo comando per verificare le connessioni.
root@chefwork .chef]# knife client list
ERROR: SSL Validation failure connecting to host: chefserver.test20.com - SSL_connect returned=1 errno=0 state=error: certificate verify failed
ERROR: Could not establish a secure connection to the server.
Use `knife ssl check` to troubleshoot your SSL configuration.
If your Chef Server uses a self-signed certificate, you can use
`knife ssl fetch` to make knife trust the server's certificates.

Original Exception: OpenSSL::SSL::SSLError: SSL Error connecting to https://chefserver.test20.com/clients - SSL_connect returned=1 errno=0 state=error: certificate verify failed
È possibile visualizzare una segnalazione di errore SSL. Per correggere questo errore, dobbiamo recuperare il certificato SSL per il nostro Chef Server e archiviarlo nella cartella /root/.chef/trusted_certs. Possiamo farlo eseguendo questo comando.
root@chefwork .chef]# knife ssl fetch
WARNING: Certificates from chefserver.test20.com will be fetched and placed in your trusted_cert
directory (/root/chef-repo/.chef/trusted_certs).

Knife has no means to verify these are the correct certificates. You should
verify the authenticity of these certificates after downloading.

Adding certificate for chefserver.test20.com in /root/chef-repo/.chef/trusted_certs/chefserver_test20_com.crt

Verifying the SSL:

[root@chefwork .chef]# knife ssl check
Connecting to host chefserver.test20.com:443
Successfully verified certificates from `chefserver.test20.com'

[root@chefwork .chef]# knife client list
chefnode
linox-validator
[root@chefwork .chef]# knife user list
chefadmin
Caricare il ricettario
Possiamo caricare il nostro libro di cucina sul nostro server chef dalla workstation utilizzando il comando coltello come di seguito:
Carica ricettario #knife learn_chef_httpd
[root@chefwork cookbooks]# knife cookbook upload learn_chef_httpd
Uploading learn_chef_httpd [0.2.0]
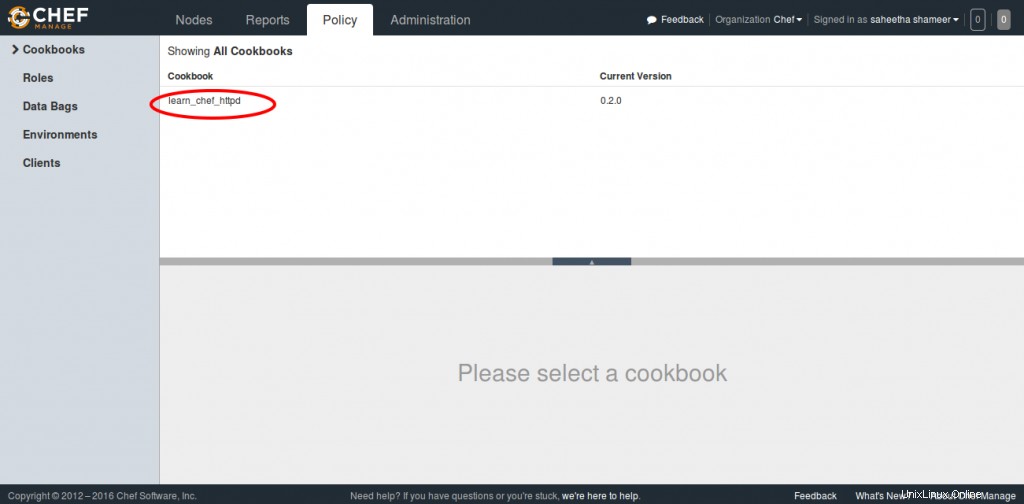
Uploaded 1 cookbook.Verifica il ricettario dalla console di Chef Server Management.
Aggiunta di un nodo
Questo è il passaggio finale dell'implementazione di Chef. Abbiamo configurato una workstation, un server Chef e quindi ora dobbiamo aggiungere i nostri client al server Chef per l'automazione. Sto aggiungendo il mio chefnode al server utilizzando il comando knife bootstrap come di seguito:
[root@chefwork cookbooks]# knife bootstrap 45.33.76.60 --ssh-user root --ssh-password dkfue@321 --node-name chefnode
Creating new client for chefnode
Creating new node for chefnode
Connecting to 45.33.76.60
45.33.76.60 -----> Installing Chef Omnibus (-v 12)
45.33.76.60 downloading https://omnitruck-direct.chef.io/chef/install.sh
45.33.76.60 to file /tmp/install.sh.5457/install.sh
45.33.76.60 trying wget...
45.33.76.60 el 7 x86_64
45.33.76.60 Getting information for chef stable 12 for el...
45.33.76.60 downloading https://omnitruck-direct.chef.io/stable/chef/metadata?v=12&p=el&pv=7&m=x86_64
45.33.76.60 to file /tmp/install.sh.5466/metadata.txt
45.33.76.60 trying wget...
45.33.76.60 sha1 4def83368a1349959fdaf0633c4d288d5ae229ce
45.33.76.60 sha256 6f00c7bdf96a3fb09494e51cd44f4c2e5696accd356fc6dc1175d49ad06fa39f
45.33.76.60 url https://packages.chef.io/stable/el/7/chef-12.10.24-1.el7.x86_64.rpm
45.33.76.60 version 12.10.24
45.33.76.60 downloaded metadata file looks valid...
45.33.76.60 downloading https://packages.chef.io/stable/el/7/chef-12.10.24-1.el7.x86_64.rpm
45.33.76.60 to file /tmp/install.sh.5466/chef-12.10.24-1.el7.x86_64.rpm
45.33.76.60 trying wget...
45.33.76.60 Comparing checksum with sha256sum...
45.33.76.60 Installing chef 12
45.33.76.60 installing with rpm...
45.33.76.60 warning: /tmp/install.sh.5466/chef-12.10.24-1.el7.x86_64.rpm: Header V4 DSA/SHA1 Signature, key ID 83ef826a: NOKEY
45.33.76.60 Preparing... ################################# [100%]
45.33.76.60 Updating / installing...
45.33.76.60 1:chef-12.10.24-1.el7 ################################# [100%]
45.33.76.60 Thank you for installing Chef!
45.33.76.60 Starting the first Chef Client run...
45.33.76.60 Starting Chef Client, version 12.10.24
45.33.76.60 resolving cookbooks for run list: []
45.33.76.60 Synchronizing Cookbooks:
45.33.76.60 Installing Cookbook Gems:
45.33.76.60 Compiling Cookbooks...
45.33.76.60 [2016-05-20T15:36:41+00:00] WARN: Node chefnode has an empty run list.
45.33.76.60 Converging 0 resources
45.33.76.60
45.33.76.60 Running handlers:
45.33.76.60 Running handlers complete
45.33.76.60 Chef Client finished, 0/0 resources updated in 08 seconds
[root@chefwork chef-repo]#
Questo comando inizializzerà anche l'installazione del client Chef nel nodo Chef. Puoi verificarlo dalla CLI sulla workstation utilizzando i comandi del coltello di seguito:
[root@chefwork chef-repo]# knife node list
chefnode
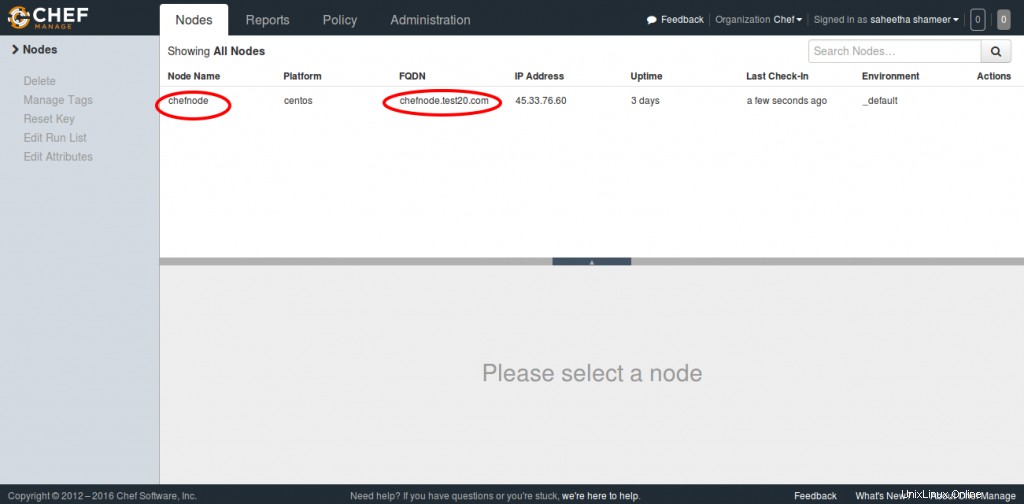
[root@chefwork chef-repo]# knife node show chefnode
Node Name: chefnode
Environment: _default
FQDN: chefnode.test20.com
IP: 45.33.76.60
Run List: recipe[learn_chef_httpd]
Roles:
Recipes:
Platform: centos 7.2.1511
Tags:Verifying it from the Management console.
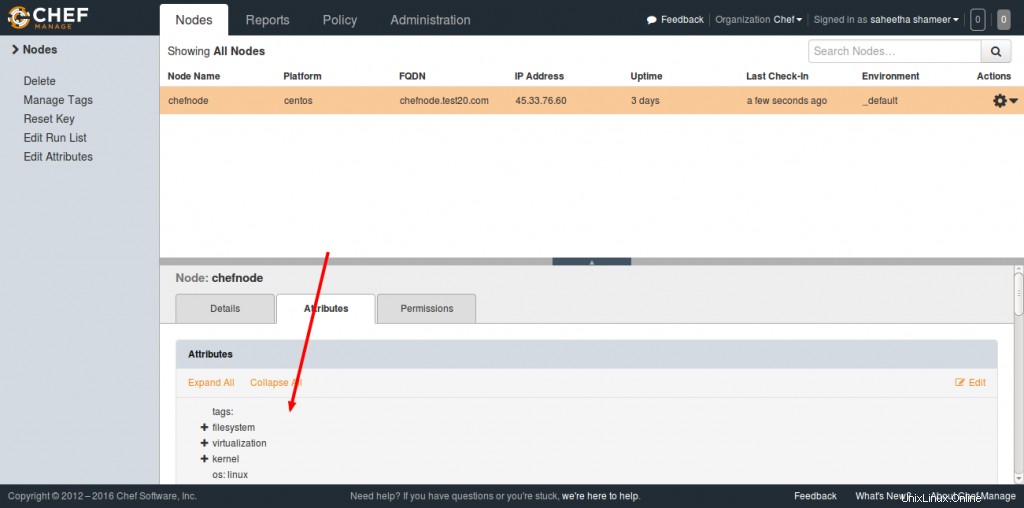
We can get more information regarding the added node by selecting the node and viewing the Attributes section.
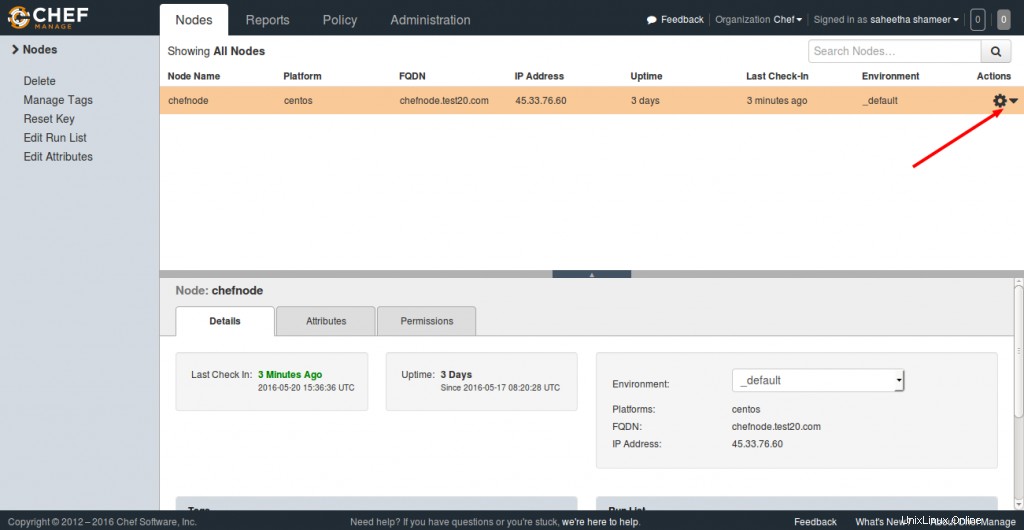
Managing Node Run List
Let's see how we can add a cookbook to the node and manage its runlist from the Chef server. As you see in the screenshot, you can click the Actions tab and select the Edit Runlist option to manage the runlist.
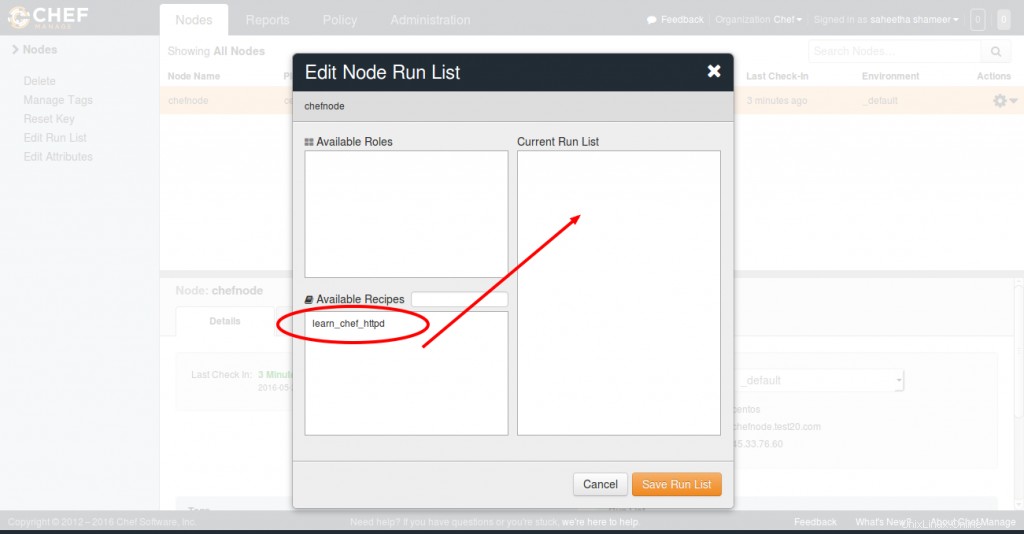
In the Available Recipes, you can see our learn_chef_httpd recipe, you can drag that from the available packages to the current run list and save the runlist.
Now login to your node and just run the command chef-client to execute your runlist.
root@chefnode ~]# chef-client
Starting Chef Client, version 12.10.24
resolving cookbooks for run list: ["learn_chef_httpd"]
Synchronizing Cookbooks:
- learn_chef_httpd (0.2.0)
Installing Cookbook Gems:
Compiling Cookbooks...
Converging 4 resources
Recipe: learn_chef_httpd::default
* yum_package[httpd] action install
Similarly, we can add any number of nodes to your Chef Server depending on its configuration and hardware. I hope this article provided you with the basic understanding of Chef implementation. I would recommend your valuable comments and suggestions on this. Thank you for reading this :)
Happy Automation with Chef!!