Questo tutorial mostra come installare Nginx su un server CentOS 7 con supporto PHP (tramite PHP-FPM) e supporto MySQL (MariaDB).
Cos'è LEMP?
Nginx (pronunciato "engine x") è un server HTTP gratuito, open source e ad alte prestazioni. Nginx è noto per la sua stabilità, il ricco set di funzionalità, la configurazione semplice e il basso consumo di risorse.
Prerequisiti LEMP
In questo tutorial, userò il nome host server1.example.com con l'indirizzo IP 192.168.1.100. Queste impostazioni potrebbero differire per te, quindi devi sostituirle dove appropriato.
Userò l'editor nano in questo tutorial per modificare i file di configurazione. Nano può essere installato in questo modo.
yum -y install nano
Consiglio di installare un firewall. Se non hai ancora installato firewalld e desideri utilizzare un firewall, installalo con questi comandi:
yum -y install firewalld
avvia il firewall e abilita l'avvio all'avvio.
systemctl start firewalld.service
systemctl enable firewalld.service
Quindi, apri la tua porta SSH per assicurarti di poterti connettere al server tramite SSH.
firewall-cmd --permanent --zone=public --add-service=ssh
firewall-cmd --reload
Abilitazione di repository CentOS aggiuntivi
L'ultimo Nginx non è disponibile dai repository CentOS ufficiali, quindi includiamo il repository del progetto Nginx per installarlo:
nano /etc/yum.repos.d/nginx.repo
[nginx]
name=nginx repo
baseurl=http://nginx.org/packages/centos/$releasever/$basearch/
gpgcheck=0
enabled=1
Installazione di MySQL (MariaDB)
Innanzitutto, installiamo MariaDB come sostituto di MySQL. MariaDB è un fork gratuito di MySQL. Esegui questo comando sulla shell per installare il server del database MariaDB:
yum -y install mariadb mariadb-server net-tools
Quindi creiamo i collegamenti di avvio del sistema per MariaDB (in modo che si avvii automaticamente ogni volta che il sistema si avvia) e avviamo il server MariaDB:
systemctl enable mariadb.service
systemctl start mariadb.service
Ora controlla che la rete sia abilitata. Si noti che il servizio MraiDB è denominato mysql in quanto è un server di database compatibile. Corri
netstat -tap | grep mysql
Dovrebbe mostrare qualcosa del genere:
[[email protected] ~]# netstat -tap | grep mysql
tcp 0 0 0.0.0.0:mysql 0.0.0.0:* LISTEN 19842/mysqld
Corri:
mysql_secure_installation
per impostare una password per l'utente root (altrimenti chiunque può accedere al tuo database MySQL!):
[[email protected] ~]# mysql_secure_installation
/usr/bin/mysql_secure_installation: line 379: find_mysql_client: command not found
NOTE: RUNNING ALL PARTS OF THIS SCRIPT IS RECOMMENDED FOR ALL MariaDB
SERVERS IN PRODUCTION USE! PLEASE READ EACH STEP CAREFULLY!
In order to log into MariaDB to secure it, we'll need the current
password for the root user. If you've just installed MariaDB, and
you haven't set the root password yet, the password will be blank,
so you should just press enter here.
Enter current password for root (enter for none):
OK, successfully used password, moving on...
Setting the root password ensures that nobody can log into the MariaDB
root user without the proper authorisation.
Set root password? [Y/n] <-- ENTER
New password: <-- yourrootsqlpassword
Re-enter new password: <-- yourrootsqlpassword
Password updated successfully!
Reloading privilege tables..
... Success!
By default, a MariaDB installation has an anonymous user, allowing anyone
to log into MariaDB without having to have a user account created for
them. This is intended only for testing, and to make the installation
go a bit smoother. You should remove them before moving into a
production environment.
Remove anonymous users? [Y/n] <-- ENTER
... Success!
Normally, root should only be allowed to connect from 'localhost'. This
ensures that someone cannot guess at the root password from the network.
Disallow root login remotely? [Y/n] <-- ENTER
... Success!
By default, MariaDB comes with a database named 'test' that anyone can
access. This is also intended only for testing, and should be removed
before moving into a production environment.
Remove test database and access to it? [Y/n] <-- ENTER
- Dropping test database...
... Success!
- Removing privileges on test database...
... Success!
Reloading the privilege tables will ensure that all changes made so far
will take effect immediately.
Reload privilege tables now? [Y/n] <-- ENTER
... Success!
Cleaning up...
All done! If you've completed all of the above steps, your MariaDB
installation should now be secure.
Thanks for using MariaDB!
[[email protected] ~]#
[[email protetta] ~]# mysql_secure_installation
Installazione di Nginx
Nginx è disponibile come pacchetto da nginx.org che possiamo installare in questo modo:
yum -y install nginx
Quindi creiamo i collegamenti di avvio del sistema per nginx e lo avviamo:
systemctl enable nginx.service
systemctl start nginx.service
Ci sono possibilità che tu riceva un errore che la porta 80 è già in uso, il messaggio di errore sarà così:
[[email protected] ~]# service nginx start
Starting nginx: nginx: [emerg] bind() to 0.0.0.0:80 failed (98: Address already in use)
nginx: [emerg] bind() to 0.0.0.0:80 failed (98: Address already in use)
nginx: [emerg] bind() to 0.0.0.0:80 failed (98: Address already in use)
nginx: [emerg] bind() to 0.0.0.0:80 failed (98: Address already in use)
nginx: [emerg] bind() to 0.0.0.0:80 failed (98: Address already in use)
nginx: [emerg] still could not bind()
                                                           [FAILED]
[[email protected] ~]#
Ciò significa che un altro server web (probabilmente Apache) è già in esecuzione su questo server. Arrestare il servizio Apache e quindi avviare il servizio per NGINX:
systemctl stop httpd.service
yum remove httpd
systemctl disable httpd.service
Quindi prova ad avviare nuovamente Nginx.
systemctl start nginx.service
Apri le porte HTTP e HTTPS nel firewall
firewall-cmd --permanent --zone=public --add-service=http
firewall-cmd --permanent --zone=public --add-service=https
firewall-cmd --reload
L'output risultante sulla shell sarà simile al seguente:
[[email protected] ~]# firewall-cmd --permanent --zone=public --add-service=http
success
[[email protected] ~]# firewall-cmd --permanent --zone=public --add-service=https
success
[[email protected] ~]# firewall-cmd --reload
success
[[email protected] ~]#
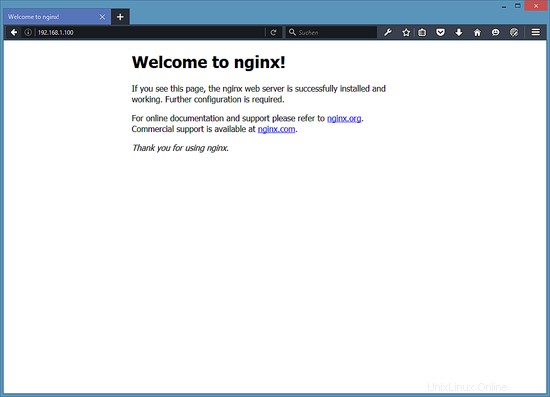
Digita l'indirizzo IP o il nome host del tuo server web in un browser (ad es. http://192.168.1.100) e dovresti vedere la pagina di benvenuto di Nginx:
Installazione di PHP
Possiamo far funzionare PHP 5 con Nginx tramite PHP-FPM (FastCGI Process Manager). PHP-FPM è un'implementazione PHP FastCGI alternativa con alcune funzionalità aggiuntive utili per siti di qualsiasi dimensione, in particolare per i siti più trafficati. Possiamo installare php-fpm insieme a php-cli e alcuni moduli PHP5 come php-mysql di cui hai bisogno se vuoi usare MySQL dai tuoi script PHP come segue:
yum -y install php-fpm php-cli php-mysql php-gd php-ldap php-odbc php-pdo php-pecl-memcache php-pear php-mbstring php-xml php-xmlrpc php-mbstring php-snmp php-soap
APC è un cacher di codice operativo PHP gratuito e aperto per la memorizzazione nella cache e l'ottimizzazione del codice intermedio PHP. È simile ad altri cacher di codice operativo PHP, come eAccelerator e Xcache. Si consiglia vivamente di averne uno installato per velocizzare la tua pagina PHP.
Installerò APC dal repository pecl PHP. PECL richiede l'installazione degli strumenti di sviluppo Centos per compilare il pacchetto APC.
yum -y install php-devel
yum -y groupinstall 'Development Tools'
e installa APC:
pecl install apc
[[email protected] ~]# pecl install apc
downloading APC-3.1.13.tgz ...
Starting to download APC-3.1.13.tgz (171,591 bytes)
.................done: 171,591 bytes
55 source files, building
running: phpize
Configuring for:
PHP Api Version: 20100412
Zend Module Api No: 20100525
Zend Extension Api No: 220100525
Enable internal debugging in APC [no] : <-- ENTER
Enable per request file info about files used from the APC cache [no] : <-- ENTER
Enable spin locks (EXPERIMENTAL) [no] : <-- ENTER
Enable memory protection (EXPERIMENTAL) [no] : <-- ENTER
Enable pthread mutexes (default) [no] : <-- ENTER
Enable pthread read/write locks (EXPERIMENTAL) [yes] : <-- ENTER
building in /var/tmp/pear-build-rootVrjsuq/APC-3.1.13
......
Quindi apri /etc/php.ini e imposta cgi.fix_pathinfo=0:
nano /etc/php.ini
[...]
; cgi.fix_pathinfo provides *real* PATH_INFO/PATH_TRANSLATED support for CGI.  PHP's
; previous behaviour was to set PATH_TRANSLATED to SCRIPT_FILENAME, and to not grok
; what PATH_INFO is.  For more information on PATH_INFO, see the cgi specs.  Setting
; this to 1 will cause PHP CGI to fix its paths to conform to the spec.  A setting
; of zero causes PHP to behave as before.  Default is 1.  You should fix your scripts
; to use SCRIPT_FILENAME rather than PATH_TRANSLATED.
; http://www.php.net/manual/en/ini.core.php#ini.cgi.fix-pathinfo
cgi.fix_pathinfo=0
[...]
(Leggi http://wiki.nginx.org/Pitfalls per scoprire perché dovresti farlo.)
e aggiungi la riga:
[...]
extension=apc.so
alla fine del file /etc/php.ini.
Inoltre, per evitare errori di fuso orario come
[28-June-2016 14:21:01] PHP Warning: phpinfo(): It is not safe to rely on the system's timezone settings. You are *required* to use the date.timezone setting or the date_default_timezone_set() function. In case you used any of those methods and you are still getting this warning, you most likely misspelled the timezone identifier. We selected 'Europe/Berlin' for 'CEST/2.0/DST' instead in /usr/share/nginx/html/info.php on line 2
... in /var/log/php-fpm/www-error.log quando chiami uno script PHP nel tuo browser, dovresti impostare date.timezone in /etc/php.ini:
[...]
[Date]
; Defines the default timezone used by the date functions
; http://www.php.net/manual/en/datetime.configuration.php#ini.date.timezone
date.timezone = "Europe/Berlin"
[...]
Puoi scoprire il fuso orario corretto per il tuo sistema eseguendo:
cat /etc/sysconfig/clock
[[email protected] nginx]# cat /etc/sysconfig/clock
ZONE="Europe/Berlin"
[[email protected] nginx]#
Quindi, crea i collegamenti di avvio del sistema per php-fpm e avvialo:
systemctl enable php-fpm.service
systemctl start php-fpm.service
PHP-FPM è un processo demone (con lo script init /etc/init.d/php-fpm) che esegue un server FastCGI sulla porta 9000.
Configurazione di Nginx
La configurazione di nginx è in /etc/nginx/nginx.conf che apriamo ora:
nano /etc/nginx/nginx.conf
Innanzitutto (questo è facoltativo) puoi aumentare il numero di processi di lavoro e impostare keepalive_timeout su un valore ragionevole:
[...]
worker_processes  4;
[...]
    keepalive_timeout  2;
[...]
Gli host virtuali sono definiti nei contenitori del server {} nella directory /etc/nginx/conf.d. Modifichiamo il vhost predefinito (in /etc/nginx/conf.d/default.conf) come segue:
nano /etc/nginx/conf.d/default.conf
[...]
server {
    listen       80;
    server_name  localhost;

    #charset koi8-r;
    #access_log  /var/log/nginx/log/host.access.log  main;

    location / {
        root   /usr/share/nginx/html;
        index  index.html index.htm index.php;
    }

    #error_page  404              /404.html;

    # redirect server error pages to the static page /50x.html
    #
    error_page   500 502 503 504  /50x.html;
    location = /50x.html {
        root   /usr/share/nginx/html;
    }

    # proxy the PHP scripts to Apache listening on 127.0.0.1:80
    #
    #location ~ \.php$ {
    #    proxy_pass   http://127.0.0.1;
    #}

    # pass the PHP scripts to FastCGI server listening on 127.0.0.1:9000
    #

    location ~ \.php$ {
        root           /usr/share/nginx/html;
        try_files $uri =404;
        fastcgi_pass   127.0.0.1:9000;
        fastcgi_index  index.php;
        fastcgi_param  SCRIPT_FILENAME  $document_root$fastcgi_script_name;
        include        fastcgi_params;
    }

	# deny access to .htaccess files, if Apache's document root
    # concurs with nginx's one
    #
    location ~ /\.ht {
        deny  all;
    }
}
nome del server _; lo rende un vhost catchall predefinito (ovviamente puoi anche specificare un nome host qui come www.example.com).
Nella posizione / parte, ho aggiunto index.php alla riga dell'indice. root /usr/share/nginx/html; significa che la radice del documento è la directory /usr/share/nginx/html.
La parte importante per PHP è la stanza posizione ~ \.php$ {}. Decommentalo per abilitarlo. Modificare la riga principale nella radice del documento del sito Web (ad es. root /usr/share/nginx/html;). Si noti che ho aggiunto la riga try_files $uri =404; per prevenire exploit zero-day (vedi http://wiki.nginx.org/Pitfalls#Passing_Uncontrol_Requests_to_PHP e http://forum.nginx.org/read.php?2,88845,page=3). Assicurati di cambiare la riga fastcgi_param in fastcgi_param SCRIPT_FILENAME $document_root$fastcgi_script_name; perché altrimenti, l'interprete PHP non troverà lo script PHP che chiami nel tuo browser ($document_root si traduce in /usr/share/nginx/html perché è quello che abbiamo impostato come radice del nostro documento).
PHP-FPM è in ascolto sulla porta 9000 su 127.0.0.1 per impostazione predefinita, quindi diciamo a Nginx di connettersi a 127.0.0.1:9000 con la linea fastcgi_pass 127.0.0.1:9000;. È anche possibile fare in modo che PHP-FPM utilizzi un socket Unix - lo descriverò nel capitolo 7.
Ora salva il file e ricarica Nginx:
systemctl restart nginx.service
Ora crea il seguente file PHP nella radice del documento /usr/share/nginx/html...
nano /usr/share/nginx/html/info.php
<?php
phpinfo();
?>
Ora chiamiamo quel file in un browser (es. http://192.168.1.100/info.php):
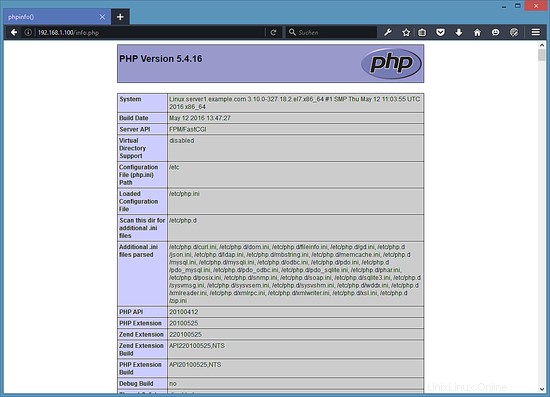
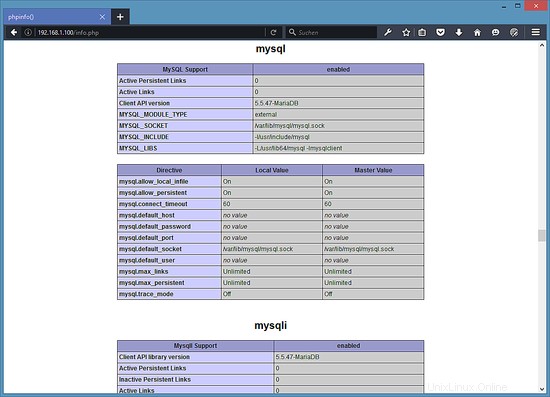
Come vedi, PHP 5 funziona e funziona tramite FPM/FastCGI, come mostrato nella riga dell'API del server. Se scorri più in basso, vedrai tutti i moduli che sono già abilitati in PHP5, incluso il modulo MySQL:
Fare in modo che PHP-FPM utilizzi un socket Unix
Per impostazione predefinita, PHP-FPM è in ascolto sulla porta 9000 su 127.0.0.1. È anche possibile fare in modo che PHP-FPM utilizzi un socket Unix che evita l'overhead del TCP. Per fare ciò, apri /etc/php-fpm.d/www.conf...
nano /etc/php-fpm.d/www.conf
... e fai in modo che la linea di ascolto appaia come segue:
[...]
;listen = 127.0.0.1:9000
listen = /var/run/php-fpm/php5-fpm.sock
[...]
Quindi ricarica PHP-FPM:
systemctl restart php-fpm.service
Quindi, passa attraverso la tua configurazione Nginx e tutti i tuoi vhost e cambia la riga fastcgi_pass 127.0.0.1:9000; a fastcgi_pass unix:/tmp/php5-fpm.sock;, ad es. così:
vi /etc/nginx/conf.d/default.conf
[...]
    location ~ \.php$ {
        root           /usr/share/nginx/html;
        try_files $uri =404;
        fastcgi_pass   unix:/var/run/php-fpm/php5-fpm.sock;
        fastcgi_index  index.php;
        fastcgi_param  SCRIPT_FILENAME  $document_root$fastcgi_script_name;
        include        fastcgi_params;
    }
[...]
Infine, ricarica Nginx:
systemctl restart nginx.service
Scarica questo server CentOS 7 come macchina virtuale
Questa configurazione è disponibile come download di una macchina virtuale in formato ova/ovf (compatibile con VMWare e Virtualbox) per gli abbonati howtoforge.
Dettagli di accesso per la VM
- La password di root è:howtoforge
- La password dell'utente "amministratore" è:howtoforge
Modifica entrambe le password al primo accesso.
- L'indirizzo IP della VM è 192.168.1.100
Link
- nginx:http://nginx.org/
- Wiki di nginx:http://wiki.nginx.org/
- PHP:http://www.php.net/
- PHP-FPM:http://php-fpm.org/
- MySQL:http://www.mysql.com/
- CentOS:http://www.centos.org/