Spacewalk gestisce gli aggiornamenti dei contenuti software per le distribuzioni derivate da Red Hat come Fedora, CentOS e Scientific Linux, dietro il tuo firewall. Questa è la versione open source del satellite RedHat 5. Abbiamo il satellite RedHat 6 e la versione open source è katello. Ti mostrerò in dettaglio come configurarlo in dettaglio nel mio prossimo tutorial. Spacewalk è uno strumento molto potente quando si tratta di gestire l'infrastruttura ed è davvero stabile e ben costruito.
Sto esaminando l'installazione di Spacewalk e ti mostrerò in dettaglio come configurarlo per essere pronto per la produzione insieme a tutte le funzionalità che possiamo utilizzare con esso. Sto andando con l'installazione di Postgres incorporata.
In questo tutorial utilizzerò 3 server:
- 192.168.1.20 - Spacewalk Server - centos 7
- 192.168.1.21 - client spacewalk - centos 6
- 192.168.1.22 - client space walk - centos 7
Requisiti
CentOS 7 con installazione minima:
cat /etc/redhat-release
Risultato:
CentOS Linux release 7.3.1611(Core)
SELinux in modalità forzata:
sestatus
SELinux status: enabled
SELinuxfs mount: /sys/fs/selinux
SELinux rootdirectory: /etc/selinux
Loaded policy name: targeted
Current mode:enforcing
Mode from config file: enforcing
Policy MLS status: enabled
Policy deny_unknown status: allowed
Max kernel policy version: 28
[[email protected] ~]#
Aggiungi la voce host/etc/hosts
192.168.1.20 spacewalk.sunil.cc spacewalk
Installazione del server Spacewalk
Installazione del repository CentOS Spacewalk.
rpm -Uvh http://yum.spacewalkproject.org/2.6/RHEL/7/x86_64/spacewalk-repo-2.6-0.el7.noarch.rpm
cat > /etc/yum.repos.d/jpackage-generic.repo << EOF
[jpackage-generic]
name=JPackage generic
baseurl=http://vesta.informatik.rwth-aachen.de/ftp/pub/comp/Linux/jpackage/5.0/generic/free/
#mirrorlist=http://www.jpackage.org/mirrorlist.php?dist=generic&type=free&release=5.0
enabled=1
gpgcheck=1
gpgkey=http://www.jpackage.org/jpackage.asc
EOF
rpm -Uvh https://dl.fedoraproject.org/pub/epel/epel-release-latest-7.noarch.rpm
Installazione di PostgreSQL per la passeggiata nello spazio:
yum install -y spacewalk-setup-postgresql spacewalk-postgresql
Aggiunta di regole Firewall.
firewall-cmd --add-service=http --permanent; firewall-cmd --add-service=https --permanent; firewall-cmd --add-port=5222/tcp --permanent;firewall-cmd --add-port=5269/tcp --permanent;firewall-cmd --add-port=69 â??permanent; firewall-cmd --add-port=5222/udp --permanent;firewall-cmd --add-port=5269/udp --permanent
E ricarica il firewall.
firewall-cmd --reload
Abilita Firewall.
systemctl enable firewalld
systemctl restart firewalld
Configura il server PostgreSQL.
Qui ho dato il nome DB per essere spacewalk, nome utente per essere spacewalkuser e password spacewalkuser.
spacewalk-setup-postgresql create --db spacewalk --user spacewalkuser --password spacewalkuser
/usr/bin/spacewalk-setup-postgresql: line 87: isSUSE: command not found
/usr/bin/spacewalk-setup-postgresql: line 100: isSUSE: command not found
Note: Forwarding request to 'systemctl enable postgresql.service'.
Created symlink from /etc/systemd/system/multi-user.target.wants/postgresql.service to /usr/lib/systemd/system/postgresql.service.
Hint: the preferred way to do this is now "postgresql-setup initdb"
Initializing database ... OK
/usr/bin/spacewalk-setup-postgresql: line 154: [: 018446744073692774399: integer expression expected
Redirecting to /bin/systemctl start  postgresql.service
Redirecting to /bin/systemctl reload  postgresql.service
Configurazione del server Spacewalk.
spacewalk-setup --skip-db-install
* Setting up SELinux..
** Database: Setting up database connection for PostgreSQL backend.
** Database: Embedded database installation SKIPPED.
Could not connect to the database.  Your connection information may be incorrect.  Error: DBI connect('dbname=rhnschema','rhnuser',...) failed: FATAL:  no pg_hba.conf entry for host "[local]", user "rhnuser", database "rhnschema", SSL off at /usr/share/perl5/vendor_perl/Spacewalk/Setup.pm line 1686.

Hostname (leave empty for local)?
Database? spacewalk
Username? spacewalkuser
Password?
** Database: Populating database.
*** Progress: ###########################
* Configuring tomcat.
* Setting up users and groups.
** GPG: Initializing GPG and importing key.
** GPG: Creating /root/.gnupg directory
You must enter an email address.
Admin Email Address? [email protected]
* Performing initial configuration.
* Configuring apache SSL virtual host.
Should setup configure apache's default ssl server for you (saves original ssl.conf) [Y]?
** /etc/httpd/conf.d/ssl.conf has been backed up to ssl.conf-swsave
* Configuring jabberd.
* Creating SSL certificates.
CA certificate password?
You must enter a password.
CA certificate password?
Re-enter CA certificate password?
Organization? IT
Organization Unit [spacewalk.sunil.cc]?
Email Address [[email protected]]?
City? Den Haag
State?
State? Zuid-Holland
Country code (Examples: "US", "JP", "IN", or type "?" to see a list)? NL
** SSL: Generating CA certificate.
** SSL: Deploying CA certificate.
** SSL: Generating server certificate.
** SSL: Storing SSL certificates.
* Deploying configuration files.
* Update configuration in database.
* Setting up Cobbler..
Cobbler requires tftp and xinetd services be turned on for PXE provisioning functionality. Enable these services [Y]? Y
* Restarting services.
Installation complete.
Visit https://spacewalk.sunil.cc to create the Spacewalk administrator account.
[[email protected] ~]#
Riavvia la passeggiata spaziale.
spacewalk-service restart
Shutting down spacewalk services...
Redirecting to /bin/systemctl stop  taskomatic.service
Stopping cobblerd (via systemctl):                         [  OK  ]
Redirecting to /bin/systemctl stop  rhn-search.service
Redirecting to /bin/systemctl stop  osa-dispatcher.service
Redirecting to /bin/systemctl stop  httpd.service
Redirecting to /bin/systemctl stop  tomcat.service
Redirecting to /bin/systemctl stop  jabberd.service
Redirecting to /bin/systemctl stop  postgresql.service
Done.
Starting spacewalk services...
Redirecting to /bin/systemctl start  postgresql.service
Redirecting to /bin/systemctl start  jabberd.service
Redirecting to /bin/systemctl start  tomcat.service
Waiting for tomcat to be ready ...
Redirecting to /bin/systemctl start  httpd.service
Redirecting to /bin/systemctl start  osa-dispatcher.service
Redirecting to /bin/systemctl start  rhn-search.service
Starting cobblerd (via systemctl):                         [  OK  ]
Redirecting to /bin/systemctl start  taskomatic.service
Done.
[[email protected] ~]#
Configura User Spacewalk
Accedi all'URL dal browser http://192.168.1.20
Inserisci i dettagli dell'organizzazione.
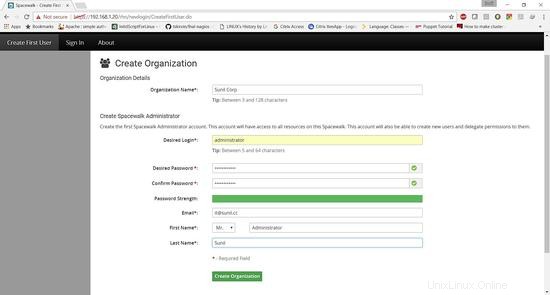
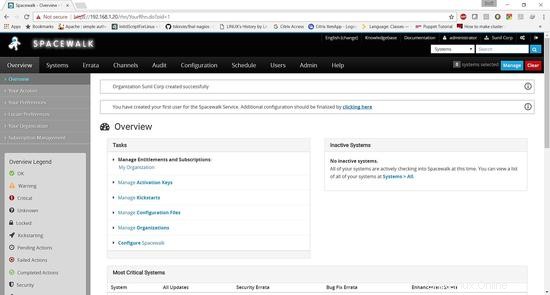
Spacewalk è stato installato correttamente.
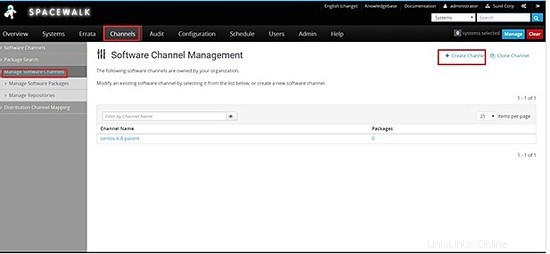
Creazione del canale Spacewalk
Clicca su canali -> gestisci canali software -> crea canale
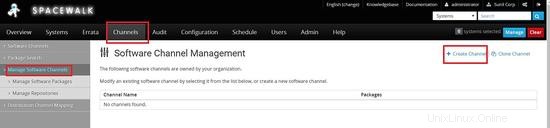
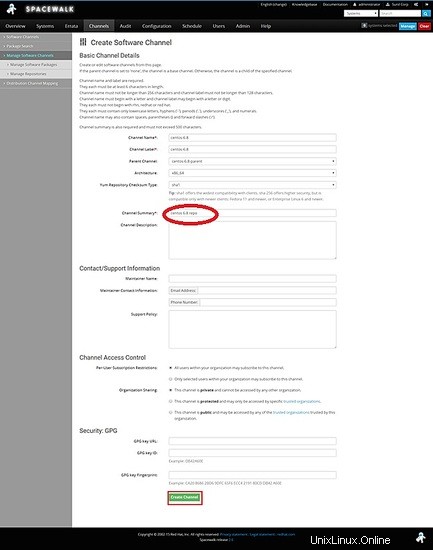
Crea un canale principale -> centos6.8-parent
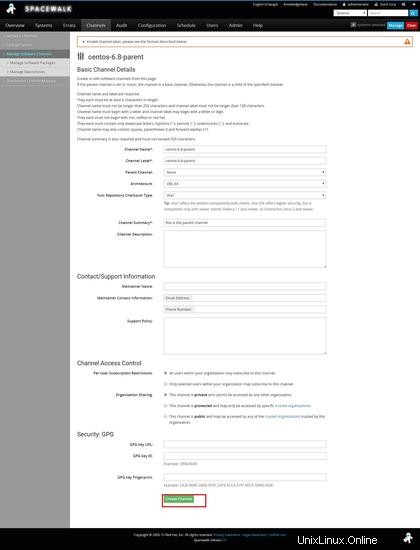
Ora dobbiamo creare canali figlio
Canali -> gestisci canali -> crea canale
Scegli il canale principale da centos-6.8-genitore
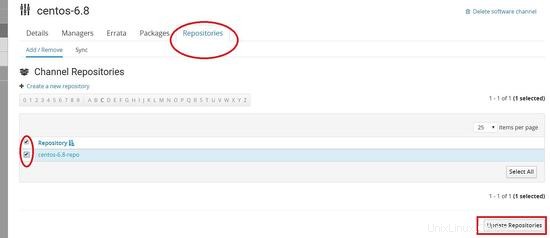
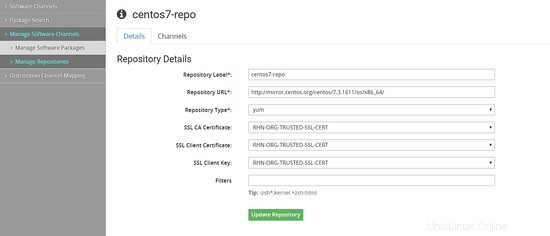
Ora creeremo il repository per centos 6.8
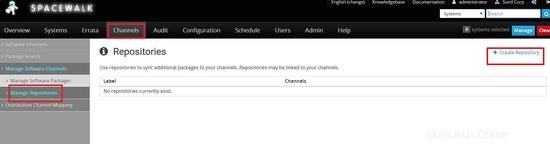
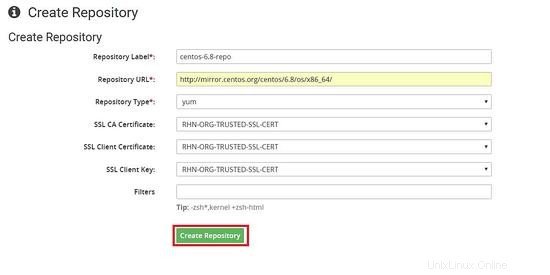
Collegamento del repository al canale figlio che abbiamo creato in precedenza
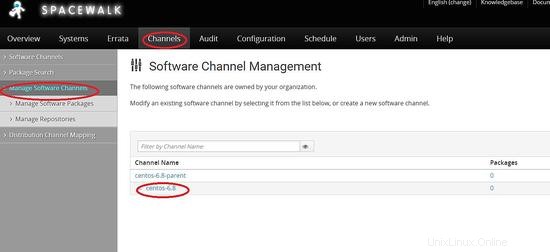
È necessario replicare gli stessi passaggi per la creazione del canale in centos 7.
Ora dobbiamo scaricare i pacchetti dal repository. Possiamo farlo tramite riga di comando o dalla dashboard.
riga di comando
[[email protected] ~]# spacewalk-repo-sync --list
00:01:23 ======================================
00:01:23 |   Channel Label   |   Repository   |
00:01:23 ======================================
00:01:23 centos-7-child | http://mirror.centos.org/centos/7.3.1611/os/x86_64/
00:01:23 centos-6.8 | http://mirror.centos.org/centos/6.8/os/x86_64/
00:01:23 centos-7 | No repository set
00:01:23 centos-6.8-parent | No repository set
[[email protected] ~]#

[[email protected] ~]# spacewalk-repo-sync -c centos-6.8
00:02:18 ======================================
00:02:18 | Channel: centos-6.8
00:02:18 ======================================
00:02:18 Sync of channel started.
00:02:18 Repo URL: http://mirror.centos.org/centos/6.8/os/x86_64/
00:02:30 Packages in repo:              6696
00:02:40 Packages already synced:          0
00:02:40 Packages to sync:              6696
00:02:40 1/6696 : 389-ds-base-1.2.11.15-74.el6-0.x86_64
00:02:43 2/6696 : 389-ds-base-devel-1.2.11.15-74.el6-0.i686
00:02:43 3/6696 : 389-ds-base-devel-1.2.11.15-74.el6-0.x86_64
00:02:44 4/6696 : 389-ds-base-libs-1.2.11.15-74.el6-0.i686
00:02:45 5/6696 : 389-ds-base-libs-1.2.11.15-74.el6-0.x86_64
00:02:46 6/6696 : ConsoleKit-0.4.1-6.el6-0.x86_64
00:02:47 7/6696 : ConsoleKit-devel-0.4.1-6.el6-0.x86_64
Una volta fatto, apparirà così
[[email protected] ~]# spacewalk-repo-sync -c centos-6.8
08:44:57 ======================================
08:44:57 | Channel: centos-6.8
08:44:57 ======================================
08:44:57 Sync of channel started.
08:44:57 Repo URL: http://mirror.centos.org/centos/6.8/os/x86_64/
08:44:58 Packages in repo:              6696
08:45:47 No new packages to sync.
08:45:47 Repo http://mirror.centos.org/centos/6.8/os/x86_64/ has comps file comps.xml.
08:45:47 Repo http://mirror.centos.org/centos/6.8/os/x86_64/ has 0 errata.
08:45:47 Sync of channel completed in 0:00:49.
08:45:47 Total time: 0:00:49
[[email protected] ~]#
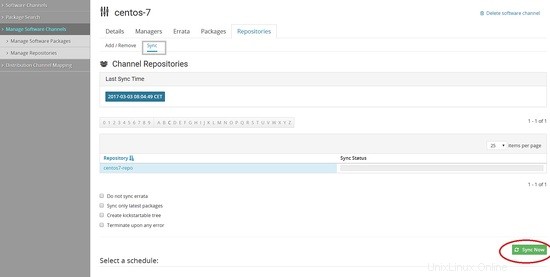
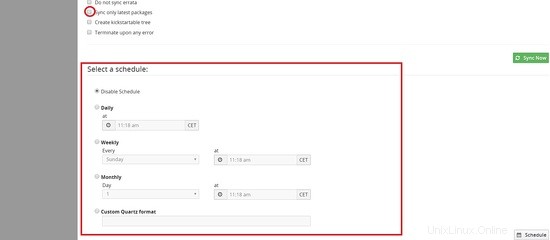
Dal browser Web
Puoi anche programmare la sincronizzazione giornaliera o settimanale per la sincronizzazione automatica in questa pagina e anche selezionare sincronizza solo i pacchetti più recenti
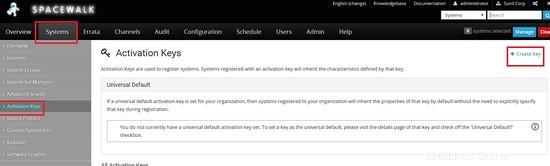
Creazione di chiavi di attivazione per host Centos 6 e centos 7 per l'autenticazione con il server Spacewalk
Vai a Sistemi -> Chiavi di attivazione -> Crea chiave
Ora dobbiamo creare la chiave per centos 6 , qui uso la chiave come centos-6 e scelgo il canale genitore che ho creato in precedenza centos-6.8-parent
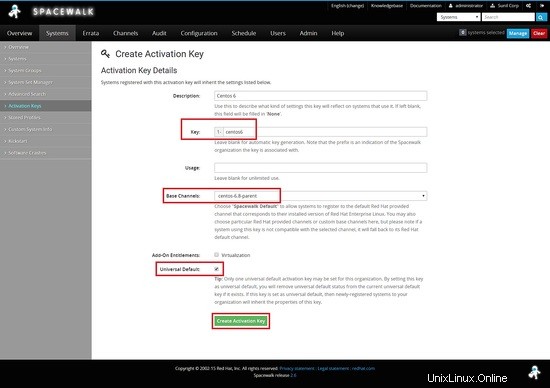
Fai lo stesso per centos 7
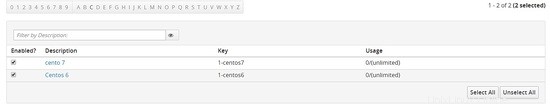
Dovresti vedere due tasti uno per centos 6 e l'altro per centos 7
Configurazione client
In questo capitolo, ti mostrerò come installare e configurare client con server Spacewalk.
Cento6 - 192.168.1.21
Cento7 - 192.168.1.22
Configura il tuo repository client yum
Cento 6
[[email protected] ~]# rpm -Uvh http://yum.spacewalkproject.org/2.6-client/RHEL/6/x86_64/spacewalk-client-repo-2.6-0.el6.noarch.rpm
Cento 7
[[email protected] ~]# rpm -Uvh http://yum.spacewalkproject.org/2.6-client/RHEL/7/x86_64/spacewalk-client-repo-2.6-0.el7.noarch.rpm
Installazione dei pacchetti necessari.
Cento 6
Installa sia epel repo che i seguenti pacchetti su entrambi i nodi centos6 e centos7.
Abilita epel repository
[[email protected] ~]# yum install epel-release -y
[[email protected] ~]# yum install rhn-client-tools rhn-check rhn-setup rhnsd m2crypto yum-rhn-plugin osad rhncfg-actions rhncfg-management -y
Registrati con Spacewalk Server
Prima di connetterci con il server spacewalk dovremo scaricare il certificato SSL dal server spacewalk.
[[email protected] ~]# wget -O /usr/share/rhn/RHN-ORG-TRUSTED-SSL-CERT http://spacewalk.sunil.cc/pub/RHN-ORG-TRUSTED-SSL-CERT
--2017-03-04 21:54:16--  http://spacewalk.sunil.cc/pub/RHN-ORG-TRUSTED-SSL-CERT
Resolving spacewalk.sunil.cc... 192.168.1.20
Connecting to spacewalk.sunil.cc|192.168.1.20|:80... connected.
HTTP request sent, awaiting response... 200 OK
Length: 5291 (5.2K)
Saving to: /usr/share/rhn/RHN-ORG-TRUSTED-SSL-CERT

100%[===================================================================================================================>] 5,291       --.-K/s   in 0s

2017-03-04 21:54:17 (630 MB/s) - /usr/share/rhn/RHN-ORG-TRUSTED-SSL-CERT saved [5291/5291]

[[email protected] ~]#
Ora dobbiamo registrarci con la chiave di attivazione che abbiamo creato in precedenza, abbiamo creato 1-centos6 per centos6 e 1-centos7 per centos7.
Cento 6
[[email protected] ~]# rhnreg_ks --force --activationkey="1-centos6" --serverUrl=http://spacewalk.sunil.cc/XMLRPC --sslCACert=/usr/share/rhn/RHN-ORG-TRUSTED-SSL-CERT --profilename=$HOSTNAME
Cento 7
[[email protected] ~]# rhnreg_ks --force --activationkey="1-centos7" --serverUrl=http://spacewalk.sunil.cc/XMLRPC --sslCACert=/usr/share/rhn/RHN-ORG-TRUSTED-SSL-CERT --profilename=$HOSTNAME
Sincronizzando il profilo con spacewalk, eseguilo su entrambi i nodi centos6 e centos7.
[[email protected] ~]# rhn-profile-sync
Questo può essere utilizzato per eseguire comandi remoti e trasferire file da spacewalk e una delle fantastiche funzionalità dell'utilizzo del server spacewalk.
    [[email protected] ~]# chkconfig osad on
[[email protected] ~]# service osad restart
Shutting down osad:                                        [  OK  ]
Starting osad:                                             [  OK  ]
[[email protected] ~]# rhn-actions-control --enable-all
[[email protected] ~]#
[[email protected] ~]# systemctl enable osad
Created symlink from /etc/systemd/system/multi-user.target.wants/osad.service to /usr/lib/systemd/system/osad.service.
[[email protected] ~]# systemctl restart osad
[[email protected] ~]# rhn-actions-control --enable-all
[[email protected] ~]#
Ora possiamo eseguire una sincronizzazione del profilo.
    [[email protected] ~]# rhn-profile-sync
Updating package profile...
Updating hardware profile...
[[email protected] ~]#
   [[email protected] ~]# rhn-profile-sync
Updating package profile...
Updating hardware profile...
[[email protected] ~]#
Ora puoi controllare lo stesso sulla dashboard della passeggiata nello spazio.
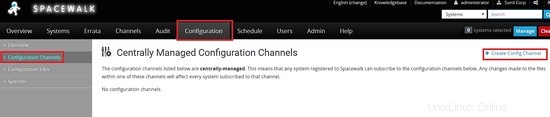
Esecuzione di comandi remoti e gestione dei file tramite Spacewalk.
In questo capitolo vedremo quanto è potente la passeggiata nello spazio quando si tratta di eseguire comandi remoti e gestire i file di configurazione.
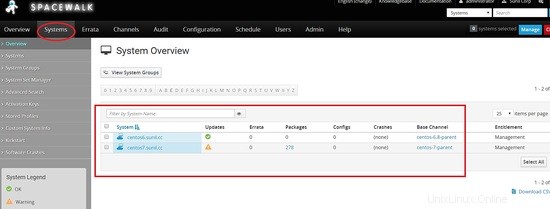
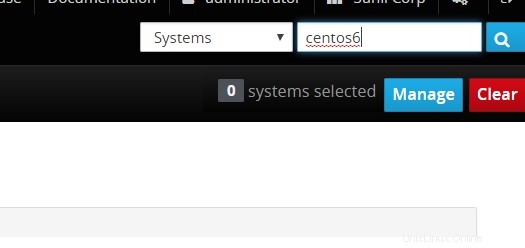
Per eseguire i comandi remoti, accedi alla dashboard di Spacewalk e cerca l'host su cui dovremo eseguire il comando remoto.
Fai clic su comando remoto e digita i comandi che dovrai eseguire.
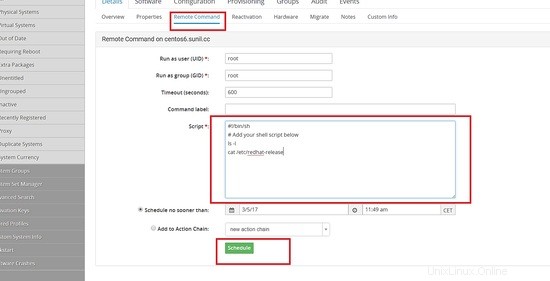
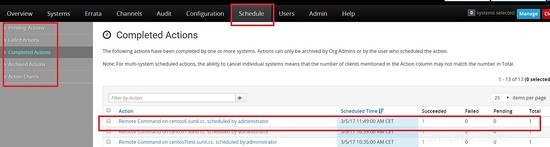
Una volta programmato puoi andare alla scheda programmato e controllare lo stato.
Clicca sull'host per vedere i risultati.
Esecuzione di comandi remoti dalla passeggiata nello spazio.
Avremo bisogno di installare spacecmd per eseguire comandi remoti.
[[email protected] ~]# yum install spacecmd -y
per prima cosa aggiungeremo il sistema usando ssm e prima di fare il login, puoi usare le stesse credenziali del frontend.
[[email protected] ~]# spacecmd
Welcome to spacecmd, a command-line interface to Spacewalk.

Type: 'help' for a list of commands
      'help ' for command-specific help
      'quit' to quit

Spacewalk Username: administrator
Spacewalk Password:
INFO: Connected to https://spacewalk.sunil.cc/rpc/api as administrator
spacecmd {SSM:0}> system_list
centos6.sunil.cc
centos7.sunil.cc
centos7test.sunil.cc
spacecmd {SSM:0}> ssm_add centos6.sunil.cc
spacecmd {SSM:1}> ssm_list
centos6.sunil.cc
spacecmd {SSM:1}> exit
crea uno script chiamato con qualsiasi nome qui l'ho chiamato ff.sh.
    [[email protected] ~]# cat ff.sh
#!/bin/bash
cat /etc/redhat-release
[[email protected] ~]#
Ora per eseguire il comando remoto.
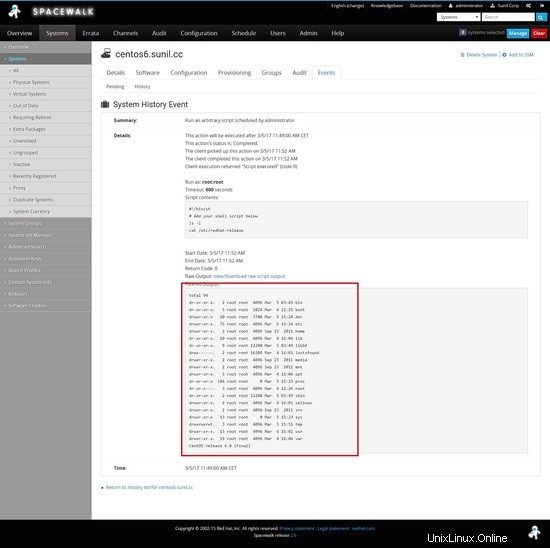
[[email protected] ~]# spacecmd -y system_runscript "ssm -f ff.sh"
INFO: Connected to https://spacewalk.sunil.cc/rpc/api as administrator

User:       root
Group:      root
Timeout:    600 seconds
Start Time: 20170305T12:16:17
p
Script Contents
---------------
#!/bin/bash
cat /etc/redhat-release

Systems
-------
centos6.sunil.cc
INFO: Action ID: 33
INFO: Scheduled: 1 system(s)
[[email protected] ~]#
Per controllare l'output puoi eseguire il comando seguente.
    [[email protected] ~]# spacecmd schedule_getoutput 33
INFO: Connected to https://spacewalk.sunil.cc/rpc/api as administrator
System:      centos6.sunil.cc
Start Time:  20170305T12:16:19
Stop Time:   20170305T12:16:19
Return Code: 0

Output
------
CentOS release 6.8 (Final)

[[email protected] ~]#
Risoluzione dei problemi
Nel caso in cui i comandi siano in sospeso per molto tempo, è possibile eseguire i seguenti passaggi per risolvere questo problema.
Assicurati che osa-dispatcher sia in esecuzione sul server Spacewalk.
    [[email protected] ~]# systemctl status osa-dispatcher
? osa-dispatcher.service - OSA Dispatcher daemon
   Loaded: loaded (/usr/lib/systemd/system/osa-dispatcher.service; enabled; vendor preset: disabled)
   Active: active (running) since Sun 2017-03-05 09:59:55 CET; 2h 21min ago
  Process: 3470 ExecStart=/usr/sbin/osa-dispatcher --pid-file /var/run/osa-dispatcher.pid (code=exited, status=0/SUCCESS)
  Process: 3469 ExecStartPre=/bin/rm -f /var/run/osa-dispatcher.pid (code=exited, status=0/SUCCESS)
 Main PID: 3474 (osa-dispatcher)
   CGroup: /system.slice/osa-dispatcher.service
           ??3474 /usr/bin/python -s /usr/sbin/osa-dispatcher --pid-file /var/run/osa-dispatcher.pid

Mar 05 09:59:55 spacewalk.sunil.cc systemd[1]: Starting OSA Dispatcher daemon...
Mar 05 09:59:55 spacewalk.sunil.cc systemd[1]: PID file /var/run/osa-dispatcher.pid not readable (yet?) after start.
Mar 05 09:59:55 spacewalk.sunil.cc systemd[1]: Started OSA Dispatcher daemon.
[[email protected] ~]#
Nel caso in cui non sia in esecuzione, riavvia il servizio Spacewalk.
[[email protected] ~]# spacewalk-service restart
Assicurati che la porta del firewall sia aperta per 5222.
Si prega di eseguire i seguenti passaggi sul lato client.
    [[email protected] ~]# systemctl stop osad
    [[email protected] ~]# rm -rf /etc/sysconfig/rhn/osad-auth.conf
    [[email protected] ~]# rhn_check -vvv
[[email protected] ~]# systemctl start osad
[[email protected] ~]# systemctl status osad
? osad.service - OSAD daemon
   Loaded: loaded (/usr/lib/systemd/system/osad.service; enabled; vendor preset: disabled)
   Active: active (running) since Sun 2017-03-05 13:54:46 CET; 26s ago
  Process: 18696 ExecStart=/usr/sbin/osad --pid-file /var/run/osad.pid (code=exited, status=0/SUCCESS)
 Main PID: 18697 (osad)
   CGroup: /system.slice/osad.service
           ??18697 /usr/bin/python -s /usr/sbin/osad --pid-file /var/run/osad.pid

Mar 05 13:54:46 centos7test.sunil.cc systemd[1]: Starting OSAD daemon...
Mar 05 13:54:46 centos7test.sunil.cc systemd[1]: PID file /var/run/osad.pid not readable (yet?) after start.
Mar 05 13:54:46 centos7test.sunil.cc systemd[1]: Started OSAD daemon.
[[email protected] ~]# netstat -aunltp|grep 5222
tcp     1698      0 192.168.1.23:48127      192.168.1.20:5222       ESTABLISHED 18697/python
[[email protected] ~]#
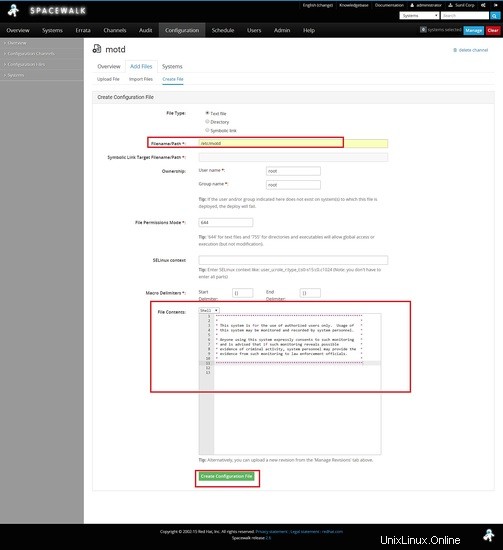
Distribuzione del file attraverso la passeggiata nello spazio.
In questo esempio, cambierò il motd del server centos 6.
Per prima cosa creerò un canale di configurazione.
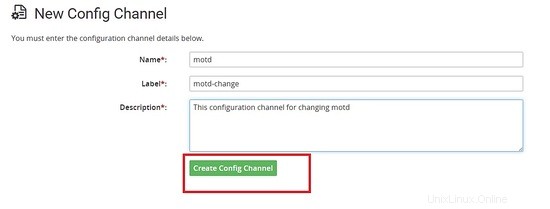
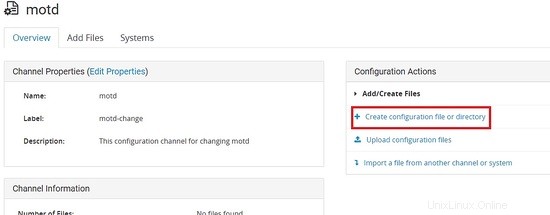
Creazione di un file con il contenuto seguente.
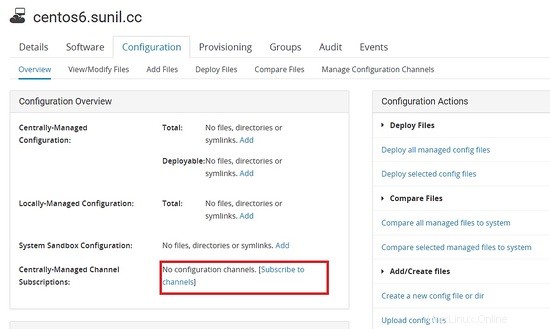
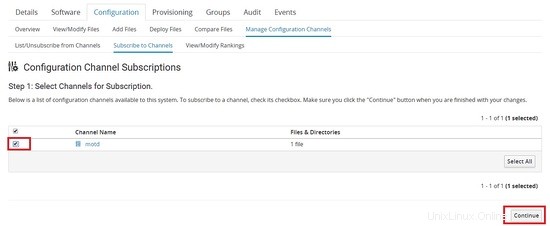
Ora dobbiamo iscriverci al canale su quale server deve essere distribuito.
Il file può essere estratto dal client.
    [[email protected] ~]# rhncfg-client channels
Using server name spacewalk.sunil.cc
Config channels:
Label                           Name
-----                           ----
motd-change                     motd
[[email protected] ~]#
[[email protected] ~]# rhncfg-client get
Using server name spacewalk.sunil.cc
Deploying /etc/motd
[[email protected] ~]#
[[email protected] ~]# ls -l /etc/motd
-rw-r--r-- 1 root root 760 Mar  5 14:29 /etc/motd
[[email protected] ~]# cat /etc/motd
********************************************************************
*                                                                  *
* This system is for the use of authorized users only.  Usage of   *
* this system may be monitored and recorded by system personnel.   *
*                                                                  *
* Anyone using this system expressly consents to such monitoring   *
* and is advised that if such monitoring reveals possible          *
* evidence of criminal activity, system personnel may provide the  *
* evidence from such monitoring to law enforcement officials.      *
*                                                                  *
********************************************************************

[[email protected] ~]#