 Chef è un software di automazione dell'infrastruttura IT, che può essere utilizzato per gestire tutti i server e le apparecchiature di rete della tua organizzazione .
Hai bisogno di una workstation chef quando vuoi interagire con il server chef o qualsiasi nodo fisico (server, apparecchiature di rete, ecc.) nella tua infrastruttura.
Su una workstation chef, utilizzando diversi comandi relativi allo chef (ad esempio coltello), è possibile creare libri di cucina o creare ricette che verranno eseguite sui singoli nodi. Puoi anche avviare un nuovo nodo dalla workstation chef.
Questo tutorial spiega come installare e configurare la workstation Chef su un server Linux.
Scarica ChefDK
ChefDK sta per Chef Development Kit. ChefDK è disponibile per quasi tutte le piattaforme, comprese le distribuzioni basate su Debian, Ubuntu, le distribuzioni basate su RedHat come CentOS, Mac OS X e Windows.
L'attuale versione stabile di ChefDK è 0.11.2, per il sistema basato su RHEL, è disponibile sia per la versione 6 che per la versione 7 (ovvero CentOS 6 e CentOS 7). La versione RPM in pacchetto è disponibile solo per la versione a 64 bit.
Scaricalo da qui o utilizza l'URL diretto come mostrato di seguito.
Per CentOS 7, usa quanto segue:
cd ~
wget https://packages.chef.io/stable/el/7/chefdk-0.11.2-1.el7.x86_64.rpm
Per CentOS 6, usa quanto segue:
cd ~
wget https://packages.chef.io/stable/el/6/chefdk-0.11.2-1.el6.x86_64.rpm
Installa ChefDK
Installa ChefDK utilizzando l'RPM che abbiamo scaricato sopra.
# rpm -ivh chefdk-0.11.2-1.el7.x86_64.rpm
Preparing...                          ################################# [100%]
Updating / installing...
   1:chefdk-0.11.2-1.el7              ################################# [100%]
Thank you for installing Chef Development Kit!
Questo installerà ChefDK in /opt/chefdk come mostrato di seguito.
# ls -l /opt/chefdk/
drwxr-xr-x. 2 root root  4096 Mar  3 13:50 bin
drwxr-xr-x. 7 root root    62 Mar  3 13:50 embedded
-rw-r--r--. 1 root root 13249 Feb 22 14:26 version-manifest.json
-rw-r--r--. 1 root root  8233 Feb 22 14:26 version-manifest.txt
Verifica l'installazione di ChefDK
Esegui la verifica dello chef, che verificherà tutti i diversi componenti forniti con ChefDK per assicurarsi che funzionino tutti correttamente senza problemi, come mostrato di seguito.
# chef verify
Running verification for component 'berkshelf'
Running verification for component 'test-kitchen'
Running verification for component 'tk-policyfile-provisioner'
Running verification for component 'chef-client'
Running verification for component 'chef-dk'
Running verification for component 'chef-provisioning'
Running verification for component 'chefspec'
Running verification for component 'generated-cookbooks-pass-chefspec'
Running verification for component 'rubocop'
Running verification for component 'fauxhai'
Running verification for component 'knife-spork'
Running verification for component 'kitchen-vagrant'
Running verification for component 'package installation'
Running verification for component 'openssl'
Running verification for component 'inspec'
.......
---------------------------------------------
Verification of component 'test-kitchen' succeeded.
Verification of component 'chef-dk' succeeded.
Verification of component 'chefspec' succeeded.
Verification of component 'rubocop' succeeded.
Verification of component 'knife-spork' succeeded.
Verification of component 'openssl' succeeded.
Verification of component 'berkshelf' succeeded.
Verification of component 'chef-client' succeeded.
Verification of component 'fauxhai' succeeded.
Verification of component 'inspec' succeeded.
Verification of component 'tk-policyfile-provisioner' succeeded.
Verification of component 'kitchen-vagrant' succeeded.
Verification of component 'chef-provisioning' succeeded.
Verification of component 'package installation' succeeded.
Verification of component 'generated-cookbooks-pass-chefspec' succeeded.
Quello che segue è un caso di esempio, in cui la verifica dello chef non è riuscita. Inoltre, tieni presente che il ruby è richiesto da Chef, che viene incorporato in ChefDK.
# chef verify
..
/opt/chefdk/embedded/lib/ruby/gems/2.1.0/gems/mixlib-shellout-2.2.6/lib/mixlib/shellout.rb:289:in `invalid!': Expected process to exit with [0], but received '1' (Mixlib::ShellOut::ShellCommandFailed)
---- Begin output of /usr/bin/ohai -v ----
STDOUT:
STDERR: /opt/chefdk/embedded/lib/ruby/site_ruby/2.1.0/rubygems/dependency.rb:319:in `to_specs': Could not find 'chef-config' (= 12.8.0) - did find: [chef-config-12.7.2] (Gem::LoadError)
Riceviamo questo messaggio di errore:"Impossibile trovare 'chef-config' (=12.8.0) – trovato:[chef-config-12.7.2] (Gem::LoadError)"
Nel messaggio di errore precedente, lo chef-config fornito con ChefDK era 12.7.2, che è una versione precedente, che non era compatibile in questa configurazione. Quindi, in questo caso, ho installato manualmente la versione 12.8.0 di chef-config.
Dopodiché, quando ho eseguito la verifica dello chef, non ha visualizzato il messaggio di errore sopra.
Verifica la versione ChefDK
Quando esegui il comando chef –version, mostrerà il numero di versione di ChefDK e tutti i componenti che ne derivano, come mostrato di seguito.
# chef --version
Chef Development Kit Version: 0.11.2
chef-client version: 12.7.2
berks version: 4.2.0
kitchen version: 1.5.0
Imposta variabili ENV Chef
Dovresti anche impostare le variabili di ambiente relative a Chef. Ad esempio:GEM_ROOT, GEM_HOME, GEM_PATH.
export GEM_ROOT="/opt/chefdk/embedded/lib/ruby/gems/2.1.0"
export GEM_HOME="/root/.chefdk/gem/ruby/2.1.0"
export GEM_PATH="/root/.chefdk/gem/ruby/2.1.0:/opt/chefdk/embedded/lib/ruby/gems/2.1.0"
Inoltre, se hai già installato ruby sul tuo sistema, dovresti aggiornare la tua variabile PATH di conseguenza per usare il ruby fornito con chefDK come mostrato di seguito.
export PATH="/opt/chefdk/bin:/root/.chefdk/gem/ruby/2.1.0/bin:/opt/chefdk/embedded/bin:/opt/chefdk/bin:/root/.chefdk/gem/ruby/2.1.0/bin:/opt/chefdk/embedded/bin:/opt/chefdk/bin:/root/.chefdk/gem/ruby/2.1.0/bin:/opt/chefdk/embedded/bin:/usr/local/sbin:/usr/local/bin:/usr/sbin:/usr/bin:/root/bin"
Il comando seguente ti mostrerà tutte le variabili d'ambiente Chef che dovrebbero essere impostate.
chef shell-init bash
Il modo rapido per impostare queste variabili di ambiente è aggiungere la riga sopra al file .bash_profile come mostrato di seguito.
echo 'eval "$(chef shell-init bash)"' >> ~/.bash_profile
Regole firewall per accedere a Chef Manage
Successivamente, devi scaricare lo starter kit Chef dal tuo Chef Server che è già in esecuzione.
Per accedere alla GUI di Chef Manage, su Chef Server, aggiungi le seguenti regole firewalld per aprire le porte appropriate sul server Chef.
firewall-cmd --direct  --add-rule ipv4 \
filter INPUT_direct 0 -i eth0 -p tcp \
 --dport 443 -j ACCEPT

firewall-cmd --direct  --add-rule ipv4 \
filter INPUT_direct 0 -i eth0 -p tcp \
 --dport 80 -j ACCEPT

firewall-cmd --direct  --add-rule ipv4 \
filter INPUT_direct 0 -i eth0 -p tcp \
 --dport 9683 -j ACCEPT

firewall-cmd --reload
Scarica lo Starter Kit dalla GUI di Chef Manage
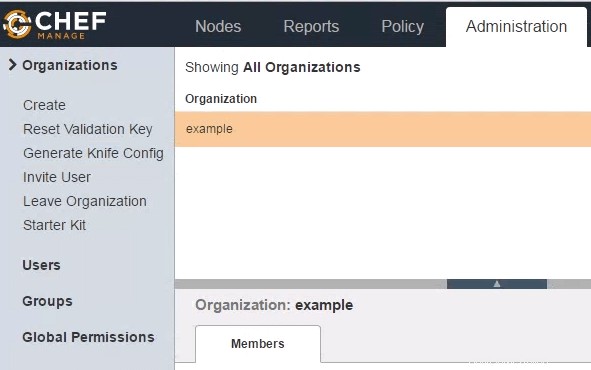
Accedi a Chef Manage GUI e fai clic sulla scheda "Amministrazione" in alto. Quindi, seleziona l'organizzazione dall'elenco. In questo esempio, il nome dell'organizzazione è "esempio". Una volta selezionata l'organizzazione, fai clic su "Starter Kit" dal menu a sinistra come mostrato di seguito.
Quando fai clic su "Download", riceverai questo messaggio di avviso:Sei sicuro?:Le chiavi utente e organizzazione verranno ripristinate. Sei sicuro di volerlo fare?.
Clicca su Procedi. Questo scaricherà il file chef-starter.zip sul tuo computer locale.
Decomprimi il kit iniziale
Trasferisci il file chef-starter.zip sulla workstation Chef e decomprimilo nella home directory di root come mostrato di seguito.
# cd ~
# unzip chef-starter.zip
Archive:  chef-starter.zip
   creating: chef-repo/cookbooks/
   creating: chef-repo/cookbooks/starter/
   creating: chef-repo/cookbooks/starter/templates/
   creating: chef-repo/cookbooks/starter/templates/default/
  inflating: chef-repo/cookbooks/starter/templates/default/sample.erb
   creating: chef-repo/cookbooks/starter/files/
   creating: chef-repo/cookbooks/starter/files/default/
  inflating: chef-repo/cookbooks/starter/files/default/sample.txt
   creating: chef-repo/cookbooks/starter/recipes/
  inflating: chef-repo/cookbooks/starter/recipes/default.rb
   creating: chef-repo/cookbooks/starter/attributes/
  inflating: chef-repo/cookbooks/starter/attributes/default.rb
  inflating: chef-repo/cookbooks/starter/metadata.rb
  inflating: chef-repo/cookbooks/chefignore
  inflating: chef-repo/README.md
  inflating: chef-repo/.gitignore
   creating: chef-repo/.chef/
   creating: chef-repo/roles/
  inflating: chef-repo/.chef/knife.rb
  inflating: chef-repo/roles/starter.rb
  inflating: chef-repo/.chef/ramesh.pem
  inflating: chef-repo/.chef/example-validator.pem
Se stai configurando manualmente la cartella chef-repo, devi creare manualmente le sottodirectory precedenti e copiare il file knife.rb, il file Organization-validator.pem (ad esempio:example-validator.pem) e nomeutente.pem (ad esempio:ramesh.pem) nelle directory mostrate sopra.
Ottieni il certificato SSL di Chef Server
A questo punto, se esegui l'elenco dei client knife, riceverai questo messaggio di errore come mostrato di seguito:"ERRORE:Errore di convalida SSL durante la connessione alla verifica del certificato host non riuscita"
# cd ~/chef-repo
# knife client list
ERROR: SSL Validation failure connecting to host: centos.example.com - SSL_connect returned=1 errno=0 state=error: certificate verify failed
ERROR: Could not establish a secure connection to the server.
Use `knife ssl check` to troubleshoot your SSL configuration.
If your Chef Server uses a self-signed certificate, you can use
`knife ssl fetch` to make knife trust the server's certificates.

Original Exception: OpenSSL::SSL::SSLError: SSL Error connecting to https://centos.example.com/organizations/example/clients - SSL_connect returned=1 errno=0 state=error: certificate verify failed
La verifica del certificato non è riuscita, perché il certificato SSL non è ancora stato scaricato dal server Chef.
Per questo, esegui il seguente comando "knife ssl fetch" come mostrato di seguito.
# cd ~/chef-repo
# knife ssl fetch
WARNING: Certificates from centos.example.com will be fetched and placed in your trusted_cert
directory (/root/chef-repo/.chef/trusted_certs).

Knife has no means to verify these are the correct certificates. You should
verify the authenticity of these certificates after downloading.
Questo scaricherà il certificato nella seguente directory truster_certs.
# ls -l /root/chef-repo/.chef/trusted_certs
-rw-r--r--. 1 root root 1379 Mar 20 20:17 centos_example_com.crt

# cat /root/chef-repo/.chef/trusted_certs/centos_example_com.crt
-----BEGIN CERTIFICATE-----
MIIDzDCCArSgAwIBAgIBADANBgkqhkiG9w0BAQsFADBRMQswCQYDVQQGEwJVUzEQ
MA4GA1UECgwHWW91Q29ycDETMBEGA1UECwwKT3BlcmF0aW9uczEbMBkGA1UEAwwS
ZXJhdGlvbnMxGzAZBgNVBAMMEmNlbnRvcy5leGFtcGxlLmNvbTCCASIwDQYJKoZI
..
..
WLyr2ORLMcck/OGsubabO/koMNTqhl2JJPECNiDJh06MeZ/2+BOwGZSpXDbw+vFE
NJAsLfsTzihGWZ58einMFA==
-----END CERTIFICATE-----
Verifica finale della postazione Chef
Se la workstation chef funziona correttamente, quando si esegue la "lista client coltello", verranno visualizzati tutti i client che sono collegati a questa workstation. Dal momento che l'abbiamo appena installato, vedremo solo il validatore della tua organizzazione come mostrato di seguito.
# cd ~/chef-repo

# knife client list
example-validator
Se esegui questo comando su una workstation chef esistente a cui sono già collegati diversi server, vedrai un elenco di tutti i server gestiti dallo chef.
Nell'esempio seguente, vediamo 5 server collegati a questa workstation chef.
# knife client list
example-validator
node1
node2
node3
node4
node5