Tensorflow è una piattaforma di machine learning open source gratuita e end-to-end creata dal team di Google Brain. È una libreria utilizzata per il calcolo numerico e l'apprendimento automatico su larga scala. Puoi installarlo in un ambiente virtuale Python o usando Anaconda, come contenitore docker. Viene fornito con una serie di librerie e risorse della community che ti aiutano a sviluppare programmi e applicazioni di machine learning.
In questo tutorial, ti mostreremo come installare Tensorflow con Docker su Ubuntu 20.04.
Prerequisiti
- Un nuovo server Ubuntu 20.04 sulla piattaforma Atlantic.Net Cloud
- Una password di root configurata sul tuo server
Fase 1:crea un server cloud Atlantic.Net
Per prima cosa, accedi al tuo server Atlantic.Net Cloud. Crea un nuovo server, scegliendo Ubuntu 20.04 come sistema operativo con almeno 2GB di RAM. Collegati al tuo Cloud Server tramite SSH e accedi utilizzando le credenziali evidenziate in alto nella pagina.
Dopo aver effettuato l'accesso al tuo server Ubuntu 20.04, esegui il comando seguente per aggiornare il tuo sistema di base con gli ultimi pacchetti disponibili.
apt-get update -y
Passaggio 2:installazione di Docker CE
Innanzitutto, installa tutte le dipendenze richieste con il seguente comando:
apt-get install git apt-transport-https ca-certificates curl software-properties-common -y
Quindi, aggiungi la chiave e il repository Docker GPG con il seguente comando:
curl -fsSL https://download.docker.com/linux/ubuntu/gpg | apt-key add -
add-apt-repository "deb [arch=amd64] https://download.docker.com/linux/ubuntu focal stable"
Una volta aggiunto il repository, installa Docker e Docker componi con il seguente comando:
apt-get install docker-ce -y
Una volta completata l'installazione, verifica la versione Docker con il seguente comando:
docker --version
Dovresti vedere il seguente output:
Docker version 20.10.5, build 55c4c88
Fase 3:avvia Tensorflow Container
Docker fornisce un contenitore Tensorflow per la creazione di applicazioni di machine learning.
Innanzitutto, scarica il contenitore Tensorflow utilizzando il seguente comando:
docker pull tensorflow/tensorflow:latest
Dovresti ottenere il seguente output:
latest: Pulling from tensorflow/tensorflow
d519e2592276: Pull complete
d22d2dfcfa9c: Pull complete
b3afe92c540b: Pull complete
c12ceea561ed: Pull complete
1f0ffb4d2509: Pull complete
961442e8e0e4: Pull complete
0b2b6f75fc95: Pull complete
e266fced02fa: Pull complete
c29b15b084af: Pull complete
5d43e8c7056a: Pull complete
Digest: sha256:0118f3db64ddadf5d16f4b8d85ffb14228e194c0211c690562fb5dfd16fc86c0
Status: Downloaded newer image for tensorflow/tensorflow:latest
docker.io/tensorflow/tensorflow:latest
Quindi, crea un contenitore Tensorflow dall'immagine scaricata con il comando seguente:
docker run -it -p 8888:8888 tensorflow/tensorflow:latest
Verrai reindirizzato all'interno del contenitore Tensorflow:
________                               _______________
___  __/__________________________________  ____/__  /________      __
__  /  _  _ \_  __ \_  ___/  __ \_  ___/_  /_   __  /_  __ \_ | /| / /
_  /   /  __/  / / /(__  )/ /_/ /  /   _  __/   _  / / /_/ /_ |/ |/ /
/_/    \___//_/ /_//____/ \____//_/    /_/      /_/  \____/____/|__/


WARNING: You are running this container as root, which can cause new files in
mounted volumes to be created as the root user on your host machine.

To avoid this, run the container by specifying your user's userid:

$ docker run -u $(id -u):$(id -g) args...

example@unixlinux.online:/#
Ora puoi scrivere ed eseguire qualsiasi applicazione all'interno del contenitore. Puoi uscire dal container in qualsiasi momento usando il seguente comando:
exit
Fase 4:avvia Tensorflow Jupyter Container
Docker fornisce anche un contenitore Tensorflow con notebook Jupyter che consente di scrivere ed eseguire codice tramite la dashboard del notebook Jupyter.
Puoi scaricare e avviare il contenitore Tensorflow Jupyter con il seguente comando:
docker run -it -p 8088:8088 tensorflow/tensorflow:latest-jupyter
Dovresti ottenere il seguente output:
latest-jupyter: Pulling from tensorflow/tensorflow
d519e2592276: Already exists
d22d2dfcfa9c: Already exists
b3afe92c540b: Already exists
c12ceea561ed: Already exists
1f0ffb4d2509: Already exists
961442e8e0e4: Already exists
0b2b6f75fc95: Already exists
e266fced02fa: Already exists
c29b15b084af: Already exists
5d43e8c7056a: Already exists
c09e41c80475: Pull complete
4928d4fd53b4: Pull complete
4f8c501e8020: Pull complete
9a927eacde80: Pull complete
cca85cdd242a: Pull complete
c491a3ee7337: Pull complete
70252b385326: Pull complete
c385e49aff55: Pull complete
32a1800a0df4: Pull complete
56ac089c301a: Pull complete
32b4fcc94634: Pull complete
62fbf7c8b492: Pull complete
a184bae0471c: Pull complete
3138b3afe589: Pull complete
322ff03a149a: Pull complete
Digest: sha256:15ca1ea5083f1f9fcc2b006df4f1d51c3d0b6f2616fa14c12ff6dc7c4bc83588
Status: Downloaded newer image for tensorflow/tensorflow:latest-jupyter
[I 03:08:37.757 NotebookApp] Writing notebook server cookie secret to /root/.local/share/jupyter/runtime/notebook_cookie_secret
jupyter_http_over_ws extension initialized. Listening on /http_over_websocket
[I 03:08:38.106 NotebookApp] Serving notebooks from local directory: /tf
[I 03:08:38.107 NotebookApp] Jupyter Notebook 6.2.0 is running at:
[I 03:08:38.107 NotebookApp] http://40959756271a:8088/?token=2cbdd5bc2250270506f38954ed7f891a146cc71e50bc46fb
[I 03:08:38.108 NotebookApp]  or http://127.0.0.1:8088/?token=2cbdd5bc2250270506f38954ed7f891a146cc71e50bc46fb
[I 03:08:38.108 NotebookApp] Use Control-C to stop this server and shut down all kernels (twice to skip confirmation).
[C 03:08:38.114 NotebookApp]

    To access the notebook, open this file in a browser:
        file:///root/.local/share/jupyter/runtime/nbserver-1-open.html
    Or copy and paste one of these URLs:
        http://40959756271a:8088/?token=2cbdd5bc2250270506f38954ed7f891a146cc71e50bc46fb
     or http://127.0.0.1:8088/?token=
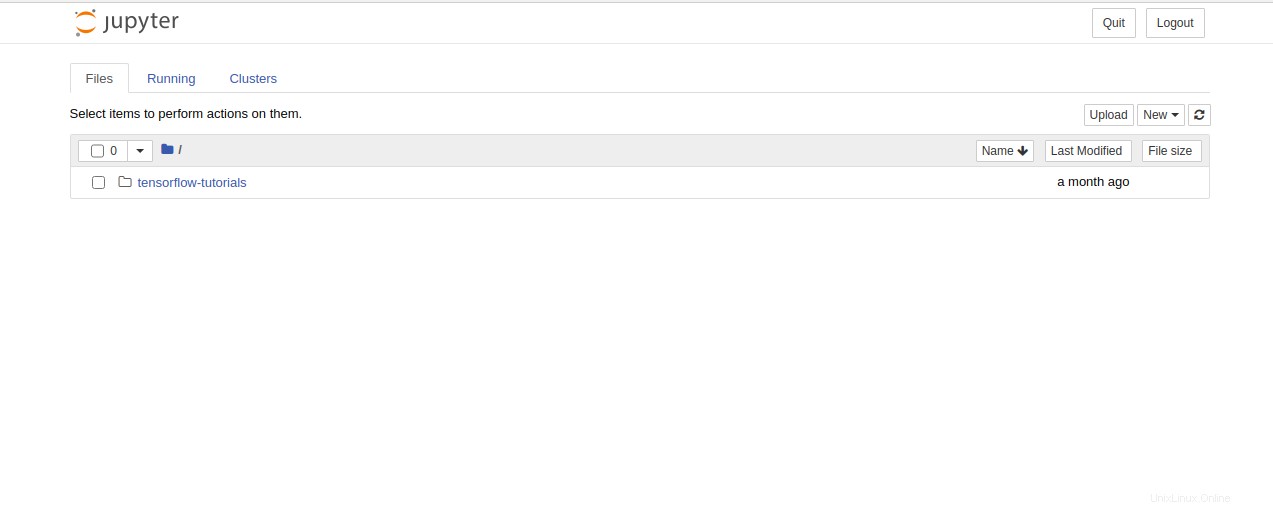
È ora possibile accedere al notebook Jupyter utilizzando l'URL http://your-server-ip:8088/?token=2cbdd5bc2250270506f38954ed7f891a146cc71e50bc46fb. Dovresti vedere la seguente schermata:
Conclusione
Congratulazioni! Hai installato correttamente Tensorflow con Docker su Ubuntu 20.04. Ora puoi scrivere ed eseguire facilmente un programma di apprendimento automatico con Tensorflow. Provalo oggi su un VPS Atlantic.Net!