Cert-Manager è un controller utilizzato per la gestione dei certificati. Un Cert-Manager può aiutare a emettere certificati da diversi emittenti come Let's Encrypt, HashiCorp Vault, Venafi, una semplice coppia di chiavi di firma o autofirmati. Cert-Manager convalida i certificati, assicura che siano aggiornati e li rinnova prima della scadenza. Cert-Manager è composto da diversi componenti come indicato di seguito.
- Emittente : Issuers e ClusterIssuers sono oggetti in Kubernetes che rappresentano le autorità di certificazione (CA) in grado di generare certificati firmati.
- Certificato : Un Certificato è una risorsa con spazio dei nomi che fa riferimento a un Emittente o ClusterIssuer e sarà rinnovata e tenuta aggiornata.
- Richiesta di certificato : Il CertificateRequest è una risorsa con spazio dei nomi utilizzata per richiedere un certificato a un emittente o un emittente del cluster.
- Ordini ACME : Un ordine rappresenta una richiesta di certificato che verrà creata una volta creata una nuova risorsa CertificateRequest che fa riferimento a un emittente ACME
- Sfide ACME :quando viene creata una risorsa per l'ordine, le risorse Challenge per ogni nome DNS autorizzato con il server ACME verranno create dal controller dell'ordine.
- Webhook :viene distribuito come un altro pod insieme ai principali pod Cert-Manager e ha 3 funzioni: ValidatingAdmissionWebhook, MutatingAdmissionWebhook e CustomResourceConversionWebhook.
- CA Iniettore r:Aiuta a configurare i certificati per Webhook di convalida, Webhook di mutazione e Webhook di conversione.
In questo articolo, imposteremo un Cert-Manager con l'emittente Let's Encrypt. Proteggeremo la nostra applicazione di esempio utilizzando i certificati TLS e avremo HTTPS nel nostro nome host per accedere all'applicazione tramite Ingress. Per fare ciò, aggiungeremo annotazioni a Ingress in modo che la risorsa del certificato venga creata per nostro conto.
Per conoscere in dettaglio Cert-Manager, visita la documentazione ufficiale qui. L'obiettivo di questo articolo è impostare il Cert-Manager utilizzando Helm e si presume che tu abbia familiarità con i concetti relativi al Cert-Manager.
Prerequisiti
- Account AWS (crea se non ne hai uno).
- Kubernetes Cluster (fai clic qui per imparare a creare un Kubernetes Cluster utilizzando Kops e saperne di più.)
- Nginx Ingress Controller nel cluster K8S (cerca "What is Ingress Controller and how to deploy Nginx Ingress Controller in Kubernetes Cluster on AWS using Helm" per imparare a configurare Nginx Ingress Controller)
- Helm v3.5.3 (fai clic qui per imparare a installare Helm su Ubuntu Server)
- Bucket S3 (fai clic qui per imparare a creare un bucket S3 su AWS).
- Nome dominio (fai clic qui per imparare a registrare un dominio su AWS).
- Ruolo IAM con autorizzazioni di amministratore(fai clic qui per imparare a creare un ruolo IAM su AWS).
Cosa faremo?
- Controlla il controller di ingresso nel cluster
- Imposta un gestore certificati
- Crea file di definizione oggetto per un'applicazione di esempio
- Impostazione di staging e produzione Let's Encrypt Issuer
- Distribuisci un'applicazione di esempio
- Distribuisci un oggetto Ingress con TLS
Controlla il controller di ingresso nel cluster
Prima di procedere, controlla se il controller di ingresso Nginx è in esecuzione nel cluster.
kubectl get pods
kubectl get svc

Gestione certificati di installazione
Note: I have used Helm binary present at my current location, hence you can see ./helm in screenshots.
Usa Helm v3.5.3 ed esegui i seguenti comandi, questo installerà Helm Chart per Cert-Manager.
kubectl create namespace cert-manager
helm repo add jetstack https://charts.jetstack.io
helm repo update helm install cert-manager jetstack/cert-manager --namespace cert-manager --version v1.2.0 --set installCRDs=true
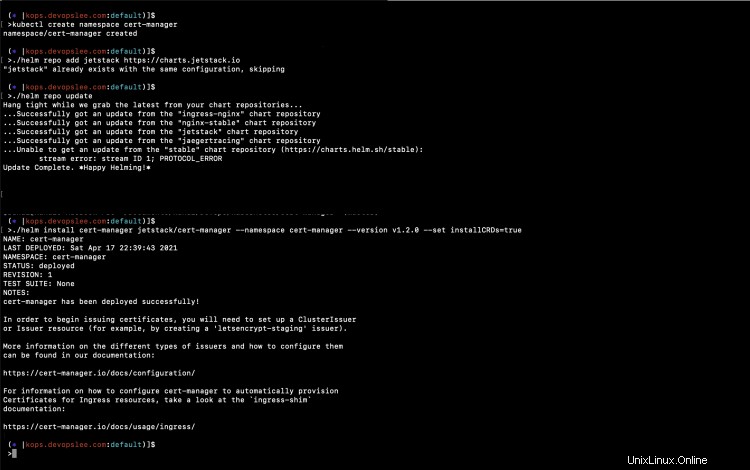
Nella schermata sopra, puoi vedere che il grafico Helm per Cert-Manager è stato installato.
Controlla i pod che sono stati creati come parte del Cert-Manager.
kubectl get pods -A
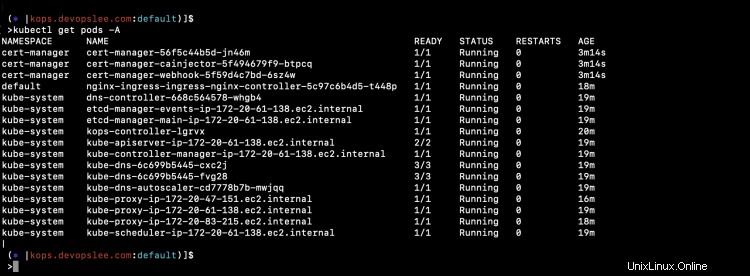
Puoi vedere 3 nuovi pod nello spazio dei nomi "cert-manager".
Crea file di definizione oggetto per un'applicazione di esempio e gli emittenti
Crea 1-nginx-main-app.yaml per l'applicazione 1
Link Github:fai clic qui per copiare il file dal mio repository Github.
apiVersion: apps/v1
kind: Deployment
metadata:
  labels:
    run: nginx
  name: nginx-deploy-main
spec:
  replicas: 1
  selector:
    matchLabels:
      run: nginx-main
  template:
    metadata:
      labels:
        run: nginx-main
    spec:
      containers:
      - image: nginx
        name: nginx


---
apiVersion: v1
kind: Service
metadata:
  name: nginx-deploy-main
spec:
  type: ClusterIP
  ports:
  - port: 80
    targetPort: 80
  selector:
    run: nginx-main
Crea 2-nginx-green-app.yaml per l'applicazione 2.
Link Github:fai clic qui per copiare il file dal mio repository Github.
apiVersion: apps/v1
kind: Deployment
metadata:
  labels:
    run: nginx
  name: nginx-deploy-green
spec:
  replicas: 1
  selector:
    matchLabels:
      run: nginx-green
  template:
    metadata:
      labels:
        run: nginx-green
    spec:
      volumes:
      - name: webdata
        emptyDir: {}
      initContainers:
      - name: web-content
        image: busybox
        volumeMounts:
        - name: webdata
          mountPath: "/webdata"
        command: ["/bin/sh", "-c", 'echo "<h1>I am <font color=green>GREEN</font></h1>" > /webdata/index.html']
      containers:
      - image: nginx
        name: nginx
        volumeMounts:
        - name: webdata
          mountPath: "/usr/share/nginx/html"


---
---
apiVersion: v1
kind: Service
metadata:
  name: nginx-deploy-green
spec:
  type: ClusterIP
  ports:
  - port: 80
    targetPort: 80
  selector:
    run: nginx-green
Crea 3-nginx-blue-app.yaml per l'applicazione 3
Link Github:fai clic qui per copiare il file dal mio repository Github.
apiVersion: apps/v1
kind: Deployment
metadata:
  labels:
    run: nginx
  name: nginx-deploy-blue
spec:
  replicas: 1
  selector:
    matchLabels:
      run: nginx-blue
  template:
    metadata:
      labels:
        run: nginx-blue
    spec:
      volumes:
      - name: webdata
        emptyDir: {}
      initContainers:
      - name: web-content
        image: busybox
        volumeMounts:
        - name: webdata
          mountPath: "/webdata"
        command: ["/bin/sh", "-c", 'echo "<h1>I am <font color=blue>BLUE</font></h1>" > /webdata/index.html']
      containers:
      - image: nginx
        name: nginx
        volumeMounts:
        - name: webdata
          mountPath: "/usr/share/nginx/html"


---
apiVersion: v1
kind: Service
metadata:
  name: nginx-deploy-blue
spec:
  type: ClusterIP
  ports:
  - port: 80
    targetPort: 80
  selector:
    run: nginx-blue
Crea 4-tls-ingress.yaml per creare regole di ingresso basate sul percorso con Staging Issuer.
Link Github:fai clic qui per copiare il file dal mio repository Github.
apiVersion: extensions/v1beta1
kind: Ingress
metadata:
  annotations:
    nginx.ingress.kubernetes.io/rewrite-target: /
    cert-manager.io/cluster-issuer: letsencrypt-staging
  name: ingress-resource-3
spec:
  tls:
  - hosts:
    - kops.devopslee.com
    secretName: sample-kubernetes-tls
  rules:
  - host: kops.devopslee.com
    http:
      paths:
      - path: /
        backend:
          serviceName: nginx-deploy-main
          servicePort: 80
      - path: /blue
        backend:
          serviceName: nginx-deploy-blue
          servicePort: 80
      - path: /green
        backend:
          serviceName: nginx-deploy-green
          servicePort: 80
Crea 5-tls-ingress-prod-issuer.yaml per creare regole Ingress basate sul percorso con Production Essuer.
Link Github:fai clic qui per copiare il file dal mio repository Github.
apiVersion: extensions/v1beta1
kind: Ingress
metadata:
  annotations:
    nginx.ingress.kubernetes.io/rewrite-target: /
    cert-manager.io/cluster-issuer: letsencrypt-production
  name: ingress-resource-3
spec:
  tls:
  - hosts:
    - kops.devopslee.com
    secretName: sample-kubernetes-tls
  rules:
  - host: kops.devopslee.com
    http:
      paths:
      - path: /
        backend:
          serviceName: nginx-deploy-main
          servicePort: 80
      - path: /blue
        backend:
          serviceName: nginx-deploy-blue
          servicePort: 80
      - path: /green
        backend:
          serviceName: nginx-deploy-green
          servicePort: 80
Crea staging_issuer.yaml per Let's Encrypt Staging Issuer
Link Github:fai clic qui per copiare il file dal mio repository Github.
apiVersion: cert-manager.io/v1
kind: ClusterIssuer
metadata:
  name: letsencrypt-staging
spec:
  acme:
    # Email address used for ACME registration
    email: your-email-id-here
    server: https://acme-staging-v02.api.letsencrypt.org/directory
    privateKeySecretRef:
      # Name of a secret used to store the ACME account private key
      name: letsencrypt-staging-private-key
    # Add a single challenge solver, HTTP01 using nginx
    solvers:
    - http01:
        ingress:
          class: nginx
Crea production_issuer.yaml per Let's Encrypt Production Issuer
Link Github:fai clic qui per copiare il file dal mio repository Github.
apiVersion: cert-manager.io/v1
kind: ClusterIssuer
metadata:
  name: letsencrypt-production
spec:
  acme:
    # Email address used for ACME registration
    email: your-email-id-here
    server: https://acme-v02.api.letsencrypt.org/directory
    privateKeySecretRef:
      # Name of a secret used to store the ACME account private key
      name: letsencrypt-production-private-key
    # Add a single challenge solver, HTTP01 using nginx
    solvers:
    - http01:
        ingress:
          class: nginx
Puoi trovare tutti questi file nel mio repository Github qui.
Impostazione staging e produzione Let's Encrypt Issuer
Installeremo sia Staging che Production Cluster Issuer.
Messa in scena :
Lo staging ha "server:https://acme-staging-v02.api.letsencrypt.org/directory"
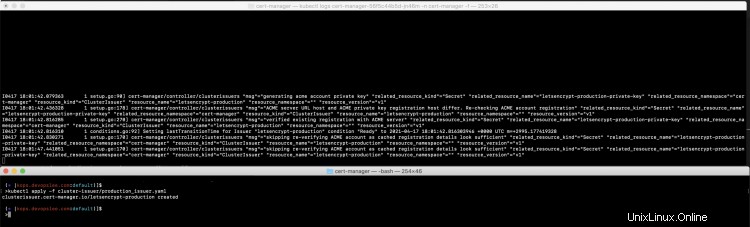
kubectl logs cert-manager-56f5c44b5d-jn46m -n cert-manager -f
kubectl apply -f cluster-issuer/staging_issuer.yaml

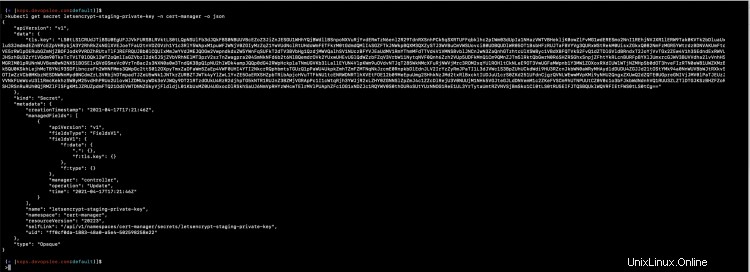
Questo crea un segreto chiamato "letsencrypt-staging-private-key"
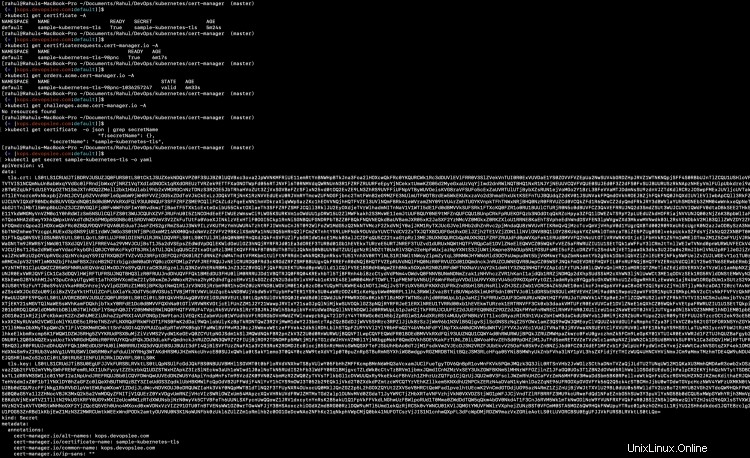
kubectl get secret letsencrypt-staging-private-key -n cert-manager -o json
Produzione :
La produzione ha "server:https://acme-v02.api.letsencrypt.org/directory"
kubectl logs cert-manager-56f5c44b5d-jn46m -n cert-manager -f
kubectl apply -f cluster-issuer/production_issuer.yaml
Questo crea un segreto chiamato "letsencrypt-production-private-key"
kubectl get secret letsencrypt-production-private-key -n cert-manager -o json
Distribuisci un'applicazione di esempio
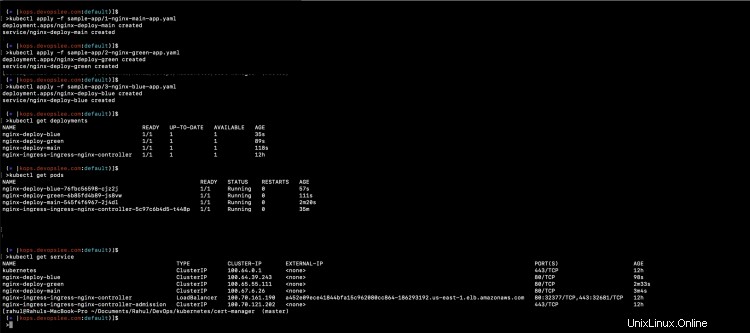
Distribuiamo le nostre 3 applicazioni di esempio.
kubectl apply -f sample-app/1-nginx-main-app.yaml
kubectl apply -f sample-app/2-nginx-green-app.yaml
kubectl apply -f sample-app/3-nginx-blue-app.yaml
Check the deployments, pods, and services created by the above commands.
kubectl get deployments
kubectl get pods kubectl
get service
Distribuisci ingresso
Innanzitutto, distribuiamo un Ingress with Staging Issuer.
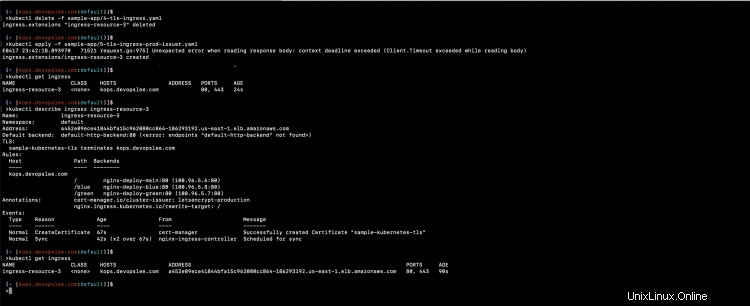
kubectl apply -f sample-app/4-tls-ingress.yaml
kubectl get ingress
kubectl describe ingress ingress-resource-3

Dopo aver creato la risorsa Ingress, puoi vedere cosa è successo in background per emettere il certificato per la sezione TLS di Ingress.
kubectl get certificate -A
kubectl get certificaterequests.cert-manager.io -A
kubectl get orders.acme.cert-manager.io -A
kubectl get challenges.acme.cert-manager.io -A
kubectl get certificate -o json | grep secretName
kubectl get secret sample-kubernetes-tls -o yaml
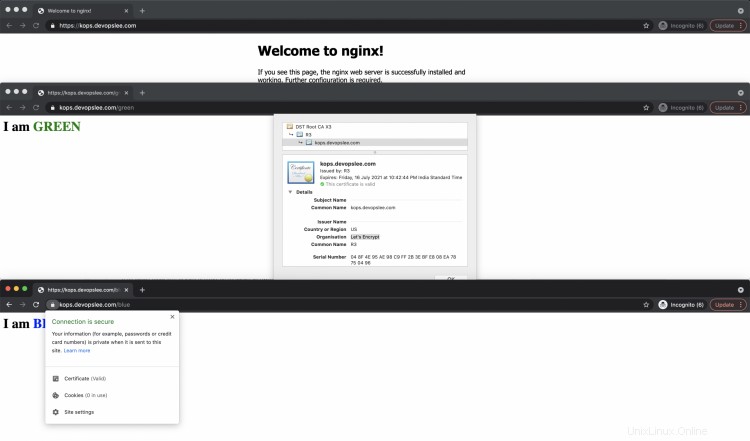
È ora possibile accedere all'applicazione tramite HTTPS, ma poiché abbiamo utilizzato l'ambiente di staging dell'emittente Let's Encrypt, riceveremo un avviso "La tua connessione a questo sito non è sicura".

Distribuisci Ingress con l'emittente di produzione.
Ora eliminiamo l'Ingress utilizzando lo Staging e creiamo un nuovo Ingress puntato all'emittente di produzione.
kubectl delete -f sample-app/4-tls-ingress.yaml
kubectl apply -f sample-app/5-tls-ingress-prod-issuer.yaml
kubectl get ingress
kubectl describe ingress ingress-resource-3
Questa volta se provi ad accedere all'applicazione, non riceverai nessun avviso come "La connessione a questo sito non è sicura".
Conclusione
In questo articolo, abbiamo visto i passaggi per configurare un Cert-Manager sul cluster Kubernetes. Abbiamo distribuito un'applicazione di esempio e instradato il traffico attraverso l'ingresso in base al percorso e protetto la connessione con HTTPS utilizzando un certificato emesso dall'emittente del cluster Let's Encrypt. Abbiamo prima emesso un certificato utilizzando l'ambiente Let's Encrypt Staging e poi utilizzato l'ambiente di produzione Let's Encrypt