Ogni volta che apri una pagina web sul tuo computer, i pacchetti di dati vengono inviati e ricevuti sulla tua interfaccia di rete. A volte, l'analisi di questi pacchetti diventa importante per molte ragioni. Per fortuna, Linux offre un'utilità della riga di comando che scarica le informazioni relative a questi pacchetti di dati in output.
In questo articolo, discuteremo le basi dello strumento in questione - tcpdump . Ma prima di farlo, vale la pena ricordare che tutti gli esempi qui sono stati testati su una macchina Ubuntu 18.04 LTS e su Debian 10, ma funzionerà anche su altre distribuzioni Linux come CentOS, Fedora, Gentoo e Arch Linux.
Comando Linux tcpdump
Il comando tcpdump in Linux ti consente di scaricare il traffico su una rete. Di seguito è riportata la sua sintassi in breve:
tcpdump [OPTIONS]
Ecco la sintassi dettagliata:
tcpdump [ -AbdDefhHIJKlLnNOpqStuUvxX# ] [ -B buffer_size ]
               [ -c count ]
               [ -C file_size ] [ -G rotate_seconds ] [ -F file ]
               [ -i interface ] [ -j tstamp_type ] [ -m module ] [ -M secret ]
               [ --number ] [ -Q in|out|inout ]
               [ -r file ] [ -V file ] [ -s snaplen ] [ -T type ] [ -w file ]
               [ -W filecount ]
               [ -E [email protected] algo:secret,...  ]
               [ -y datalinktype ] [ -z postrotate-command ] [ -Z user ]
               [ --time-stamp-precision=tstamp_precision ]
               [ --immediate-mode ] [ --version ]
               [ expression ]
Ed ecco come lo spiega la pagina man dello strumento:
Tcpdump prints out a description of the contents of packets on a network interface that match the
boolean expression; the description is preceded by a time stamp, printed, by default, as hours,
minutes, seconds, and fractions of a second  since  midnight.

It can  also  be  run with the -w flag, which causes it to save the packet data to a file for
later analysis, and/or with the -r flag, which causes it to read from a saved packet file rather
than to read packets from a network interface.  It can also be run with the -V  flag,  which causes
it to read a list of saved packet files.

In all cases, only packets that match expression will be processed by tcpdump.
Di seguito sono riportati alcuni esempi in stile Domande e risposte che dovrebbero darti un'idea migliore di come funziona il comando tcpdump.
Q1. Come usare tcpdump?
Prima di utilizzare tcpdump per annusare i pacchetti di dati, dovresti idealmente sapere su quale interfaccia di rete desideri che lo strumento funzioni. Per un elenco delle interfacce di rete disponibili sul sistema, utilizzare l'opzione della riga di comando -D con tcpdump.
tcpdump -D
Ecco come la pagina man spiega questa opzione:
Print the list of the network interfaces available on the system and on which tcpdump can capture
packets. For each network interface, a number and an interface name, possibly followed by a text
description of the interface, is printed. The interface name or the number can be supplied to the
-i flag to specify an interface on which to capture.

This can be useful on systems that don't have a command to list them (e.g., Windows systems, or
UNIX systems lacking  ifconfig -a); the number can be useful on Windows 2000 and later systems,
where the interface name is a somewhat complex string.

The  -D  flag  will not be supported if tcpdump was built with an older version of libpcap that
lacks the pcap_findalldevs() function.
Ad esempio, nel mio caso, è stato prodotto il seguente output:
1.wlx18a6f713679b [Up, Running]
2.any (Pseudo-device that captures on all interfaces) [Up, Running]
3.lo [Up, Running, Loopback]
4.enp3s0 [Up]
5.nflog (Linux netfilter log (NFLOG) interface)
6.nfqueue (Linux netfilter queue (NFQUEUE) interface)
7.usbmon1 (USB bus number 1)
8.usbmon2 (USB bus number 2)
9.usbmon3 (USB bus number 3)
10.usbmon4 (USB bus number 4)
Ora che hai un elenco di interfacce, puoi sceglierne una e passare il suo nome come input all'opzione della riga di comando -i di tcpdump. Ad esempio:
tcpdump -i wlx18a6f713679b
Di seguito è una parte dell'output prodotto da questo comando nel mio caso:
tcpdump: verbose output suppressed, use -v or -vv for full protocol decode
listening on wlx18a6f713679b, link-type EN10MB (Ethernet), capture size 262144 bytes
11:53:11.408964 IP 192.168.2.132.52898 > 239.255.255.250.3702: UDP, length 656
11:53:11.409492 IP himanshu.57383 > one.one.one.one.domain: 8572+ [1au] PTR? 250.255.255.239.in-addr.arpa. (57)
11:53:11.409588 IP 192.168.2.140.49690 > 239.255.255.250.1900: UDP, length 174
11:53:11.409954 IP 192.168.2.147.mdns > 224.0.0.251.mdns: 1 [2q] PTR (QU)? _%9E5E7C8F47989526C9BCD95D24084F6F0B27C5ED._sub._googlecast._tcp.local. PTR (QU)? _googlecast._tcp.local. (94)
11:53:11.499220 IP one.one.one.one.domain > himanshu.57383: 8572 NXDomain 0/1/1 (114)
11:53:11.499950 IP himanshu.34201 > one.one.one.one.domain: 12068+ [1au] PTR? 132.2.168.192.in-addr.arpa. (55)
11:53:11.591291 IP one.one.one.one.domain > himanshu.34201: 12068 NXDomain* 0/1/2 (278)
11:53:11.592195 IP himanshu.55501 > one.one.one.one.domain: 31630+ [1au] PTR? 1.1.1.1.in-addr.arpa. (49)
11:53:11.842603 IP himanshu.57253 > one.one.one.one.domain: 16905+ [1au] PTR? 140.2.168.192.in-addr.arpa. (55)
11:53:11.951226 IP himanshu.52662 > one.one.one.one.domain: 52377+ [1au] PTR? 251.0.0.224.in-addr.arpa. (53)
11:53:12.428931 IP 192.168.2.140.49690 > 239.255.255.250.1900: UDP, length 174
11:53:12.437905 IP 192.168.2.147.mdns > 224.0.0.251.mdns: 2 [2q] PTR (QM)? _%9E5E7C8F47989526C9BCD95D24084F6F0B27C5ED._sub._googlecast._tcp.local. PTR (QM)? _googlecast._tcp.local. (94)
11:53:12.438730 IP6 fe80::eccc:59f2:fc78:9e07.52899 > ff02::c.3702: UDP, length 656
11:53:12.439017 IP himanshu.33194 > one.one.one.one.domain: 15679+ [1au] PTR? c.0.0.0.0.0.0.0.0.0.0.0.0.0.0.0.0.0.0.0.0.0.0.0.0.0.0.0.2.0.f.f.ip6.arpa. (101)
11:53:12.572386 IP one.one.one.one.domain > himanshu.33194: 15679 NXDomain 0/1/1 (165)
11:53:12.642129 IP 192.168.2.11.mdns > 224.0.0.251.mdns: 0*- [0q] 1/0/3 PTR Google-Home-Mini-e3a3ae72a03e3d1c60d24653d4666ca6._googlecast._tcp.local. (356)
...
...
Q2. Come far uscire tcpdump dopo aver ricevuto un determinato numero di pacchetti?
Questo può essere ottenuto usando l'opzione della riga di comando -c. Ad esempio, se vuoi che tcpdump visualizzi solo le informazioni relative a 10 pacchetti, puoi farlo nel modo seguente:
tcpdump -c 10
Ad esempio, nel mio caso, ho eseguito il seguente comando:
tcpdump -c 10 -i wlx18a6f713679b
Di seguito è riportato l'output che è stato prodotto:
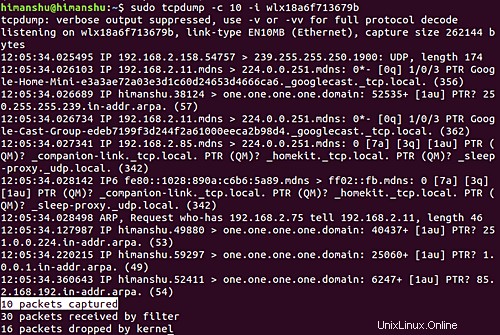
Quindi puoi vedere che sono stati catturati 10 pacchetti.
T3. Come fare in modo che tcpdump visualizzi l'intestazione a livello di collegamento nell'output?
Questo può essere fatto usando l'opzione della riga di comando -e. Ad esempio:
tcpdump -e -i wlx18a6f713679b
Ed ecco l'output prodotto:
listening on wlx18a6f713679b, link-type EN10MB (Ethernet), capture size 262144 bytes
12:14:07.951396 3c:a8:2a:a7:7b:c1 (oui Unknown) > Broadcast, ethertype IPv4 (0x0800), length 197: 192.168.2.55.17500 > 255.255.255.255.17500: UDP, length 155
12:14:07.952111 3c:a8:2a:a7:7b:c1 (oui Unknown) > Broadcast, ethertype IPv4 (0x0800), length 197: 192.168.2.55.17500 > 192.168.2.255.17500: UDP, length 155
...
...
Quindi puoi vedere che le intestazioni a livello di collegamento sono state prodotte nell'output.
Q4. Come fare in modo che tcpdump visualizzi numericamente gli indirizzi IP stranieri?
Questo può essere ottenuto usando l'opzione della riga di comando -f.
tcpdump -f -i [INTERFACE]
Fare in modo che tcpdump visualizzi indirizzi IPv4 "stranieri" in modo numerico anziché simbolico ha i suoi vantaggi in determinate situazioni. Uno di questi esempi è menzionato nella pagina man dello strumento:
this option is intended to get around serious brain damage in Sun's NIS server — usually it hangs
forever translating non-local internet numbers
Q5. Come fare in modo che tcpdump produca numeri di pacchetto in output?
Per fare in modo che tcpdump produca numeri di pacchetto in output, usa il --number opzione della riga di comando.
Ad esempio, ho eseguito il seguente comando:
tcpdump --number -i wlx18a6f713679b
Ed ecco parte dell'output che è stato prodotto:
listening on wlx18a6f713679b, link-type EN10MB (Ethernet), capture size 262144 bytes
    1  12:38:35.522944 ARP, Request who-has 192.168.2.196 tell _gateway, length 46
    2  12:38:35.523265 IP6 fe80::8ab4:a6ff:fe9d:a6bb > ff02::16: HBH ICMP6, multicast listener report v2, 1 group record(s), length 28
    3  12:38:35.523578 IP6 fe80::8ab4:a6ff:fe9d:a6bb > ip6-allrouters: ICMP6, router solicitation, length 16
    4  12:38:35.523861 ARP, Request who-has 192.168.2.15 tell 192.168.2.170, length 28
...
...
...
Quindi puoi vedere che ora ogni riga inizia con un numero.
Q6. Come fare in modo che tcpdump stampi un output più breve?
Questo può essere fatto usando l'opzione della riga di comando -q. Ecco come lo spiega la pagina man dello strumento:
Quick (quiet?) output. Print less protocol information so output lines are shorter.
Di seguito è riportato un esempio di questa opzione:
Quindi puoi vedere che questa volta sono state prodotte meno informazioni in output.
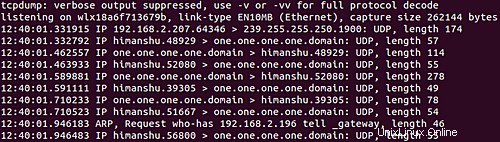
Q7. Come omettere le informazioni sul timestamp dall'output di tcpdump?
Utilizzare l'opzione della riga di comando -t per questo. Ecco un comando di esempio:
tcpdump -t -i wlx18a6f713679b
E il seguente è il suo output:
listening on wlx18a6f713679b, link-type EN10MB (Ethernet), capture size 262144 bytes
IP himanshu.56992 > mails11.telegram.org.https: Flags [.], ack 3090054317, win 965, options [nop,nop,TS val 226976758 ecr 3781653930], length 0
IP himanshu.41122 > one.one.one.one.domain: 12755+ [1au] PTR? 22.171.154.149.in-addr.arpa. (56)
IP mails11.telegram.org.https > himanshu.56824: Flags [.], ack 273652159, win 1001, options [nop,nop,TS val 3781656472 ecr 226966324], length 0
ARP, Request who-has 192.168.2.48 tell _gateway, length 46
ARP, Request who-has 192.168.2.135 tell _gateway, length 46
...
...
Quindi puoi vedere che le informazioni sul timestamp (che in genere si trovano all'inizio di ogni riga) non sono presenti nell'output ora.
Q8. Come fare in modo che tcpdump produca un output dettagliato?
È possibile utilizzare l'opzione della riga di comando -v in questo caso. Di seguito è riportato come la pagina man dello strumento spiega questa opzione:
tcpdump -v -i [INTERFACE]
When parsing and printing, produce (slightly more) verbose output. For example, the time to live,
identification, total length and options in an IP packet are printed. Also enables additional
packet integrity checks such as verifying the IP and ICMP header checksum.

When writing to a file with the -w option, report, every 10 seconds, the number of packets captured
Conclusione
Abbiamo appena scalfito la superficie qui poiché il comando tcpdump offre molte opzioni della riga di comando. Una volta che hai finito di esercitarti, puoi andare alla pagina man dello strumento per saperne di più.