Se chiedi a un gruppo di sviluppatori cos'è Linux, la maggior parte di loro probabilmente dirà che è un sistema operativo open source. Quelli con più conoscenze tecniche probabilmente lo chiameranno kernel.
Per me, però, Linux non è solo un sistema operativo o un kernel. Per me è libertà. La libertà di mettere insieme un sistema operativo in base alle mie esigenze, ed è qui che entra in gioco Arch Linux.
Secondo la loro wiki,
Arch Linux è una distribuzione GNU/Linux per uso generico x86-64 sviluppata in modo indipendente che si sforza di fornire le ultime versioni stabili della maggior parte del software seguendo un modello a rilascio progressivo.
L'installazione predefinita è un sistema di base minimo, configurato dall'utente per aggiungere solo ciò che è richiesto di proposito.
In altre parole, Arch Linux è una distribuzione ottimizzata per l'architettura x86-64 destinata a utenti Linux esperti. Ti consente di avere la piena responsabilità e il controllo sul tuo sistema.
Potrai scegliere quali pacchetti desideri, il kernel (sì, ce ne sono più), il bootloader, l'ambiente desktop e così via.
Hai mai sentito qualcuno dire,
Oh, comunque, io uso Arch Linux!
Questo perché l'installazione di Arch Linux su una macchina richiede una conoscenza adeguata di come funzionano le diverse parti di una distribuzione Linux. Quindi eseguire Arch Linux sul tuo sistema è una sorta di testimonianza della tua comprensione di Linux.
Parlando per esperienza, l'installazione di Arch Linux non è molto diversa dall'installazione di qualcosa come Fedora o Ubuntu. È solo che devi eseguire manualmente i singoli passaggi invece di avere un programma di installazione che fa le cose per te. Ma una volta completato il processo, inizierai a capire come funzionano le altre distribuzioni in generale.
In questo articolo, ti guiderò attraverso l'intero processo di installazione e configurazione di Arch Linux sul tuo computer. Verso la fine parlerò anche di alcune attività comuni e di suggerimenti per la risoluzione dei problemi.
Quindi vieni con me e ti mostrerò quanto è profonda la tana del coniglio.
Sommario
- Alcuni presupposti che sto facendo
- Come creare un'unità USB avviabile per Arch Linux
- Come preparare il computer per l'installazione di Arch Linux
- Come installare Arch Linux
- Come impostare il layout e il carattere della tastiera della console
- Come verificare la modalità di avvio
- Come connettersi a Internet
- Come aggiornare l'orologio di sistema
- Come partizionare i dischi
- Come formattare le partizioni
- Come montare i file system
- Come configurare gli specchi
- Come installare il sistema di base Arch Linux
- Come configurare Arch Linux
- Come generare il file Fstab
- Come accedere al sistema appena installato utilizzando Arch-chroot
- Come configurare il fuso orario
- Come configurare la localizzazione
- Come configurare la rete
- Come impostare la password di root
- Come creare un utente non root
- Come installare il microcodice
- Come installare e configurare un boot loader
- Come installare Xorg
- Come installare i driver grafici
- Come installare un ambiente desktop
- Come installare GNOME
- Come installare il plasma
- Come finalizzare l'installazione
- Come passare da un ambiente desktop all'altro
- Come gestire i pacchetti utilizzando Pacman
- Come installare i pacchetti utilizzando Pacman
- Come rimuovere i pacchetti utilizzando Pacman
- Come aggiornare i pacchetti utilizzando Pacman
- Come cercare pacchetti utilizzando Pacman
- Come utilizzare AUR in Arch Linux
- Come installare i pacchetti utilizzando un helper
- Come installare i pacchetti manualmente
- Come risolvere i problemi comuni
- Come utilizzare l'ISO di Live Arch come supporto di salvataggio
- Ulteriori letture
- Conclusione
Alcuni presupposti che sto facendo
Prima di entrare nel cuore del tutorial, voglio chiarire alcune cose. Per rendere accessibile l'intero articolo, sto facendo le seguenti ipotesi su di te e sul tuo sistema:
- Conosci Arch Linux a livello base
- Arch Linux
- Domande frequenti
- Arch rispetto ad altre distribuzioni
- Il tuo computer utilizza UEFI e non BIOS
- Hai un'unità USB abbastanza grande (4 GB) per avviare Linux da
- Hai una precedente esperienza nell'installazione di Linux (Ubuntu/Fedora)
- Hai abbastanza spazio per installare Linux sul tuo HDD o SSD
Questo è praticamente tutto. Se hai tutto quanto sopra, sei a posto.
Come creare un'unità USB avviabile per Arch Linux
Per scaricare Arch Linux, vai su https://archlinux.org/download/ e scarica l'ultima versione (01.01.2022 al momento della stesura di questo articolo). L'ISO dovrebbe avere una dimensione di circa 870 megabyte.
Una volta scaricato, dovrai inserirlo nella tua USB. Puoi usare il programma Fedora Media Writer per farlo. Scarica e installa l'applicazione sul tuo sistema. Ora collega la tua chiavetta USB e apri l'applicazione:
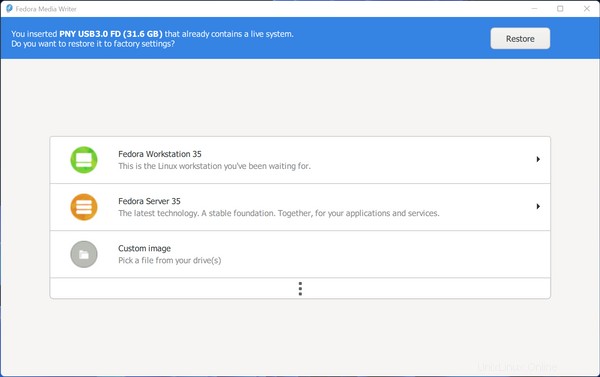
Fare clic su "Immagine personalizzata" e utilizzare il browser di file per selezionare il file ISO di Arch Linux scaricato.
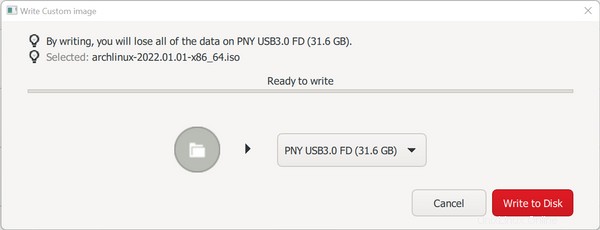
L'applicazione ora ti consentirà di scegliere una delle tue unità USB collegate. Fai molta attenzione nella selezione di quella giusta se hai più unità USB collegate alla tua macchina. Ora premi il pulsante "Scrivi su disco" e attendi fino al termine del processo.
Come preparare il computer per l'installazione di Arch Linux
In questo passaggio dovrai apportare alcune modifiche al tuo sistema, altrimenti Arch Linux potrebbe non avviarsi o funzionare correttamente.
La prima modifica che dovrai apportare è disabilitare l'avvio protetto nella configurazione UEFI. Questa funzione aiuta a prevenire attacchi di malware durante l'avvio, ma impedisce anche l'avvio del programma di installazione di Arch Linux.
Le istruzioni dettagliate su come disabilitarlo variano a seconda della marca della scheda madre o del laptop. Questa volta dovrai cercare tu stesso in Internet per trovare la strada giusta.
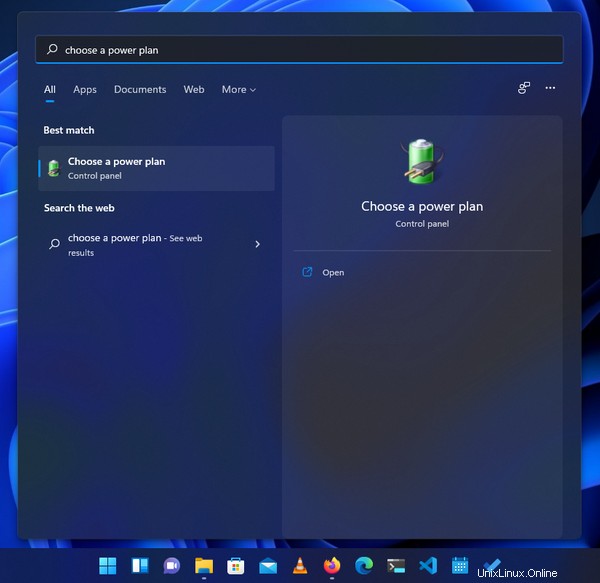
La seconda cosa che dovresti disabilitare è rilevante solo se stai installando Arch Linux insieme a Windows. C'è una funzione di Windows chiamata avvio rapido che riduce il tempo di avvio del tuo computer mettendolo parzialmente in ibernazione.
Questa è generalmente una bella funzionalità da avere, ma impedisce a qualsiasi altro sistema operativo in una configurazione di avvio doppio di accedere al disco rigido nel processo.
Per disabilitare questa funzione, apri il menu di avvio e cerca "Scegli un piano di alimentazione" come segue:
Quindi nella finestra successiva, fai clic su "Scegli cosa fanno i pulsanti di accensione" dalla barra laterale di sinistra:

Quindi nella finestra successiva vedrai un elenco di "Impostazioni di spegnimento" e l'opzione "Attiva avvio rapido (consigliato)" dovrebbe essere mostrata come di sola lettura lì.
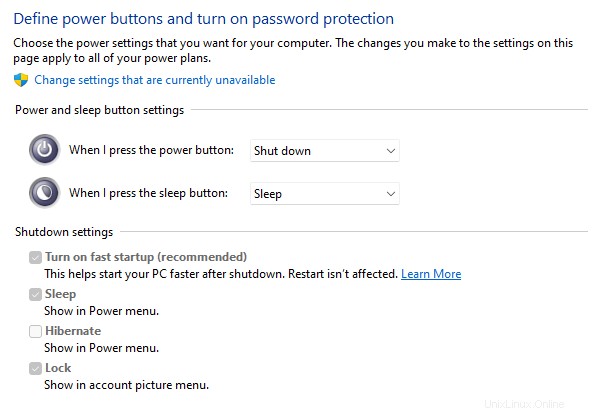
Fai clic su "Modifica impostazioni attualmente non disponibili" in alto e dovresti essere in grado di modificare le impostazioni.
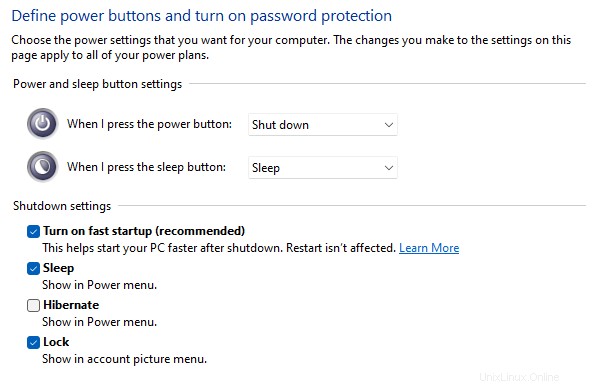
Deseleziona l'opzione "Attiva avvio rapido (consigliato)" e premi il pulsante "Salva modifiche" in basso. D'ora in poi il processo di avvio potrebbe richiedere alcuni istanti in più, ma ne vale la pena.
In questo articolo, installerò Arch Linux come sistema operativo predefinito. Quindi assegnerò il mio intero spazio su disco ad esso.
Se stai cercando di installarlo insieme a Windows, tuttavia, ho un articolo dedicato sull'argomento. E in quell'articolo, c'è una sezione che discute il processo di partizionamento in dettaglio.
Come installare Arch Linux
Supponendo che tu abbia un'unità USB avviabile e che il tuo computer sia configurato correttamente, dovrai eseguire l'avvio dall'unità USB. Il processo di avvio da un'unità USB varia da macchina a macchina.
Sulla mia macchina, premendo il tasto F12 durante l'avvio mi porta all'elenco dei dispositivi avviabili. Da lì posso scegliere la mia unità USB avviabile. Potresti già conoscere la tecnica appropriata per il tuo computer o potresti dover cercare un po'.
Una volta che sei riuscito ad atterrare nell'elenco dei dispositivi di avvio collegati, seleziona l'unità USB da cui eseguire l'avvio e dovrebbe apparire il seguente menu:
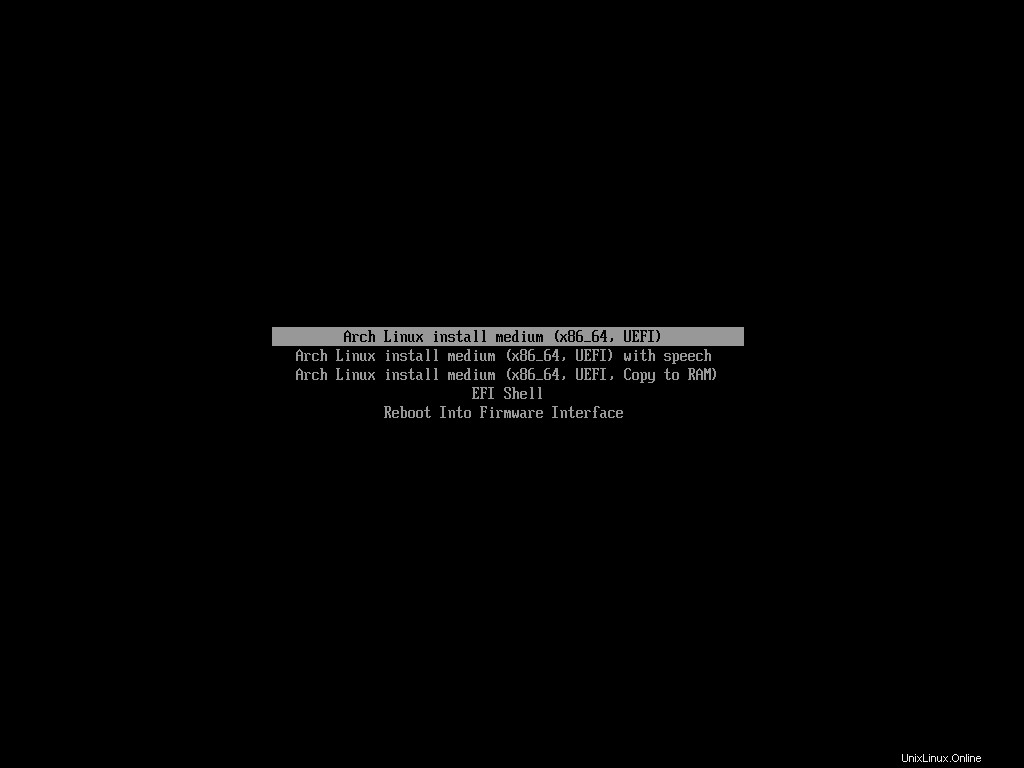
Scegli il primo dall'elenco e attendi fino al termine dell'avvio del programma di installazione di Arch. Una volta avviato completamente, vedrai qualcosa di simile a questo:
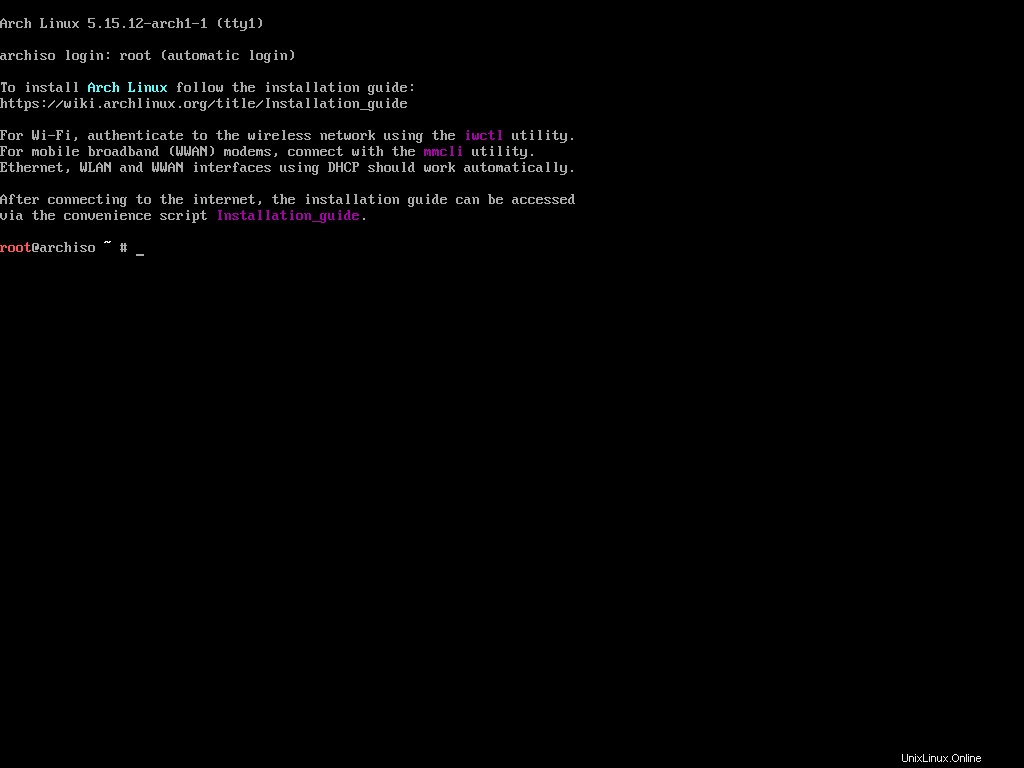
Questo è tutto. Questo è tutto ciò che otterrai. A differenza di altri sistemi operativi con cui potresti avere familiarità, il programma di installazione di Arch non ha alcuna interfaccia utente grafica per automatizzare l'installazione.
Richiede piuttosto che tu investa tempo e fatica e configuri ogni parte della distribuzione pezzo per pezzo. Può sembrare scoraggiante ma, ad essere onesti, se capisci cosa stai facendo, installare Arch Linux è piuttosto divertente.
Come impostare il layout e il carattere della tastiera della console
Come ho già detto, il programma di installazione di Arch non ha un'interfaccia utente grafica, quindi ci sarà molta digitazione. La configurazione del layout della tastiera e un font dall'aspetto gradevole possono rendere il processo di installazione molto meno frustrante.
Per impostazione predefinita, la console presuppone che tu abbia un layout di tastiera standard degli Stati Uniti. Questo dovrebbe andare bene per la maggior parte delle persone, ma nel caso in cui tu ne abbia uno diverso, puoi cambiarlo.
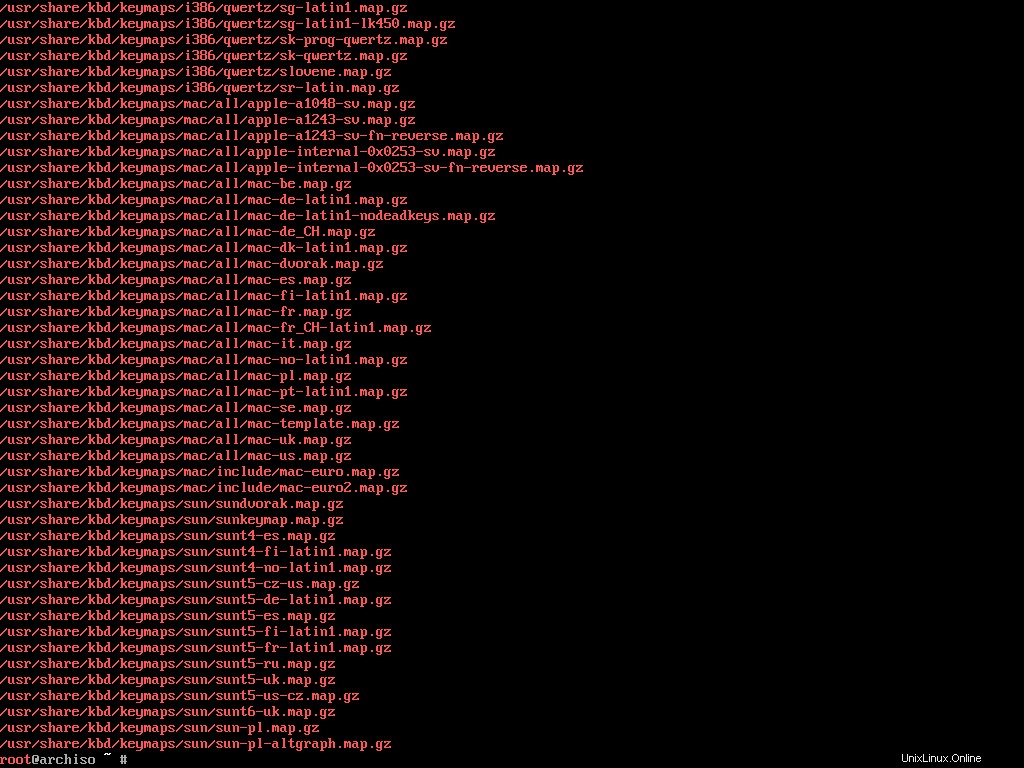
Tutte le keymap disponibili sono generalmente conservate all'interno di /usr/share/kbd/keymaps directory sotto forma di map.gz File. Puoi vederne l'elenco usando ls comando:
ls /usr/share/kbd/keymaps/**/*.map.gz
Questo elencherà tutte le mappe chiave disponibili:
Ora, ad esempio, se hai il layout della tastiera Mac-US, individua il corrispondente map.gz file da questo elenco che è il mac-us.map.gz uno.
Puoi usare i loadkeys comando per caricare la mappa dei tasti desiderata. Per impostare mac-us.map.gz come impostazione predefinita, esegui il seguente comando:
loadkeys mac-us
Puoi anche cambiare il carattere della console se non ti piace quello predefinito. Proprio come le mappe dei tasti, i caratteri della console sono mantenuti all'interno di /usr/share/kbd/consolefonts che puoi elencare usando ls comando:
ls /usr/share/kbd/consolefontsQuesto elencherà tutti i caratteri disponibili:

Ora puoi usare il setfont comando per impostare uno di questi. Ad esempio, se vuoi impostare il drdos8x16 come impostazione predefinita, esegui il seguente comando:
setfont drdos8x16
Entrambi i loadkeys e setfont i comandi fanno parte di kbd pacchetto contenente gli strumenti essenziali della tastiera Linux. Hanno un'ottima documentazione, quindi se desideri saperne di più, sentiti libero di dare un'occhiata.
Come verificare la modalità di avvio
Ora che hai configurato la tua console, il passaggio successivo consiste nell'assicurarti di aver eseguito l'avvio in modalità UEFI e non in modalità BIOS.
Ad essere onesti, questo passaggio mi sembra superfluo poiché dice letteralmente x86_64 UEFI nel menu di avvio dal vivo. Ma facciamolo per il bene della guida all'installazione ufficiale di Arch.
Per verificare la modalità di avvio, eseguire il comando seguente:
ls /sys/firmware/efi/efivarsSe sei in modalità UEFI, elencherà una serie di file sullo schermo:
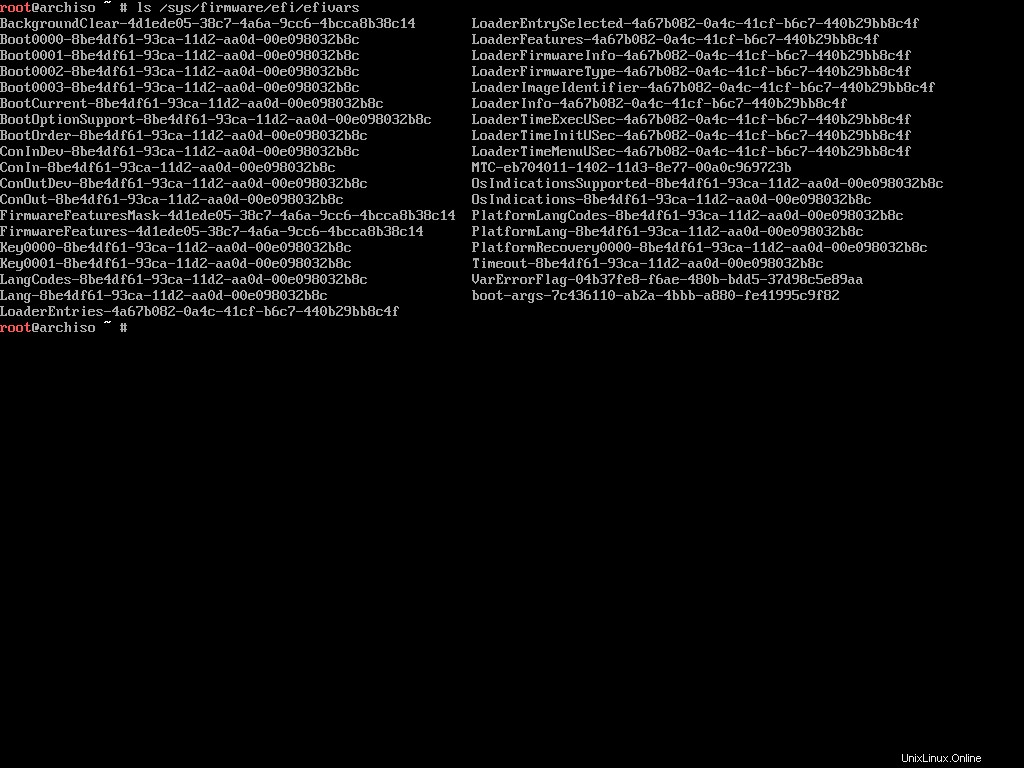
In caso di avvio del BIOS, efi la directory non esisterà nemmeno all'interno di /sys/firmware directory. Se sei in modalità UEFI, (cosa che dovresti esserlo se hai seguito tutto correttamente) vai al passaggio successivo.
Come connettersi a Internet
A differenza di molte altre distribuzioni live, l'ambiente live Arch non viene fornito con tutti i pacchetti necessari integrati. Contiene un numero minimo di pacchetti che puoi usare per installare il resto del sistema. Quindi, una connessione Internet funzionante è d'obbligo.
Se stai utilizzando una rete cablata, dovresti avere una connessione Internet funzionante fin dall'inizio. Per provarlo, esegui il ping di uno qualsiasi degli indirizzi pubblici disponibili:
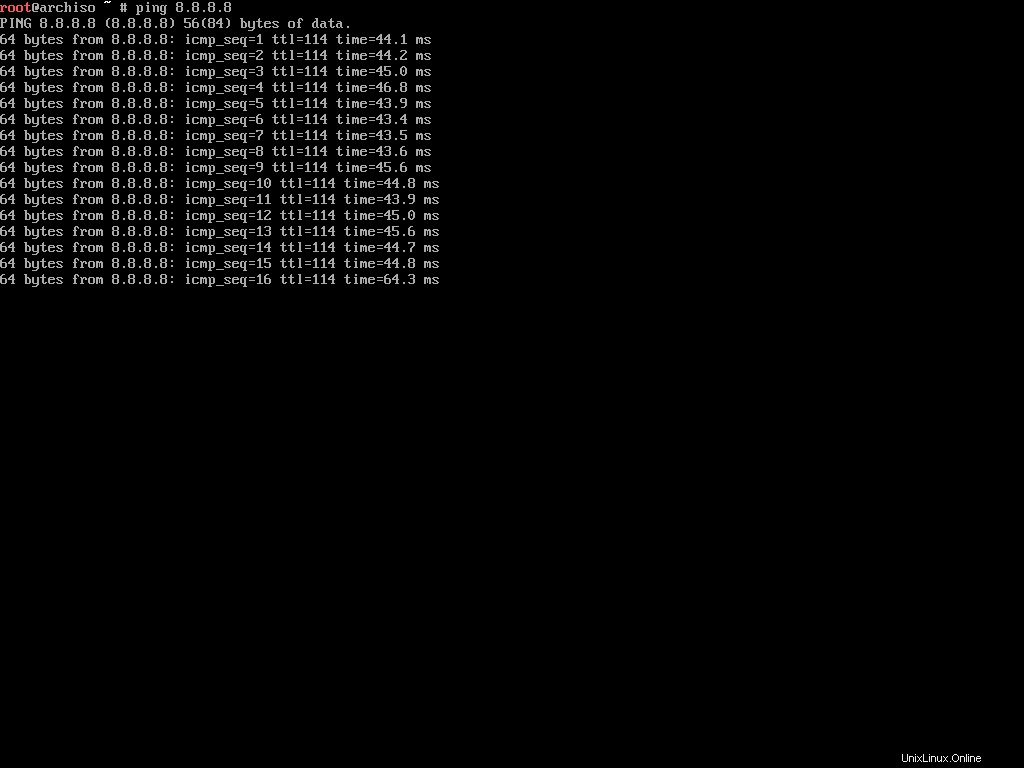
Sto facendo questi screenshot usando VirtualBox, quindi la connessione Internet funziona perfettamente con la connessione cablata. Ma se hai una connessione wireless, le cose possono diventare un po' complicate.
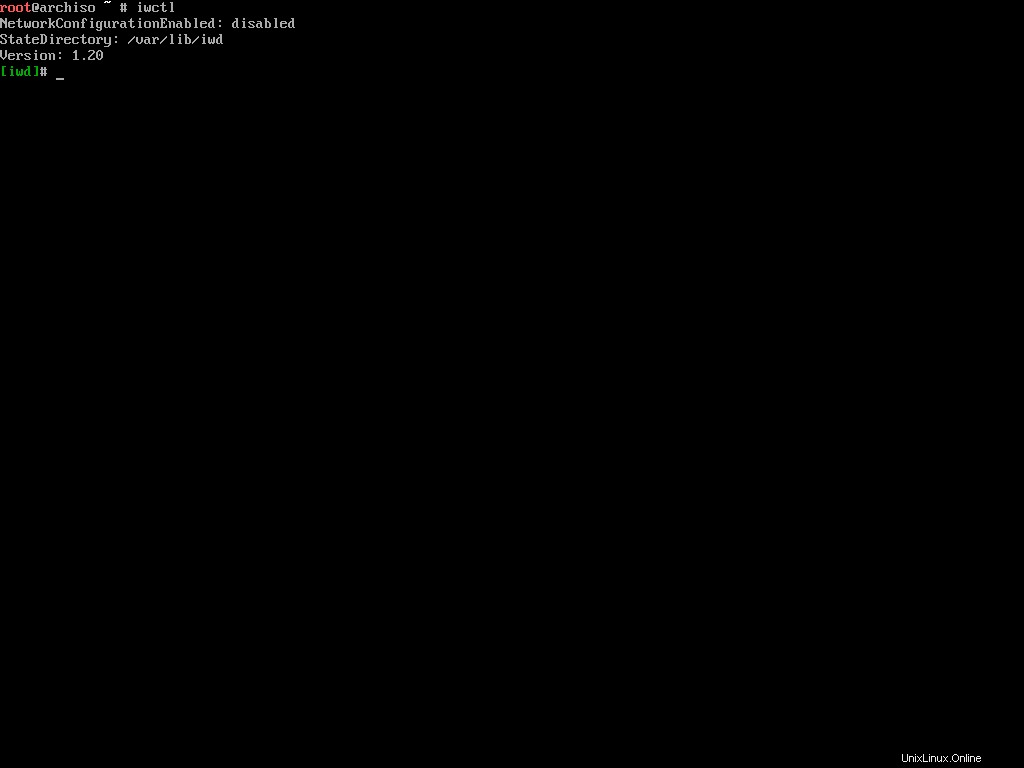
L'ambiente live viene fornito con iwd o pacchetto demone wireless iNet. Puoi utilizzare questo pacchetto per connetterti a una rete wireless vicina.
Per cominciare, esegui il seguente comando:
iwctlVerrà avviato un prompt interattivo come segue:
Ora esegui il seguente comando per vedere l'elenco dei dispositivi wireless disponibili:
device list
Questo sputerà fuori un elenco di dispositivi wireless disponibili. Per dispositivi wireless intendo qualsiasi adattatore wireless collegato al tuo computer. Assumiamo wlan0 è il nome del dispositivo.
Per cercare le reti wireless vicine utilizzando il dispositivo trovato, eseguire il comando seguente:
# station <device> scan

station wlan0 scan
Potresti pensare che questo comando stamperà un elenco di tutte le reti vicine, ma non è così. Per visualizzare l'elenco delle reti, eseguire il comando seguente:
# station <device> get-networks

station wlan0 get-networks
Ora supponendo che il nome della tua rete domestica si chiami Skynet , puoi connetterti eseguendo il comando seguente:
# station <device> connect <SSID>

station wlan0 connect Skynet
Il iwctl il programma ti chiederà la password wi-fi. Inseriscilo con cura e, una volta connesso alla rete, esci dal programma scrivendo exit e premendo invio. Prova a eseguire nuovamente il ping di un indirizzo pubblico e assicurati che Internet funzioni correttamente.
Come aggiornare l'orologio di sistema
In Linux, NTP o Network Time Protocol viene utilizzato per sincronizzare gli orologi del sistema del computer su una rete. Puoi usare il timedatectl comando per abilitare NTP sul tuo ambiente Arch live:
timedatectl set-ntp trueQuesto comando inizierà a produrre un po' di output e dopo alcuni secondi. Se non vedi più il cursore dei comandi, prova a premere Invio. Ho affrontato questo inconveniente alcune volte in passato.
Come partizionare i dischi
Questo è probabilmente il passaggio più delicato dell'intero processo di installazione, perché se incasini le partizioni, perdi i tuoi preziosi dati. Quindi il mio consiglio sarebbe di non seguire immediatamente questa sezione. Invece, leggi prima l'intera sezione e poi segui.
Per iniziare il processo di partizionamento, dovrai prima conoscere i diversi dischi collegati al tuo computer. Puoi usare fdisk che è un programma guidato da finestre di dialogo per la creazione e la manipolazione di tabelle delle partizioni.
fdisk -lQuesto comando elencherà le tabelle delle partizioni per tutti i dispositivi disponibili sul tuo computer.
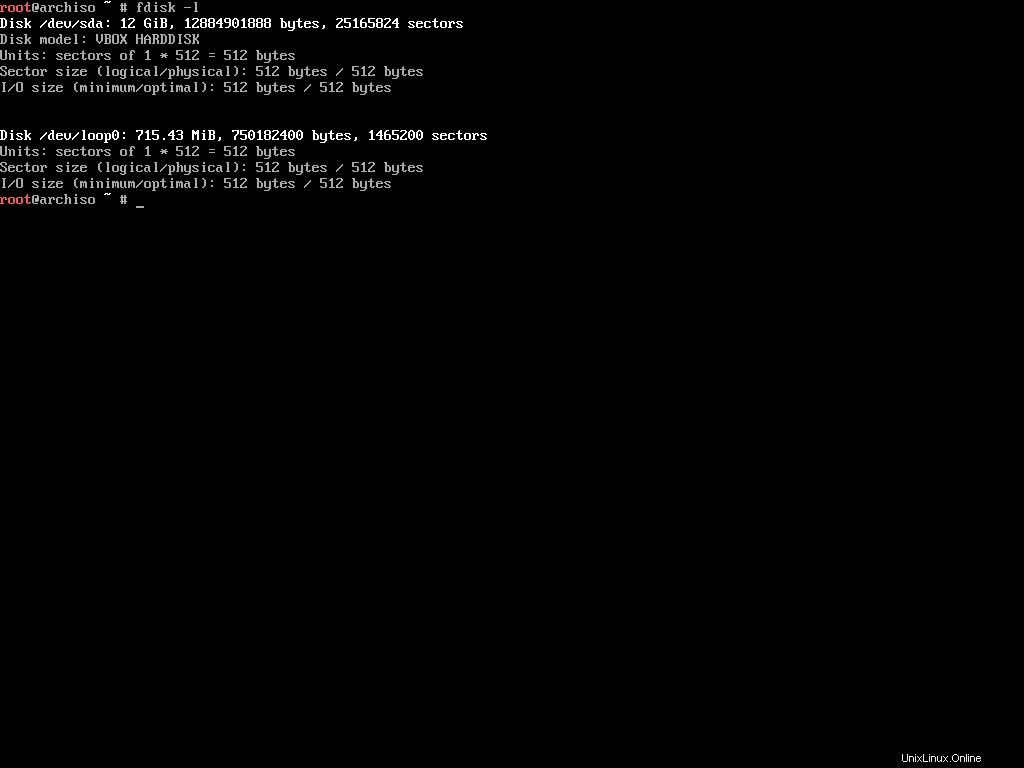
Come puoi vedere, ci sono due dispositivi collegati al mio computer (macchina virtuale in realtà). A seconda del numero di dispositivi che hai, questo elenco può essere più lungo, quindi ignora tutti i dispositivi che terminano con rom , loop o airoot durante la revisione dell'elenco. Non è possibile utilizzare questi dispositivi per l'installazione.
Quindi questo ci lascia con il /dev/sda dispositivo. Tieni presente che questo può essere completamente diverso sulla tua macchina. Ad esempio, se hai un'unità NVME, potresti visualizzare /dev/nvme0n1 invece.
Dopo aver deciso quale dispositivo utilizzare, è una buona idea controllare se sono presenti partizioni all'interno di quel dispositivo. Per farlo, puoi usare la seguente variante dello stesso fdisk comando:
fdisk /dev/sda -l
Ricordati di sostituire /dev/sda con quello che hai. Questo comando elencherà tutte le partizioni all'interno del dispositivo specificato.
Sebbene non ci siano partizioni in questo dispositivo, in una situazione di vita reale potresti aver creato partizioni in precedenza. Tali partizioni verranno visualizzate come /dev/sda1 , /dev/sda2 o nel caso di un'unità NVME /dev/nvme0n1p1 , /dev/nvme0n1p2 e così via.
Il fdisk il programma può fare molto di più che elencare le partizioni. Consulta la pagina ArchWiki corrispondente per conoscere le attività che puoi eseguire utilizzando questo programma.
C'è un altro programma cfdisk che è un manipolatore di tabelle di partizione del disco basato su curses- (libreria di programmazione) per Linux. È simile per funzionalità a fdisk ma essendo basato su curses significa che ha un'interfaccia con cui è più facile lavorare.
Esegui il comando seguente per avviare cfdisk sul tuo dispositivo preferito:
cfdisk /dev/sda
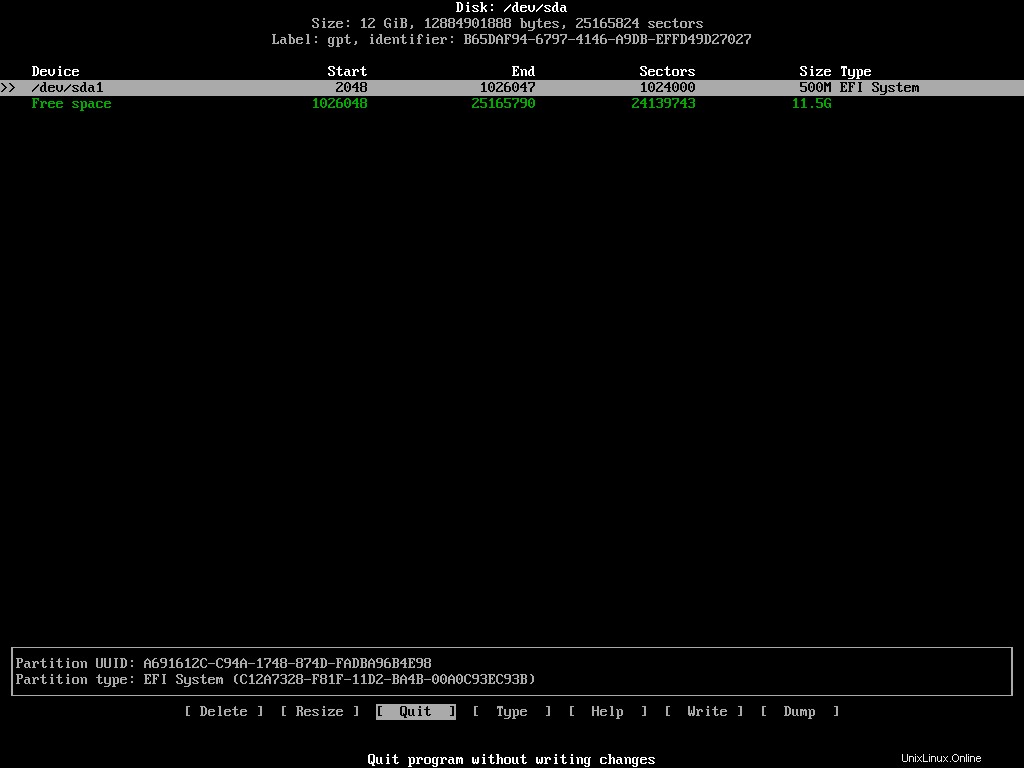
Ricordati di sostituire /dev/sda con quello che hai. Se il dispositivo ha una tabella delle partizioni creata in precedenza, allora cfdisk mostrerà direttamente l'elenco delle partizioni. Altrimenti potrai scegliere un tipo di tabella delle partizioni per cominciare:
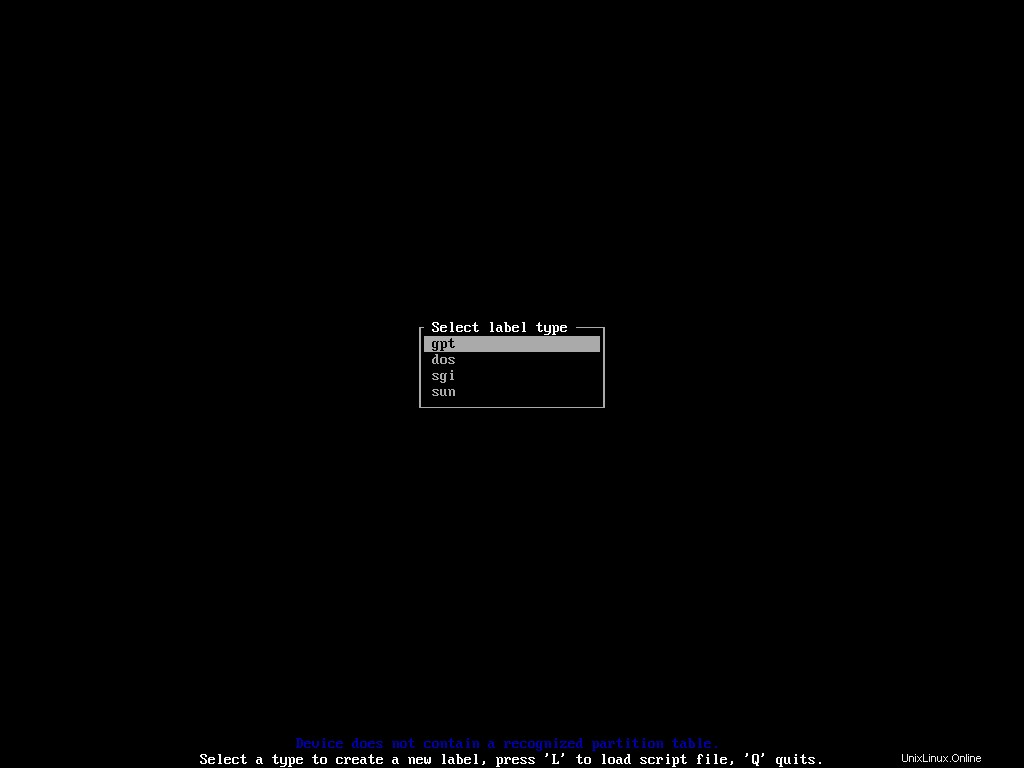
Scegli gpt per il tuo sistema basato su UEFI. Successivamente, atterrerai nell'elenco delle partizioni e dello spazio libero sul dispositivo:
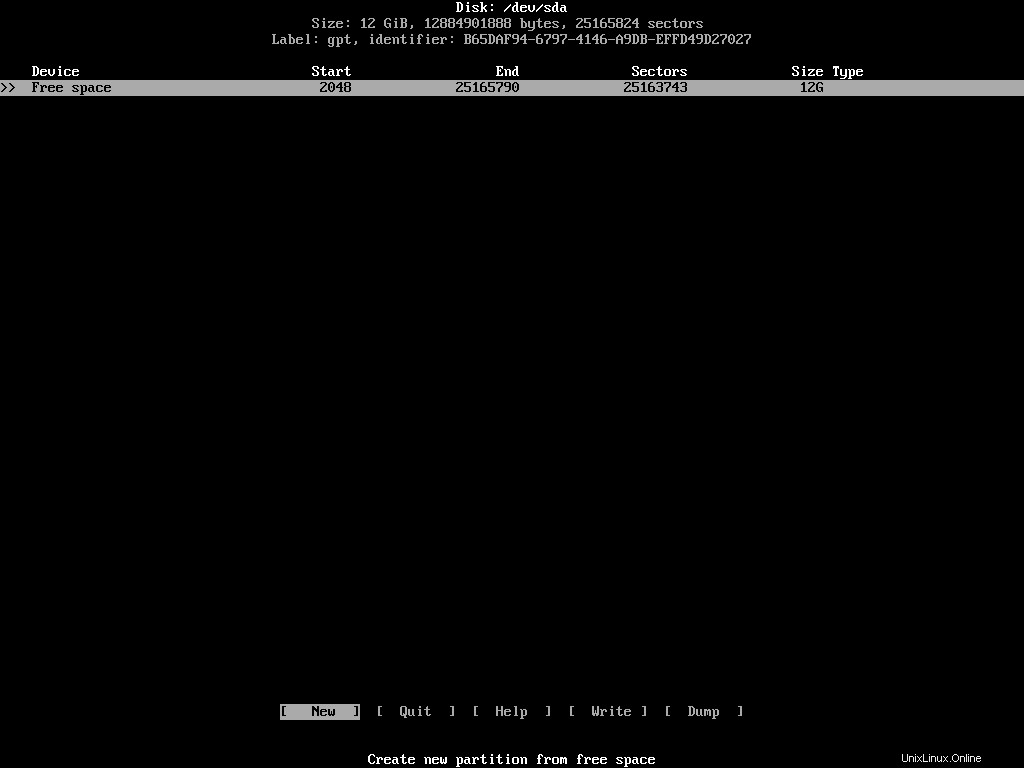
Puoi spostarti verticalmente lungo l'elenco dei dispositivi utilizzando i tasti freccia su/giù e spostarti orizzontalmente lungo le diverse azioni utilizzando i tasti freccia sinistra/destra.
Per installare Arch, o qualsiasi altra distribuzione Linux, avrai bisogno di tre partizioni separate. Sono i seguenti:
- Partizione di sistema EFI:per archiviare i file richiesti dal firmware UEFI.
- ROOT – per l'installazione della distribuzione stessa.
- SWAP:per fungere da spazio di overflow per la tua RAM.
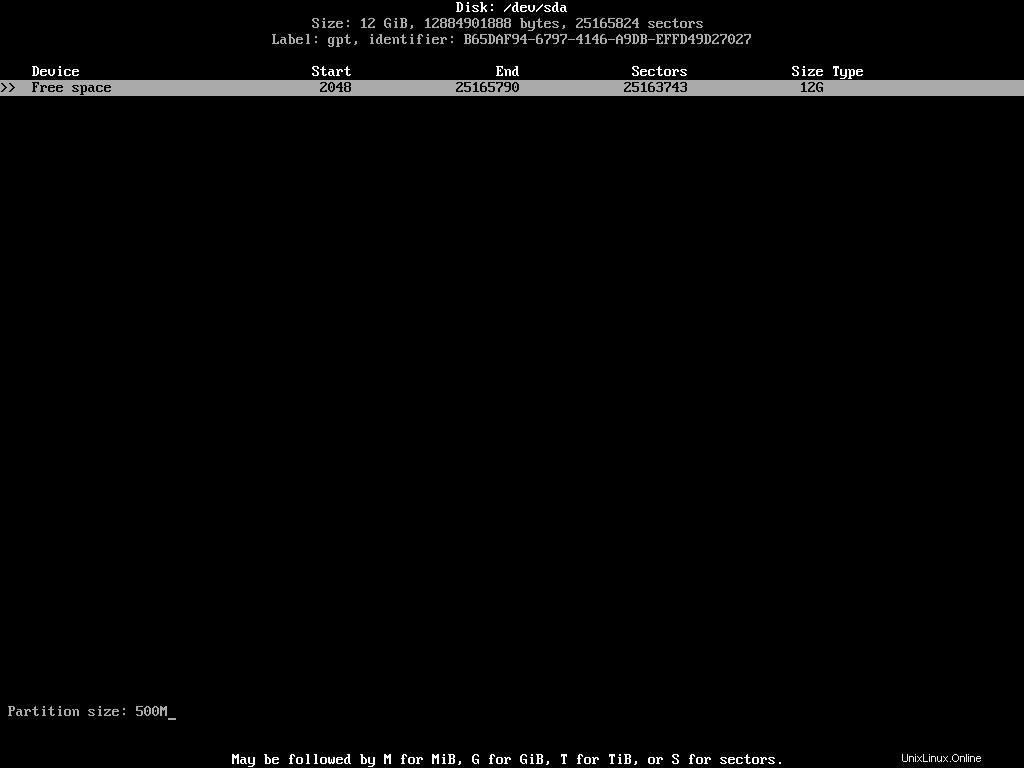
Assicurati che la partizione/spazio libero corretto sia evidenziato nell'elenco e seleziona [ New ] azione.
Metti la dimensione della partizione desiderata. Puoi usare M per indicare megabyte, G per gigabyte e T per terabyte.
Per una partizione di sistema EFI, è necessario allocare almeno 500 MB. Dopo aver inserito la dimensione desiderata, premere Invio per finalizzare. L'elenco aggiornato delle partizioni potrebbe apparire come segue:
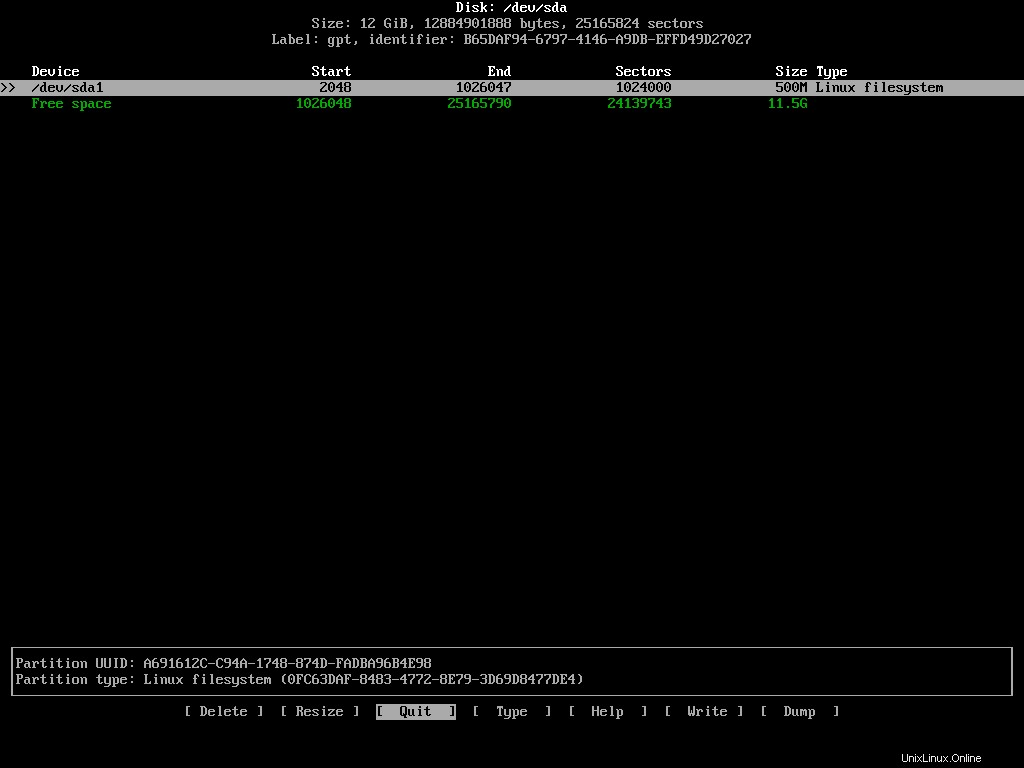
La partizione di sistema EFI è un tipo speciale di partizione. Deve essere in un tipo e un formato specifici. Per modificare il tipo predefinito, mantieni evidenziata la partizione appena creata e seleziona [ Type ] dall'elenco delle azioni.
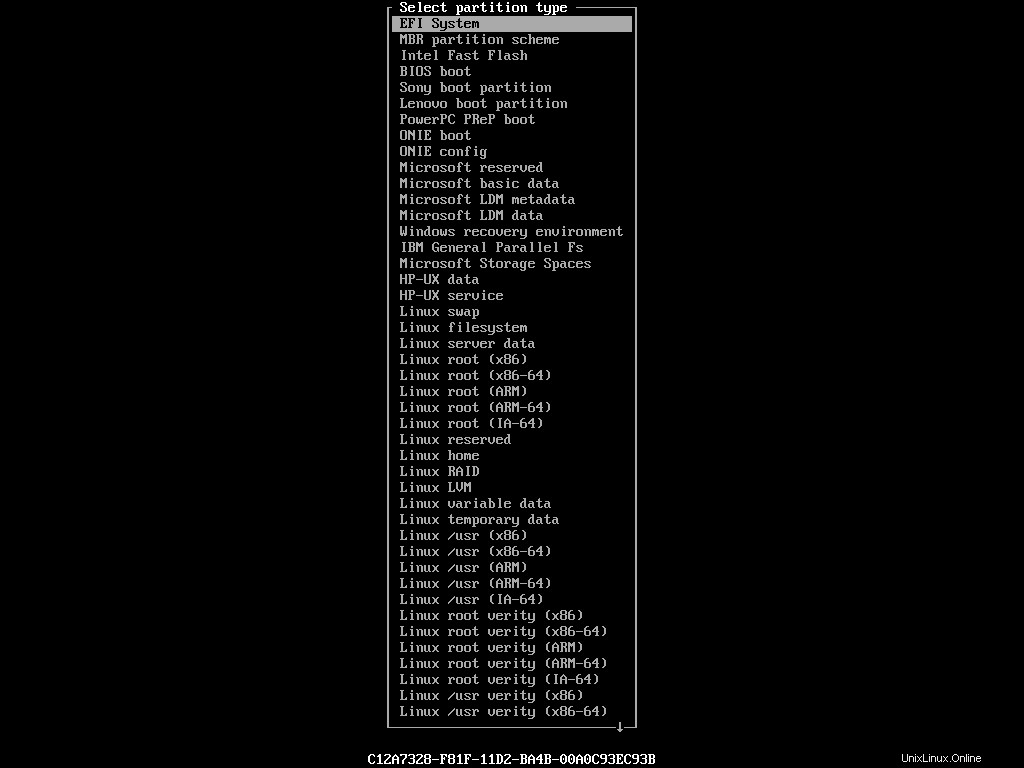
Da questo lungo elenco di tipi, evidenziare EFI System e premere Invio. Il tipo di partizione nell'elenco dovrebbe essere aggiornato di conseguenza:
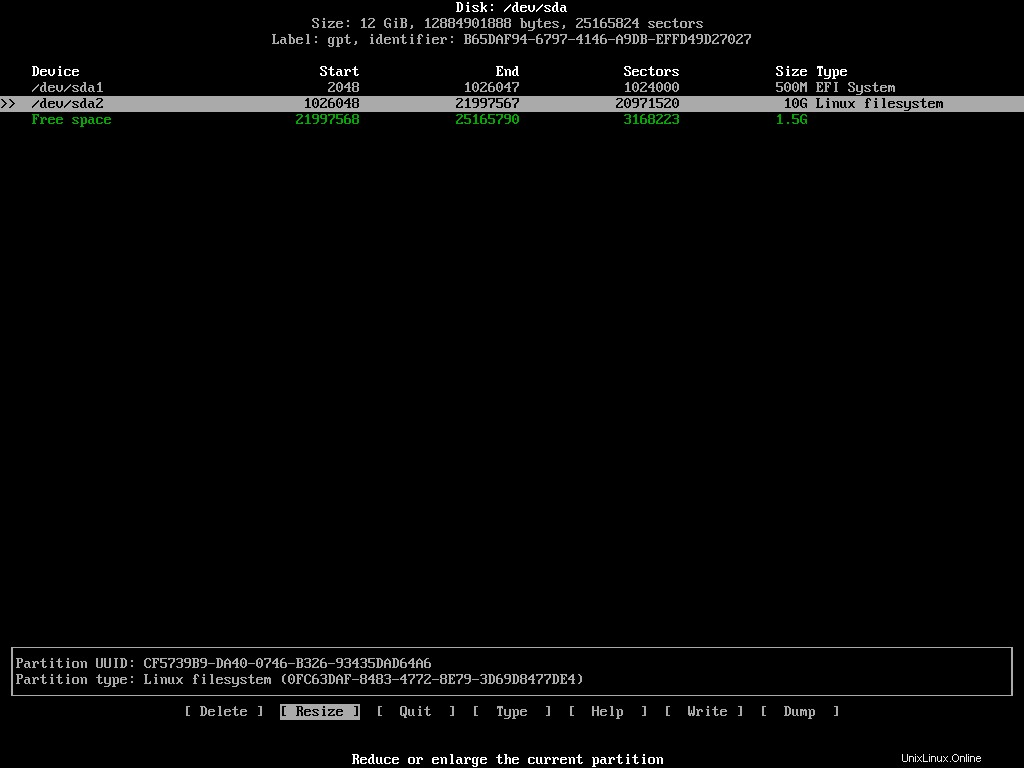
La prossima è la partizione di root. Evidenzia lo spazio libero rimanente e seleziona [ New ] di nuovo. Questa volta assegna 10 GB a questa partizione. La dimensione ideale della partizione di root dipende dalle tue necessità. Personalmente alloco almeno 100 GB alla partizione di root di tutte le mie installazioni Linux.
Non è necessario modificare il tipo di questa partizione. Il Linux filesystem predefinito lo farà.
Crea un'ultima partizione con lo spazio rimanente e cambia il suo tipo in Linux swap dal menu:
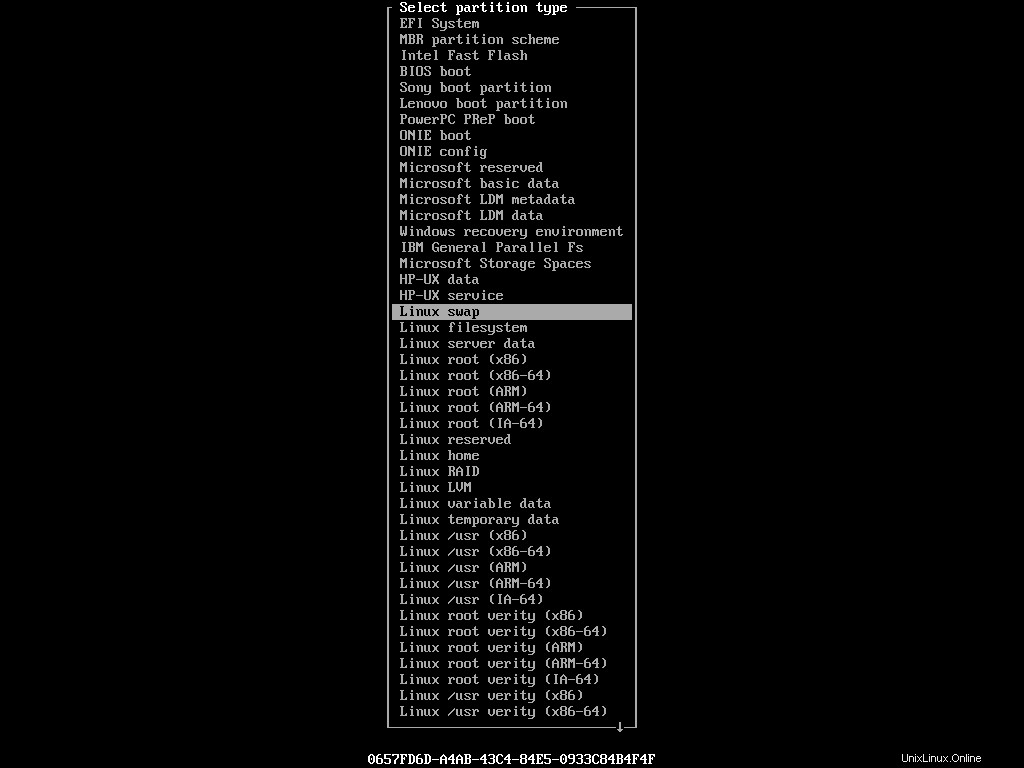
La dimensione ideale di una partizione di swap è oggetto di dibattito. Personalmente non ho partizioni di swap sulle mie macchine. La quantità di RAM fisica che ho è più che sufficiente. Ma se dovessi sentirne il bisogno in seguito, uso un swapfile invece. Ad ogni modo, lo stato finale del tuo dispositivo dovrebbe essere il seguente:
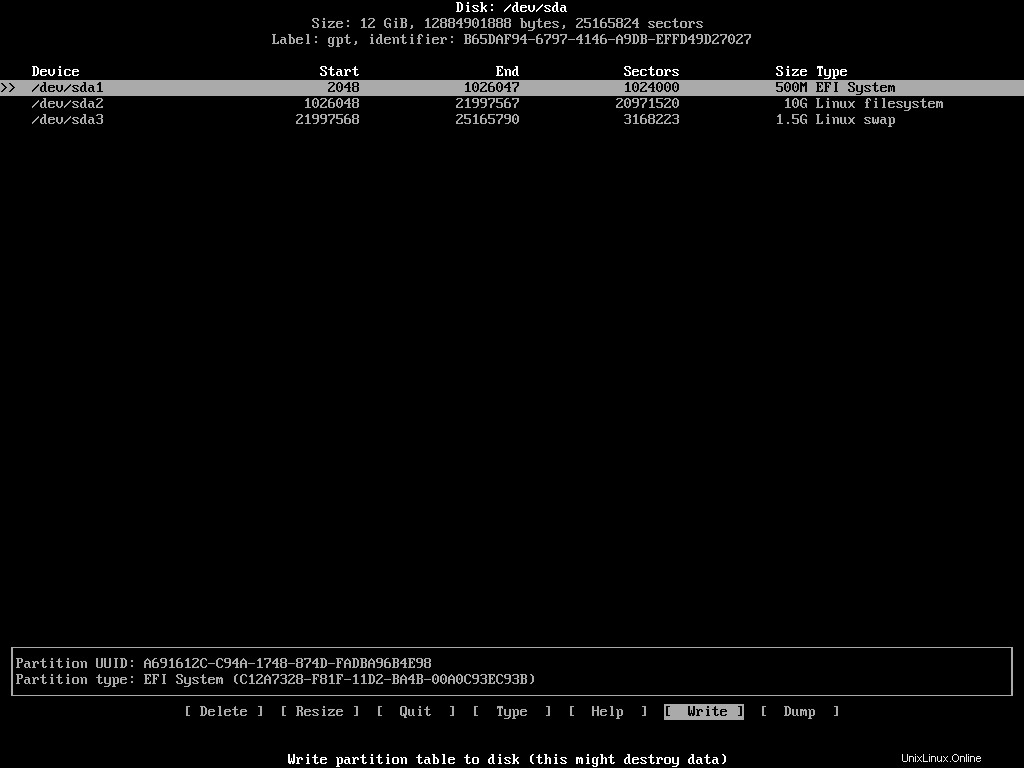
Se sei soddisfatto della configurazione, evidenzia [ Write ] dall'elenco delle azioni e premi Invio. Il programma chiederà se si desidera mantenere o meno queste modifiche. Dovrai scrivere yes e premi invio se sei d'accordo. Una volta che la tabella delle partizioni è stata modificata, seleziona [ Quit ] per uscire dal programma.
Una cosa che vorrei menzionare per coloro che cercano di installare Arch Linux insieme a Windows è, in tal caso, la partizione di sistema EFI dovrebbe già esistere nel tuo dispositivo. Quindi non toccarlo. Basta creare le altre partizioni e andare avanti.
Come formattare le partizioni
Ora che hai creato le partizioni necessarie, dovrai formattarle di conseguenza. Puoi usare mkfs e mkswap programmi per farlo. Prima della formattazione, dai un'ultima occhiata all'elenco delle partizioni eseguendo il comando seguente:
fdisk /dev/sda -lQuesta volta vedrai le tre partizioni appena create con i loro dettagli:
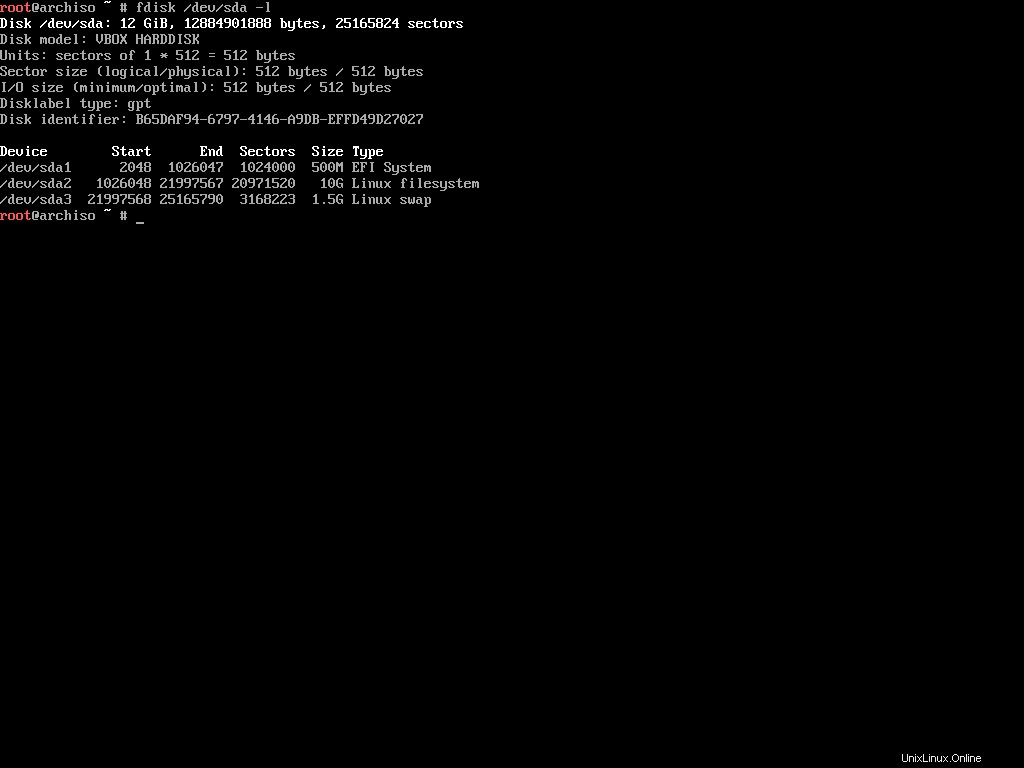
Prendi nota dei nomi dei dispositivi, come /dev/sda1 , /dev/sda2 , /dev/sda3 e così via. La partizione di sistema EFI deve essere in formato FAT32. Eseguire il comando seguente per formattare una partizione in formato FAT32:
mkfs.fat -F32 /dev/sda1La prossima è la partizione di root. Può essere in diversi formati, ma preferisco usare EXT4 per tutti i miei filesystem Linux. Utilizzare il comando seguente per formattare la partizione in EXT4:
mkfs.ext4 /dev/sda2Il completamento di questa operazione potrebbe richiedere alcuni istanti a seconda delle dimensioni della partizione. Infine, la partizione di swap. Usa il seguente comando per formattarlo:
mkswap /dev/sda3Con ciò, hai terminato il processo di preparazione delle partizioni per l'installazione.
Come montare i file system
Ora che hai creato e formattato le tue partizioni, sei pronto per montarle. Puoi usare il mount comando con punti di montaggio appropriati per montare qualsiasi partizione:
# mount <device> <mount point>

mount /dev/sda2 /mnt
Spero che ti ricordi che il /dev/sda2 la partizione è stata creata per essere la partizione di root. Il /mnt il punto di montaggio in Linux serve per montare temporaneamente un dispositivo di archiviazione. Dato che abbiamo solo bisogno di montare la partizione per l'installazione di Arch Linux su di essa, il /mnt il punto di montaggio è perfetto.
Nel caso di una partizione di swap, non la monterai come le altre. Dovrai dire a Linux di usare questa partizione come swap in modo esplicito. Per farlo, esegui il seguente comando:
swapon /dev/sda3
Come avrai intuito, il swapon comando dice al sistema di scambiare su questo dispositivo. Lavoreremo con la partizione di sistema EFI in una sezione successiva. Per ora, sarà sufficiente montare queste due partizioni.
Come configurare i mirror
C'è un ultimo passaggio prima di poter installare Arch Linux sul tuo computer, ovvero la configurazione dei mirror. I mirror sono server situati in diversi punti del mondo per servire la popolazione vicina.
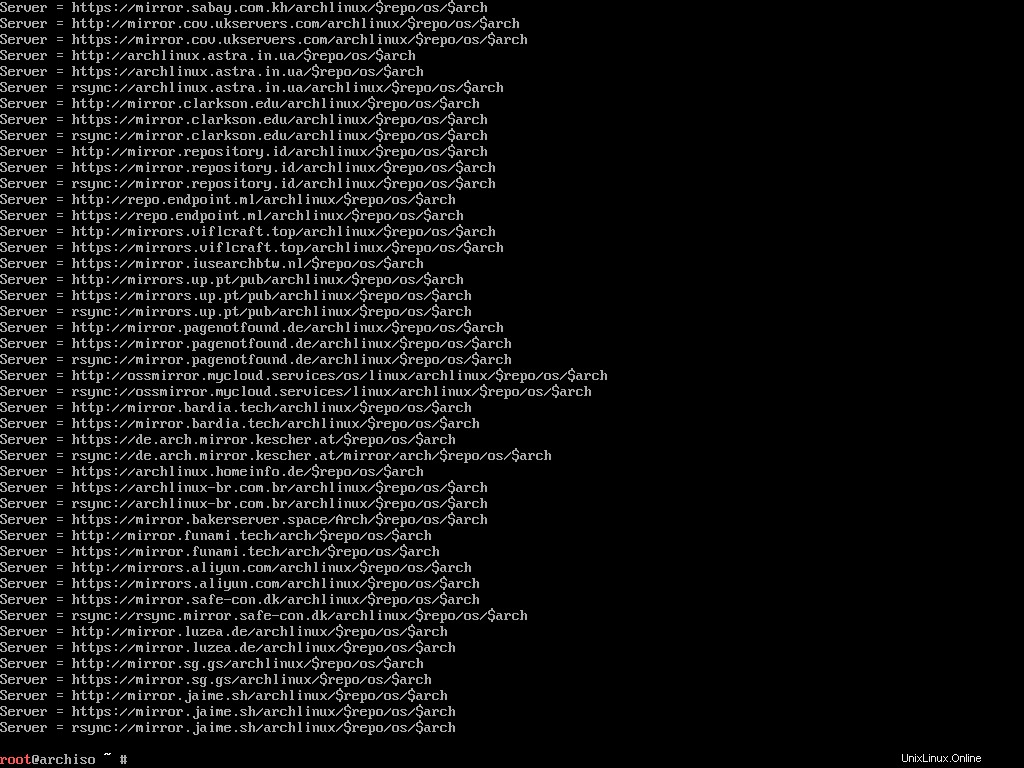
Il programma di installazione viene fornito con Reflector, uno script Python scritto per recuperare l'ultimo elenco di mirror nella pagina di stato del mirror di Arch Linux. Per stampare l'ultimo elenco di mirror, esegui semplicemente il seguente comando:
reflectorSe hai una connessione Internet lenta, potresti riscontrare un messaggio di errore come segue:
failed to rate http(s) download (https://arch.jensgutermuth.de/community/os/x86_64/community.db): Download timed out after 5 second(s).Ciò accade quando il timeout predefinito (5 secondi) è inferiore al tempo effettivo impiegato per scaricare le informazioni.
Puoi rimediare a questo problema usando il --download-timeout opzione:
reflector --download-timeout 60Ora il riflettore aspetterà un intero minuto prima di iniziare a urlare. Sul tuo schermo dovrebbe apparire un lungo elenco di mirror:
Scorrere l'intero elenco per trovare specchi vicini sarebbe una seccatura. Ecco perché Reflector può farlo per te.
Reflector può generare un elenco di specchi in base a una pletora di determinati vincoli. Ad esempio, desidero un elenco di mirror sincronizzati nelle ultime 12 ore e che si trovano in India o Singapore (questi due sono i più vicini alla mia posizione) e ordina i mirror in base alla velocità di download.
Si scopre che il riflettore può farlo:
reflector --download-timeout 60 --country India,Singapore --age 12 --protocol https --sort rateI server trovati verranno elencati come prima:
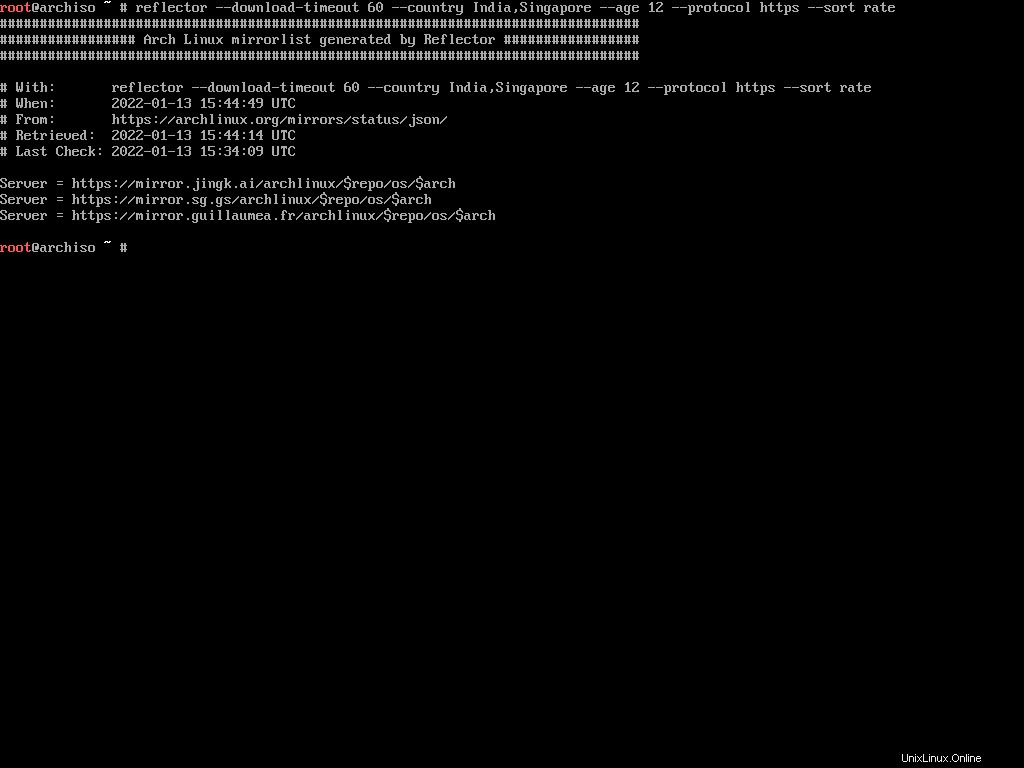
Stampare un elenco di mirror come questo non è sufficiente. Dovrai rendere persistente l'elenco nel /etc/pacman.d/mirrorlist Posizione. Pacman, il gestore di pacchetti predefinito per Arch Linux, usa questo file per conoscere i mirror.
Prima di sovrascrivere l'elenco dei mirror di default, creane una copia:
cp /etc/pacman.d/mirrorlist /etc/pacman.d/mirrorlist.bak
Ora esegui il comando riflettore con il --save opzione come segue:
reflector --download-timeout 60 --country India,Singapore --age 12 --protocol https --sort rate --save /etc/pacman.d/mirrorlistQuesto comando genererà l'elenco dei mirror e sovrascriverà quello predefinito. Ora sei pronto per installare il sistema Arch Linux di base.
Come installare il sistema di base Arch Linux
Prima di installare il sistema di base, è una buona idea aggiornare la cache dei pacchetti in base al nuovo elenco di mirror. Per farlo, esegui il seguente comando:
pacman -Sy
Il pacman programma per Arch Linux è ciò che apt è su Ubuntu o dnf è per Fedora. Il -S opzione significa sincronizzazione che equivale a install in apt o dnf gestori di pacchetti.
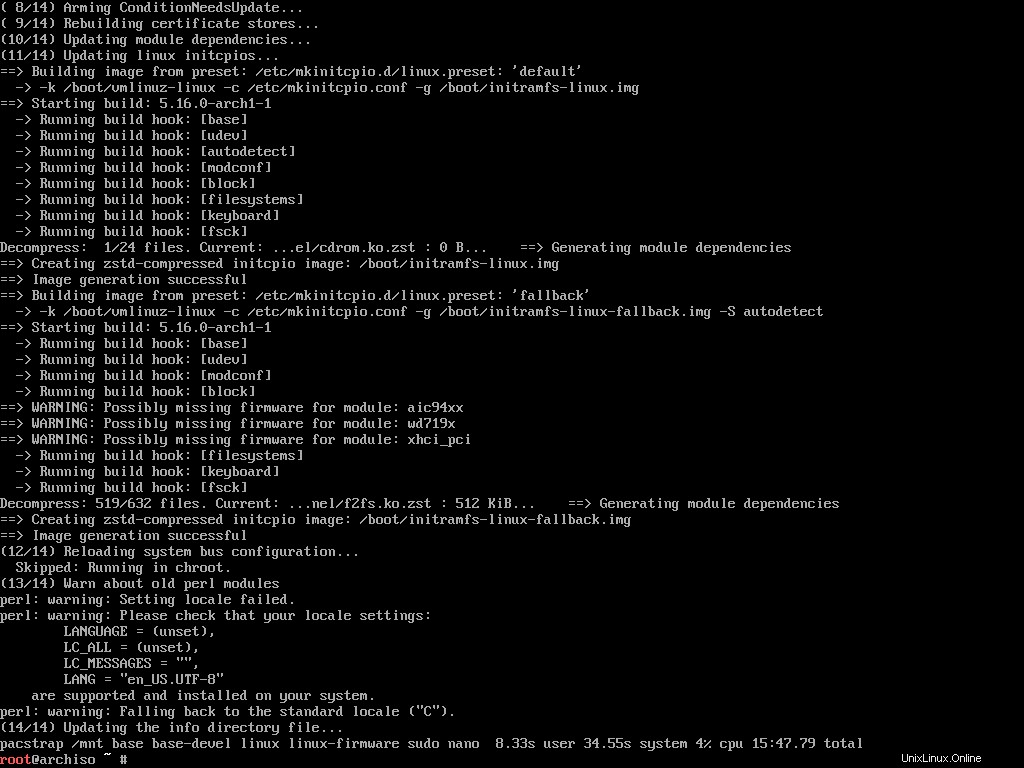
Una volta terminato il processo di aggiornamento, puoi utilizzare il pacstrap script per installare il sistema Arch Linux. Eseguire il comando seguente per avviare il processo di installazione:
pacstrap /mnt base base-devel linux linux-firmware sudo nano ntfs-3g networkmanager
Il pacstrap script può installare i pacchetti in una nuova directory radice specificata. Come forse ricorderete, la partizione di root è stata montata su /mnt mount point, quindi è quello che userai con questo script. Quindi passerai i nomi dei pacchetti che desideri installare:
base– Pacchetto minimo impostato per definire un'installazione di base di Arch Linux.base-devel– Gruppo di pacchetti necessari per la creazione di software dal sorgente.linux– Il kernel stesso.linux-firmware– Driver per hardware comune.sudo– Vuoi eseguire i comandi come root, giusto?nano– Un clone dell'editor pico con alcuni miglioramenti.ntfs-3g– Driver e utilità del filesystem NTFS necessari per lavorare con le unità NTFS.networkmanager– Fornisce il rilevamento e la configurazione per consentire ai sistemi di connettersi automaticamente alle reti.
Vorrei chiarire che questo elenco di sette pacchetti non è qualcosa di obbligatorio. Per avere un'installazione funzionale di Arch Linux, hai solo bisogno della base , linux e linux-firmware Pacchetti. Ma considerando che avrai comunque bisogno degli altri, perché non prenderli tutti in una volta.
A seconda della tua connessione Internet, il processo di installazione potrebbe richiedere del tempo. Siediti e rilassati fino a pacstrap fa il suo dovere. Al termine, vedrai qualcosa come segue:
Congratulazioni, hai installato correttamente Arch Linux sul tuo computer. Non resta che configurare il sistema.
Come configurare Arch Linux
Installare Arch Linux non è stato così difficile, vero? In effetti, secondo me, installarlo è molto più semplice che configurarlo. C'è molto da fare qui. Allora iniziamo.
Come generare il file Fstab
Secondo ArchWiki,
Il fstab file può essere utilizzato per definire come montare le partizioni del disco, vari altri dispositivi a blocchi o file system remoti nel file system. In altre distribuzioni come Ubuntu o Fedora questo viene generato automaticamente durante l'installazione. Su Arch, tuttavia, dovrai farlo manualmente. Per farlo, esegui il seguente comando:
genfstab -U /mnt >> /mnt/etc/fstab
Il genfstab il programma può rilevare tutti i mount correnti al di sotto di un determinato punto di montaggio e stamparli in un formato compatibile con fstab sull'output standard. Quindi genfstab -U /mnt produrrà tutti i montaggi correnti sotto /mnt punto di montaggio. Possiamo salvare quell'output in /mnt/etc/fstab file utilizzando il >> operatore.
Come accedere al sistema appena installato utilizzando Arch-Chroot
In questo momento sei connesso all'ambiente live e non al tuo sistema appena installato.
Per continuare a configurare il tuo sistema appena installato, dovrai prima accedere ad esso. Per farlo, esegui il seguente comando:
arch-chroot /mnt
L'arch-chroot bash fa parte di arch-install-scripts pacchetto e consente di passare alla root del sistema appena installato utente senza alcun riavvio. Che figata!
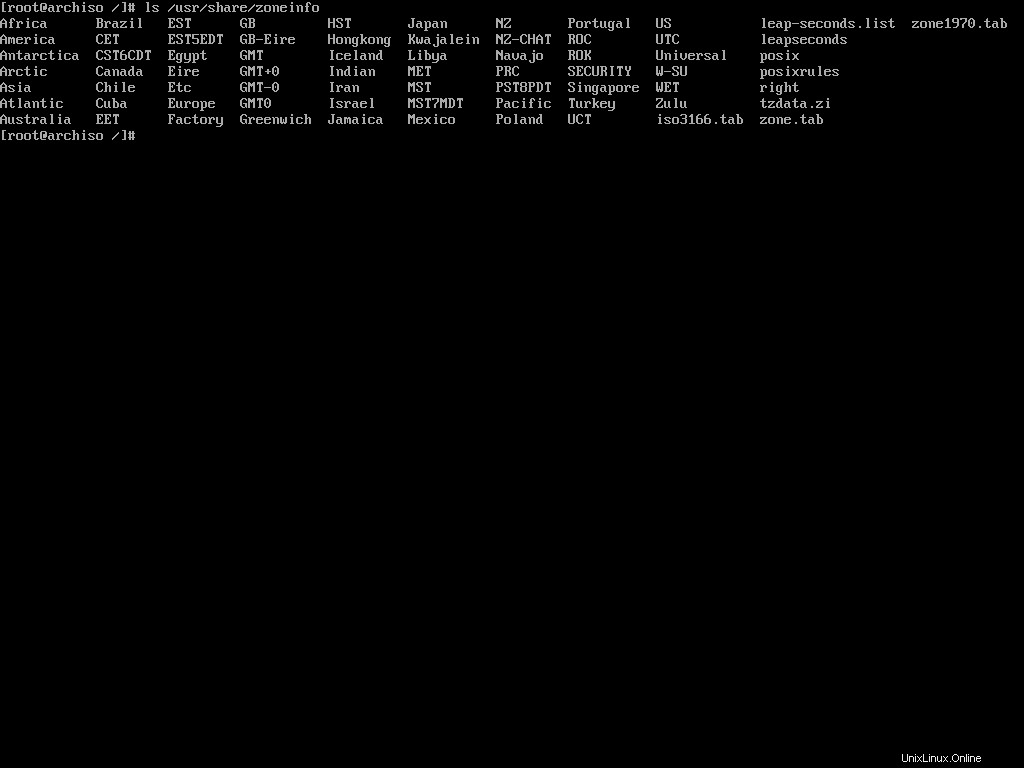
Come configurare il fuso orario
Dopo aver cambiato root, la prima cosa da configurare è il fuso orario. To see a list of all the available zones, execute the following command:
ls /usr/share/zoneinfoAll the major zones should be in the directory.
I live in Dhaka, Bangladesh which resides inside the Asia zone. If I list out the content of Asia, I should see Dhaka there:
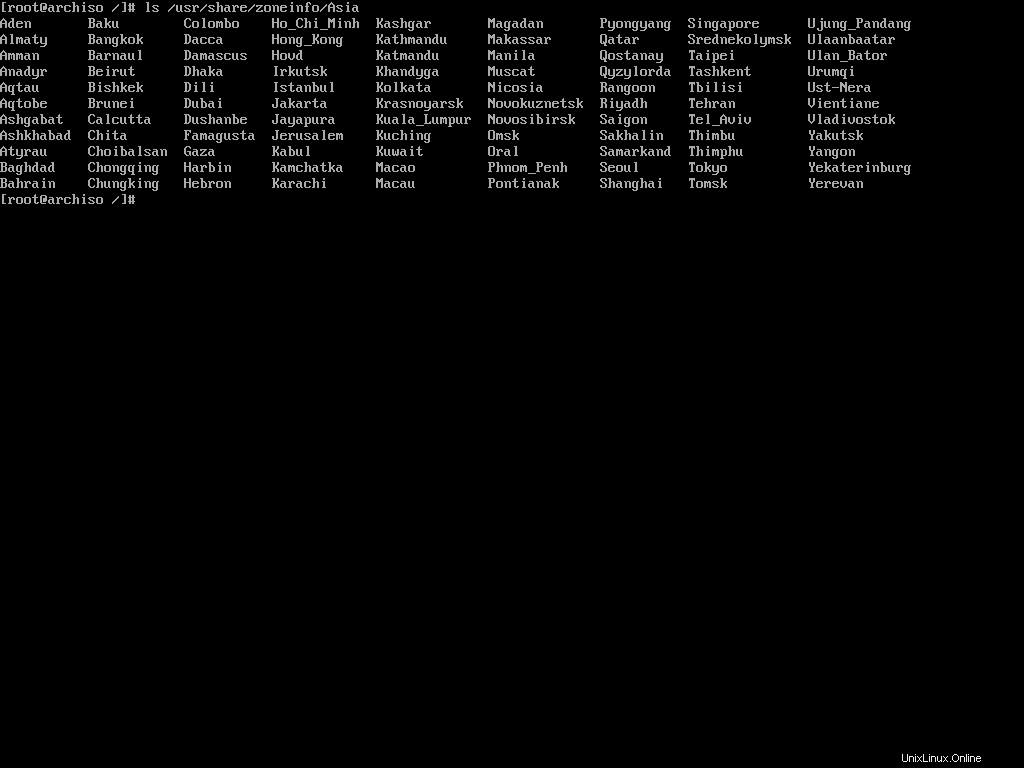
To set Asia/Dhaka as my default time zone, I'll have to make a symbolic link of the file at the /etc/localtime posizione:
ln -sf /usr/share/zoneinfo/Asia/Dhaka /etc/localtime
The ln command is used for creating symbolic links. The -sf options indicate soft and force, respectively.
How To Configure the Localization
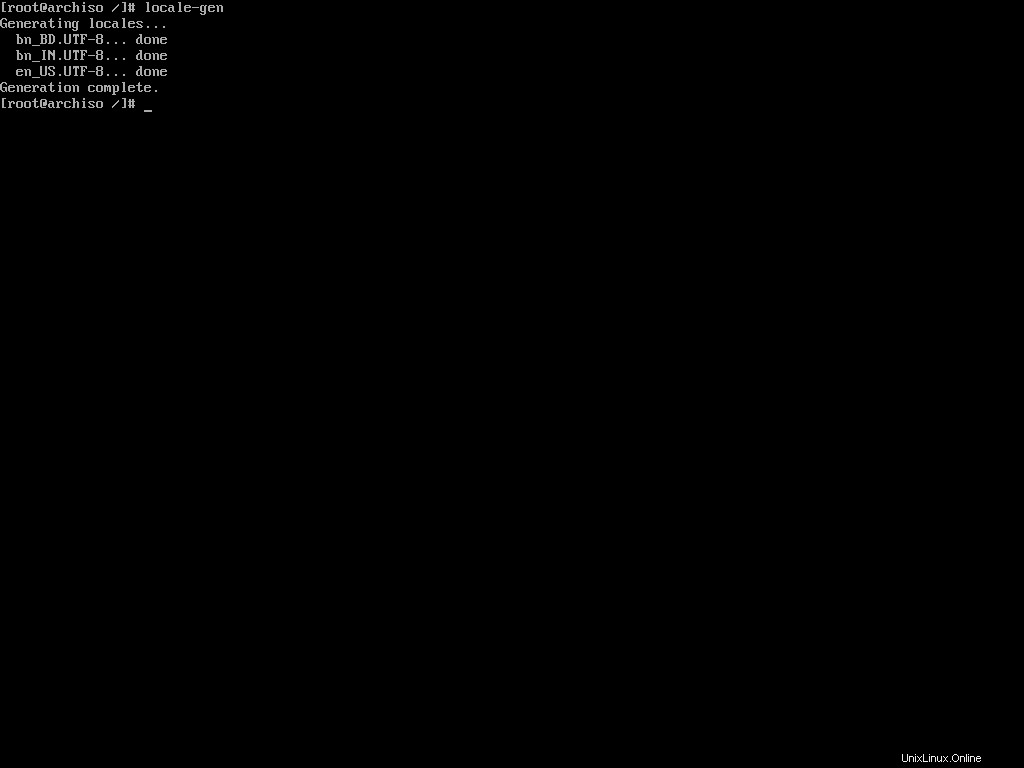
Now you'll have to configure your languages. Arch Linux has an easy way to set that up as well.
First, you'll have to edit the etc/locale.gen file according to your localization. Open the file in the nano text editor:
nano /etc/locale.genYou'll see a long list of languages:
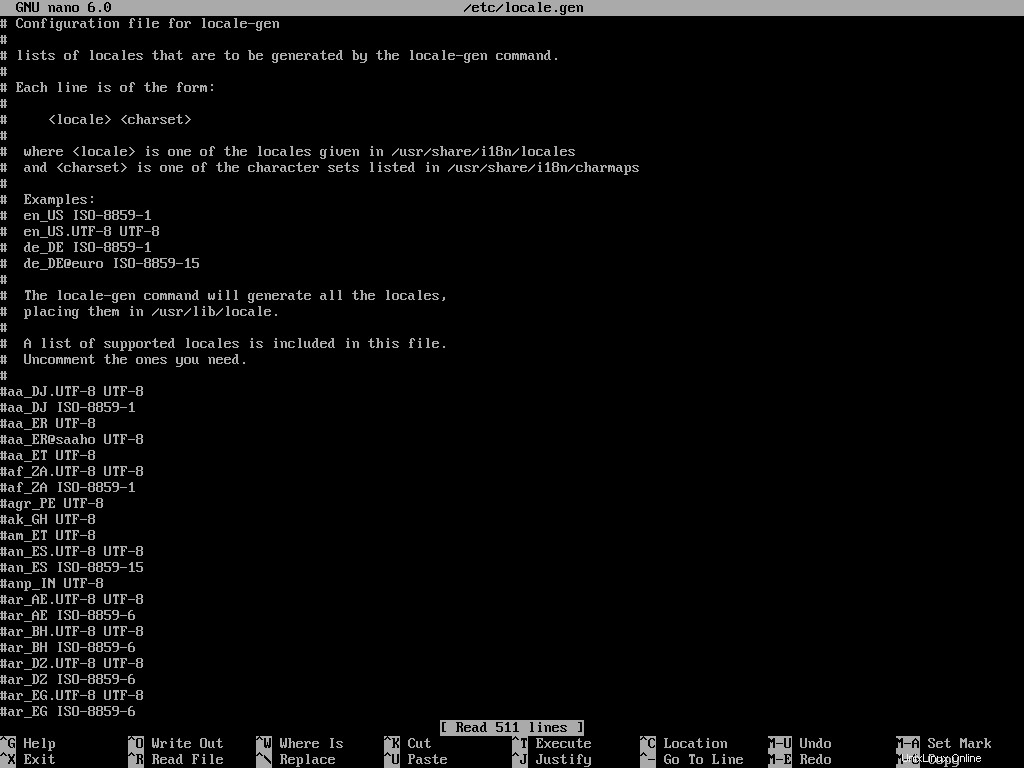
You'll have to uncomment the languages that you want to enable. I usually only need English and Bengali. So I'll locate the en_US.UTF-8 UTF-8 , bn_BD UTF-8 , and bn_IN UTF-8 languages. Save the file by pressing Ctrl + O and exit nano by pressing the Ctrl + X key combination.
Now you'll have to execute the following command:
locale-gen
The locale-gen command will read your /etc/locale.gen file and generate the locales accordingly.
Now that you've enabled multiple languages, you'll have to tell Arch Linux which one to use by default. To do so, open the /etc/locale.conf file and add the following line to it:
LANG=en_US.UTF-8
That's all you gotta do to configure your locale. You can always go back to the /etc/locale.gen file and add or remove languages from it. Just remember to run locale-gen whenever you do that.
Apart from the locales, if you've made any changes to your console keymaps in the first step of installation, you may want to persist them now. To do so, open the /etc/vconsole.conf file and add your preferred keymaps there.
For example, if you changed the default keymaps to mac-us in the first step, then you may want to add the following line to the vconsole.conf file:
KEYMAP=mac-usNow every time you use the virtual console, it'll have the correct keymap and you will not have to configure it every time.
How To Configure the Network
Configuring a network manually in any Linux distribution can be tricky. That's why I advised you to install the networkmanager package during the system installation. If you did as I said, you're good to go. Otherwise, use pacman to install the package now:
pacman -S networkmanager
Pacman is a package manager. You'll learn more about it later. Let's set the host name for your computer now. A host name is a unique name created to identify a machine on a network, written in the /etc/hostname file.
Open the file with nano and write your host name in it. You can use anything to identify your machine. I usually use my device brand or model as my hostname and as I'm on a legion laptop, I'll simply write the following:
legion
Local host name resolution is provided by nss-myhostname (an NSS module provided by systemd) without having to edit /etc/hosts file. It is enabled by default.
But some software may still read the /etc/hosts file directly. Open the file in nano and add the following lines to it:
127.0.0.1        localhost
::1              localhost
127.0.1.1        legion
Make sure to replace legion with your host name. Now you may install the aforementioned package:
pacman -S networkmanager
Enable the NetworkManager service by executing the following command:
systemctl enable NetworkManager
Make sure to write NetworkManager and not networkmanager as the service name. If the command succeeds, network manager will start automatically on boot from now on and do its thing.
How To Set the Root Password
You may want to set a password for the root user because why not? To do so, execute the following command:
passwd
Il passwd command lets you change the password for a user. By default it affects the current user's password which is the root right now.
It'll ask for a new password and confirmation password. Input them carefully and make sure you don't forget the password.
How To Create a Non-root User
Using your Linux system as the root user for long is not a good idea. So creating a non-root user is important. To create a new user, execute the following command:
useradd -m -G wheel farhan
The useradd command lets you create a new user. Make sure to replace my name with the one you want to use. Il -m option indicates that you also want it to create the corresponding home directory. Il -G option will add the new user to the wheel group which is the administration user group in Arch Linux.
Now you can use the passwd command once again to set the password for the newly created user:
passwd farhanThe program will prompt you for a new password and a password confirmation. Again, don't forget to replace my name with the one you've used.
Finally, you'll have to enable sudo privilege for this new user. To do so, open the /etc/sudoers file using nano. Once open, locate the following line and uncomment it:
# %wheel ALL=(ALL) ALL
This file essentially means that all users in the wheel group can use sudo by providing their password. Save the file by hitting Ctrl + O and exit nano by hitting Ctrl + X. Now the new user will be able to use sudo when necessary.
How To Install Microcode
According to PCMag,
A set of elementary instructions in a complex instruction set computer (CISC). The microcode resides in a separate high-speed memory and functions as a translation layer between the machine instructions and the circuit level of the computer. Microcode enables the computer designer to create machine instructions without having to design electronic circuits.
Processor manufacturers such as Intel and AMD often release stability and security updates to the processor. These updates are crucial for the system's stability.
In Arch Linux, microcode updates are available through official packages that every user should install on their systems.
# for amd processors
pacman -S amd-ucode

# for intel processors
pacman -S intel-ucode
Just installing these packages is not enough though. You'll have to make sure that your bootloader is loading them. You'll learn about it in the next section.
How To Install and Configure a Boot Loader
Secondo Wikipedia,
A bootloader, also spelled as boot loader or called boot manager and bootstrap loader, is a computer program that is responsible for booting a computer.
The internals of bootloader is out of scope of this article so I'll just go on with the installation process. If you've used any other Linux distribution in the past you may have encountered the GRUB menu.
GRUB is one of the most popular bootloaders out there. Although there are a number of options available, I'll demonstrate the installation of GRUB because it is what most people will likely use.
To install GRUB, you'll have to first install two packages.
pacman -S grub efibootmgr
If you're installing alongside other operating systems, you'll also need the os-prober pacchetto:
pacman -S os-proberThis program will search for already installed operating systems on your system and will make them a part of the GRUB configuration file.
Now, you'll have to mount the EFI system partition you created a few sections ago. To do so, you'll have to first create an efi directory:
mkdir /boot/efiSecondo Wikipedia,
In Linux, and other Unix-like operating systems, the /boot/ directory holds files used in booting the operating system.
This directory is present in all Unix-like operating systems. The above mentioned command creates a directory called efi inside the /boot directory. After creating the directory, you'll have to mount your EFI system partition in that directory.
mount /dev/sda1 /boot/efi
I hope you remember that we formatted the /dev/sda1 device as the EFI system partition during the partitioning phase. Make sure to use the correct one for your device.
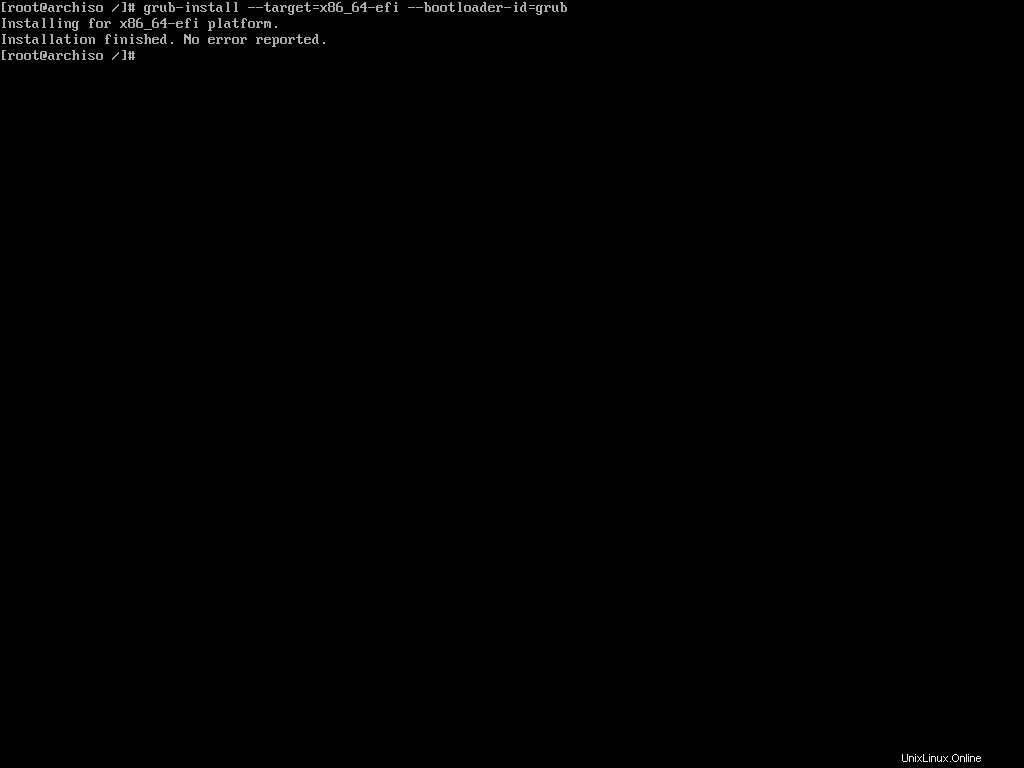
Now, we'll use the grub-install command to install GRUB in the newly mounted EFI system partition:
grub-install --target=x86_64-efi --bootloader-id=grub
You can more or less use this command verbatim. You can change the --bootloader-id to something more expressive like arch or something else. If the installation finishes without any errors, you'll then have to generate the GRUB configuration file.
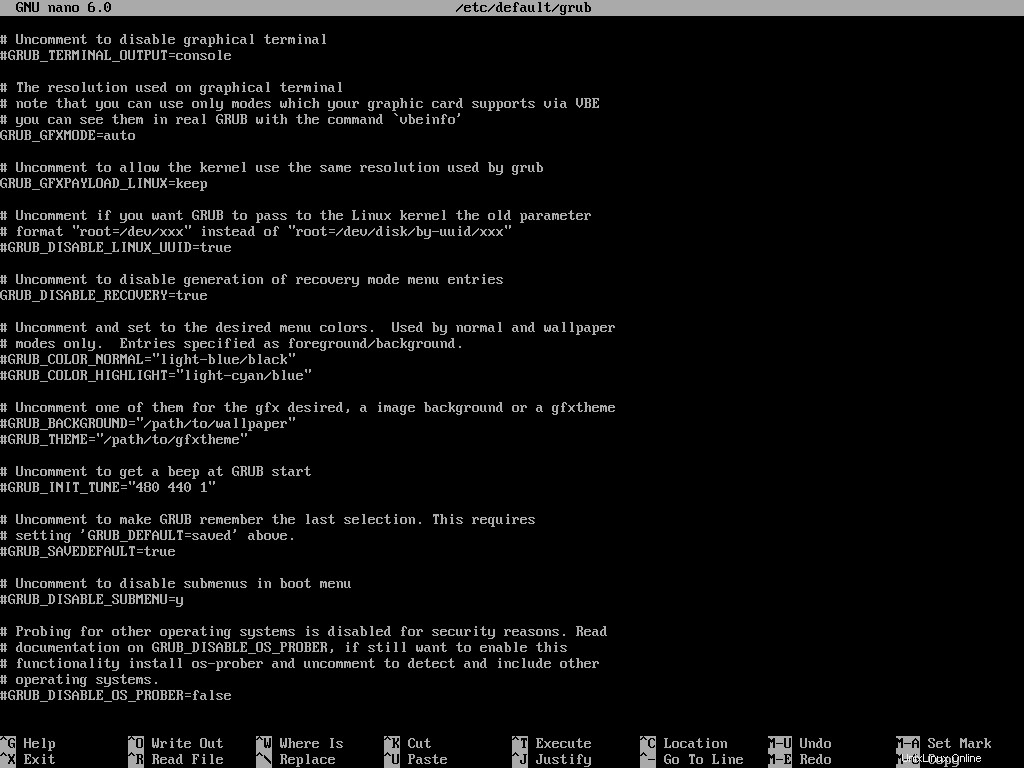
If you're installing alongside other operating systems, you'll have to enable os-prober before generating the configuration file. To do so, open the /etc/default/grub file in nano text editor. Locate the following line and uncomment it:
#GRUB_DISABLE_OS_PROBER=falseThis should be the last line in the aforementioned file so just scroll to the bottom and uncomment it.
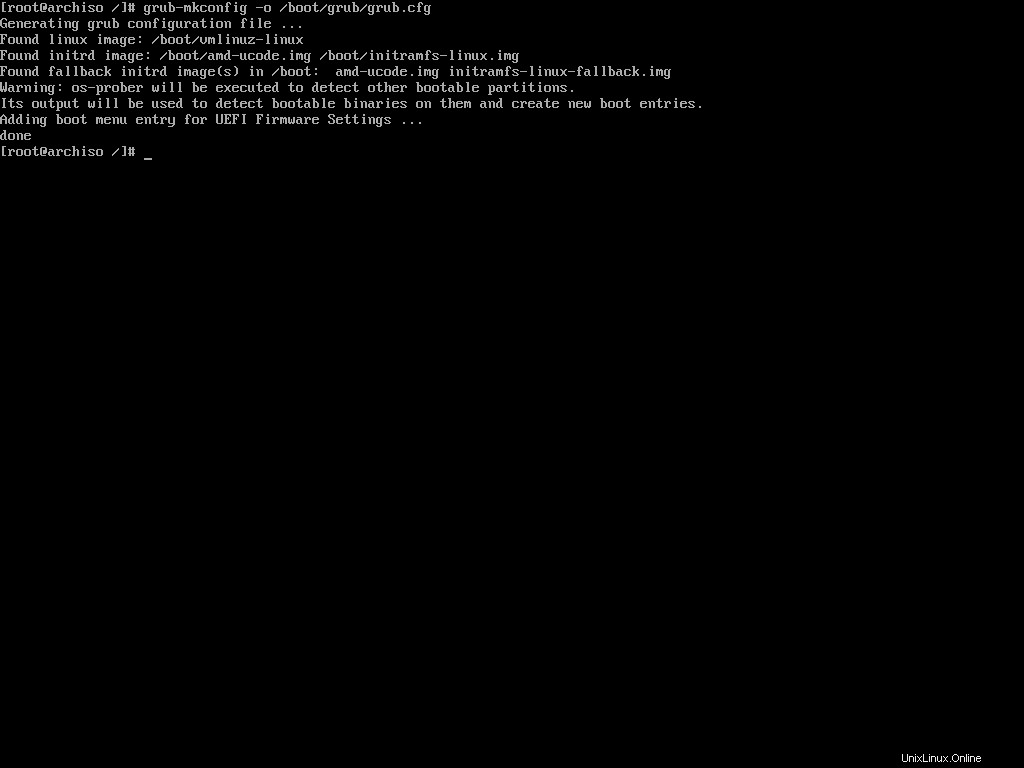
Now execute the following command to generate the configuration file:
grub-mkconfig -o /boot/grub/grub.cfg
The grub-mkconfig command generates the GRUB configuration file and saves it to a given target location. In this case /boot/grub/grub.cfg is the target location.
The command will also take into account the microcode you installed earlier and any other existing operating system on your machine.
Congratulations, you now have a working Arch Linux installation. At this point, you can exit the Arch-Chroot environment, unmount the partition, and reboot. But I would suggest you to stay a bit longer and set-up the graphical user interface as well.
How To Install Xorg
To run programs with graphical user interfaces on your system, you'll have to install an X Window System implementation. The most common one is Xorg.
To install Xorg, execute the following command:
pacman -S xorg-serverWait until the installation is done and then move on to installing the necessary graphics drivers.
How To Install Graphics Drivers
Installing graphics drivers on Arch Linux is very straightforward. You just install the packages required by your graphics processing unit and call it a day.
# for nvidia graphics processing unit
pacman -S nvidia nvidia-utils

# for amd discreet and integrated graphics processing unit
pacman -S xf86-video-amdgpu

# for intel integrated graphics processing unit
pacman -S xf86-video-intel
If you need further assistance, feel free to check the ArchWiki page.
How To Install a Desktop Environment
Now that you've installed Xorg and the necessary graphics drivers, you're ready to install a desktop environment like GNOME, Plasma, or XFCE.
Arch Linux supports a long list of desktop environments but I've only tried out GNOME and Plasma. I'll demonstrate how you can install either of these two.
How To Install GNOME
To install GNOME, you'll have to install the gnome pacchetto. To do so, execute the following command:
pacman -S gnome
During the installation, you'll be offered multiple choices for pipwire-session-manager and emoji-font Pacchetti. Accept the defaults by hitting Enter in both prompts. The installation may take some time to finish.
The gnome package comes with GDM or Gnome Display Manager. You can enable the service by executing the following command:
systemctl enable gdmThat's all you need to do to get GNOME up and running on your Arch system.
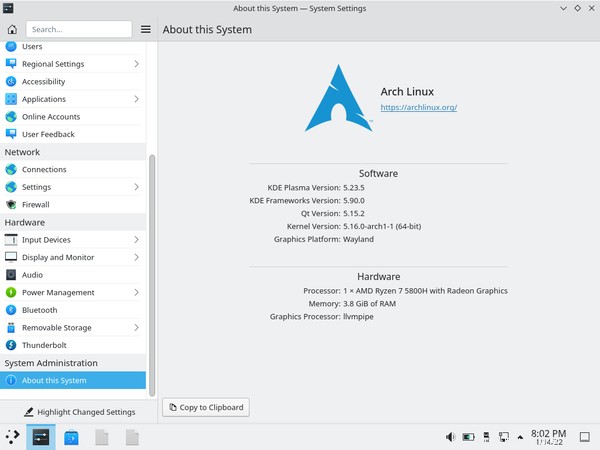
How To Install Plasma
The KDE Plasma installation is not that different from GNOME. You'll need to install Plasma related packages instead of GNOME.
pacman -S plasma plasma-wayland-session
If you have an NVIDIA graphics card, then avoid installing the plasma-wayland-session and use plain old X11. I own two devices with NVIDIA GPUs and both of them have shown instability when using Wayland.
During the installation, you'll get multiple choices for ttf-font , pipwire-session-manager , and phonon-qt5-backend Pacchetti. Make sure to pick noto-fonts as your ttf-font and accept the defaults for the other two.
Like gdm in GNOME, Plasma comes with sddm as the default display manager. Execute the following command to enable the service:
systemctl enable sddmAnd that's all you need to do to get Plasma up and running on your Arch Linux system.
How To Finalize The Installation
Now that you've installed Arch Linux and gone through all necessary configuration steps, you can reboot to your newly installed system. To do so, first come out of the Arch-Chroot environment:
exitNext, unmount the root partition to make sure there are no pending operations:
umount -R /mntNow reboot the machine:
rebootWait until you see the GRUB menu.
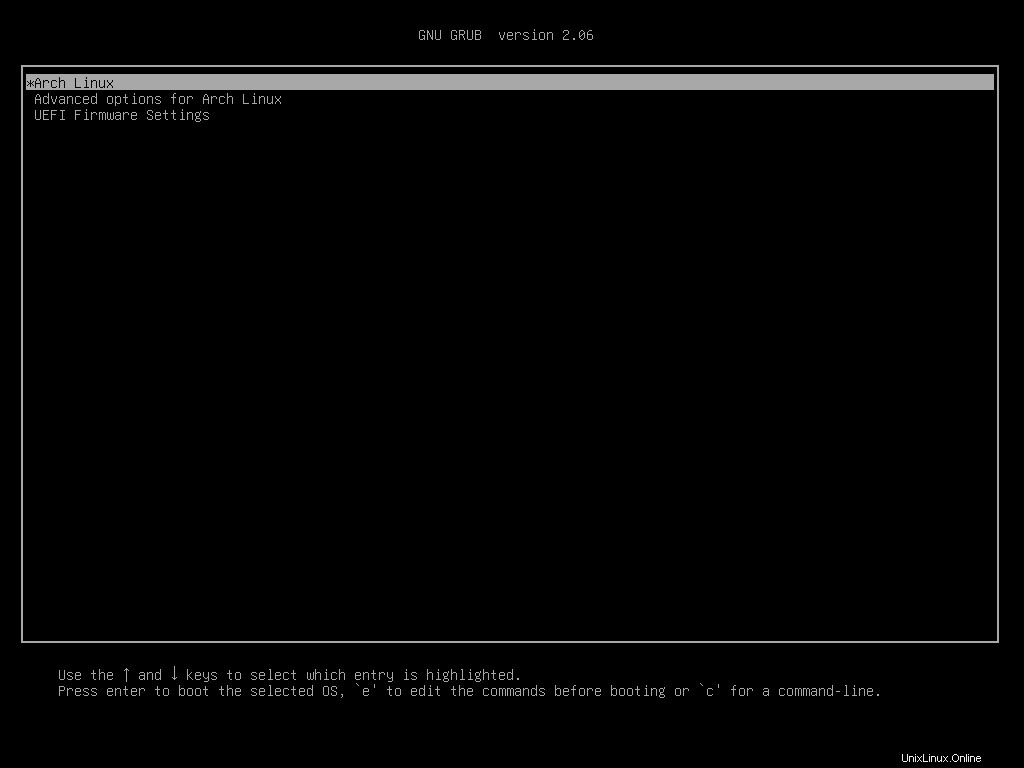
Choose Arch Linux from the list and wait until the system finishes booting up.
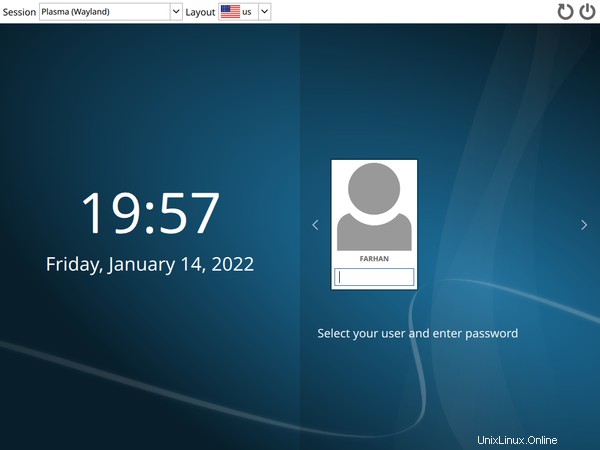
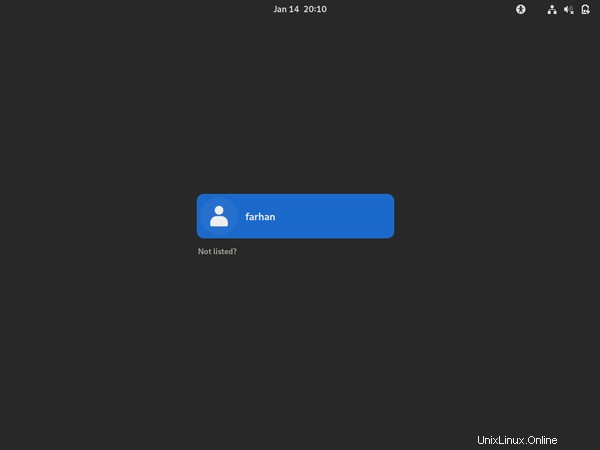
Log in with your user credentials and voilà!
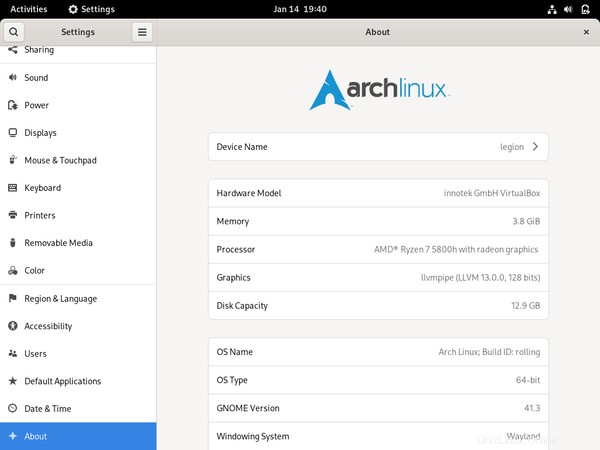
Your shiny new Arch Linux system is ready to do wonders.
How To Switch Between Desktop Environments
Unlike other distributions coupled tightly with their default desktop environment, Arch is flexible. You can switch to another desktop environment whenever you feel like it.
To do so, first logout of your current session.
As you can see, I'm currently using Plasma. Now switch to TTY2 press Ctrl + Alt + F2 key combination. You'll see a console login prompt:
Login with the root credentials and disable the sddm display manager.
systemctl disable sddmThen uninstall the Plasma related packages you installed earlier:
sudo pacman -Rns plasma plasma-wayland-sessionOnce the packages have been uninstalled, install the packages needed for GNOME:
pacman -S gnome
Then perform the installation according to the section you read earlier. After the gnome package has been installed, enable the gdm display manager:
systemctl enable gdmRestart the computer.
rebootWait until the Arch Linux system finishes booting.
Lo and behold, the gorgeous Gnome Display Manager. Login with your credentials.
You can switch between the desktop environments as much as you want to, but I would suggest on settling down with one of them. Also, I wouldn't recommend having multiples of them installed at the same time.
How To Manage Packages Using Pacman
You've already installed a number of packages using pacman. It's equivalent to package managers like apt in Ubuntu and dnf in Fedora.
In this section, I'll introduce you to some of the common pacman commands that you may need on a daily basis.
How To Install Packages Using Pacman
To install a package using pacman, you can use the following command syntax:
# sudo pacman -S <package name>

sudo pacman -S rust
You can install multiple packages as follows:
# sudo pacman -S <package name> <package name>

sudo pacman -S rust golang
You can also specify the repository you want to install the package from like this:
# sudo pacman -S <package repository>/<package name>

sudo pacman -S extra/rust
In this command, the -S option means synchronize which is equivalent to install in the case of apt or dnf package managers.
How To Remove Packages Using Pacman
To remove a package using pacman you can use the following syntax:
# sudo pacman -R <package name>

sudo pacman -R rust
This will remove the package but will leave the dependencies. You can remove the package with dependencies if they're not required by any other package by executing the following command:
# sudo pacman -Rs <package name>

sudo pacman -Rs rust
Pacman often saves important configuration files when removing certain applications. You can override this behavior by using the following syntax:
# sudo pacman -Rn <package name>

sudo pacman -Rn rust
I usually use sudo pacman -Rns whenever I want to uninstall something. One last thing that I want to show is how to remove orphan packages.
In Ubuntu the sudo apt autoremove command uninstalls any unnecessary package. The equivalent command in Arch is:
sudo pacman -Qdtq | pacman -Rs -This will cleanup any leftover package from previously installed packages.
How To Upgrade Packages Using Pacman
To upgrade all the packages in your system, you can use the following syntax:
sudo pacman -Syu
In this command, the S option synchronizes the packages, y refreshes the local package cache, and u updates the system. This is like the ultimate upgrade command and I run it at least once everyday.
How To Search for Packages Using Pacman
To search for a package in the database, you can use the following syntax:
# sudo pacman -Ss <package name>

sudo pacman -Ss rust
This will print out all the packages found in the database with that search term and will also indicate if any of those are already installed.
If you would like to check if a package is already installed or not, you can use the following command:
# sudo pacman -Qs <package name>

sudo pacman -Qs rust
This is useful when you want to uninstall a package but do not know its exact name.
How To Use AUR in Arch Linux
According to It's FOSS,
AUR stands for Arch User Repository. It is a community-driven repository for Arch-based Linux distributions users. It contains package descriptions named PKGBUILDs that allow you to compile a package from source with makepkg and then install it via pacman (package manager in Arch Linux).
AUR is one of the most attractive features of Arch Linux. It's due to AUR that Arch Linux has a package count almost equal to Debian. You've already used pacman to install various packages. Sadly, you can not use that to install packages from AUR.
You'll have to install one of the AUR helpers instead. Arch Linux doesn't support any of these helpers and advises you to learn how to build packages manually. I'll explain both techniques here. If you understand how a helper works, you'll be able to do it manually as well.
How To Install Packages Using a Helper
Among the available and currently maintained AUR helpers, I like the yay or yet another yogurt package. It's written in Go and is quite solid.
You can not install yay like other packages. You'll have to get the source code and compile the program. You'll need git and the base-devel package to do so. Assuming you've already installed base-devel during Arch Linux installation:
pacman -S git
Clone the yay repository from GitHub and cd into it:
git clone https://aur.archlinux.org/yay.git && cd yayTo build and install yay from source, execute the following command:
makepkg -si
The makepkg script automates the build process of packages. The -si options stand for sync dependencies and install. The first option will install required dependencies (Golang in this case) and the later option will install the built package.
After the build process finishes, makepkg will ask for installation confirmation and your password. Input your password carefully and let the installation finish.
Check if yay has been installed properly or not:
yay --version
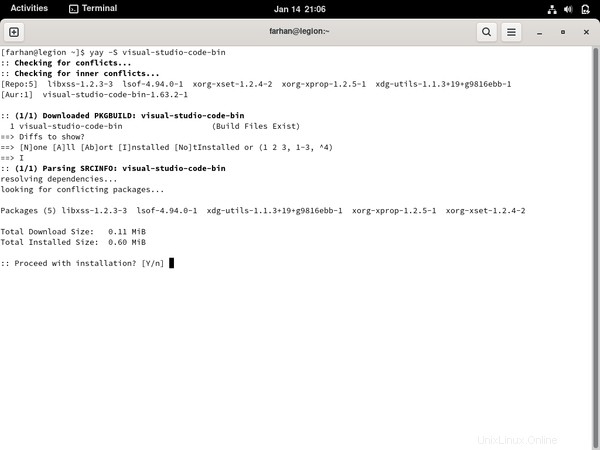
# yay v11.1.0 - libalpm v13.0.1Now let's install something using yay. One of the common packages you may want to install is the visual-studio-code-bin package. To do so, execute the following command:
yay -S visual-studio-code-binUnlike pacman, you shouldn't run yay with sudo. Yay will look for the given package and will ask whether you would like to see the diff or not:
All the repositories over at AUR comes with a PKGBUILD file which contains the instructions for building this package. Yay has this nice feature where it shows you what has changed in the PKGBUILD file since the last time.
For now, I'll pick N for none and hit enter. Yay will now look for the dependencies and ask for your password to install them.
Confirm the installation and provide your password. Yay will then install the dependencies and start building the package. Once built, yay will install the package and prompt for your password where necessary.
After the installation finishes, search for Visual Studio Code in the application launcher:
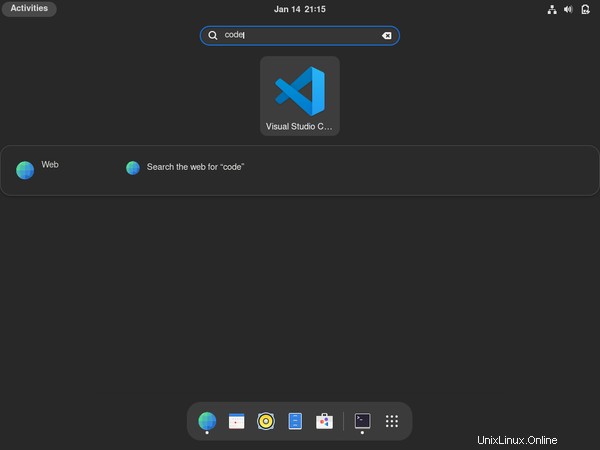
Congratulations on installing your first package from AUR. Yay commands are almost identical to pacman, so if you can do something with pacman, you should be able to do that with yay as well.
In fact, yay can also install packages from official Arch Linux repositories like pacman. But I would suggest you to use yay only for installing packages from AUR when necessary and pacman for everything else.
How To Install Packages Manually
Like I said in the previous section, the ArchWiki suggests avoiding any AUR helper and installing packages from AUR manually. I'll now show you how to do it.
Make sure you have git and base-devel packages installed. If not, use pacman to install them.
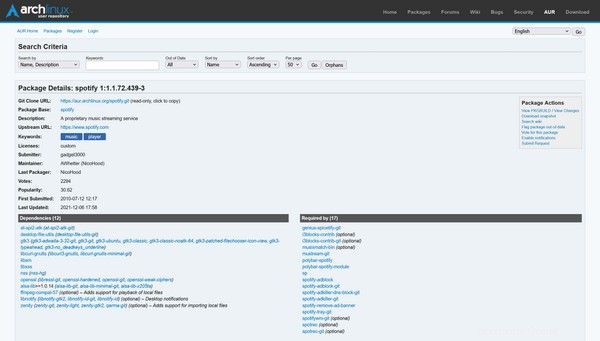
For the demonstration, let's install Spotify this time. First visit the AUR page for the spotify package - https://aur.archlinux.org/packages/spotify/ and copy the "Git Clone URL" from there.
The page even lists all the dependencies you'll need. Clone the repository to your machine:
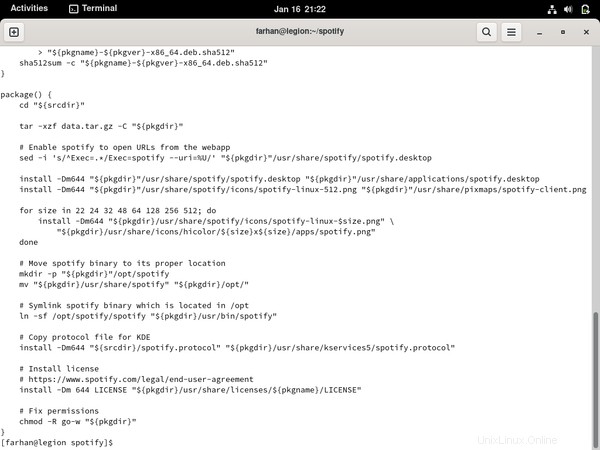
Every AUR repository comes with a PKGBUILD file containing the instructions for building the package. Whenever you're installing a package from AUR, it's a great idea to checkout the PKGBUILD file using something like the cat comando:
Make sure there's nothing harmful in the file. Once you're satisfied, use makepkg to install any dependencies, build the package, and install it. Ideally there shouldn't be any issues but sometimes, things can take an unexpected turn.
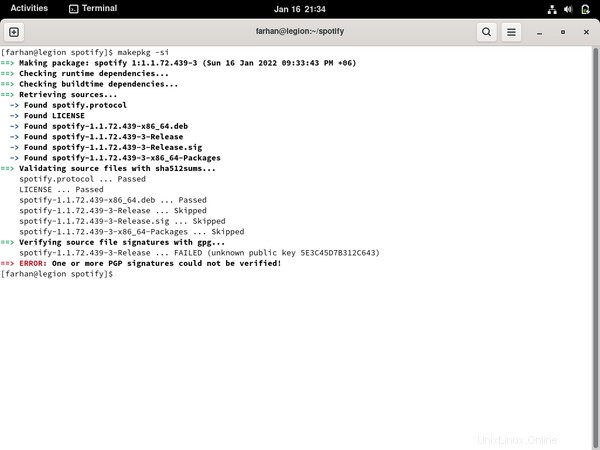
In these cases, go back to the corresponding AUR page and check the user comments. Like in this case, I found the following pinned comment:

Turns out the package requires you to add the Spotify for Linux gpg key to the user kyechain. This command downloads the gpg key using curl and pipes it as the input of the gpg --import comando:
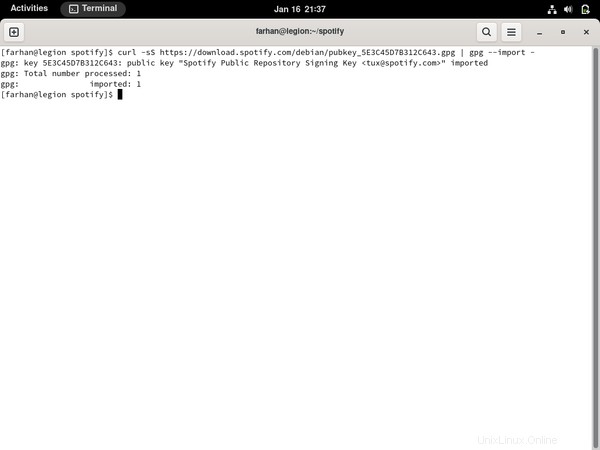
Try executing makepkg -si once again and everything should work fine this time:
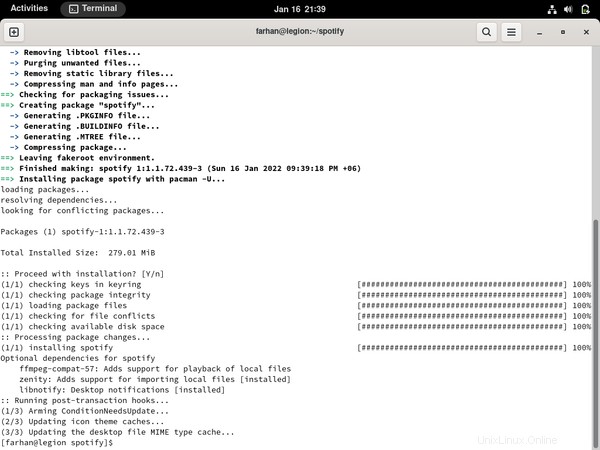
See, told ya! Manually installing packages often involves such troubleshooting but help is almost always around the comment corner. Let's enjoy some music now.
How To Troubleshoot Common Problems
Look, I've been using Arch as my primary on all my devices for some years now but I still run into issues. Fortunately there are some great places to look for help when you're stuck:
- ArchWiki
- Arch Linux Forum
- r/archlinux
For the most part, the wiki should have the information you're looking for. In fact, if you're on a laptop and having difficulty getting something to work, there is an entire wiki category dedicated to different laptops. So look around the wiki.
If the wiki fails to solve your problem, then ask other fellow users at the forum as well as the subreddit. But whenever you're doing that, make sure to do your research first and include as much description as you can in the post. It's really annoying if other users have to keep asking you for more information and it'll also lower the chance that you'll get an answer.
How To Use the Live Arch ISO as a Rescue Media
Whatever people may say, Arch Linux is very stable as long as you know what you're doing. If you go about installing every funky package you come across in the AUR or keep switching different kernels without knowing what they're for, your system may fail to boot.
In those cases, you can use your live USB drive as a rescue media. To do so, reconnect the bootable USB to your computer and boot into the live environment. Once there, configure the time, keymaps, and fonts if you want to.
Then use fdisk to list out all your partitions and locate the one holding your Arch Linux installation. In my case it's the /dev/sda2 partizione. Mount the partition like you did before:
mount /dev/sda2 /mntNow use Arch-Chroot to log in as the root user.
arch-chroot /mntNow uninstall the bad package you installed or go back to a kernel version that used to work in the past and so on. Once done, exit the Arch-Chroot environment, unmount the partition, and reboot:
exit
umount -R /mnt
reboot
If the computer boots fine then congratulations. Otherwise try the wiki, forum, or the subreddit. If nothing works, you may have to do a fresh install.
Further Reading
If you've come this far then you've done a lot of reading already – but that's not all. This entire handbook was written by combining information from the wiki, forum, and subreddit. I'm listing out some wiki pages that I think you should read.
- Installation guide
- Network configuration
- General recommendation
- Desktop environment
- pacman
- Arch Build System
- makepkg
- List of applications
Couldn't think of any more at the moment but I'll keep this list updated.
Conclusione
I would like to thank you from the bottom of my heart for the time you've spent on reading this article. I hope you've enjoyed your time and have learned a lot about not only Arch but Linux in general
Apart from this one, I've written full-length handbooks on other complicated topics available for free on freeCodeCamp.
These handbooks are part of my mission to simplify hard to understand technologies for everyone. Each of these handbooks takes a lot of time and effort to write.
If you've enjoyed my writing and want to keep me motivated, consider leaving starts on GitHub and endorse me for relevant skills on LinkedIn.
I'm always open to suggestions and discussions on Twitter or LinkedIn. Hit me with direct messages.
In the end, consider sharing the resources with others, because
In open source, we feel strongly that to really do something well, you have to get a lot of people involved. — Linus Torvalds
Till the next one, stay safe and keep learning.