Questo tutorial spiega come integrare ClamAV in ProFTPd per la scansione antivirus su un sistema Debian Lenny. Ciò si ottiene tramite mod_clamav. Alla fine, ogni volta che un file viene caricato tramite ProFTPd, ClamAV controllerà il file e lo cancellerà se si tratta di malware.
Non garantisco che questo funzionerà per te!
1 Nota preliminare
Dovresti avere una configurazione ProFTPd funzionante sul tuo server Debian Lenny.
2 Installazione di ClamAV
ClamAV può essere installato come segue:
aptitude install clamav clamav-daemon libclamav-dev
Ora dobbiamo riconfigurare ClamAV in modo che Clamd utilizzi connessioni TCP invece di un socket Unix locale. Si consiglia vivamente di evitare le connessioni socket Unix quando si utilizza la funzione Chroot di ProFTPd (DefaultRoot ~). Il motivo è che se mod_clamav deve connettersi a Clamd, il socket Unix non è disponibile nell'ambiente chroot.
Corri
dpkg-reconfigure clamav-base
... e rispondi a queste domande come segue (accetta i valori predefiniti per tutte le altre domande):
Tipo di socket:<-- TCP
Il clamd della porta TCP sarà in ascolto su:<-- 3310
Il clamd dell'indirizzo IP sarà in ascolto su:<-- 127.0.0.1
Quindi riavvia Clamd e freshclam:
/etc/init.d/clamav-daemon restart
/etc/init.d/clamav-freshclam restart
Ora corri
netstat -tap | grep clamd
... e dovresti vedere che Clamd è in ascolto su localhost tramite TCP:
server1:~# netstat -tap | grep clamd
tcp        0      0 localhost.localdom:3310 *:*                     LISTEN      29430/clamd
server1:~#
3 Ricostruzione di ProFTPd
Sfortunatamente mod_clamav non fa parte di ProFTPd per impostazione predefinita e non esiste un pacchetto Debian per mod_clamav, quindi dobbiamo ricostruire ProFTPd con mod_clamav. Userò il pacchetto sorgente Debian di ProFTPd e costruirò nuovi pacchetti ProFTPd .deb con il supporto di mod_clamav.
Per prima cosa installiamo tutti i pacchetti necessari per ricostruire ProFTPd:
aptitude build-dep proftpd
Abbiamo anche bisogno del seguente pacchetto (che non viene installato dal comando precedente per qualche motivo...):
aptitude install libpam-dev
Ora scarichiamo il pacchetto sorgente di ProFTPd in /usr/src:
cd /usr/src
apt-get source proftpd
Quindi scarichiamo mod_clamav in /usr/src e lo decomprimiamo:
wget --no-check-certificate https://secure.thrallingpenguin.com/redmine/attachments/download/1/mod_clamav-0.11rc.tar.gz
tar xzvf mod_clamav-0.11rc.tar.gz
Quindi copiamo i file mod_clamav-0.11rc/mod_clamav.* nella directory proftpd-dfsg-1.3.1/contrib...
cp mod_clamav-0.11rc/mod_clamav.* proftpd-dfsg-1.3.1/contrib
... e patch i sorgenti di ProFTPd:
cd proftpd-dfsg-1.3.1
patch -p1 < ../mod_clamav-0.11rc/proftpd.patch
Quindi dobbiamo modificare debian/rules:
vi debian/rules
Cerca nella sezione CONF_ARGS e aggiungi --with-modules=mod_clamav ad essa:
[...]
CONF_ARGS := --prefix=/usr \
             --with-includes=$(shell pg_config --includedir):$(shell mysql_config --include|sed -e 's/-I//') \
             --mandir=/usr/share/man --sysconfdir=/etc/$(NAME) --localstatedir=/var/run --libexecdir=/usr/lib/$(NAME) \
             --enable-sendfile --enable-facl --enable-dso --enable-autoshadow --enable-ctrls --with-modules=mod_readme \
             --enable-ipv6 --enable-nls --with-modules=mod_clamav
[...] |
Ora possiamo ricostruire ProFTPd:
dpkg-buildpackage
Ora andiamo di una directory in alto, ecco dove sono stati creati i nuovi pacchetti .deb:
cd ..
Il comando
ls -l
ti mostra i pacchetti disponibili:
server1:/usr/src# ls -l
total 5472
drwxr-xr-x  2  501  501    4096 2009-04-20 10:22 mod_clamav-0.11rc
-rw-r--r--  1 root src     5115 2010-10-01 03:28 mod_clamav-0.11rc.tar.gz
-rw-r--r--  1 root src   195066 2010-10-01 03:32 proftpd_1.3.1-17lenny4_all.deb
-rw-r--r--  1 root src   690228 2010-10-01 03:32 proftpd-basic_1.3.1-17lenny4_i386.deb
drwxr-xr-x 13 root root    4096 2010-10-01 03:32 proftpd-dfsg-1.3.1
-rw-r--r--  1 root src   107998 2010-10-01 03:29 proftpd-dfsg_1.3.1-17lenny4.diff.gz
-rw-r--r--  1 root src     1103 2010-10-01 03:29 proftpd-dfsg_1.3.1-17lenny4.dsc
-rw-r--r--  1 root src     3305 2010-10-01 03:32 proftpd-dfsg_1.3.1-17lenny4_i386.changes
-rw-r--r--  1 root src  2662056 2007-10-16 01:02 proftpd-dfsg_1.3.1.orig.tar.gz
-rw-r--r--  1 root src  1255660 2010-10-01 03:32 proftpd-doc_1.3.1-17lenny4_all.deb
-rw-r--r--  1 root src   213004 2010-10-01 03:32 proftpd-mod-ldap_1.3.1-17lenny4_i386.deb
-rw-r--r--  1 root src   203562 2010-10-01 03:32 proftpd-mod-mysql_1.3.1-17lenny4_i386.deb
-rw-r--r--  1 root src   203512 2010-10-01 03:32 proftpd-mod-pgsql_1.3.1-17lenny4_i386.deb
server1:/usr/src#
Possiamo installare i nuovi pacchetti ProFTPd .deb come segue:
dpkg -i proftpd*.deb
4 Configurazione di ProFTPd
Ora dobbiamo configurare ProFTPd per utilizzare mod_clamav ogni volta che viene caricato un file. Apri /etc/proftpd/proftpd.conf...
vi /etc/proftpd/proftpd.conf
... e aggiungi la strofa
<IfModule mod_clamav.c>
   ClamAV on
   ClamServer 127.0.0.1
   ClamPort 3310
</IfModule>
da qualche parte, ad es. sotto il
<IfModule mod_ctrls_admin.c>
AdminControlsEngine off
</IfModule>
sezione:
[...] <IfModule mod_ctrls_admin.c> AdminControlsEngine off </IfModule> <IfModule mod_clamav.c> ClamAV on ClamServer 127.0.0.1 ClamPort 3310 </IfModule> # # Alternative authentication frameworks # #Include /etc/proftpd/ldap.conf Include /etc/proftpd/sql.conf [...] |
Riavvia ProFTPd:
/etc/init.d/proftpd restart
Ora controlla se mod_clamav è caricato eseguendo:
proftpd -vv
mod_clamav dovrebbe essere elencato nell'output:
server1:~# proftpd -vv
 - ProFTPD Version: 1.3.1 (stable)
 -   Scoreboard Version: 01040002
 -   Built: Fri Oct 1 03:31:03 CEST 2010
 -     Module: mod_core.c
 -     Module: mod_xfer.c
 -     Module: mod_auth_unix.c
 -     Module: mod_auth_file/0.8.3
 -     Module: mod_auth.c
 -     Module: mod_ls.c
 -     Module: mod_log.c
 -     Module: mod_site.c
 -     Module: mod_delay/0.6
 -     Module: mod_dso/0.4
 -     Module: mod_auth_pam/1.0.1
 -     Module: mod_clamav.c
 -     Module: mod_cap/1.0
 -     Module: mod_ctrls/0.9.4
 -     Module: mod_lang/0.8
server1:~#
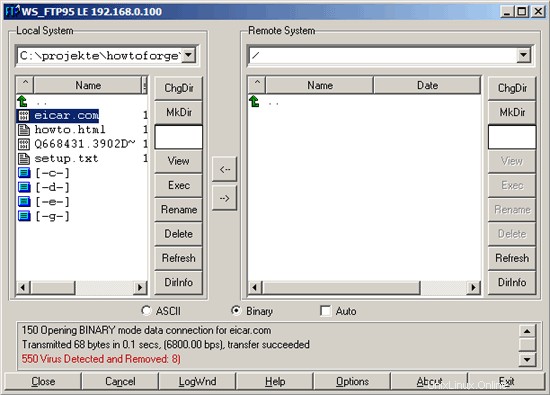
Questo è tutto! Ora, ogni volta che qualcuno tenta di caricare malware sul tuo server tramite ProFTPd, i file "cattivi" verranno eliminati. Puoi verificarlo scaricando il virus di prova Eicar da http://www.eicar.org/anti_virus_test_file.htm; prova a caricarlo sul tuo server ProFTPd e, se tutto va bene, dovrebbe essere cancellato:
5 link
- ProFTPd:http://www.proftpd.org/
- mod_clamav:http://www.thrallingpenguin.com/resources/mod_clamav.htm
- ClamAV:http://www.clamav.net/
- Debian:http://www.debian.org/