Bitwarden è un gestore di password gratuito e open source che archivia le credenziali del sito Web in un deposito crittografato. Ti consente di archiviare tutte le tue credenziali di accesso e di mantenerle sincronizzate tra tutti i tuoi dispositivi. È progettato per consentire a individui, team e organizzazioni aziendali di gestire le proprie credenziali da una posizione centralizzata. Bitwarden fornisce un'applicazione client per PC desktop, smartphone e tablet. Fornisce inoltre un generatore di password per generare password sicure e sicure.
In questo post, ti mostreremo come installare il gestore di password Bitwarden su Debian 11.
Prerequisiti
- Un server che esegue Ubuntu 20.04.
- Sul server è configurata una password di root.
Installa Docker e Docker Compose
Bitwarden fornisce una versione gratuita che puoi installare con Docker. Per impostazione predefinita, l'ultima versione di Docker non è inclusa nel repository predefinito di Debian 11. Quindi dovrai installarlo dal repository ufficiale di Docker.
Innanzitutto, installa tutte le dipendenze richieste utilizzando il seguente comando:
apt-get install apt-transport-https ca-certificates curl gnupg-agent software-properties-common
Una volta installate tutte le dipendenze, scarica e aggiungi la chiave GPG con il seguente comando:
curl -fsSL https://download.docker.com/linux/debian/gpg | gpg --dearmor -o /usr/share/keyrings/docker-archive-keyring.gpg
Successivamente, aggiungi il repository Docker CE all'APT utilizzando il comando seguente:
echo "deb [arch=amd64 signed-by=/usr/share/keyrings/docker-archive-keyring.gpg] https://download.docker.com/linux/debian $(lsb_release -cs) stable" | tee /etc/apt/sources.list.d/docker.list
Quindi, aggiorna il repository e installa Docker CE con il seguente comando:
apt-get update -y
apt-get install docker-ce docker-ce-cli containerd.io -y
Una volta completata l'installazione, puoi verificare la versione Docker CE utilizzando il seguente comando:
docker --version
Otterrai il seguente output:
Docker version 20.10.9, build c2ea9bc
Puoi anche controllare lo stato della finestra mobile con il seguente comando:
systemctl status docker
Dovresti vedere il seguente output:
? docker.service - Docker Application Container Engine
     Loaded: loaded (/lib/systemd/system/docker.service; enabled; vendor preset: enabled)
     Active: active (running) since Sat 2021-10-25 09:33:15 UTC; 14min ago
TriggeredBy: ? docker.socket
       Docs: https://docs.docker.com
   Main PID: 11656 (dockerd)
      Tasks: 29
     Memory: 1.0G
     CGroup: /system.slice/docker.service
             ??11656 /usr/bin/dockerd -H fd:// --containerd=/run/containerd/containerd.sock
             ??27717 /usr/bin/docker-proxy -proto tcp -host-ip 0.0.0.0 -host-port 80 -container-ip 172.18.0.5 -container-port 8052

Oct 25 09:33:14 ubuntu2004 dockerd[11656]: time="2021-10-03T09:33:14.865741428Z" level=info msg="Default bridge (docker0) is assigned with an >
Oct 25 09:33:14 ubuntu2004 dockerd[11656]: time="2021-10-03T09:33:14.951326143Z" level=info msg="Loading containers: done."
Oct 25 09:33:14 ubuntu2004 dockerd[11656]: time="2021-10-03T09:33:14.974570590Z" level=info msg="Docker daemon" commit=4484c46d9d graphdriver(>
Oct 25 09:33:14 ubuntu2004 dockerd[11656]: time="2021-10-03T09:33:14.974729712Z" level=info msg="Daemon has completed initialization"
Oct 25 09:33:15 ubuntu2004 dockerd[11656]: time="2021-10-03T09:33:15.030128906Z" level=info msg="API listen on /run/docker.sock"
Oct 25 09:33:15 ubuntu2004 systemd[1]: Started Docker Application Container Engine.
Oct 25 09:45:52 ubuntu2004 dockerd[11656]: time="2021-10-03T09:45:52.583474433Z" level=info msg="ignoring event" module=libcontainerd namespac>
Oct 25 09:45:52 ubuntu2004 dockerd[11656]: time="2021-10-03T09:45:52.619380786Z" level=info msg="ignoring event" module=libcontainerd namespac>
Oct 25 09:45:52 ubuntu2004 dockerd[11656]: time="2021-10-03T09:45:52.635359740Z" level=info msg="ignoring event" module=libcontainerd namespac>
Oct 25 09:45:52 ubuntu2004 dockerd[11656]: time="2021-10-03T09:45:52.637507396Z" level=info msg="ignoring event" module=libcontainerd namespac
Quindi, scarica l'ultima versione di Docker Composer con il seguente comando:
wget https://github.com/docker/compose/releases/download/v2.0.1/docker-compose-linux-x86_64
Quindi, copia il binario scaricato nel percorso di sistema utilizzando il seguente comando:
mv docker-compose-linux-x86_64 /usr/bin/docker-compose
Quindi, imposta l'autorizzazione di esecuzione sul binario Docker Compose:
chmod 755 /usr/bin/docker-compose
Installa Bitwarden su Debian 11
Per prima cosa, vai al sito web di Bitwarden e fornisci il tuo indirizzo email come mostrato di seguito:
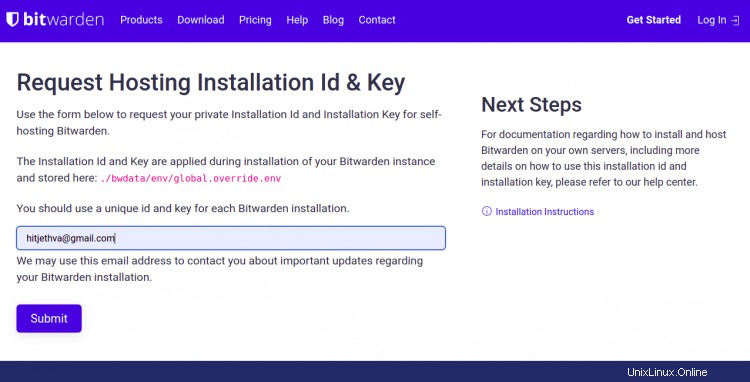
Quindi, fai clic su invia pulsante. Otterrai l'ID e la chiave di installazione nella schermata seguente. Annotali perché ne avrai bisogno in seguito durante l'installazione.
Ora, scarica lo script di installazione di Bitwarden usando il seguente comando:
curl -Lso bitwarden.sh https://go.btwrdn.co/bw-sh
Una volta scaricato lo script, impostare il permesso di esecuzione con il seguente comando:
chmod +x bitwarden.sh
Quindi, avvia l'installazione utilizzando il seguente comando:
./bitwarden.sh install
Ti verrà chiesto di fornire il tuo nome di dominio o indirizzo IP e vault come mostrato di seguito:
 _     _ _                         _
| |__ (_) |___      ____ _ _ __ __| | ___ _ __
| '_ \| | __\ \ /\ / / _` | '__/ _` |/ _ \ '_ \
| |_) | | |_ \ V  V / (_| | | | (_| |  __/ | | |
|_.__/|_|\__| \_/\_/ \__,_|_|  \__,_|\___|_| |_|

Open source password management solutions
Copyright 2015-2021, 8bit Solutions LLC
https://bitwarden.com, https://github.com/bitwarden

===================================================

bitwarden.sh version 1.43.0
Docker version 20.10.9, build c2ea9bc
docker-compose version 1.25.0, build unknown

(!) Enter the domain name for your Bitwarden instance (ex. bitwarden.example.com): 69.28.84.207

(!) Do you want to use Let's Encrypt to generate a free SSL certificate? (y/n): n

(!) Enter the database name for your Bitwarden instance (ex. vault): vault
Fornisci tutte le informazioni richieste, quindi premi Invio . Ti verrà chiesto di fornire l'ID di installazione e la chiave come mostrato di seguito:
Digest: sha256:29bd0777de8b902bd26a67f74c832c8032f1bea41e716277a98f7d439a8f2912
Status: Downloaded newer image for bitwarden/setup:1.43.0
docker.io/bitwarden/setup:1.43.0

(!) Enter your installation id (get at https://bitwarden.com/host): xxxxxxx-xxxxxx-xxxx-xxxx-xxxxxxxxxx

(!) Enter your installation key: xxxxxxxxxxx

(!) Do you have a SSL certificate to use? (y/n): n

(!) Do you want to generate a self-signed SSL certificate? (y/n): y
Fornisci tutte le informazioni richieste, quindi premi Invio per avviare l'installazione. Al termine dell'installazione, otterrai il seguente output:
Generating self signed SSL certificate.
Generating a RSA private key
.....++++
...........................................................................................................................++++
writing new private key to '/bitwarden/ssl/self/69.28.84.207/private.key'
-----
Generating key for IdentityServer.
Generating a RSA private key
........................................................................................................................................................................++++
..............................................................................................................++++
writing new private key to 'identity.key'
-----

!!!!!!!!!! WARNING !!!!!!!!!!
You are using an untrusted SSL certificate. This certificate will not be
trusted by Bitwarden client applications. You must add this certificate to
the trusted store on each device or else you will receive errors when trying
to connect to your installation.

Building nginx config.
Building docker environment files.
Building docker environment override files.
Building FIDO U2F app id.
Building docker-compose.yml.

Installation complete

If you need to make additional configuration changes, you can modify
the settings in `./bwdata/config.yml` and then run:
`./bitwarden.sh rebuild` or `./bitwarden.sh update`

Next steps, run:
`./bitwarden.sh start`
Quindi, avvia Bitwarden usando il seguente comando:
./bitwarden.sh start
Otterrai il seguente output:
 _     _ _                         _
| |__ (_) |___      ____ _ _ __ __| | ___ _ __
| '_ \| | __\ \ /\ / / _` | '__/ _` |/ _ \ '_ \
| |_) | | |_ \ V  V / (_| | | | (_| |  __/ | | |
|_.__/|_|\__| \_/\_/ \__,_|_|  \__,_|\___|_| |_|

Open source password management solutions
Copyright 2015-2021, 8bit Solutions LLC
https://bitwarden.com, https://github.com/bitwarden

===================================================

bitwarden.sh version 1.43.0
Docker version 20.10.9, build c2ea9bc
docker-compose version 1.25.0, build unknown

Pulling mssql         ... done
Pulling web           ... done
Pulling attachments   ... done
Pulling api           ... done
Pulling identity      ... done
Pulling sso           ... done
Pulling admin         ... done
Pulling portal        ... done
Pulling icons         ... done
Pulling notifications ... done
Pulling events        ... done
Pulling nginx         ... done

Creating network "docker_default" with the default driver
Creating network "docker_public" with the default driver
Creating bitwarden-web           ... done
Creating bitwarden-mssql         ... done
Creating bitwarden-sso           ... done
Creating bitwarden-icons         ... done
Creating bitwarden-attachments   ... done
Creating bitwarden-identity      ... done
Creating bitwarden-notifications ... done
Creating bitwarden-api           ... done
Creating bitwarden-events        ... done
Creating bitwarden-admin         ... done
Creating bitwarden-portal        ... done
Creating bitwarden-nginx         ... done
1.43.0: Pulling from bitwarden/setup
Digest: sha256:29bd0777de8b902bd26a67f74c832c8032f1bea41e716277a98f7d439a8f2912
Status: Image is up to date for bitwarden/setup:1.43.0
docker.io/bitwarden/setup:1.43.0


Bitwarden is up and running!
===================================================

visit https://69.28.84.207
to update, run `./bitwarden.sh updateself` and then `./bitwarden.sh update`
Una volta terminato, puoi procedere al passaggio successivo.
Accedi all'interfaccia web di Bitwarden
Ora apri il tuo browser web e accedi all'interfaccia web di Bitwarden utilizzando l'URL https://your-server-ip . Otterrai la seguente pagina:
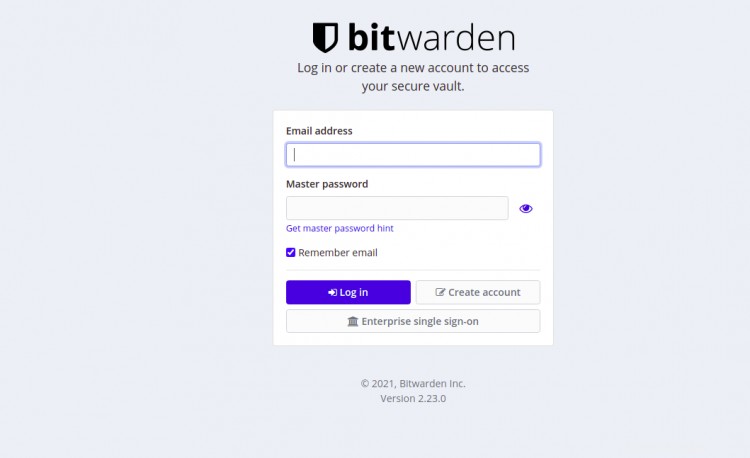
Fai clic su Crea account pulsante. Otterrai la seguente pagina:
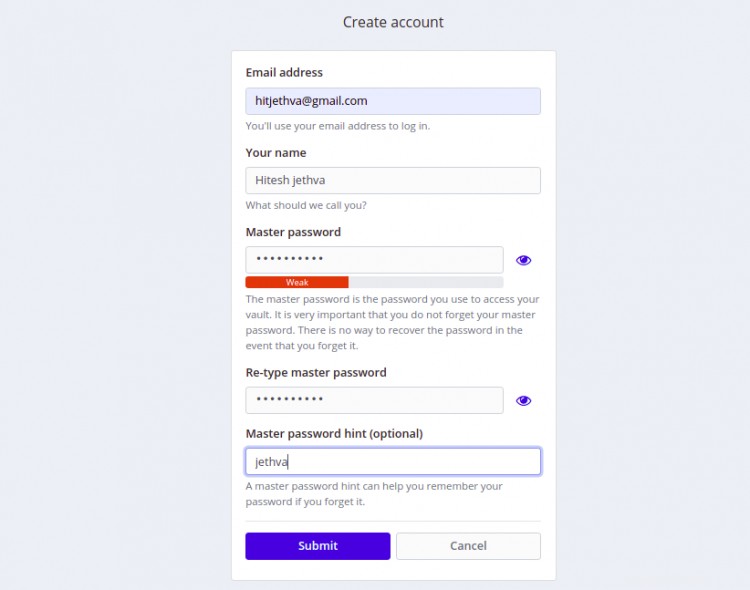
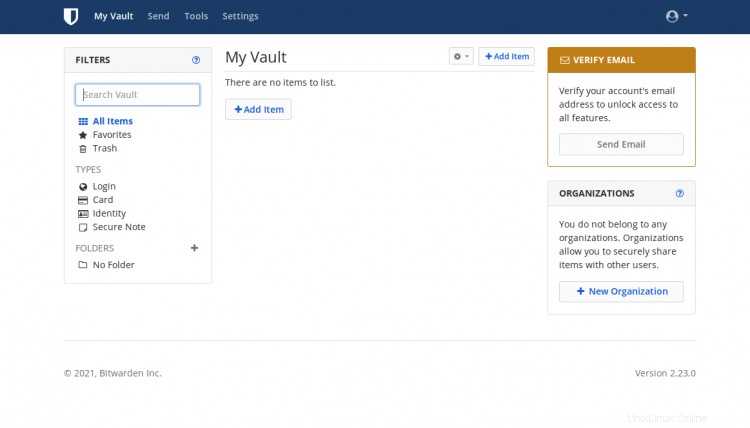
Fornisci la tua email, nome, password principale e fai clic su Invia pulsante. Otterrai la schermata di accesso di Bitwarden:

Fornisci il tuo indirizzo e-mail, password e fai clic sul pulsante Accedi. Dovresti vedere la dashboard di Bitwarden nella pagina seguente:
Conclusione
Congratulazioni! hai installato correttamente Bitwarden password manager su Debian 11. Ora puoi implementare questa soluzione nella tua organizzazione e iniziare a gestire tutte le credenziali dalla posizione centrale. Sentiti libero di chiedermi se hai domande.